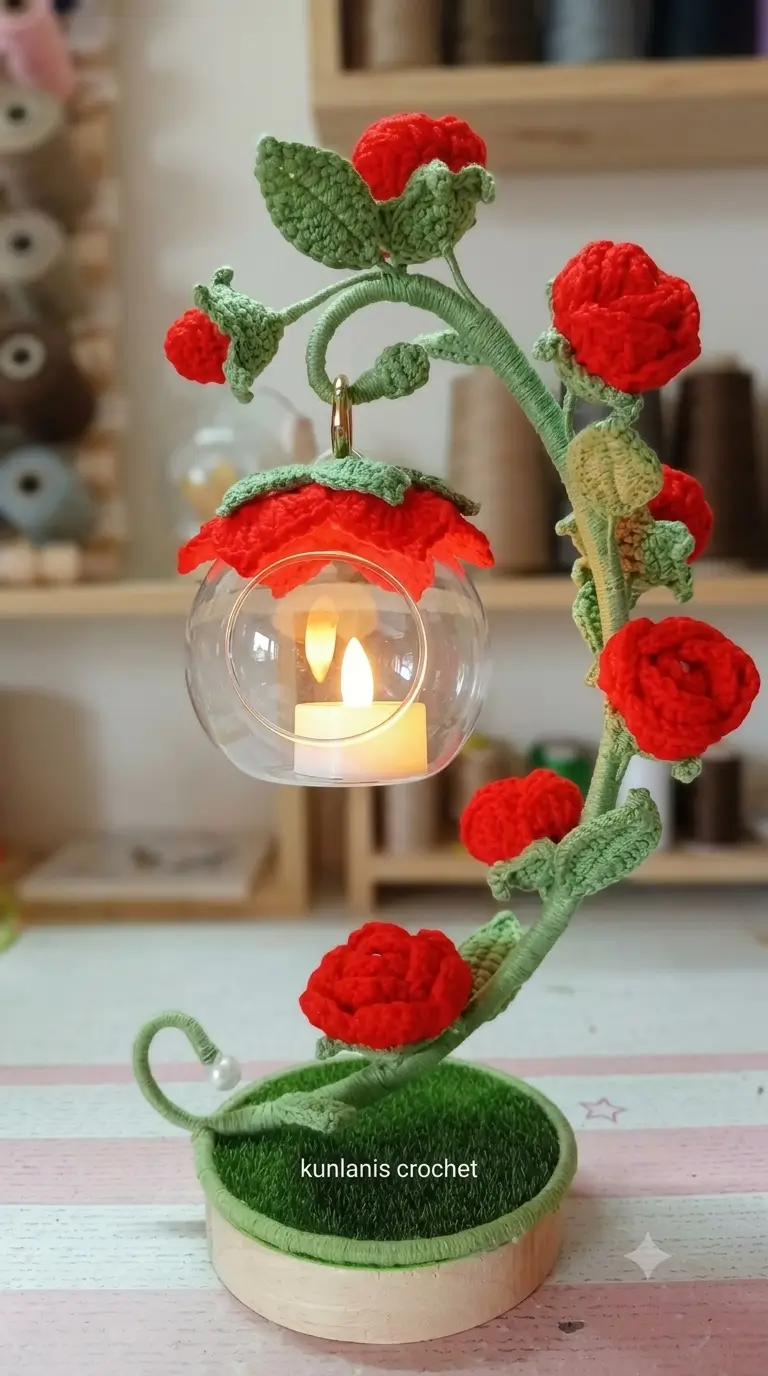
Introduction
A crochet rose vine lantern pattern has two opposing jobs: the petals must read as layered roses while the curved stem carries a suspended globe without sagging. This reconstruction uses DK yarn, 3–4 mm hooks, wire reinforcement, and an LED-only light source. Intermediate crochet skills suit the wiring and assembly. Build it when you need a self-supporting floral light rather than a flat rose appliqué.
The Design: What Makes the Rose Vine Lantern Different
The first structural decision in this crochet rose vine lantern pattern is a wired S-curve rather than a soft crocheted stem. A hanging globe creates off-center load, so the main branch needs a rigid core and a broad base connection.
Second, the roses use compact centers with separate rolled petal strips. That keeps each bloom readable from several angles while limiting weight at the branch tips.
Third, leaf wires terminate inside wrapped stems instead of being sewn only to the outer yarn layer. This stops foliage from rotating after assembly. Comparable rose patterns use DK yarn with 3–4 mm hooks, while wired bouquet patterns specify craft wire for stems.
A common failure in a crochet flower lamp pattern is hanging the globe before load-testing the branch. Extra glue cannot correct excessive torque at the base.
Project Info at a Glance
| Skill Level | Time | Finished Size | Hook | Best For |
|---|---|---|---|---|
| Intermediate | 5–8 hours | Approx. 35–36 cm reference size | 3–4 mm | LED floral décor and display lighting |
The reference size comes from comparable floral lamp patterns. The supplied photo appears larger, so finished dimensions will depend on branch wire length, globe size, yarn thickness, and base diameter.
Materials and Tools
Yarn
- Red — DK/light-worsted — 50 g minimum — suitable for roses and buds
- Sage green — DK/light-worsted — 100 g working quantity — for leaves, calyces and stem wrapping
- Olive or muted gold — DK — 5–10 g — for the contrasting accent leaf
- Dark green — small amount — optional for the base edge or grass transition
The photographed red petals appear thicker than standard DK acrylic. Fine chenille can create a similar dense flower surface, but it changes the final diameter. Make one test rose before producing the complete set.
Tools
- 3.0 mm crochet hook for leaves and structural pieces
- 4.0 mm crochet hook for rose components
- 2.5–3 mm aluminum craft wire, about 60 cm for the main support
- 18-gauge craft wire for branches and leaf stems
- Fiberfill, approximately 15–25 g
- Tapestry needle
- Stitch markers
- Wire cutters
- Round-nose pliers
- 12 cm circular wooden base
- Artificial-grass or dense green felt insert
- Clear acrylic or glass globe, approximately 8–10 cm
- Small gold split ring, S-hook or suspension clip
- One pearl-like bead, 10–14 mm
- Battery-operated LED tealight only
Do not use a real flame near yarn, adhesive, artificial grass, wood, acrylic, or other textile components.
Abbreviations
MR — magic ring
sc — single crochet
inc — 2 sc in the same stitch
dec — single-crochet decrease
sl st — slip stitch
ch — chain
hdc — half double crochet
dc — double crochet
tr — treble crochet
BLO — back loop only
FLO — front loop only
st/sts — stitch/stitches
For an invisible decrease, insert the hook through the front loops of the next two stitches and complete them together as one sc.
Pattern — Step by Step
Work stuffed flower centers in continuous spirals. Petal strips, leaves, caps, and decorative sections are worked separately before assembly.
Full Rose — Make 4
Yarn: red
Rose Center
R1: 6 sc in MR (6)
R2: inc ×6 (12)
R3: (1 sc, inc) ×6 (18)
R4: (2 sc, inc) ×6 (24)
R5: (3 sc, inc) ×6 (30)
R6: (4 sc, inc) ×6 (36)
R7: sc around (36)
R8: (4 sc, dec) ×6 (30)
R9: (3 sc, dec) ×6 (24)
R10: (2 sc, dec) ×6 (18)
R11: (1 sc, dec) ×6 (12)
Add enough stuffing to hold a rounded center without creating a hard sphere.
R12: dec ×6 (6)
Fasten off. Leave a 15 cm tail and close the opening.
Inner Petal Strip
Ch 37.
Row 1: Sc in second ch from hook and across (36).
Row 2: Divide the strip into six sections. Work a rounded petal profile across each six-stitch section using sl st, hdc, dc, hdc and sl st combinations.
Fasten off. Leave a 25 cm sewing tail.
Outer Petal Strip
Ch 49.
Row 1: Sc in second ch from hook and across (48).
Row 2: Divide the strip into eight sections. Shape eight broader petals across the 48 foundation stitches.
Fasten off. Leave a long sewing tail.
Start the inner strip at the top of the center and coil it clockwise. Stitch the base of every second petal into the stuffed center.
Position the outer strip lower on the flower so the second layer alternates with the inner petals.
Rose Bud — Make 3
Yarn: red
R1: 6 sc in MR (6)
R2: inc ×6 (12)
R3: (1 sc, inc) ×6 (18)
R4: (2 sc, inc) ×6 (24)
R5: sc around (24)
R6: sc around (24)
R7: (2 sc, dec) ×6 (18)
R8: sc around (18)
R9: (1 sc, dec) ×6 (12)
Stuff lightly from the lower half.
R10: dec ×6 (6)
Fasten off and close.
For the bud petal strip:
Ch 25.
Row 1: Sc across (24).
Row 2: Divide the row into four six-stitch sections and shape one shallow petal across each section.
Fasten off. Leave a long sewing tail.
Wrap the strip tightly around the center. Keep the upper third more closed than the full roses.
Calyx — Make 7
Yarn: sage green
R1: 6 sc in MR (6)
R2: inc ×6 (12)
R3: (1 sc, inc) ×6 (18)
R4: Divide the 18 stitches into six groups of three.
For each sepal:
Ch 6. Starting in the second ch from the hook, work sc, hdc, dc, hdc, sc. Sl st back to the base.
Repeat six times around the calyx.
Fasten off. Leave a 20 cm tail.
Cup one calyx beneath each rose or bud. Stitch through the flower center rather than catching only the outer petals.
Rose Leaves — Make 8
Yarn: sage green
Ch 11.
Row 1: Starting in the second chain from the hook, work:
sc, hdc, 2 dc, 2 tr, 2 dc, hdc, sc.
Ch 2 at the tip.
Work the mirrored sequence along the opposite side of the foundation chain.
Row 2: Sc around the complete leaf edge. At the tip, work sc, ch 3, sl st in first ch, sc to create a small point.
Fasten off. Leave a 15 cm tail.
Cut a 15–18 cm length of leaf wire.
Lay approximately 5 cm of wire along the center back of the leaf. Stitch it into position with matching green yarn.
Wrap the remaining wire with green yarn to form the leaf stem.
Olive Accent Leaf — Make 1
Yarn: muted olive or gold
Ch 13.
Row 1: Work sc, hdc, 2 dc, 4 tr, 2 dc, hdc, sc along the first side.
Ch 2.
Mirror the sequence along the opposite side.
Row 2: Sc around the full edge, placing 3 sc at the pointed tip.
Fasten off. Leave a 20 cm tail.
Attach wire to the back using the same method as the green leaves.
Red Lantern Collar
Yarn: red
R1: 6 sc in MR (6)
R2: inc ×6 (12)
R3: (1 sc, inc) ×6 (18)
R4: (2 sc, inc) ×6 (24)
R5: (3 sc, inc) ×6 (30)
R6: (4 sc, inc) ×6 (36)
R7: (5 sc, inc) ×6 (42)
R8: Create the ruffled edge by alternating low stitches with five-dc shell sections around the 42-stitch base.
Fasten off. Leave a 30 cm tail.
Place the finished collar over the upper part of the globe. It should cover the top section without blocking the main transparent viewing area.
If your globe is larger than 10 cm, add another increase round before creating the ruffle.
Green Lantern Cap
Yarn: sage green
R1: 6 sc in MR (6)
R2: inc ×6 (12)
R3: (1 sc, inc) ×6 (18)
Divide the 18 stitches into three equal sections.
Shape three pointed leaf sections around the cap.
Fasten off. Leave a 25 cm sewing tail.
Position the cap over the red collar.
Create a small central opening only if the suspension ring needs to pass through the crochet fabric.
Main Vine
Yarn: sage green
Cut approximately 60 cm of 2.5–3 mm aluminum wire.
Mark points about 8 cm, 24 cm, 38 cm and 51 cm from the lower end.
Bend the wire gradually into an S-shaped profile.
Keep the lowest 8 cm relatively straight so the support can be fixed securely into the base.
Wrap the wire with sage-green yarn from bottom to top. Keep every wrap close to the previous one so the metal does not show.
Apply a small amount of suitable craft adhesive at the beginning and end of the wrapped section.
Avoid covering the full wire with rigid adhesive because the branch still needs minor adjustment during assembly.
Upper Branch and Globe Support
Cut approximately 28 cm of branch wire.
Overlap the first 5 cm against the main branch.
Wrap both wires tightly with green yarn.
Curve the remaining wire into a loop above the globe position.
Attach a small gold split ring or S-hook to the lowest point of this loop.
Place the empty globe temporarily on the hanger.
Check the balance before attaching flowers.
Lower Tendril
Yarn: sage green
Cut approximately 20 cm of thinner craft wire.
Wrap it completely with green yarn while leaving about 8 mm exposed at one end.
Wind the wrapped section around a cylinder measuring approximately 20–25 mm in diameter.
Remove the cylinder to create an open spiral.
Attach a 10–14 mm pearl-style bead to the end.
Bend or cover the final wire tip so no sharp metal remains exposed.
Circular Base
Use a wooden circular base measuring approximately 12 cm in diameter.
Cut artificial grass or dense green felt to fit inside the top surface.
Prepare an anchor hole for the main wire.
For greater resistance to twisting, the lower wire can be bent into a short U or L shape beneath the grass insert.
Insert the branch before permanently fixing the decorative base covering.
Test the complete support with the empty globe hanging from the upper branch.
The base must remain flat.
Globe Hanger
Attach the gold split ring, S-hook, or suspension clip to the upper branch.
Hang the empty globe.
View the piece from the front.
If the globe tilts, shift the hanger approximately 2–4 mm along the support before changing the main branch shape.
Remove the globe while attaching the roses and leaves.
Assembly
- Anchor the main vine into the circular base and shape the final S-curve. Temporarily hang the empty globe to check the center of gravity.
- Remove the globe and secure the upper branch to the main support. Wrap the connection over at least 5 cm rather than forming a single-point joint.
- Sew one calyx beneath each full rose and rose bud. Pass the needle through the center several times so the bloom cannot rotate freely.
- Position the four full roses around the upper, right, lower-right and lower areas of the branch. Keep heavier flowers closer to major support points.
- Attach the three rose buds to thinner branch ends and transition areas. Their smaller diameter reduces weight at the outer edges.
- Add the eight green leaves around the roses. Wrap at least 3 cm of each leaf wire against the branch before covering the connection with green yarn.
- Position the olive accent leaf on the upper-right section. Angle it slightly toward the front so its contrasting color remains visible.
- Fit the red lantern collar and green cap around the upper section of the globe. Pass the hanger through the central opening and stitch the crochet layers together.
- Attach the lower tendril near the base and shape its pearl-tipped curl. Fit the grass insert only after the main structural adjustments are finished.
- Hang the globe and place a battery-operated LED tealight inside. Inspect the branch from the front and both sides, then cover any remaining exposed wire with green yarn.
The finished rose vine should support the globe without external bracing.
7 Technical Tips
- Marker drift: Place the stitch marker in the first stitch of every rose-center round. A one-stitch error becomes much more visible once the center reaches the 36-stitch plateau.
- Overstuffing: Fill each rose only until the center retains its rounded form. Packing it tightly adds weight to the branch and forces the outer petals away from the center.
- Visible decreases: Use invisible decreases during the shaping rounds of the rose center. Standard decreases can produce six repeated dents around the surface.
- Globe tilt: Test the suspension point before permanently fixing the lantern collar. A hanger adjustment of only 2–4 mm can correct a visibly uneven globe.
- Velvet tension: If using chenille or velvet yarn, crochet one complete 36-stitch test center first. Thicker yarn can enlarge each rose enough to change the balance of the entire structure.
- Flower rotation: Pin all seven flowers to the wired vine before making permanent connections. Any bloom that rotates more than about 15 degrees needs a longer wrapped attachment section.
- Tail length: Leave approximately 15–25 cm of sewing yarn on flowers, calyces and leaves. Very short tails can pull through the fabric when the wired structure is adjusted.
Conclusion
The rose vine lantern is finished when the branch retains its S-curve, the clear globe hangs level, and every wire end is hidden beneath yarn or inside the base. Before final placement, load-test the structure with the empty globe for at least ten minutes and check the main anchor for movement. Add the battery-operated LED only after that test. Photograph your crochet rose vine lantern pattern from the front and side, then save the finished project to Pinterest or share it on Instagram with #RoseVineLantern. Record your hook size, yarn type and wire diameter for future versions. Which rose position would you replace with a smaller closed bud to make the vine more asymmetrical?









