Introduction
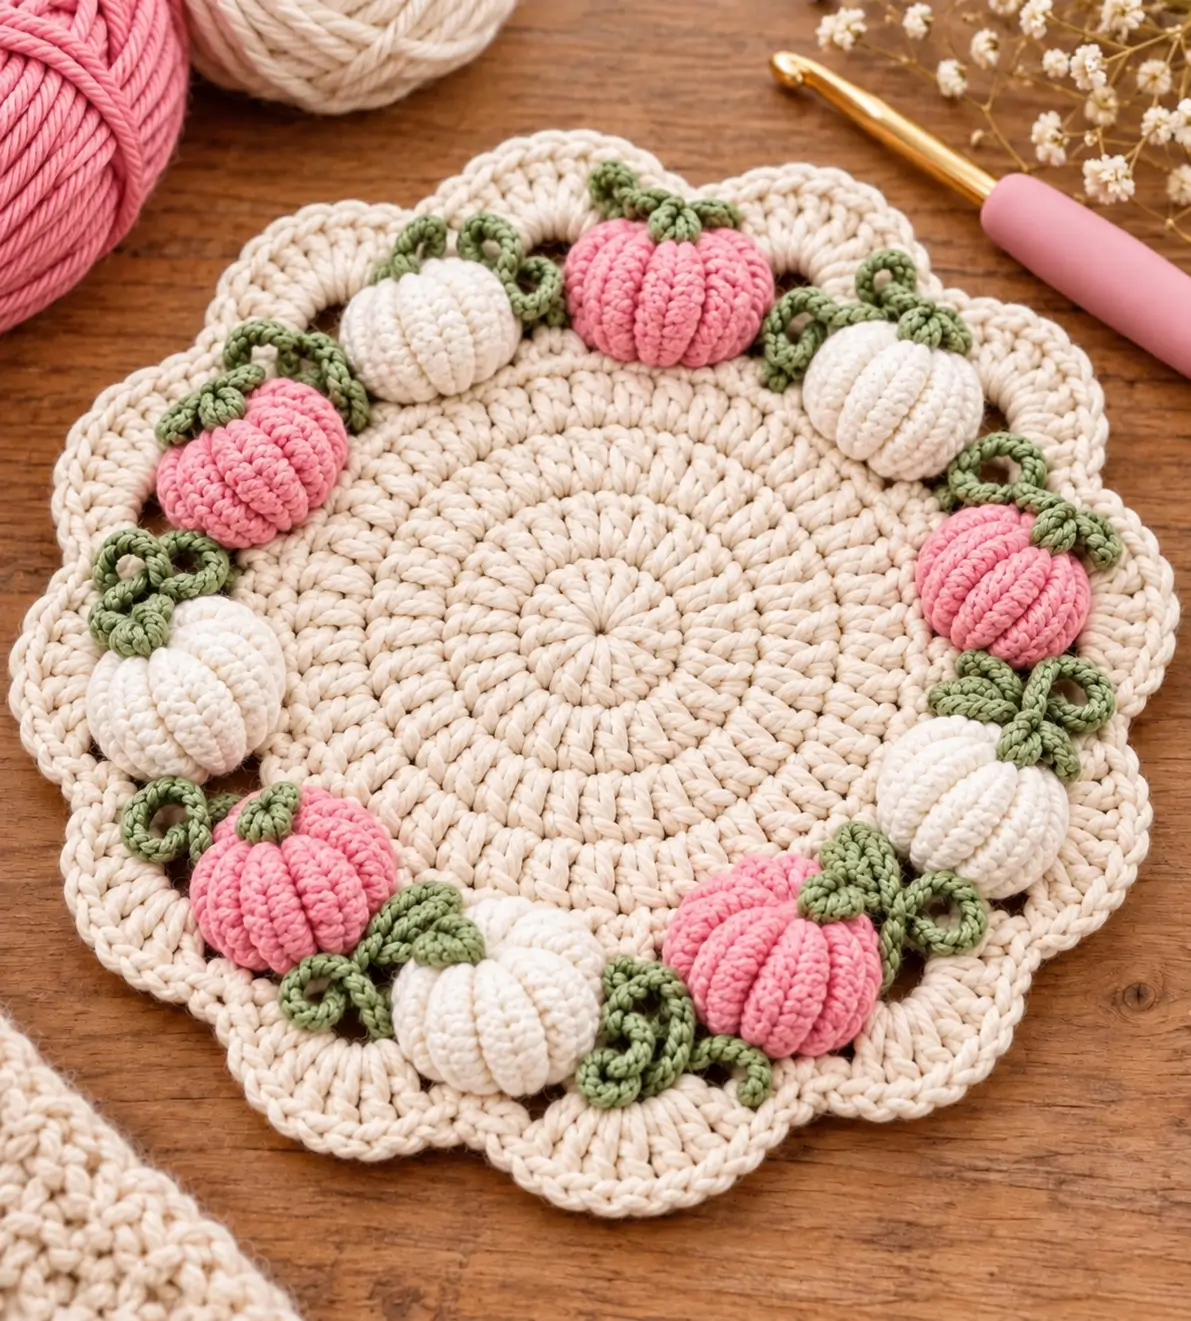
Eight ribbed pumpkins around a cream scalloped circle turn an ordinary round mat into a recognizable pumpkin wreath. This crochet pumpkin placemat pattern combines a dense circular cotton base, shell-style edging, stuffed pink and white pumpkins, green stems, and curled vines. Worked mainly with worsted cotton and a 4.0–5.0 mm hook, the finished piece is designed for autumn table displays, centerpieces, and decorative place settings.
The Design: What Makes This Pumpkin Placemat Different
The base must stay flat before any decoration is attached. Its circular construction expands at controlled intervals, distributing increases around each round instead of stacking them into obvious wedges. A broad scalloped border then adds the petal-like outline visible around the photograph.
The pumpkins provide the second structural layer. Each one is worked separately, stuffed, divided into pronounced vertical ribs, and sewn near the outer edge. Alternating pink and cream prevents the pumpkin ring from becoming visually heavy.
Green stems and curled vines occupy the narrow spaces between pumpkins. Their job is not simply decorative: the vines visually connect separate stuffed pieces into one continuous wreath. A common mistake with a crochet pumpkin placemat is attaching the pumpkins too far toward the center, which leaves too little usable flat space.
Project Info at a Glance
| Skill Level | Time | Finished Size | Hook | Best For |
|---|---|---|---|---|
| Intermediate | 6–9 hours | Approx. 30–35 cm diameter | 4.0–5.0 mm | Fall table décor, centerpiece, decorative placemat |
Round crochet placemats in worsted cotton commonly finish near 13 inches, or about 33 cm, and published pumpkin appliqués made with worsted yarn and a 4 mm hook can measure about 10 × 9.5 cm. The miniature pumpkins used here are intentionally smaller so eight can fit around the perimeter. 0
Materials and Tools
Yarn
- Cream — worsted/weight 4 cotton — approximately 140–180 g for the placemat and four pumpkins.
- Pink — worsted/weight 4 cotton — approximately 35–50 g for four miniature pumpkins.
- Sage green — worsted/weight 4 cotton — approximately 20–30 g for stems, leaves, and curling vines.
The yarn quantities are estimates for the photo-inspired project. Cotton is a practical choice for the circular base because it gives the scalloped edge enough definition to remain visible after blocking.
Tools
- 5.0 mm crochet hook for the placemat base
- 4.0 mm crochet hook for pumpkins and vines
- Polyester stuffing
- Tapestry needle
- Long yarn needle for pumpkin shaping
- Locking stitch markers
- Scissors
- Blocking mat and pins
- Measuring tape
Abbreviations
- MR — magic ring
- ch — chain
- sc — single crochet
- hdc — half double crochet
- dc — double crochet
- inc — increase
- dec — decrease
- sl st — slip stitch
- st/sts — stitch/stitches
- BLO — back loop only
- FO — fasten off
For an invisible decrease, insert the hook through the front loops of the next two stitches, yarn over and pull through both loops, then complete the single crochet.
Pattern — Step by Step
This is an original photo-inspired construction. The placemat is worked in joined rounds, while each miniature pumpkin is made separately and attached after the base has been blocked.
Round Placemat Center
Yarn: cream. Use a 5.0 mm hook.
R1: Make MR. Ch 2, work 12 dc into MR. Join with sl st to first dc. (12)
R2: Ch 2, 2 dc in each st around. Join. (24)
R3: Ch 2, (dc 1, 2 dc in next st) ×12. Join. (36)
R4: Ch 2, (dc 2, 2 dc in next st) ×12. Join. (48)
R5: Ch 2, (dc 3, 2 dc in next st) ×12. Join. (60)
R6: Ch 2, (dc 4, 2 dc in next st) ×12. Join. (72)
R7: Ch 2, (dc 5, 2 dc in next st) ×12. Join. (84)
R8: Ch 2, (dc 6, 2 dc in next st) ×12. Join. (96)
R9: Ch 2, (dc 7, 2 dc in next st) ×12. Join. (108)
R10: Ch 2, (dc 8, 2 dc in next st) ×12. Join. (120)
Lay the work on a flat surface after R10. If the center forms waves, the increases are too generous for your tension. If the edge cups upward, the circle needs slightly more expansion.
Textured Outer Round
R11: Ch 1, sc in each st around. Join with sl st. (120)
R12: Ch 2, dc in each st around. Join. (120)
This non-increase round firms the outer area before the scallops are added. The pumpkin decorations will later sit over part of this section.
Scalloped Border
Continue with cream yarn.
The photographed mat has a broad petal-style perimeter rather than a narrow picot edge.
R13: Ch 1. *Skip 2 sts, work 7 dc in next st, skip 2 sts, sc in next st.* Repeat around.
Adjust the final repeat by one stitch if necessary to close the round cleanly. Join with sl st.
R14: Sl st to the first shell. Work 1 sc in the first dc, 1 sc in each of the next 2 dc, (sc, ch 2, sc) in the center dc, sc in each of the remaining 3 dc. Sl st into the sc between shells.
Repeat around the complete perimeter.
Fasten off and weave the tail into the wrong side.
The ch-2 section should sit at the center of every scallop. Pin these points during blocking to produce an even flower-like outline.
Mini Crochet Pumpkins
The photograph uses eight small ribbed pumpkins: four pink and four cream. Worsted yarn is commonly used for small crochet pumpkins, with hook sizes around 4–5.5 mm depending on the desired density. Published ribbed versions also use external shaping strands to create pronounced pumpkin sections. 1
Pink Pumpkin — Make 4
Yarn: pink. Use a 4.0 mm hook.
R1: 6 sc in MR. (6)
R2: Inc ×6. (12)
R3: (Sc 1, inc) ×6. (18)
R4: (Sc 2, inc) ×6. (24)
R5: (Sc 3, inc) ×6. (30)
R6–R9: Sc around. (30)
R10: (Sc 3, dec) ×6. (24)
R11: (Sc 2, dec) ×6. (18)
Stuff now. Keep the center slightly softer than the outer edge because the pumpkin will be compressed during shaping.
R12: (Sc 1, dec) ×6. (12)
R13: Dec ×6. (6)
Fasten off, leaving approximately 60 cm of yarn for shaping. Thread the tail through the remaining six stitches and pull the opening closed.
White Pumpkin — Make 4
Yarn: cream. Use a 4.0 mm hook.
Work exactly as for the pink pumpkin.
R1: 6 sc in MR. (6)
R2: Inc ×6. (12)
R3: (Sc 1, inc) ×6. (18)
R4: (Sc 2, inc) ×6. (24)
R5: (Sc 3, inc) ×6. (30)
R6–R9: Sc around. (30)
R10: (Sc 3, dec) ×6. (24)
R11: (Sc 2, dec) ×6. (18)
R12: (Sc 1, dec) ×6. (12)
R13: Dec ×6. (6)
Stuff before the final two rounds and close the opening.
Creating the Pumpkin Ribs
Thread the long finishing tail onto a yarn needle.
Insert the needle through the center bottom and bring it out through the center top. Carry the yarn down the outside of the pumpkin, following a straight path from top to bottom.
Insert through the bottom center again and bring the needle back through the top.
Pull until the strand sinks slightly into the pumpkin body.
Repeat this process six times at equal intervals around the pumpkin.
Published ribbed pumpkin patterns use the same general technique of passing yarn around the stuffed body to divide it into visible sections. 2
Do not pull one strand significantly tighter than the others. Unequal tension produces one narrow segment and several oversized sections.
Green Pumpkin Stem — Make 8
Yarn: sage green.
R1: 6 sc in MR. (6)
R2: BLO sc around. (6)
R3: Sc around. (6)
Fasten off, leaving a 15 cm sewing tail.
Do not stuff the stem. Flatten the bottom slightly and sew it over the center opening of the pumpkin.
Small Pumpkin Leaf — Make 8
Yarn: sage green.
Ch 6.
Beginning in second ch from hook:
Sl st, sc, hdc, dc, 5 dc in final ch.
Rotate to work along the opposite side of the foundation chain:
Dc, hdc, sc, sl st.
Fasten off, leaving a 15 cm tail.
Pin the leaf beside the stem before sewing. The pointed end should face outward rather than disappearing beneath the pumpkin.
Curly Pumpkin Vine — Make 12 to 16
Yarn: sage green.
Ch 18.
Beginning in second chain from hook, work 2 sc in each chain across.
The chain should curl naturally into a spiral.
For a tighter tendril, work 3 sc in each chain. For a longer open curl, begin with 22–24 chains.
Fasten off, leaving approximately 20 cm for attachment.
Short Curly Vine — Make 8
Ch 10.
Beginning in second chain from hook, work 2 sc in each ch.
Fasten off.
Use these shorter spirals between neighboring pumpkins where a full 18-chain vine would cover too much of the cream base.
Pumpkin Placement
The placement of the eight pumpkins controls the wreath effect. Do not sew the first pumpkin permanently before all eight have been positioned.
| Position | Pumpkin Color | Decoration |
|---|---|---|
| 12 o’clock | Pink | Stem + 2 vines |
| 1:30 | White | Stem + vine |
| 3 o’clock | Pink | Stem + vine |
| 4:30 | White | Stem + leaf |
| 6 o’clock | Pink | Stem + 2 vines |
| 7:30 | White | Stem + vine |
| 9 o’clock | Pink | Stem + leaf |
| 10:30 | White | Stem + vine |
The exact positions can shift according to the finished diameter. Maintain approximately equal spacing while alternating pink and cream.
Assembly
- Block the cream placemat before attaching any three-dimensional decorations. Pin every scallop separately so the perimeter dries evenly.
- Finish all eight pumpkins, including stuffing and the six external shaping passes.
- Sew one sage stem to the center top of every pumpkin.
- Attach the small green leaves beside selected stems, allowing the pointed ends to remain visible.
- Arrange the eight pumpkins around the outer portion of the cream circle, alternating pink and white.
- Keep the inner edge of each pumpkin outside the main usable center so a bowl or decorative object can still sit flat.
- Sew each pumpkin to the mat through several stitches along its lower back rather than stitching around its entire circumference.
- Position long green vines between the pumpkins and use shorter curls to fill narrow spaces.
- Tack each vine at two or three points while leaving the curled sections raised from the mat.
- Lay the finished piece flat and correct any pumpkin that tilts inward before weaving in the final attachment tails.
The completed placemat should have a broad flat center, an alternating ring of eight dimensional pumpkins, visible green curls between them, and a cream scalloped edge extending beyond the decorations.
7 Technical Tips for a Better Pumpkin Placemat
- Wavy circular base: Too many increases cause the cream mat to ruffle before the scalloped border is added. Check the circle on a flat surface every two rounds and correct the increase rate before continuing.
- Cupped center: Too few increases turn the mat into a shallow bowl. If the outer edge lifts noticeably after R8 or R9, add a small number of evenly distributed increases rather than concentrating them in one area.
- Overstuffed pumpkins: A pumpkin packed firmly like a ball resists the shaping strands. Stop adding fiberfill while the body can still compress approximately 1 cm under moderate finger pressure.
- Uneven pumpkin ribs: Shaping strands placed at random intervals produce different-sized segments. Divide the circumference visually into six sections before tightening the first strand.
- Hidden scallops: Pumpkins sewn too close to the outside edge cover the cream shell border. Keep enough space for at least half of every scallop to remain visible beyond the pumpkin ring.
- Flat vines: Sewing every stitch of a spiral to the placemat removes its curled appearance. Anchor each tendril only at the base and at one or two additional points.
- Loose decorations: A single attachment stitch allows stuffed pumpkins to rotate during handling. Catch at least three separate sections of the pumpkin’s lower back when sewing it to the mat.
Choosing Yarn for the Placemat
Worsted cotton suits the photographed construction because it can produce both a firm circular base and clearly defined miniature pumpkins. Current round placemat patterns also commonly specify worsted cotton for washable table pieces. 3
The base can be made with a 5.0 mm hook for slightly more drape, while the pumpkins benefit from a smaller 4.0 mm hook. Tighter pumpkin stitches reduce the chance of polyester filling appearing through the fabric.
If acrylic is substituted, expect the finished base to respond differently to blocking. Follow the yarn label and avoid direct contact with a hot iron.
Changing the Pumpkin Colors
Pink and cream create the soft contrast shown in the reference image, but the construction does not depend on those colors. Burnt orange and cream produce a conventional autumn palette, while mustard and ivory give the wreath a warmer neutral appearance.
Another option is to crochet all eight pumpkins in one color and use two shades of green for the stems and vines. For stronger contrast, alternate rust, mustard, cream, and olive pumpkins around the circumference.
Keep the circular base relatively neutral when using several pumpkin colors. A cream, oatmeal, or pale beige foundation prevents the three-dimensional decorations from competing with the background.
Making a Smaller Pumpkin Centerpiece
The same construction can be reduced to six pumpkins. Stop the circular base several rounds earlier, add a proportionally smaller scalloped border, and arrange six decorations at equal intervals.
For a coaster-sized version, omit the stuffed pumpkins entirely and replace them with flat pumpkin appliqués. A published worsted-weight pumpkin appliqué using a 4 mm hook measures approximately 10 × 9.5 cm, so the appliqué itself would need to be scaled down for a small coaster. 4
When resizing, establish the diameter of the cream base first. The pumpkins should be treated as perimeter decorations rather than used to determine the size of the center.
Using the Finished Placemat
The raised pumpkins make this design better suited to decorative table use than to supporting a full dinner plate. Keep plates, hot cookware, and unstable containers away from the dimensional border.
A vase, lightweight decorative bowl, battery-operated candle arrangement, or other stable object can occupy the flat central area as long as its base does not rest on the pumpkins.
If the piece will be used beneath warm serving dishes, select a yarn whose manufacturer permits the intended use and keep all three-dimensional decorations outside the contact area. Polyester stuffing and synthetic yarn should not be treated as heat-resistant materials.
Finishing the Crochet Pumpkin Placemat
Set the finished piece on a flat table and inspect the wreath from directly above. Eight pumpkins should form a balanced ring without closing off the cream center, while the scalloped perimeter should remain visible behind them. Reposition any vine that crosses too far into the usable middle area.
For the closest photo-inspired result, alternate four pink and four cream pumpkins and connect them visually with sage stems, small leaves, and curling tendrils. The final crochet pumpkin placemat pattern can also be adapted to rust, mustard, ivory, and olive without changing the construction.
Make one pumpkin first and record its finished diameter before completing the other seven. Matching that measurement will produce a more even wreath. Share the finished table piece on Pinterest or Instagram with #CrochetPumpkinPlacemat. Would you keep the pink-and-cream palette or replace the pink pumpkins with traditional burnt orange? “`5









