Introduction
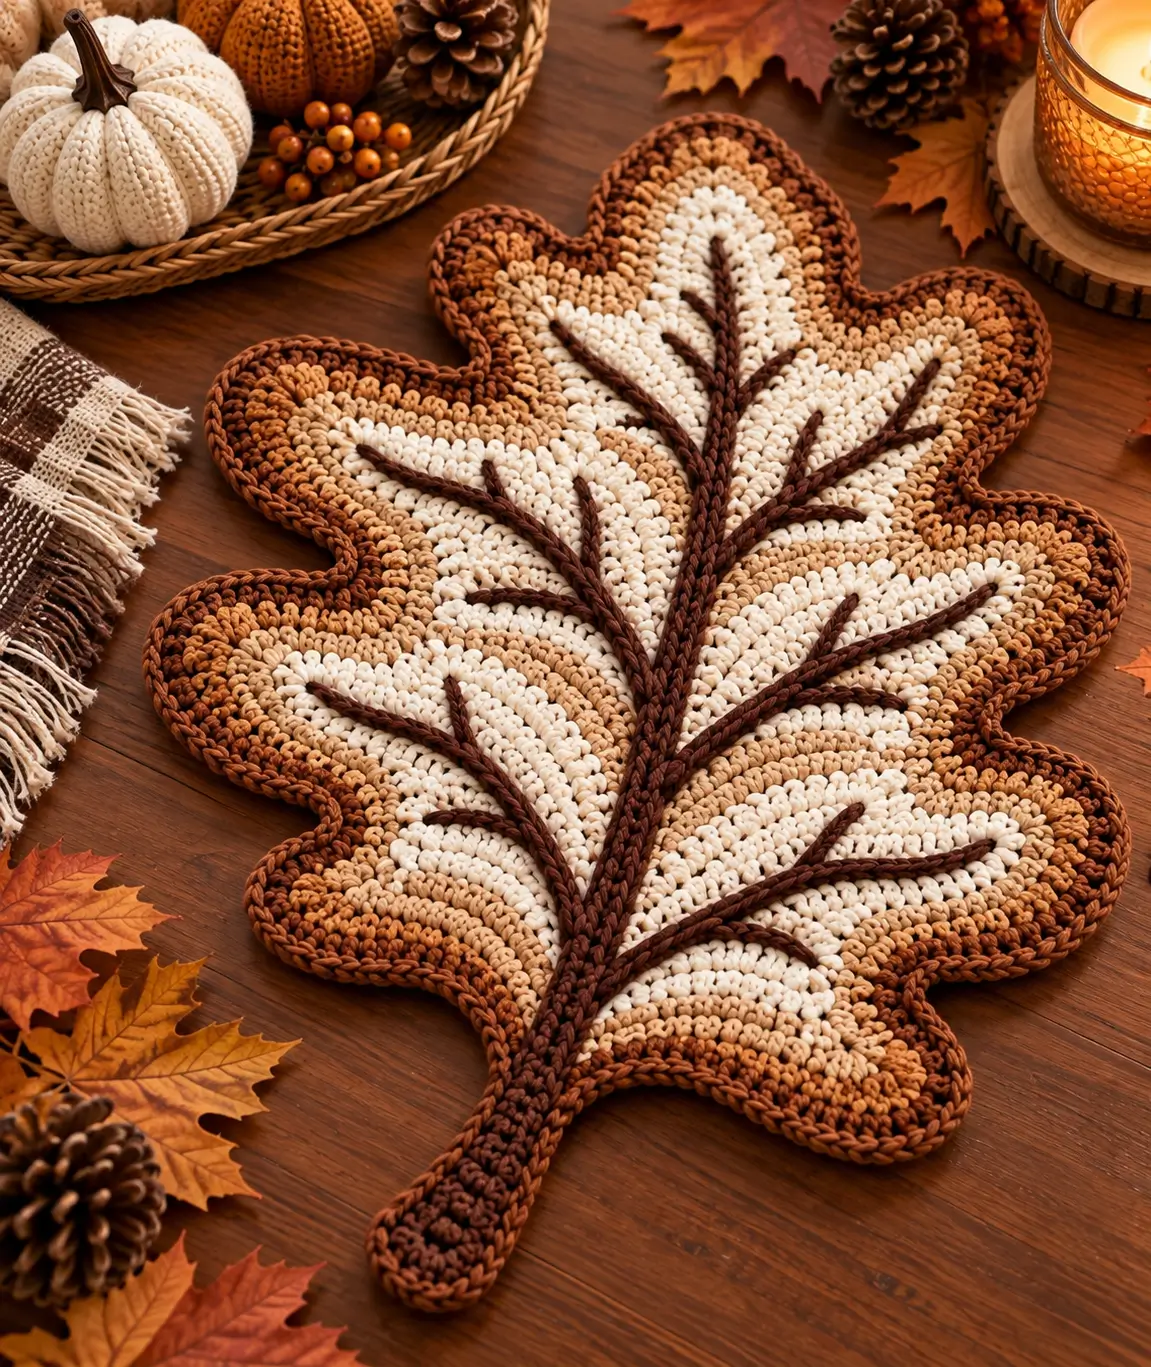
An oak leaf needs deep rounded lobes rather than the pointed edges used for maple-leaf crochet. This crochet oak leaf placemat pattern builds that recognizable outline around a cream and warm-brown center, then adds raised dark-brown veins. Worked with medium-weight cotton or similar structured yarn, the finished piece can be sized to approximately 40 cm long for use as an autumn table mat, centerpiece or seasonal place setting.
The Design: What Makes This Oak Leaf Different
The shape depends on three features: rounded side lobes, a long tapered stem and a branching vein system. The lobes must project far enough from the center to identify the piece as an oak leaf, but they also need smooth transitions so the mat lies flat. The central vein acts as the visual axis and gives the smaller diagonal veins a consistent attachment line.
Color placement creates a second layer of structure. Cream occupies much of the interior while tan, caramel and rust-brown sections move toward the outside. A dark-brown edging defines the silhouette. The most common failure in a crochet oak leaf pattern of this size is uncontrolled increases around the lobes. Too many increases create ruffles; too few pull the leaf into a bowl shape.
Project Info at a Glance
| Skill Level | Time | Finished Size | Hook | Best For |
|---|---|---|---|---|
| Intermediate | 4–7 hours | Approx. 38–42 cm long | 3–4 mm depending on yarn | Autumn table decor |
The finished dimensions are a practical target rather than an exact measurement taken from the photograph. Published crochet leaf placemat patterns include examples around 40 cm long, while yarn choice, hook size and individual tension can change the final dimensions substantially.
Materials and Tools
Yarn
- Cream — DK or light-worsted cotton — approximately 45–55 g.
- Light tan — DK or light-worsted cotton — approximately 25–35 g.
- Caramel brown — DK or light-worsted cotton — approximately 25–35 g.
- Rust brown — DK or light-worsted cotton — approximately 20–30 g.
- Dark chocolate brown — DK or light-worsted cotton — approximately 25–35 g for veins, stem and edging.
The quantities above are working estimates for a large decorative leaf rather than measurements from the photographed object. Keep extra yarn available if the finished mat is enlarged beyond approximately 40 cm.
Tools
- 3.5 mm crochet hook
- Yarn needle
- Stitch markers
- Scissors
- Measuring tape
- Blocking mat
- Rust-resistant blocking pins
A 3–4 mm hook is a practical range for DK and similar yarns used in decorative oak-leaf crochet. Select the hook that produces a dense fabric without making the stitches rigid.
Abbreviations
- ch — chain
- sl st — slip stitch
- sc — single crochet
- hdc — half double crochet
- dc — double crochet
- tr — treble crochet
- inc — increase
- dec — decrease
- st/sts — stitch/stitches
- RS — right side
- FO — fasten off
For the raised vein work, surface slip stitches or a separately crocheted cord can be used. Keep these stitches relaxed so the decorative veins do not shorten the finished leaf.
Pattern — Step by Step
1. Plan the Oak Leaf Shape
Before crocheting, identify the central axis of the leaf. The reference design is substantially longer than it is wide and uses a prominent stem extending from the bottom.
The side edge is divided into rounded lobes. Each side should mirror the other closely, although a small amount of natural asymmetry can remain.
Mark the approximate locations of the lobes before working the final border. This is more reliable than trying to create every curve by eye during the last round.
2. Central Foundation
With cream yarn, make a foundation chain long enough to form the central interior of the leaf.
For a table mat around 40 cm long, begin with a foundation approximately 22–25 cm long. The stem and outer lobes will add additional length and width.
Starting in the second chain from the hook, work along the foundation using progressively taller stitches toward the widest section:
sl st, sc, hdc, dc, then continue in dc through the central section.
Near the upper tip, reverse the sequence:
dc, hdc, sc, sl st.
Work multiple stitches into the final chain to turn around the foundation. Crochet down the opposite side using a mirrored stitch sequence.
The resulting piece should resemble a long oval or narrow leaf core. Do not attempt to create the full oak silhouette in this first section.
3. Build the Cream Interior
Continue around the central foundation with cream yarn.
Place increases around the upper tip and lower turning points so the work remains flat. Keep the long side sections relatively stable.
Work approximately three to five expansion rounds, checking the fabric after each round.
If the center begins to ripple, reduce the number of increases in the next round. If the edge pulls upward, additional increases are required.
The cream field should remain dominant because it provides the light background for the dark-brown vein system.
4. Add the Light Tan Sections
Change to light tan yarn.
Do not make the color transition a perfectly uniform ring. The reference design uses irregular bands that follow the leaf shape and help separate individual lobes.
Work the tan yarn around the existing center, adding increases where future lobes need additional width.
At the narrow sections between lobes, work several stitches without increasing. This begins forming the inward curves characteristic of an oak leaf.
Keep the fabric on a flat surface while working. Large decorative crochet pieces can accumulate excess stitches gradually, and the problem may not become obvious until several rounds later.
5. Form the First Pair of Oak Lobes
The lowest pair of lobes should project outward from the central axis.
Work taller stitches through the middle of each lobe. A progression such as sc, hdc, dc, tr, dc, hdc, sc creates a rounded projection.
Between neighboring lobes, use shorter stitches or slip stitches to pull the outline inward.
Repeat the shaping on the opposite side.
Count the stitches used for the first lobe and reproduce the same basic sequence on its partner. Exact mirror symmetry is not mandatory, but the two sides should carry comparable visual weight.
6. Form the Middle Lobes
The middle portion is the widest part of the oak leaf.
Build a larger rounded projection on each side using controlled increases and taller stitches. The widest lobe should extend farther from the center vein than the lower lobes.
Return gradually to shorter stitches as the lobe approaches the inward valley.
Abrupt transitions from treble crochet directly to slip stitch can create a hard corner. Step down through double, half double and single crochet instead.
Lay the piece flat after completing both sides. Correct any obvious difference before continuing to the upper lobes.
7. Form the Upper Lobes
The upper lobes become progressively smaller as they approach the tip.
Repeat the same general shaping method while reducing the number of stitches in each projection.
Keep the final tip rounded rather than needle-sharp. Oak leaves commonly have rounded lobes, which separates this silhouette from a pointed maple-leaf design.
Finish the uppermost section with a compact group of increases followed by a smooth transition down the opposite side.
8. Add the Caramel and Rust Color Bands
Change between caramel brown and rust brown as the outer portion develops.
Use these shades to emphasize the lobes rather than creating perfectly concentric stripes.
One lobe can carry a slightly wider caramel band while another contains more rust. Keep the overall color distribution balanced across the left and right sides.
When changing colors, complete the final yarn-over of the previous stitch with the new color. This produces a cleaner transition than fastening off after every individual section.
Carry yarn only across short distances. For long gaps, fasten off and rejoin to prevent visible floats on the reverse.
9. Dark Brown Outer Border
Join dark chocolate brown yarn at the lower edge.
Work one complete round of single crochet around the oak-leaf silhouette.
Use increases around the outermost point of each lobe. At the valleys, skip a stitch or use a controlled decrease if needed to sharpen the inward curve.
The border should trace the outline rather than change it dramatically.
For a thicker edge similar to the reference, work a second round of single crochet or slip stitches.
Check every lobe before fastening off. An extra stitch placed repeatedly around a curved edge can produce ruffling after blocking.
10. Central Raised Vein
The dark central vein is the main structural detail of the design.
With dark chocolate brown yarn, begin near the base of the leaf and work toward the upper tip.
Surface slip stitch along the central axis. Keep every stitch loose enough for the cream fabric underneath to remain flat.
For a heavier raised vein, crochet a narrow cord separately and sew it to the surface using matching yarn.
The center vein should be widest near the bottom and visually narrower toward the upper tip.
Do not pull the vein tightly during attachment. A cord that is even 1–2 cm shorter than the underlying fabric can bend the entire placemat.
11. Left Side Veins
Add several diagonal branches extending from the center vein toward the left lobes.
Begin the lowest branch approximately one-quarter of the way up the main vein. Angle it toward the center of the corresponding lower lobe.
Add another branch toward the middle lobe and a shorter branch toward the upper section.
Secondary branches can be added to reproduce the tree-like structure visible in the reference image.
Keep the branches thinner than the main center vein.
12. Right Side Veins
Repeat the branching structure on the right side.
Do not force every branch into exact bilateral symmetry. Natural-looking vein placement works better when the attachment points differ slightly while still following the lobe structure.
Each major branch should visually lead toward one of the rounded outer lobes.
Secure the ends on the reverse without pulling them tight.
13. Crochet the Stem
Use dark chocolate brown yarn.
Continue directly from the lower center vein when possible, or join fresh yarn at the base.
Chain until the stem reaches approximately 10–14 cm, depending on the overall dimensions of the leaf.
Starting in the second chain from the hook, work single crochet or slip stitches back toward the leaf.
For a wider stem, crochet along the opposite side of the foundation chain as well.
Taper the final end rather than leaving a square termination.
Join the stem firmly to the lower body of the leaf and weave the tail through several stitches.
14. Check the Finished Shape
Place the completed leaf on a flat surface before blocking.
Check the central axis first. The tip, center vein and stem should follow the same general line.
Next compare corresponding left and right lobes. Correct severe differences with localized edging stitches if necessary.
Measure the complete leaf from the top tip to the end of the stem.
A finished length around 38–42 cm produces a practical table-mat scale. A smaller version can function as a centerpiece mat or oversized trivet.
Assembly and Finishing
- Lay the completed oak leaf on a flat blocking mat with the right side facing upward.
- Align the upper tip, central vein and stem along the same vertical axis.
- Pin the largest left and right lobes first to establish the finished width.
- Shape the smaller lobes individually, maintaining rounded outer edges and visible inward valleys.
- Check that the dark-brown outer border lies flat without ruffles or stretched sections.
- Adjust the main center vein so it follows the center of the cream field without pulling the fabric.
- Arrange each diagonal vein toward its corresponding lobe and correct any twisted surface stitches.
- Straighten the stem while maintaining a slight natural taper toward its lower end.
- Wet-block or spray-block according to the yarn manufacturer’s care instructions and allow the mat to dry completely.
- Remove the pins, weave in remaining ends and measure the final length and width before use.
The finished oak leaf should lie flat with clearly separated lobes, a centered stem and raised branching veins that do not contract the surrounding crochet fabric.
7 Technical Tips for a Flat Oak Leaf Placemat
- Ruffled lobes: Too many increases around a curved section create waves. Remove one increase from the affected section on the following round rather than tightening your crochet tension.
- Cupped center: If the cream center lifts more than approximately 1 cm from a flat surface, the expansion rate is too low. Add increases gradually around the curved areas instead of concentrating them in one location.
- Unequal lobes: Place a stitch marker at the widest point of every major lobe. Compare each left-side marker with its right-side partner before beginning the dark outer border.
- Contracted center vein: Surface slip stitches must remain relaxed. A vein that finishes even 1–2 cm shorter than the fabric underneath can bend the placemat along its center.
- Blunt valleys: Use shorter stitches, a skipped stitch or a controlled decrease between adjacent lobes. Adding extra stitches inside the valley makes the oak silhouette progressively rounder and less defined.
- Twisted stem: Block the stem along the same axis as the main center vein. A stem positioned more than a few degrees off center makes the entire leaf appear asymmetrical even when the lobes match.
- Unstable table mat: Keep the finished fabric dense enough that raised veins do not roll underneath it. For a functional placemat, test the blocked piece on a hard table and correct any lobe that rises noticeably from the surface.
How to Change the Size
The safest way to resize this crochet leaf placemat is to change yarn and hook size while preserving the same proportions. A thinner yarn with a smaller hook creates a coaster or decorative appliqué; thicker cotton with a larger hook produces a larger centerpiece.
Changing the number of shaping rounds requires more planning because every additional round changes the increase requirements around the lobes.
For a large dining-table version, aim for approximately 40 cm from leaf tip to stem end. For a smaller decorative mat, reduce the dimensions to approximately 25–30 cm. A coaster-scale version can be made considerably smaller.
Always make the dark vein system proportional to the finished leaf. Thick veins on a small leaf overwhelm the cream center, while thin veins disappear visually on a large mat.
Choosing Yarn for a Crochet Oak Leaf Placemat
Cotton is a practical choice because it gives the lobes definition and responds well to blocking. A cotton-acrylic blend can also work when a slightly softer fabric is preferred.
Very fuzzy yarn makes the branching veins and color boundaries less distinct. Smooth yarn gives a cleaner result for this particular design.
For the autumn palette shown here, combine cream with three progressively darker browns. The lightest shade should occupy much of the center, while the darkest yarn is reserved for the outline, veins and stem.
Using several related browns creates depth without requiring complicated stitch textures. For a simpler version, work the complete leaf body in one caramel shade and retain dark brown only for the veins and edging.
Blocking the Oak Leaf
Blocking is part of the construction rather than an optional finishing step. The multiple lobes contain different rates of increase, so the piece may look uneven immediately after crocheting.
Pin the main vertical axis first. Next establish the widest left and right points, followed by the smaller lobes.
Measure corresponding lobes from the center vein. Matching these measurements produces a balanced shape without making the leaf unnaturally rigid.
Allow the piece to dry completely before removing pins. Moving it while damp can allow the rounded sections to contract again.
If the placemat will be washed regularly, record its blocked measurements. Re-blocking to the same dimensions after washing will help preserve the intended oak-leaf silhouette.
Conclusion
The rounded lobes are the measurement to control first; once their positions are established, the border and branching veins can follow the existing geometry. Make a gauge sample with the selected yarn, then target approximately 38–42 cm if the finished piece will function as a full table mat. Block the leaf before judging its final outline, particularly around the deepest valleys between lobes. This crochet oak leaf placemat pattern can be worked in cream and layered browns like the reference or adapted to rust, mustard and copper. Save the finished version to Pinterest or share it on Instagram with #CrochetOakLeafPlacemat. Which section would you change first: the cream center or the caramel outer lobes? “`1









