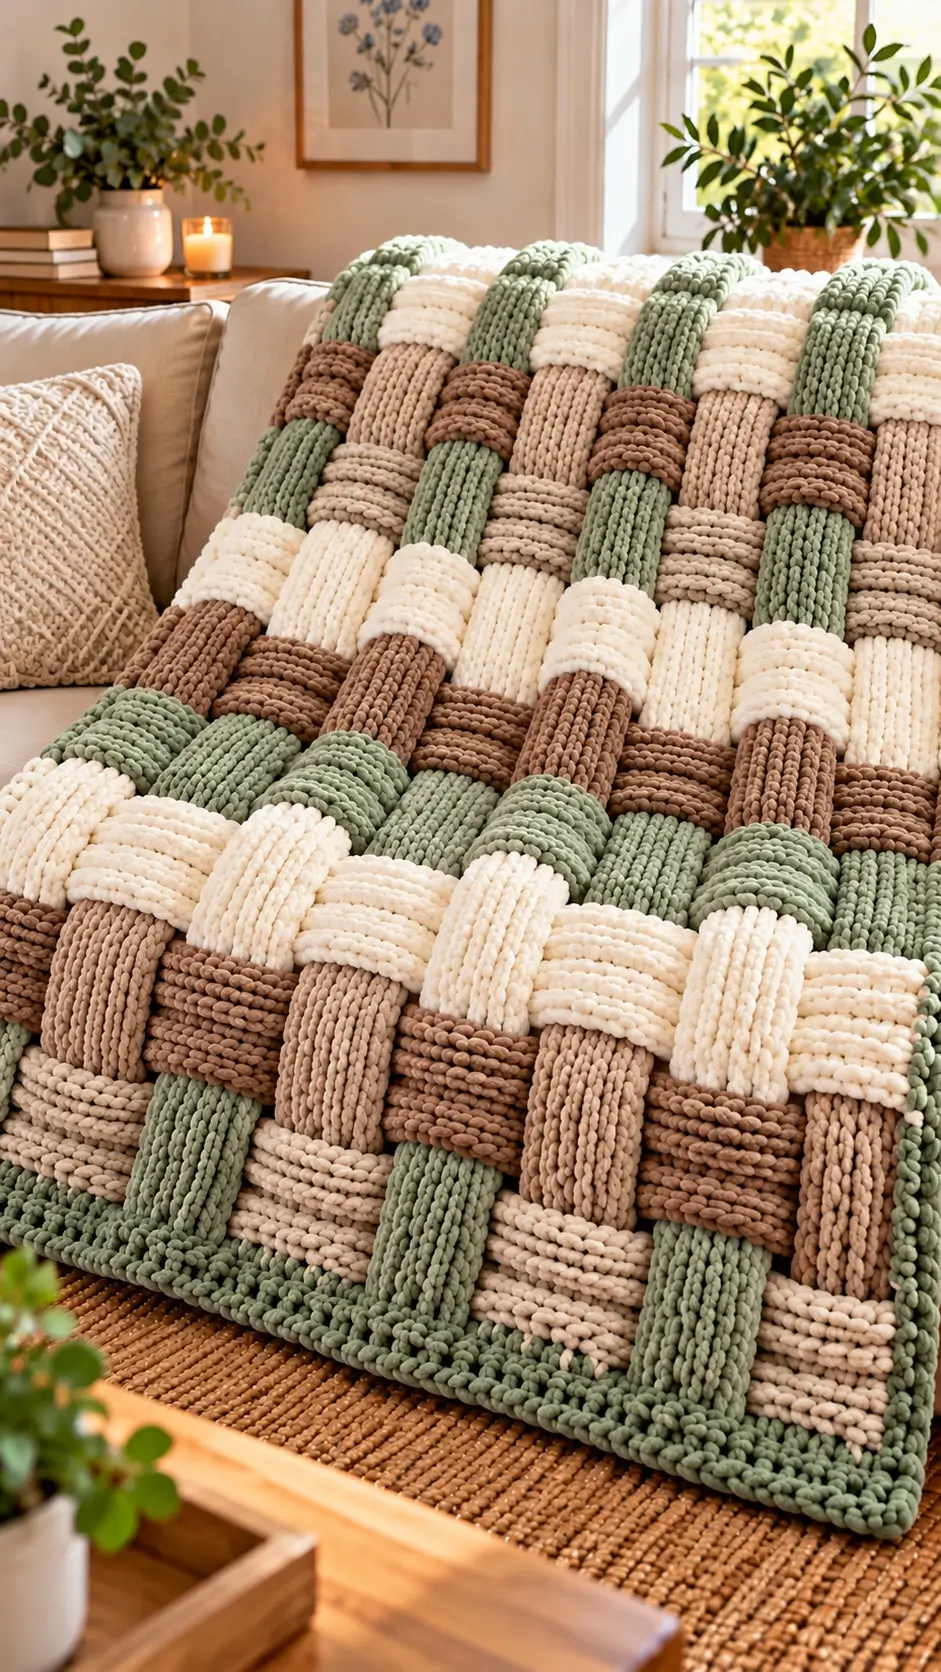
Four separate color bands crossing at right angles make this blanket look constructed rather than simply striped. This chunky basket weave crochet blanket uses super-bulky yarn, a 9 mm reference hook, and a throw-size target of approximately 127 × 144.5 cm. It suits an intermediate crocheter familiar with post stitches and produces a dense sofa throw with a pronounced geometric surface.
The Design: What Makes This Basket Weave Different
The photographed blanket depends on scale. Its apparent bands are substantially wider than the small raised squares produced by many conventional basketweave stitch repeats. That difference matters: narrow FPdc and BPdc groups read as texture, while broad contrasting blocks read as interlaced strips.
Color is the second structural decision. Sage, cream, tan, and brown alternate across both axes, preventing the surface from becoming a single-color checkerboard. A woven look crochet blanket needs deliberate placement because random changes can break the over-under rhythm.
Thickness is the third factor. Super-bulky polyester yarn works well for a basket weave crochet blanket pattern, and a 9 mm hook provides a practical starting point. A common mistake is tightening post stitches until the raised sections contract and the blanket edges bow inward.
Project Info at a Glance
| Skill Level | Time | Finished Size | Hook | Best For |
|---|---|---|---|---|
| Intermediate | Varies by tension and size | Approx. 127 × 144.5 cm | 9 mm M/N | Sofa throw, bed layer, geometric home décor |
The dimensions, yarn class, and hook size are based on a comparable super-bulky basketweave blanket rather than measurements extracted directly from the photograph. Completion time varies with individual crochet speed and the chosen construction.
Materials and Tools
Yarn
For a conventional crocheted interpretation, approximately 2,400 g total of super-bulky polyester yarn is a practical starting quantity for a large throw. To reproduce the photographed palette, divide the yarn among four colors after making a gauge swatch.
- Sage green — super bulky — approximately 700–800 g — chenille-style polyester yarn
- Cream/ivory — super bulky — approximately 600–700 g — chenille-style polyester yarn
- Camel/tan — super bulky — approximately 450–600 g — chenille-style polyester yarn
- Medium brown — super bulky — approximately 450–600 g — chenille-style polyester yarn
The individual color quantities are planning estimates based on the visible color distribution in the photographed blanket. Buy sufficient yarn from the same dye lot when possible.
Tools
- 9 mm M/N crochet hook
- Large-eye yarn needle
- Locking stitch markers
- Scissors
- Flexible measuring tape
- Removable markers for color sections
No stuffing, safety eyes, embroidery thread, or amigurumi assembly tools are required.
Abbreviations
- ch — chain
- sc — single crochet
- hdc — half double crochet
- dc — double crochet
- FPdc — front post double crochet
- BPdc — back post double crochet
- sl st — slip stitch
- st / sts — stitch / stitches
- rep — repeat
MR, inc, dec, BLO, and invisible decrease are not required because this blanket is worked as a flat rectangular textile rather than an amigurumi shape.
Chunky Basket Weave Crochet Blanket Pattern
Important Construction Note
The uploaded image cannot establish the exact stitch-by-stitch construction of the original blanket. Its bands appear more deeply separated than standard post-stitch crochet, and some areas visually resemble independently formed interlaced strips.
This pattern therefore creates a crocheted interpretation using alternating front post and back post double crochet. The technique produces a raised basketweave surface while retaining the practical structure of a single blanket fabric.
Gauge Swatch
Yarn: super bulky chenille-style yarn. Hook: 9 mm.
Make a swatch measuring at least 15 × 15 cm before beginning the full blanket.
A useful reference gauge is approximately 8 stitches × 5 rows = 10 cm in basketweave pattern. Measure only the central 10 cm of the swatch so the foundation and outside stitches do not distort the result.
If eight stitches measure less than 10 cm, change to a larger hook. If they measure more than 10 cm, move down a hook size.
Chenille yarn can change dimensions noticeably when ordinary double crochet and post stitches are worked at different tensions.
Foundation
First decide the required finished width. For a throw comparable to the reference dimensions, aim for approximately 127 cm before final finishing.
This version uses nine-stitch basket blocks.
Foundation: Chain a multiple of 9, then add 2 additional chains.
For example:
- 90 + 2 = 92 chains
- 99 + 2 = 101 chains
- 108 + 2 = 110 chains
The correct count depends on the gauge produced by your yarn and hook. Make the foundation chain loose enough to remain the same width as the finished fabric.
A tight foundation chain is a direct cause of a curved lower edge.
Setup Row
Row 1: Work 1 dc across the foundation according to your chosen starting method. Maintain an even stitch count across the entire width.
Place a removable stitch marker after every nine working stitches. The markers divide the fabric into basket blocks and make an accidental eight- or ten-stitch group easier to detect.
Basketweave Section A
Row 2: Work FPdc around each of the next 9 stitch posts.
Work BPdc around each of the following 9 stitch posts.
Continue alternating:
9 FPdc, 9 BPdc, 9 FPdc, 9 BPdc
Repeat across the central portion of the blanket while maintaining the selected edge stitches.
Post stitches are worked around the vertical post of the stitch rather than through the normal top loops.
Rows 3–7
Maintain the same raised and recessed relationship for a total section depth of approximately six rows.
Continue FPdc over the sections intended to project forward and BPdc over the recessed sections.
Do not judge the basketweave structure from the first row. The block becomes substantially more visible after several rows have stacked vertically.
Check the width after approximately three rows. If the FPdc sections contract noticeably, the post stitches are being worked more tightly than the surrounding fabric.
Basketweave Section B
After completing the first six-row block section, reverse the post treatment.
Where the previous section formed a raised FPdc block, work BPdc.
Where the previous section formed a recessed BPdc block, work FPdc.
The repeat becomes:
9 BPdc, 9 FPdc, 9 BPdc, 9 FPdc
Continue this arrangement for another six-row section.
The reversal changes the direction of the raised blocks and creates the characteristic basket-like checkerboard.
Four-Color Layout
The photographed blanket uses four dominant colors:
- Sage green
- Cream/ivory
- Camel/tan
- Medium brown
The photograph does not behave like a basic horizontal stripe pattern. Its colors visually form both horizontal and vertical elements.
A conventional flat FPdc/BPdc blanket cannot reproduce completely independent vertical strips through ordinary row-by-row color changes alone. Additional colorwork, surface crochet, separately crocheted strips, or another construction method would be required for a literal duplicate.
For a practical photo-inspired version, assign each major basketweave section a color.
Section A: Sage green
Section B: Cream
Section C: Camel
Section D: Brown
Repeat the sequence while changing the starting color periodically. This prevents every color transition from lining up vertically.
Keep a written color chart beside the project. Chenille yarn can make repeated unraveling difficult because the individual stitch tops are less distinct than those in smooth plied yarn.
Building the Blanket Length
Continue alternating six-row Basketweave Section A and Basketweave Section B.
Reverse the FPdc and BPdc orientation after each complete section.
Continue until the blanket body approaches the planned finished length.
A useful throw-size reference is approximately 127 cm wide × 144.5 cm long.
If a border will be added, stop the main body slightly short of the final target dimensions. The exact amount depends on the number of border rounds and individual gauge.
Lay the blanket flat before measuring it. Do not stretch the fabric along either axis.
Sage Green Border
The photographed blanket has a clearly defined sage-green outer edge, making sage the logical border color for this version.
Join sage green yarn at one corner.
Border Round 1: Work sc evenly around all four sides. Work 3 sc into each corner.
Border Round 2: Work 1 sc in each stitch around. At each corner, work 3 sc into the center corner stitch.
Border Round 3: Repeat Border Round 2 if a thicker outer frame is required.
Fasten off and leave a long tail.
Weave the tail through several stitches on the wrong side, reverse direction, and weave through another section before trimming.
Watch the blanket after the first border round. If the edge begins cupping toward the center, too few stitches have been worked along the sides. A rippling border usually indicates too many stitches.
Assembly and Finishing
- Lay the completed blanket on a large flat surface without stretching the fabric.
- Measure opposite edges and compare their finished dimensions.
- Check every color transition for loose or unsecured yarn tails.
- Weave tails through dense sections rather than exposed raised ridges.
- Reverse direction at least once when burying slippery polyester yarn ends.
- Inspect each FPdc and BPdc block boundary for skipped stitch posts.
- Shape all four corners by hand before laundering.
- Wash according to the care instructions printed on the selected yarn label.
- Lay the finished blanket flat and measure it again after laundering.
- Trim only fully secured yarn tails after the fabric has settled.
The completed blanket should lie rectangular with consistent raised blocks and an outer border that neither flares nor contracts.
7 Technical Tips for a Better Basket Weave Blanket
- Mark every basket block. A missed marker can turn a nine-stitch FPdc section into an eight-stitch group. That single error shifts every block that follows.
- Measure the foundation after the first 10 cm. A foundation that is substantially narrower than the working fabric can produce a bowed lower edge. Correct the tension problem before several hundred grams of yarn have been worked.
- Keep the post stitches the same height. Tight FPdc stitches shorten the raised sections and can cause local contraction. Compare block height after the first three rows.
- Count before every reversal section. One missed post changes the checkerboard alignment. The error becomes much more visible after another six-row section is completed.
- Keep the four-color chart beside the project. The photographed design relies on sage, cream, camel, and brown appearing repeatedly. Accidentally reversing two large sections changes the planned geometric arrangement.
- Secure chenille tails in multiple directions. A short tail woven in a single direction can work loose in slippery polyester yarn. Leave enough length to weave back through the fabric before trimming.
- Check the border after Round 1. Rippling indicates excess edge stitches, while inward curling indicates too few stitches or excessive tension. Correct the stitch distribution before adding another border round.
Final Notes
Measure a 15 cm swatch before purchasing the full four-color yarn quantity, then record the number of stitches per 10 cm and calculate the foundation from the selected basket-block repeat. This matters more than copying the apparent number of bands in the photograph because super-bulky chenille can vary substantially in diameter.
Use approximately 127 × 144.5 cm as a reference throw size rather than treating it as an exact measurement of the photographed blanket. Adjust the foundation and number of basketweave sections to fit the sofa, chair, or bed where the finished piece will be used.
After completing your chunky basket weave crochet blanket, photograph the four-color layout and save the project to Pinterest or share it on Instagram with #ChunkyBasketWeaveBlanket. Which color should dominate the finished layout: sage green, cream, camel, or brown?









