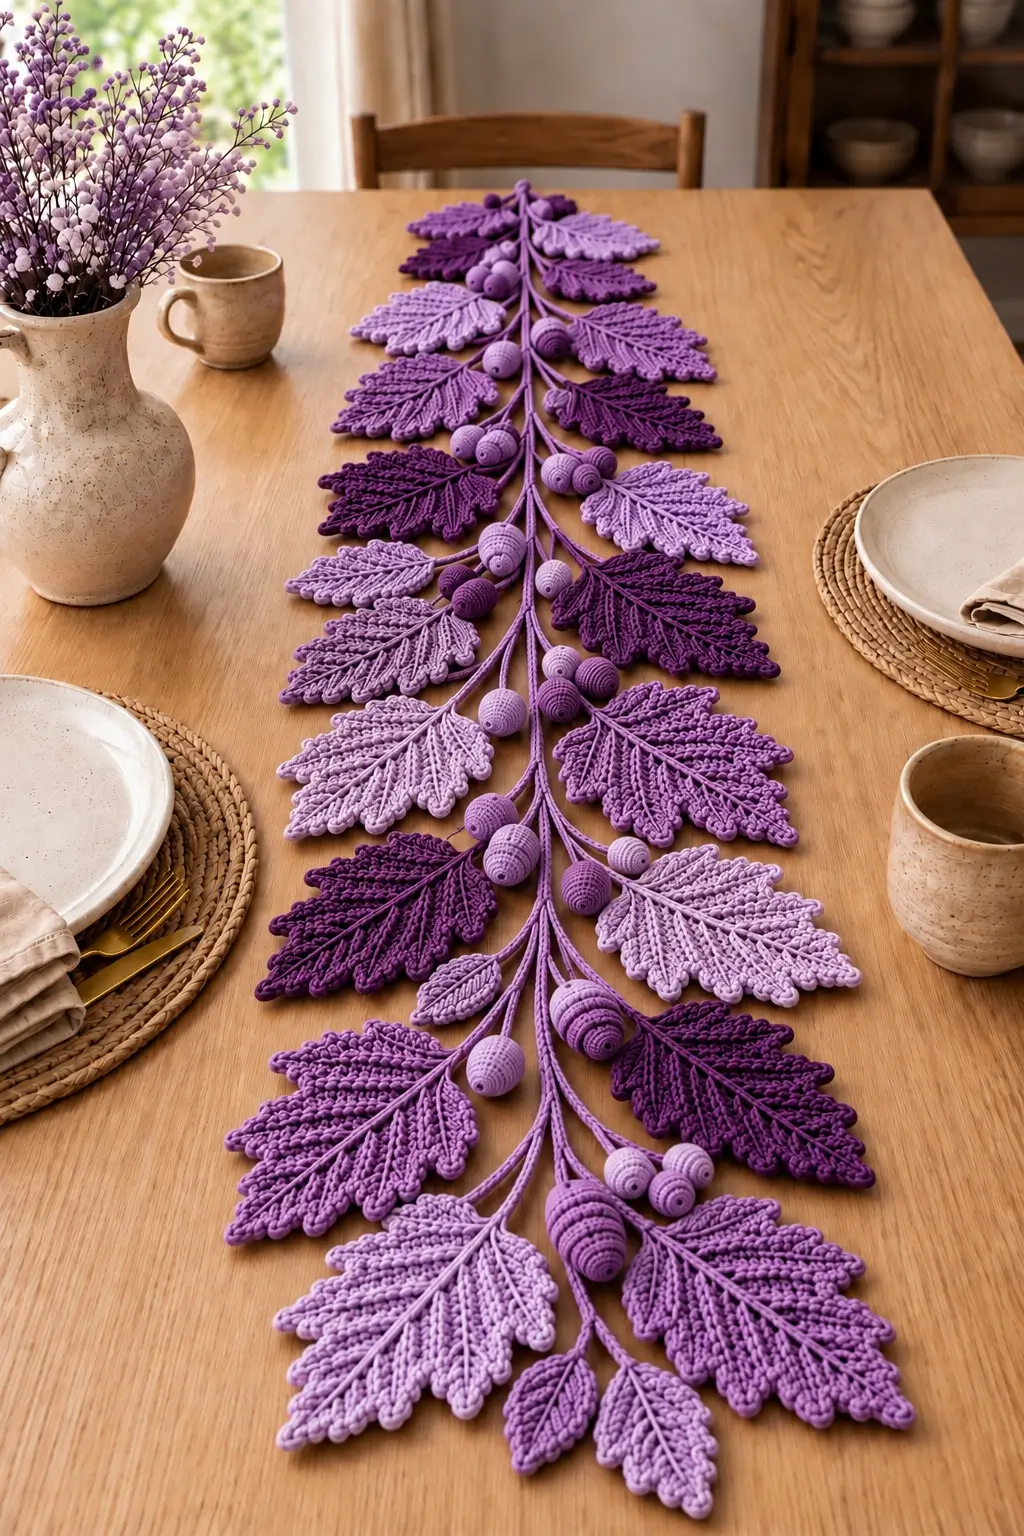
Oak leaves form rounded lobes rather than the sharp teeth of a maple leaf, and that difference controls the entire structure of this runner. This crochet oak leaf and acorn table runner pattern uses a long branching stem, dimensional cream acorns and repeated openwork leaves. Work it in cotton yarn with a 3–3.5 mm hook for a decorative botanical centerpiece that can be lengthened to fit the table.
The Design: Oak Leaves, Branches and Acorns
The photographed runner does not use a conventional rectangular background. Instead, the central branch acts as the structural spine. Smaller stems leave that spine at alternating angles and terminate in oak leaves or dimensional acorns.
Each leaf needs a visible center vein and several rounded lobes. Open chain spaces beside the vein reduce bulk and give the larger leaves the lace-like construction visible in the image.
The acorns provide the only strongly three-dimensional elements. Their bodies are worked in rounds, lightly stuffed and attached to narrow crocheted stems.
A common construction problem is attaching every branch before checking the overall width. Build the central spine first, pin the leaves and acorns in position, then sew the components together after the arrangement is balanced.
Project Information
| Skill Level | Time | Finished Size | Hook | Construction |
|---|---|---|---|---|
| Intermediate | 12–16 hours | Approx. 110–125 cm × 30–35 cm | 3–3.5 mm | Modular branch, leaves and acorns |
The dimensions above are targets for this photo-inspired runner rather than direct measurements of the photographed piece. Published oak-leaf motifs vary substantially with yarn weight: documented examples include leaves around 8–9.5 cm long, while other patterns produce approximately 10 cm leaves.
Materials and Tools
Yarn
- Cream or natural cotton: DK weight, approximately 300–400 g for a long runner.
Use a smooth cotton or cotton-blend yarn. Firm stitch definition is particularly useful for the leaf veins, rounded lobes and narrow branch sections.
Tools
- 3–3.5 mm crochet hook
- Polyester fiberfill for the acorns
- Tapestry needle
- Scissors
- Stitch markers
- Tape measure
- Blocking mats
- Rust-resistant blocking pins
Abbreviations
- MR = magic ring
- ch = chain
- sc = single crochet
- hdc = half double crochet
- dc = double crochet
- tr = treble crochet
- inc = increase
- dec = decrease
- sl st = slip stitch
- st/sts = stitch/stitches
- sp = space
- RS = right side
For the acorns, work invisible decreases through the front loops of the next two stitches to reduce visible gaps in the stuffed surface.
Pattern – Step by Step
This runner is assembled from separate components. Make the central branch first, followed by the large leaves, small leaves, acorns and connecting stems.
Central Branch – Make 1
Yarn: cream or natural.
Ch 181 loosely.
Row 1: Starting in second ch from hook, sl st in first 15 ch, sc in next 150 ch, sl st in final 15 ch. (180)
Turn the work so the unused loops of the foundation chain face upward.
Row 2: Sl st in first 15 sts, sc in next 150 sts, sl st in remaining 15 sts.
Fasten off with a 30 cm tail.
The doubled construction produces a narrow cord-like spine without making the center of the runner excessively thick.
Large Oak Leaf – Make 14
Yarn: cream or natural.
Ch 25.
Beginning in the second ch from hook, work:
Sl st in next 3 ch, sc in next 3, hdc in next 4, dc in next 8, hdc in next 3, sc in next 2, 5 sc in final ch.
Continue along the opposite side of the foundation chain:
Sc in next 2, hdc in next 3, dc in next 8, hdc in next 4, sc in next 3, sl st in final 3.
Do not fasten off.
Large Leaf Lobes
Work around the outer edge of the leaf.
Lobe 1: Ch 1, sc in next st, hdc in next, 3 dc in next st, hdc in next, sc in next.
Valley: Sl st in next st.
Lobe 2: Sc in next, hdc in next, 4 dc in next st, hdc in next, sc in next.
Valley: Sl st in next.
Lobe 3: Sc in next, hdc in next, 5 dc in next st, hdc in next, sc in next.
Valley: Sl st in next.
Continue toward the leaf tip with one or two additional lobes as spacing permits.
At the tip work:
(sc, hdc, 3 dc, ch 2, sl st in second ch from hook, 3 dc, hdc, sc)
Mirror the lobe sequence down the opposite side.
Sl st at the base and fasten off, leaving a 25 cm sewing tail.
Large Leaf Center Vein
With the right side facing, join yarn at the base of the leaf.
Surface sl st along the original foundation chain toward the tip.
Keep the stitches loose enough that the leaf remains flat.
Fasten off approximately 1 cm before the terminal point.
Openwork Side Veins
To reproduce the lace-like appearance in the photographed runner, add short chain openings beside the center vein while working the lobes.
At selected positions, replace one sc between neighboring lobe sections with:
ch 3, skip 1 st, sc in next st.
Repeat on the opposite half of the leaf at corresponding positions.
A large leaf should contain approximately four to six open spaces on each side of the central vein.
Medium Oak Leaf – Make 8
Ch 19.
Starting in second ch from hook, sl st in next 2, sc in next 3, hdc in next 3, dc in next 6, hdc in next 2, sc in next, 5 sc in final ch.
Continue along the opposite side:
Sc in next, hdc in next 2, dc in next 6, hdc in next 3, sc in next 3, sl st in final 2.
Work three or four rounded lobes along each side using combinations of sc, hdc and groups of 3–4 dc.
Work a pointed terminal lobe at the tip.
Fasten off with a 20 cm tail.
Small Oak Leaf – Make 4
Ch 13.
Starting in second ch from hook:
Sl st in next 2, sc in next 2, hdc in next 3, dc in next 3, hdc in next, 5 sc in final ch.
Continue along the opposite side:
Hdc in next, dc in next 3, hdc in next 3, sc in next 2, sl st in final 2.
Add two or three rounded lobes to each side.
Fasten off with a 15 cm tail.
Crochet Acorns
The dimensional acorns are worked in continuous rounds. Make approximately 18–22 for a runner with the density shown in the photograph.
Acorn Body – Make 18 to 22
Yarn: cream or natural.
Round 1: 6 sc in MR. (6)
Round 2: Inc ×6. (12)
Round 3: (Sc, inc) ×6. (18)
Rounds 4–7: Sc around. (18)
Round 8: (Sc, dec) ×6. (12)
Lightly stuff the acorn.
Round 9: Dec ×6. (6)
Fasten off and close the opening.
The body should remain oval rather than spherical. Add less stuffing near the closing round so the top can accept the cap cleanly.
Acorn Cap – Make 18 to 22
Round 1: 6 sc in MR. (6)
Round 2: Inc ×6. (12)
Round 3: (Sc, inc) ×6. (18)
Round 4: Working in back loops only, sc around. (18)
Fasten off with a 20 cm tail.
Place the cap over the wider end of the stuffed body and sew it around the circumference.
Acorn Texture
For the ridged appearance visible on several acorns in the photograph, add surface slip stitches around the cap or body.
Insert the hook at the top and work a loose spiral toward the widest point.
Do not pull the surface crochet tightly because it will compress the stuffing and distort the acorn.
Acorn Stem – Make 18 to 22
Ch 9.
Starting in second ch from hook, sl st in each ch. (8)
Fasten off with a 15 cm sewing tail.
Attach one end to the center of the acorn cap. Leave the opposite end free until final assembly.
Side Branches
The runner requires branches of different lengths so the leaves do not form a rigid horizontal pattern.
Long Branch – Make 8
Ch 31.
Starting in second ch from hook, sl st in first 5 ch, sc in next 20, sl st in final 5. (30)
Fasten off with a 20 cm tail.
Medium Branch – Make 8
Ch 24.
Starting in second ch from hook, sl st in first 4, sc in next 15, sl st in final 4. (23)
Fasten off.
Short Branch – Make 8
Ch 17.
Starting in second ch from hook, sl st in first 3, sc in next 10, sl st in final 3. (16)
Fasten off.
Arranging the Botanical Runner
Lay the central branch on a large flat surface before sewing any components to it.
Position the largest leaves first. Alternate them between the left and right sides of the central branch, changing the angle slightly from one pair to the next.
Leave approximately 7–10 cm between major attachment points. The exact spacing depends on the blocked width of the leaves.
Add medium leaves between the large ones. Place the smallest leaves near the two ends, where a gradual reduction in scale makes the branch appear naturally tapered.
Do not place every leaf at the same angle. Rotate neighboring leaves by approximately 10–20 degrees while keeping the general direction outward from the central spine.
Adding the Acorns
Arrange the acorns after all leaves have been pinned.
Use groups of two or three rather than attaching every acorn individually. A few single acorns can fill narrow spaces between larger branches.
Position each cluster close to the central spine. The acorns should occupy the negative spaces between leaves rather than covering the openwork leaf structure.
Pin every cluster before sewing the first one. Step back from the arrangement and check that one side does not contain noticeably more dimensional elements than the other.
Assembly
- Block every large, medium and small oak leaf individually before beginning final assembly.
- Lay the long central branch on a flat surface and mark its midpoint with a locking stitch marker.
- Pin the largest leaves alternately along the left and right sides, maintaining approximately 7–10 cm between primary attachment points.
- Add the medium and small leaves between the large sections, reducing leaf size toward both ends of the runner.
- Place long, medium and short branch cords beneath the leaf bases and pin their opposite ends to the central spine.
- Sew each branch to the central spine through several adjacent stitches so the joint cannot rotate.
- Attach the leaves through their lower center veins, leaving the rounded outer lobes free.
- Arrange acorns in clusters of two or three and attach their stems close to major branch junctions.
- Check the full runner for left-to-right balance, then secure any loose branch intersections with matching yarn.
- Block the assembled runner, pinning the central stem first and arranging every leaf and acorn only after that line is straight.
The finished runner should have one continuous central branch, alternating oak leaves, visible open spaces between the components and dimensional acorn clusters distributed along its length.
7 Technical Tips for a Defined Oak Leaf Runner
- Flattened oak lobes: Sewing around the complete perimeter of a leaf removes much of its dimensional definition. Attach only the lower center vein and approximately 2–3 cm of the leaf base.
How to Crochet a Defined Oak Leaf Shape
The outer lobes distinguish an oak leaf from many other crochet leaf motifs. Each side should contain several rounded projections separated by narrow valleys.
Use shorter stitches at the valleys and taller stitches near the middle of each lobe. A sequence moving from sc to hdc and dc creates the outward curve, while a slip stitch between sections pulls the fabric inward again.
The terminal lobe can be slightly more pointed than the side lobes. This gives the leaf a clear direction without making it resemble a sharply serrated maple leaf.
Keep the two sides approximately balanced, but exact stitch-for-stitch symmetry is not required for the botanical effect shown in the photograph.
Blocking the Oak Leaves
Block the leaves before assembly rather than waiting until the entire runner has been sewn together.
Dampen each leaf and place it on a blocking mat. Pin the base and tip first, establishing a straight central vein.
Next, pin the largest lobe on each side. Continue outward through the smaller lobes while keeping the valleys clearly separated.
Do not stretch the leaf primarily from its tip. Excessive lengthwise tension can narrow the body and reduce the rounded oak-leaf proportions.
Allow each component to dry completely before removing the pins.
Changing the Length of the Table Runner
This crochet oak leaf table runner pattern is modular, so its length can be changed without recalculating the individual leaves or acorns.
For a shorter centerpiece, reduce the central branch by approximately 20–30 chains and remove one pair of large leaves plus the corresponding acorn cluster.
For a longer dining table, extend the central branch and repeat one complete left-right arrangement of leaves. Maintain the same 7–10 cm spacing between major branch attachment points.
Do not simply stretch the central branch during blocking to gain length. That method thins the branch and changes the angles at which the side stems leave the center.
Changing the Width
The overall width is controlled primarily by leaf size and branch length.
For a narrow runner, use more medium leaves and shorten the longest side branches. For a wider centerpiece, increase the number of large leaves and position them at broader angles from the central spine.
Make one sample leaf and block it before deciding the branch length. The final blocked width is more useful than the measurement immediately after crocheting.
Making Smaller Crochet Oak Leaves
A smaller hook and finer yarn can produce miniature leaves without changing the general construction. Published examples demonstrate this clearly: DK cotton with a 2.75 mm hook can produce oak leaves around 6–9 cm long, depending on the version.
Small leaves are useful at the ends of this runner because they create a tapered transition rather than an abrupt stop.
Keep yarn weight consistent within each size group. Mixing substantially different yarn thicknesses can make the runner look uneven even when the leaf stitch counts are correct.
Making the Acorns More Dimensional
The photographed acorns have a rounded three-dimensional form, so they should not be flattened during assembly.
Fill the lower portion first, then add small amounts of stuffing as the decrease rounds close. Leave the final section slightly compressible.
When attaching the cap, sew around its lower edge rather than passing the needle repeatedly through the center of the acorn. Center stitching can pull the cap downward and flatten the top.
After assembly, roll each acorn gently between the fingers to redistribute the stuffing before attaching it to the runner.
Yarn Choice for a Botanical Table Runner
Cotton is particularly suitable for this construction because the branch and leaves need to remain relatively flat while the acorns retain a defined crocheted surface.
DK cotton also provides enough body for openwork leaves without creating excessive thickness at the central branch intersections.
If a softer yarn is used, additional blocking may be required. Very bulky yarn is less suitable because the numerous branch junctions can become disproportionately thick.
A single cream shade keeps attention on the shape and texture, as in the photographed runner. Autumn versions can instead combine olive, rust, ochre and brown while retaining the same component arrangement.
Final Blocking
After assembly, place the entire runner on blocking mats. Pin the central branch at regular intervals and confirm that it forms a straight line.
Move outward from the center. Position each side branch, then arrange the corresponding leaf before continuing to the next section.
Keep the dimensional acorns unpinned. They should rest naturally between the branches while the surrounding leaves are shaped.
Measure the widest points on both halves of the runner. Correct major differences while the yarn is damp.
Allow the runner to dry completely before removing the pins. Check every branch junction afterward and reinforce any attachment that moves more than a few millimeters.
Conclusion
The central branch controls the finished alignment of this botanical runner, so establish that line before positioning any decorative components. Block the oak leaves separately, alternate their sizes along the spine and place the dimensional acorns only after the foliage has been balanced. Record the final length, widest measurement and yarn consumption before making another version. Save this crochet oak leaf and acorn table runner pattern to Pinterest and share the finished centerpiece on Instagram with #CrochetOakLeafRunner. For a second runner, decide which botanical detail should change first: larger acorn clusters or additional small oak leaves near the tapered ends? “`0









