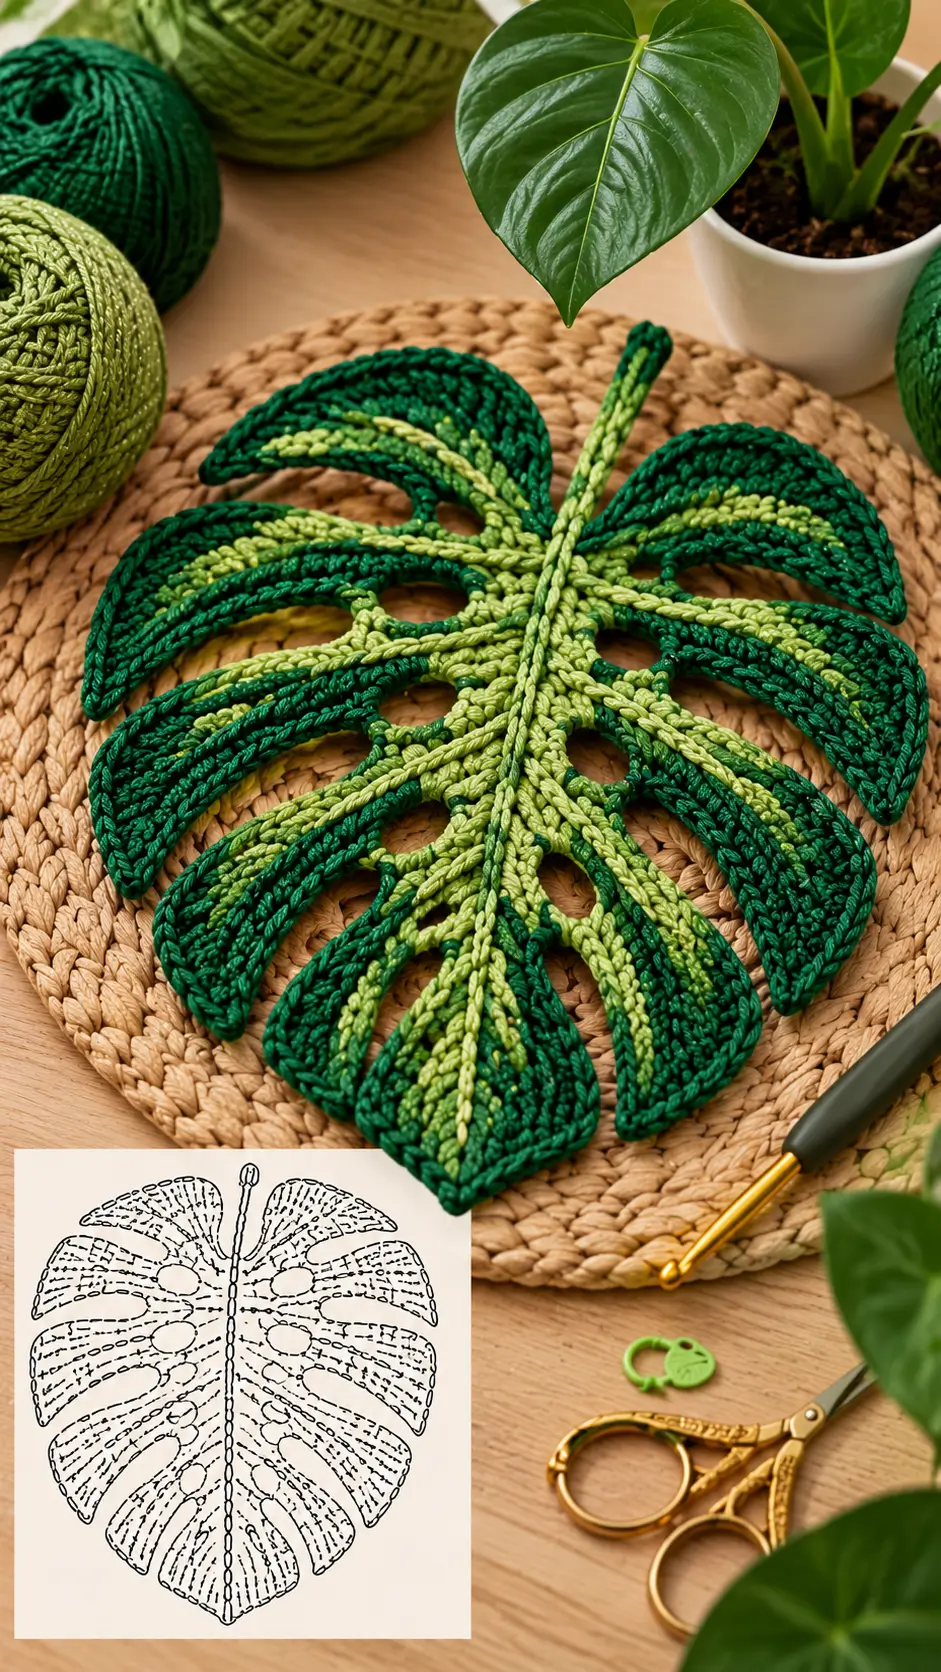
A Monstera without holes is only half the problem; its deep edge splits must also line up with the veins. This crochet monstera leaf pattern builds a large emerald-green leaf around a central axis, leaves open fenestrations between its sections, and adds raised light-green veins over the finished fabric. Use firm cotton or cotton-blend yarn with a hook appropriate to its weight. The intermediate motif works as a centerpiece, placemat, wall decoration, or plant mat.
The Design: What Makes This Monstera Leaf Different
The center vein controls the complete geometry. Large lobes branch from both sides of that axis, but they do not meet continuously along their inner edges. Deliberate chain spaces produce the characteristic openings associated with a Monstera leaf.
Color is structural rather than decorative. Deep green forms the broad leaf tissue and perimeter, while light green follows the central midrib and branches into each lobe. Those raised lines make the vein network visible without filling the open sections.
A common failure in a crochet monstera leaf is making every side lobe identical. Realistic Monstera shaping needs broader upper sections, substantial middle lobes, and progressively narrower lower sections. Equal lobes create a feather-like motif instead of the split tropical silhouette shown in the reference.
Project Info at a Glance
| Skill Level | Construction | Published Reference Size | Hook Reference | Best For |
|---|---|---|---|---|
| Intermediate | Flat central-axis leaf | Approx. 25 × 25 cm | 4–6 mm depending on yarn | Table mats, centerpieces, wall décor |
A published standalone Monstera centerpiece measures approximately 25 × 25 cm and uses about 70 g of 10-ply cotton with a 6 mm hook. Use those figures as a benchmark rather than claiming that the photographed motif has identical dimensions.
Materials and Tools
Yarn
- Deep emerald-green DK, worsted, or 10-ply cotton — main leaf body.
- Light leaf-green yarn in the same weight — center midrib and raised secondary veins.
Firm cotton provides useful definition around the large openings. A soft yarn can be used, but the outer lobes may require stronger blocking to maintain their shape.
Tools
- 4–6 mm crochet hook matched to the chosen yarn
- Yarn needle
- Locking stitch markers
- Scissors
- Tape measure
- Blocking mat
- Rustproof pins
Abbreviations
- ch — chain
- sl st — slip stitch
- sc — single crochet
- hdc — half double crochet
- dc — double crochet
- tr — treble crochet
- sp — space
- st/sts — stitch/stitches
- RS — right side
- WS — wrong side
An invisible decrease is not needed in this flat construction; shorter stitches, chain spaces, and tapered lobe rows control the outline.
Crochet Monstera Leaf Pattern — Step by Step
This reconstruction uses a central foundation with paired sections built outward. Make one complete sample before producing a coordinated set because yarn choice changes both the finished dimensions and the firmness of the fenestrations.
Central Foundation and Stem
Yarn: light green.
Foundation: Ch 31.
Mark the 10th chain from the starting end. The first section forms the visible stem, while the remaining chains establish the central midrib.
Beginning in the second chain from the hook, sl st through the first 5 chains.
Sc through the next 5 chains.
Hdc through the remaining chains toward the base.
Do not fasten off.
The gradual change from slip stitches to hdc makes the exposed stem narrower than the structural center of the leaf.
Upper Left Lobe
Change to deep green at the upper portion of the midrib.
Row 1: Ch 9.
Beginning in the second chain from the hook, work sc, hdc, 4 dc, hdc, sc.
Sl st into the central axis.
Row 2: Turn and work back along the lobe with sc at the narrow inner edge, hdc through the transition, and dc through the broad outer section.
Work 3 stitches into the outermost turning position.
Return toward the axis with mirrored stitch heights.
Fasten off or sl st to the next structural position.
Upper Right Lobe
Repeat the upper-left construction on the opposite side of the midrib.
Keep the two upper sections within approximately 5 mm of one another before continuing.
Do not connect their inner edges above the axis. The narrow separation contributes to the split-leaf appearance.
Second Left Lobe
Join deep green slightly lower on the central axis.
Ch 12.
Beginning in the second chain, work:
2 sc, 2 hdc, 5 dc, hdc, sc.
Turn around the outer end with 3 stitches in the final position.
Work down the opposite side with the stitch sequence reversed.
Join to the axis with sl st.
This lobe should be longer and broader than the upper lobe.
Second Right Lobe
Repeat the second-left section in mirror orientation.
Lay the motif flat after completing the pair.
If the axis bends strongly toward one side, compare the stitch counts and working tension of the two lobes before adding more sections.
First Fenestration Pair
The photograph shows open holes between the central axis and several outer lobes.
At the next left-side branch position, ch 5 rather than filling the complete space with solid crochet.
Anchor the chain to the outer lobe structure with sl st.
On the following pass, work sc and hdc around the chain while leaving the center of the opening unobstructed.
Repeat on the right side.
The finished holes should remain elongated rather than circular.
Middle Left Lobe
Join deep green below the first fenestration.
Ch 15.
Beginning in the second chain, work:
2 sc, 3 hdc, 6 dc, 2 hdc, sc.
Work 3 stitches into the final turning position.
Return along the opposite side with mirrored stitch heights.
Join to the central structure.
This is one of the broadest lobes in the leaf.
Middle Right Lobe
Repeat the middle-left section in mirror orientation.
Keep the lower edge slightly more curved than the upper edge.
The two middle lobes establish most of the finished width.
Second Fenestration Pair
Ch 6 from the central structure toward the inside edge of the next lobe.
Anchor with sl st.
Work around the chain on the next pass without closing the opening.
Repeat on the opposite side.
Use a stitch marker at the upper and lower end of each hole if the surrounding rows make its boundaries difficult to identify.
Lower Middle Left Lobe
Join deep green at the next branch position.
Ch 14.
Work sc, hdc, dc combinations along the chain, placing the tallest stitches through the middle third.
Turn around the outer point with 3 stitches.
Mirror the sequence back toward the central axis.
Join with sl st.
Lower Middle Right Lobe
Repeat the previous lobe on the opposite side.
These sections should be slightly narrower than the widest middle pair.
Third Fenestration Pair
Create another pair of elongated openings with ch-5 or ch-6 spaces.
Keep at least several solid stitches between adjacent holes.
If two fenestrations merge during blocking, the bridge between them is too narrow.
Lower Left Lobe
Join deep green near the lower third of the axis.
Ch 11.
Work sc, hdc, dc toward the outer section.
Use hdc and sc around the lower edge to create a more compact lobe.
Return to the axis and join.
Lower Right Lobe
Repeat the lower-left section in mirror orientation.
Compare the distance from each tip to the central axis before fastening off.
Bottom Left Lobe
Join deep green immediately above the visible stem.
Ch 9.
Work sc, hdc, dc through the central section and return with hdc and sc.
Shape the outer tip with a compact increase.
Join at the lower central structure.
Bottom Right Lobe
Repeat the final lobe on the opposite side.
The bottom pair should angle downward rather than extending horizontally.
This creates the heart-like lower contour associated with mature Monstera leaves.
Connecting the Outer Leaf Sections
With deep green, work around the outside perimeter of the leaf.
Use sc along narrow edges, hdc through gradual curves, and dc where extra height is needed.
At each lobe tip work:
(sc, hdc, 2 dc, hdc, sc).
Use sl st in the deepest perimeter splits.
Do not crochet across the major gaps between lobes. Work down one side of a split, anchor near its base, then continue up the neighboring section.
This keeps the outer silhouette deeply divided.
Light-Green Central Midrib
Return to the light-green yarn.
Join at the base of the stem.
Work surface slip stitches along the complete central axis toward the top of the leaf.
Keep each stitch loose enough that the leaf remains flat.
At the upper end, fasten off behind the final lobe.
The raised line should be continuous from the stem through the leaf center.
Raised Secondary Veins
Join light green beside the central midrib at the base of one lobe.
Surface sl st outward toward the lobe tip.
Stop approximately 1–2 cm before the dark-green perimeter.
Fasten off on the reverse side.
Repeat for every major lobe.
Angle each vein toward its corresponding outer point rather than running all branches horizontally.
The lower veins should angle downward; upper branches should angle upward.
Adding the Two-Tone Vein Detail
The photograph uses more light green through the interior than a single line of surface crochet can provide.
For a wider vein, work a second line of surface slip stitches directly beside the first.
Keep both lines close together near the central axis.
Allow them to separate slightly as they approach the lobe.
Do not fill the entire lobe with light green. The dark-green body needs to remain dominant so the vein system reads clearly.
Shaping the Fenestrations
Monstera openings should vary in size. Identical round holes make the motif look geometric rather than botanical.
Keep the upper openings relatively small.
Make the central fenestrations longer and wider.
Reduce their size again toward the lower portion of the leaf.
During blocking, insert one or two pins inside each opening and pull it gently into an elongated oval.
Do not stretch the hole until the connecting bridge becomes narrower than the surrounding stitches.
Strengthening the Stem
If the stem feels too narrow for a 25 cm leaf, join light green at its base.
Work surface sc or slip stitches along one side toward the tip.
Turn and work down the opposite side.
Keep the final 1–2 cm narrow.
This produces the thicker base and tapered upper end visible in the reference.
Assembly and Finishing
- Complete the light-green central foundation and identify the stem and leaf-axis sections.
- Make the upper paired lobes first and compare their dimensions before continuing downward.
- Add the broader middle lobes while preserving the deep external splits.
- Create the paired chain-space fenestrations and keep each opening unobstructed.
- Finish the progressively smaller lower lobes on both sides of the central axis.
- Work the deep-green perimeter without bridging across the major outer splits.
- Add the raised light-green central midrib from the stem to the upper leaf.
- Surface-crochet one light-green secondary vein into every principal lobe.
- Weave all tails into dense stitches on the reverse side, avoiding the open fenestrations.
- Wet-block the motif, pinning the stem, outer lobe tips, deep splits, and every interior opening separately.
The finished motif should have a straight central axis, paired but organically varied lobes, multiple open fenestrations, a deeply split dark-green perimeter, and raised light-green veins.
7 Technical Tips
- Check the central axis after every paired lobe. A sideways displacement greater than about 5 mm indicates unequal stitch tension between the left and right sections.
- Keep the widest middle lobes approximately 15–25% longer than the smallest upper or lower lobes. Equal lobe lengths create a feather shape rather than the broad Monstera silhouette.
- Leave at least several solid stitches between neighboring fenestrations. A bridge that is too narrow can stretch into one oversized hole during blocking.
- Stop each raised secondary vein 1–2 cm before the perimeter. Extending light green directly through the dark outer edge weakens the strong two-color outline.
- Use slip stitches at the deepest outside splits. Filling those valleys with hdc or dc closes the characteristic cut-leaf perimeter.
- Pin every fenestration individually during blocking. Blocking only the outer contour allows the internal holes to collapse into irregular slits.
- Weave tails through at least 4–5 cm of solid crochet. Running a tail beside an open hole can distort that opening when the yarn is tightened.
Choosing Yarn for a Large Monstera Leaf
Cotton is particularly useful for botanical table décor because the finished fabric has enough structure to maintain large openings. A published 25 × 25 cm Monstera centerpiece uses approximately 70 g of 10-ply cotton with a 6 mm hook.
For a smaller motif, DK or medium yarn with a 4–5 mm hook can reduce the scale. One current worsted Monstera square uses a 5 mm hook, while another standalone tutorial uses medium-weight yarn with a 4 mm hook.
Use the same yarn line for both greens. A thinner accent yarn can sink into the dark fabric, while a substantially heavier light green produces bulky raised veins.
Choose a hook that creates firm but flexible stitches. The openings should maintain their shape without making the leaf rigid.
Calculating Yarn Requirements
The published 25 cm standalone reference uses approximately 70 g of yarn. The two-tone reconstruction requires that amount to be divided between the dark body and lighter vein structure rather than treated as a verified color-by-color quantity.
For an accurate calculation, weigh both yarn balls before making the first leaf.
Complete the motif, weave in all ends, then weigh the remaining yarn separately.
Record the dark-green and light-green consumption.
If making four matching placemats, multiply each measured quantity by four and add an allowance for swatching and tension variation.
Keeping the Monstera Leaf Flat
Large lobes can curl if too many tall stitches are concentrated along their outer edges.
Place the motif on a table after every major pair of sections. The leaf should rest without requiring pressure from the hands.
If one lobe ruffles, remove an increase from that section rather than changing the entire motif.
If a lobe cups upward, additional width may be required near its outside curve.
The raised veins must also remain loose. Tight surface crochet can shorten the center axis and pull the complete leaf into a bowl shape.
Blocking the Split Leaf Shape
Dampen the finished motif according to the yarn manufacturer’s care instructions.
Pin the stem first, followed by the upper tip. These two points establish the vertical axis.
Next pin the widest left and right lobes at equal distances from the center.
Add pins to the remaining outer points.
Push each external valley inward to preserve the split perimeter.
Shape every fenestration with separate pins, keeping the holes elongated and slightly irregular.
Do not pin directly through the raised light-green veins. Arrange those lines with the fingers after the dark body has been positioned.
Leave the leaf in place until completely dry.
Using the Finished Monstera Leaf
A 25 cm version can function as a centerpiece, decorative placemat, plant-pot mat, or wall decoration. A smaller version can become a coaster or appliqué.
For a coordinated table set, alternate the color treatment. Make some leaves with emerald bodies and light-green veins, then reverse the two greens on selected motifs.
Several leaves can also be attached to a dowel for a botanical wall hanging. In that application, reinforce the stem and upper center before suspending the motif.
If using the leaf beneath a plant pot, select washable cotton and keep the raised veins low enough that the pot sits securely.
Conclusion
The openings and deep perimeter splits define this crochet monstera leaf pattern more strongly than the overall stitch count. Make one full-size sample first, block it to the intended dimensions, and record the dark- and light-green yarn consumption before producing a set. Keep the central midrib straight, vary the lobe lengths, and shape every fenestration independently rather than making identical holes. Photograph the finished tropical décor for Pinterest or Instagram with #TwoToneMonsteraCrochet. For this specific leaf, would you keep the light-green raised veins or reverse the palette so the veins are dark green over a lighter leaf body?









