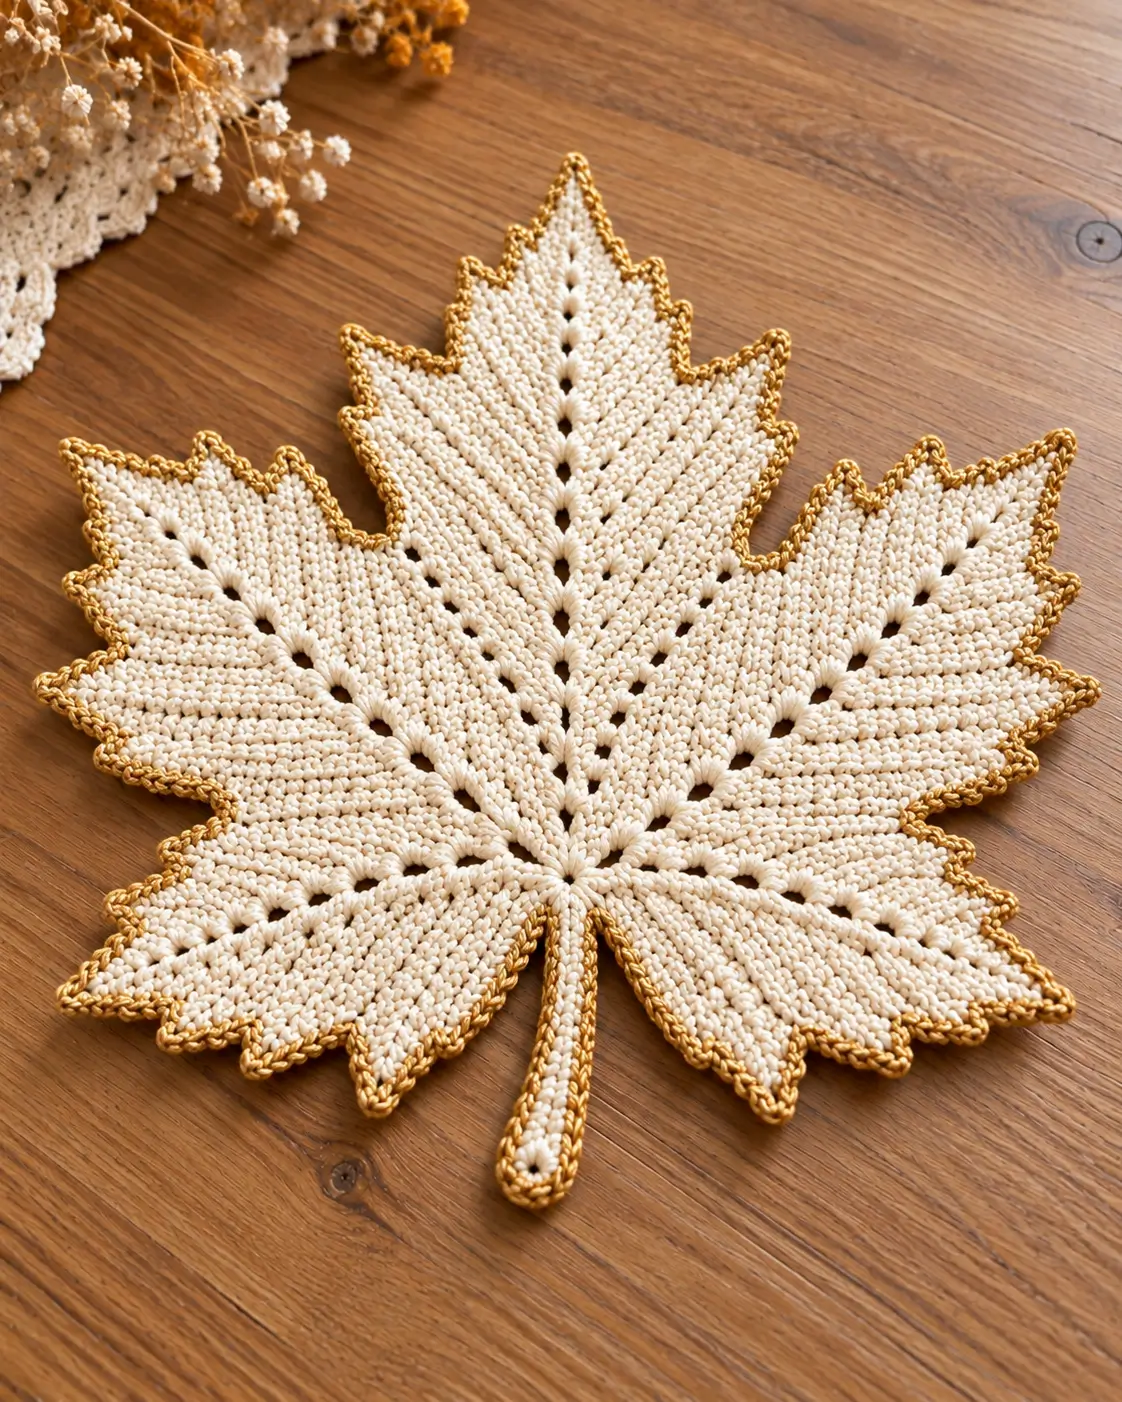
A maple leaf needs five recognizable lobes, deep valleys and a narrow stem; losing any of those proportions turns the silhouette into a generic leaf. This crochet maple leaf placemat pattern builds those features into a flat cream table mat with raised vein lines and contrasting gold edging. Use cotton yarn and a 3.5–4 mm hook for a firm fabric approximately 25–30 cm across.
The Design: What Makes This Maple Leaf Different
The shape depends on three structural details: a long central lobe, two substantial side lobes and two smaller lower lobes. Each section tapers toward a point rather than ending in a rounded edge. Deep valleys between those points create the unmistakable maple-leaf outline.
The second important feature is the vein structure. Open spaces run outward from the center and divide the fabric visually into five sections. Those lines prevent a large field of cream crochet from appearing flat while also providing reference points for shaping.
Finally, a narrow gold border follows every point and indentation. The contrast makes the serrated outline easier to read. A common failure with a crochet maple leaf placemat is adding too many stitches around the border; the finished leaf then ruffles instead of lying flat.
Project Info at a Glance
| Skill Level | Time | Finished Size | Hook | Best For |
|---|---|---|---|---|
| Intermediate | Approx. 4–6 hours | Approx. 25–30 cm wide | 3.5–4 mm | Placemats, centerpieces and fall table decor |
Finished dimensions depend on yarn weight, hook size and tension. Published maple-leaf patterns vary substantially in size, so measure the piece while working rather than relying on row count alone.
Materials and Tools
Yarn
- Cream — worsted-weight 100% cotton — approximately 45–55 g.
- Gold or mustard — worsted-weight 100% cotton — approximately 8–12 g for the edging.
Choose cotton when the finished leaf will be used on a dining table. Cotton gives the points more definition than a highly elastic yarn and is also the appropriate fiber choice when a project may encounter warm serving dishes. Do not substitute acrylic for an item intended to function as a hot pad or trivet.
Tools
- 3.5–4 mm crochet hook
- Stitch markers
- Tapestry needle
- Scissors
- Tape measure
- Blocking pins
- Blocking mat
Abbreviations
- MR — magic ring
- ch — chain
- sc — single crochet
- hdc — half double crochet
- dc — double crochet
- tr — treble crochet
- sl st — slip stitch
- st/sts — stitch/stitches
- sp — space
- sk — skip
- rep — repeat
- BLO — back loop only
Keep decreases compact where two shaped sections meet; bulky decreases make the valleys between the maple points look rounded.
Crochet Maple Leaf Placemat Pattern — Step by Step
This is a photo-inspired construction rather than a transcription of a commercial pattern. The leaf is assembled around a central foundation with five shaped lobes, decorative vein spaces, a stem and a contrasting border.
Central Foundation
Yarn: cream.
Ch 13.
Row 1: Sc in second ch from hook and across (12).
Row 2: Ch 1, turn, sc across (12).
Row 3: Ch 1, turn, 2 sc in first st, sc across to final st, 2 sc in final st (14).
Row 4: Ch 1, turn, sc across (14).
Row 5: Ch 1, turn, 2 sc in first st, sc across to final st, 2 sc in final st (16).
Row 6: Ch 1, turn, sc across (16).
Do not fasten off.
This compact section becomes the lower center of the leaf. Place a marker at its midpoint because the central lobe and stem need to remain aligned with this axis.
Central Maple Lobe
The central lobe should be the longest point in the finished leaf.
Work from the center section upward.
Row 1: Ch 1, sc across the selected center section.
Row 2: Ch 1, turn, 2 sc in first st, sc across, 2 sc in final st.
Row 3: Ch 1, turn, sc across.
Row 4: Repeat Row 2.
Rows 5–8: Work even in sc.
Begin the upper taper.
Row 9: Ch 1, turn, sc2tog, sc across to final 2 sts, sc2tog.
Row 10: Sc across.
Rows 11–16: Repeat Rows 9–10 three times.
Continue decreasing at both edges every other row until 3 stitches remain.
Final Row: Sc3tog.
Fasten off.
The final stitch forms the main upper point. Keep this point centered over the foundation marker.
Left Upper Lobe
Yarn: cream.
Join yarn along the upper-left side of the foundation, leaving a small chain-space valley between this section and the central lobe.
Row 1: Sc evenly across the designated section.
Row 2: Ch 1, turn, 2 sc in first st, sc across, 2 sc in final st.
Row 3: Sc across.
Row 4: Repeat Row 2.
Rows 5–6: Sc across.
Begin tapering.
Row 7: Ch 1, sc2tog, sc across to final 2 sts, sc2tog.
Row 8: Sc across.
Repeat Rows 7–8 until 3 stitches remain.
Final Row: Sc3tog.
Fasten off.
Right Upper Lobe
Work the right upper lobe as a mirror of the left upper lobe.
Count every row. Both upper side lobes need identical row totals or the maple leaf will lean visually toward one side after blocking.
Fasten off.
Left Lower Lobe
Yarn: cream.
The lower lobes should be shorter and broader than the three upper sections.
Join yarn along the lower-left edge of the foundation.
Row 1: Sc evenly across the selected section.
Row 2: Ch 1, turn, 2 sc in first st, sc across, 2 sc in final st.
Row 3: Sc across.
Row 4: Repeat Row 2.
Rows 5–6: Sc across.
Row 7: Ch 1, sc2tog, sc across to final 2 sts, sc2tog.
Row 8: Sc across.
Continue decreasing at each edge every other row until 3 stitches remain.
Final Row: Sc3tog.
Fasten off.
Right Lower Lobe
Repeat the instructions for the left lower lobe on the opposite side.
Compare both sections before adding the border. Their outermost points should sit at approximately the same horizontal level.
Fasten off.
Secondary Points
The photograph has smaller teeth around the five principal lobes. These secondary points are what convert a simple five-lobed leaf into a more detailed maple silhouette.
Join cream yarn along an outer edge.
Work sc along the edge until reaching a marked secondary-point position.
At the point work:
(Hdc, dc, tr, ch 2, sl st in second ch from hook, tr, dc, hdc) in the same edge space.
Continue with sc toward the next marked point.
Repeat the pointed sequence wherever an additional serration is required.
Keep the secondary points smaller than the five primary lobes. The central upper point must remain visually dominant.
Open Vein Lines
The reference leaf contains visible openings running outward from the center. They can be incorporated as chain spaces while shaping the lobes.
At each designated vein position work:
Ch 1, sk 1 st.
On the following row, work around the chain rather than directly into it where a more pronounced opening is required.
Keep the vein openings aligned toward the center junction. Randomly positioned holes will read as lace rather than leaf venation.
Raised Central Vein
Yarn: cream.
Surface crochet can be used to strengthen the main central line.
Insert the hook at the lower center of the leaf and pull up a loop.
Work surface slip stitches upward through the center toward the tip of the main lobe.
Do not pull the slip stitches tightly. Excessive tension will fold the leaf along its center.
Fasten off on the back.
Side Veins
Work one surface-crochet line from the center toward each major side lobe.
Follow the existing chain-space openings rather than crossing them.
Each side vein should terminate before the outermost point. Stopping approximately 1–2 cm before the border keeps the vein from distorting the pointed edge.
Maple Leaf Stem
Yarn: cream.
Join yarn at the bottom center of the leaf.
Ch 22.
Starting in the second chain from the hook, sc in each chain back toward the leaf.
Turn and work sc along the opposite side of the foundation chain.
At the stem tip, work 3 sc around the end to create a rounded finish.
Join to the base of the leaf with sl st.
Fasten off.
For a wider stem, work one additional round of sc around the entire piece before adding the contrasting border.
Gold Contrast Edging
Yarn: gold or mustard.
Join the contrast yarn at the bottom of the stem.
Work one round of sc evenly around the entire stem and leaf.
At each sharp outer point, work:
(Sc, ch 2, sc) in the point stitch or space.
At each deep inner valley, use sc2tog across the two neighboring edge stitches when necessary.
Continue around every lobe and secondary point.
Join with sl st when you return to the beginning.
Fasten off and weave the tail into the back of the work.
The contrast round should trace the silhouette without substantially increasing its dimensions.
How to Block the Maple Leaf
Blocking is a structural step for this design because five large lobes, multiple smaller points and deep valleys need to remain distinct.
- Wet or damp-block according to the care instructions for the selected cotton yarn.
- Place the leaf face up on a blocking mat.
- Pin the center first so the main axis remains straight.
- Pull the central lobe upward and pin its final point.
- Pin the left and right upper lobes at equal angles.
- Position both lower lobes symmetrically.
- Pin every secondary point individually.
- Push the inner valleys toward the center before pinning them.
- Straighten the stem with two or three pins.
- Allow the leaf to dry completely before removing any pins.
The completed piece should lie flat with five clearly separated primary lobes, visible vein lines, crisp secondary points and a straight central stem.
7 Technical Tips for a Better Crochet Maple Leaf
- Prevent rounded maple points. Finish each major lobe with approximately three stitches before closing to one point. Leaving five or more stitches at the tip produces a noticeably blunt end.
- Control a ruffled gold border. Do not add extra stitches along every edge stitch. Reserve increases for the outer points and use decreases inside deep valleys when the border starts to wave.
- Keep the central lobe dominant. Measure it before finishing the side sections. The top lobe should extend farther from the center than either upper side lobe.
- Stop the leaf from cupping. Surface slip stitches used for veins must remain loose enough for the fabric underneath to lie flat. Tight surface crochet pulls the surrounding fabric inward.
- Match the side lobes. Record the exact number of rows used for the first upper and lower lobes. A difference of two rows can become obvious after the points are blocked.
- Protect the deep valleys. Pin each indentation during blocking rather than pinning only the outside points. Without inward pinning, the valleys relax and the maple silhouette becomes less distinct.
- Control the stem width. Keep the stem near 1.5–2 cm wide for a 25–30 cm leaf. A substantially wider stem can overpower the lower lobes and change the proportions of the finished placemat.
Using the Maple Leaf as a Placemat or Table Decoration
The finished leaf works as an individual fall placemat, centerpiece layer or decorative table mat. A set can be worked in cream with identical gold borders, or the main color can be changed while keeping one consistent edging color.
For placemat use, make every leaf from the same yarn, hook and recorded row counts. Small differences in gauge become much more obvious when several pieces are arranged around one table.
If the project will sit beneath hot cookware rather than ordinary plates, use 100% cotton and make the fabric sufficiently thick for the intended temperature. A decorative placemat should not automatically be treated as a heat-rated trivet.
How to Adjust the Size
For a smaller maple-leaf mat, use sport-weight cotton and a 3–3.5 mm hook. A published sport-cotton maple leaf made with a 3.5 mm hook measures about 18 × 15 cm, demonstrating how yarn choice can reduce the finished footprint substantially.
For a larger placemat, use worsted or aran cotton while preserving the same proportions between the five lobes. Do not enlarge only the center section. Every lobe, vein and stem must increase proportionally or the finished shape will become narrow and elongated.
A useful target for the design shown here is approximately 25–30 cm across. Measure from the farthest left point to the farthest right point after blocking.
Finishing the Crochet Maple Leaf Placemat
Turn the piece over and inspect every yarn tail. Weave cream tails into cream sections and the gold edging tail through the border so no contrasting strand crosses the back of the main fabric.
Check every outer point after the final blocking. A single folded point can make the finished outline look asymmetrical even when the underlying stitch counts match.
The gold border should remain narrow. Its function is to define the maple silhouette rather than create another substantial band around the leaf.
Conclusion
Check the five primary lobes before adding the gold edging because border stitches can sharpen an existing point but cannot correct incorrect proportions underneath. Block the cream leaf first if necessary, compare the two upper side lobes and two lower lobes, then complete the contrast round. For a coordinated table set, record the row count of every section before starting the second piece. Save this crochet maple leaf placemat pattern to Pinterest or share the finished table setting on Instagram with #GoldEdgeMapleLeaf. The most useful next adjustment is the border color: would you keep the gold outline shown here or replace it with rust, dark brown or autumn red?









