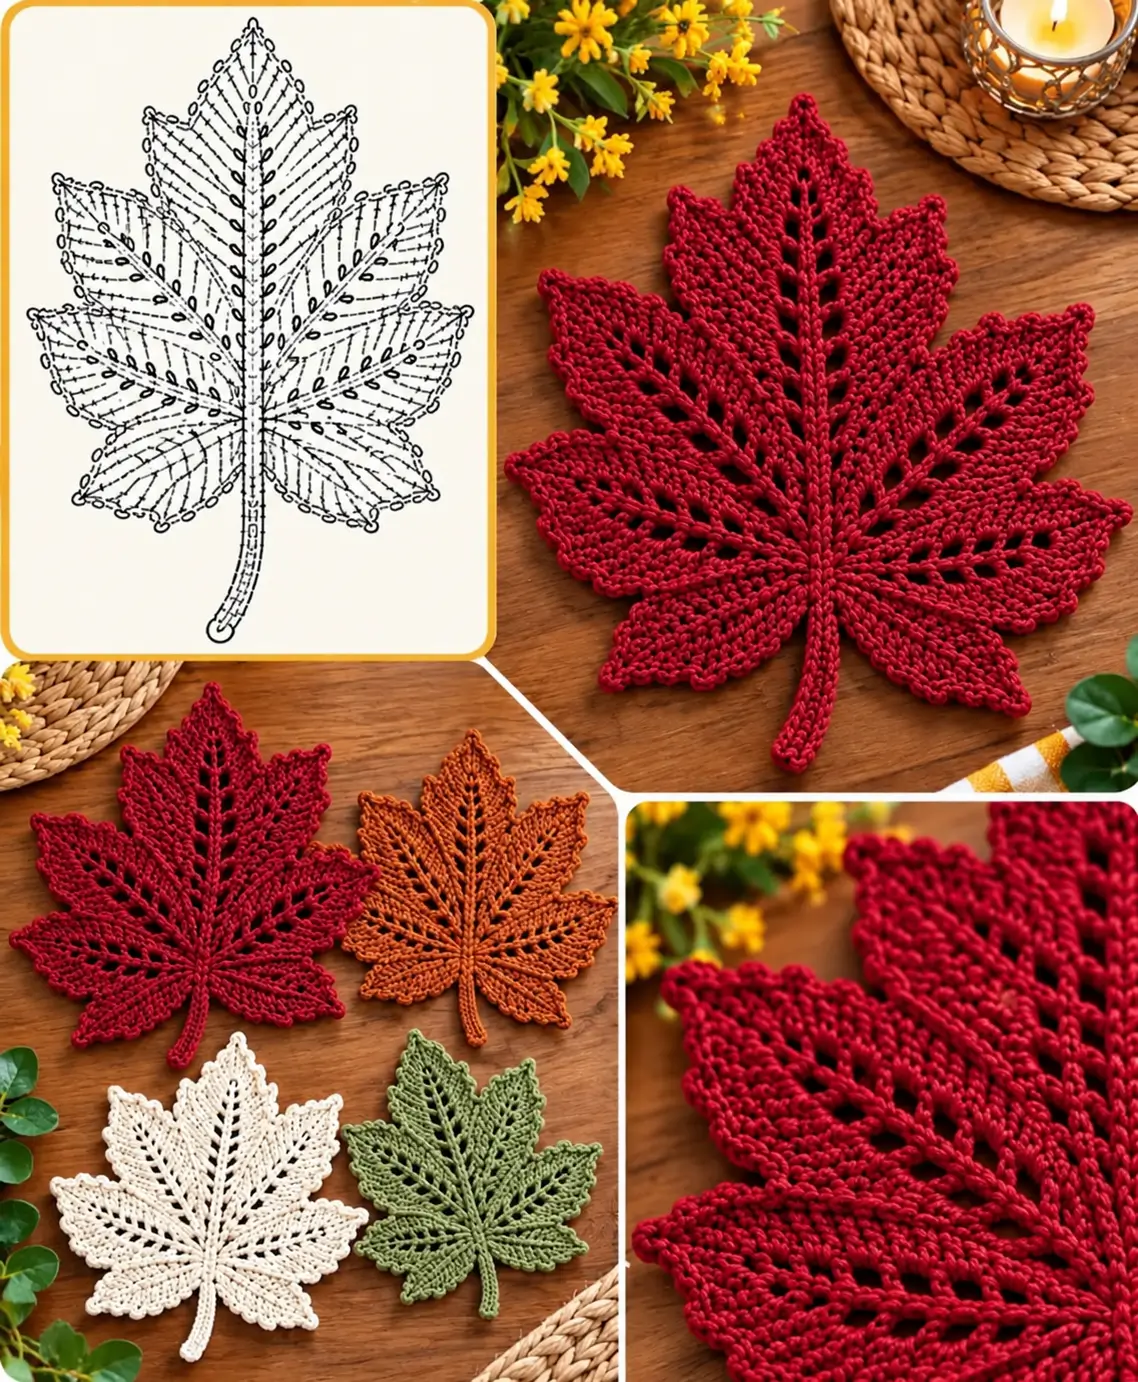
Five unequal points are what make a maple leaf recognizable; make them the same height and the silhouette immediately loses its botanical structure. This crochet maple leaf pattern uses a compact center, graduated stitches, open vein spaces and a narrow stem to reproduce the deeply divided shape shown in the reference. Worked in cotton with a 4 mm hook, the finished leaf measures approximately 15–17 cm across.
The Design: What Makes This Maple Leaf Different
The reference leaf is built around one dominant center lobe, two medium upper side lobes and two broader lower lobes. Smaller points between those major sections create the serrated maple outline. That hierarchy matters more than simply adding five identical points.
Open spaces running beside the central and branching veins reduce bulk while making the structure visible. The outer edge uses shorter stitches near each valley and progressively taller stitches toward each point. This creates the angular outline of a crochet maple leaf coaster without requiring separate pieces.
A common mistake is making every lobe equally long. The central point should clearly extend beyond the neighboring points. Another frequent problem is tight chain spaces along the veins, which can pull the finished leaf into a cup instead of allowing it to lie flat.
Project Info at a Glance
| Skill Level | Time | Finished Size | Hook | Best For |
|---|---|---|---|---|
| Intermediate | 60–90 minutes | Approx. 15–17 cm | 4 mm | Coasters, table decor, garlands, appliqués |
The exact finished measurement depends on yarn thickness and tension. Use the dimensions as a target rather than an absolute gauge requirement. A slightly smaller hook produces firmer fabric for coaster use, while a larger hook creates a softer decorative leaf.
Materials and Tools
Yarn
- Burgundy/red: DK or light worsted cotton yarn — approximately 20–30 g per leaf.
The photographed design also works well in burnt orange, cream, olive green, mustard and brown. Use the same yarn weight when making a coordinated set so every finished leaf has similar dimensions.
Cotton is particularly practical for coaster and table-mat versions because it produces defined points and a relatively firm surface. Acrylic can be substituted for decorative leaves that will not regularly sit beneath hot drinkware.
Tools
- 4 mm crochet hook
- 2 stitch markers
- Tapestry needle
- Scissors
- Blocking mat
- Rust-resistant blocking pins
- Measuring tape
Abbreviations
- MR — magic ring
- ch — chain
- sl st — slip stitch
- sc — single crochet
- hdc — half double crochet
- dc — double crochet
- tr — treble crochet
- dtr — double treble crochet
- st/sts — stitch/stitches
- sp — space
- RS — right side
Keep slip stitches relaxed wherever they form part of a vein or valley; tight slip stitches can contract one section of the leaf and distort its symmetry.
Crochet Maple Leaf Pattern — Step by Step
The leaf is constructed from a small central foundation. Five major lobes radiate outward from this center. The middle lobe is longest, the two upper side lobes are slightly shorter, and the two lower lobes are broader and shorter.
Central Foundation
Yarn: burgundy/red.
Rnd 1: Make a MR. Ch 1 and work 10 sc into the ring. Pull the ring closed. Join with sl st. (10)
Rnd 2: Ch 1. Work 2 sc in each stitch around. Join with sl st. (20)
Rnd 3: Ch 1. [Sc 1, 2 sc in next st] ×10. Join with sl st. (30)
Do not fasten off.
The 30-stitch center acts as the anchor for the five primary leaf sections. At this stage the piece should remain completely flat.
Center Maple Leaf Lobe
The central lobe is the tallest point and establishes the vertical axis of the finished leaf.
From the current position:
Row 1: Ch 13.
Working back along the chain, begin in the second chain from the hook:
Sl st, sc, sc, hdc, hdc, dc, dc, tr, tr, dc, hdc, sc.
Sl st into the next available stitch of the central foundation.
Turn the work.
Row 2: Work up the opposite side of the foundation with sc, hdc, dc, tr, tr, dc, dc, hdc, hdc, sc and sl st toward the point.
At the tip, ch 3 and sl st into the first chain to form a small picot.
Work back toward the center using mirrored stitch heights.
Secure with sl st at the base.
The completed center point should extend approximately 6–7 cm from the central ring before blocking.
Left Upper Lobe
Skip one stitch along the center and join into the next available stitch.
Row 1: Ch 10.
Starting in the second chain from the hook, work:
Sl st, sc, hdc, hdc, dc, tr, tr, dc, sc.
Attach to the foundation with sl st.
Row 2: Work back along the opposite side using sc, dc, tr, tr, dc, hdc, hdc, sc and sl st.
At the point, ch 3 and sl st into the first chain.
Return down the opposite edge using the same stitch progression.
Sl st at the base.
Right Upper Lobe
Repeat the construction used for the left upper lobe on the opposite side of the central point.
Foundation: Ch 10.
First side: Sl st, sc, hdc, hdc, dc, tr, tr, dc, sc.
Point: Ch 3, sl st into first chain.
Second side: Mirror the stitch sequence back toward the center.
Secure with sl st.
Compare the two upper lobes before continuing. Their points should sit at approximately equal distances from the center.
Left Lower Lobe
The lower lobes should be broader than the upper side lobes but slightly shorter.
Foundation: Ch 9.
Beginning in the second chain from the hook:
Row 1: Sc, hdc, dc, dc, tr, dc, hdc, sc.
Attach to the central foundation with sl st.
Row 2: Work back along the opposite edge with sc, hdc, dc, tr, dc, dc, hdc and sc.
At the point, ch 2 and sl st into the first chain.
Return to the center using the mirrored stitch sequence.
Sl st securely at the base.
Right Lower Lobe
Repeat the left lower lobe construction on the opposite side.
Foundation: Ch 9.
First side: Sc, hdc, dc, dc, tr, dc, hdc, sc.
Point: Ch 2, sl st into the first chain.
Second side: Mirror the stitch sequence toward the center.
Secure with sl st.
Small Intermediate Point 1
The reference design contains smaller serrated points between the five dominant lobes. These prevent the finished outline from looking like a simple five-petal flower.
Join yarn in the valley between the center lobe and left upper lobe.
Small Point: Ch 5.
Beginning in second chain from hook, work sc, hdc, dc, sc.
Ch 2 and sl st into the first chain to sharpen the tip.
Work down the opposite side with sc, dc, hdc and sc.
Sl st into the valley.
Small Intermediate Point 2
Repeat the same construction between the center lobe and right upper lobe.
Foundation: Ch 5.
Side 1: Sc, hdc, dc, sc.
Tip: Ch 2, sl st.
Side 2: Sc, dc, hdc, sc.
Secure at the valley.
Small Intermediate Point 3
Work another small point between the left upper and left lower lobes.
Use the same ch-5 construction.
Keep this point slightly relaxed so it spreads outward rather than folding behind the neighboring lobes.
Small Intermediate Point 4
Repeat between the right upper and right lower lobes.
Compare both sides from directly above before continuing.
Outer Edge
Join yarn at the base of the left lower lobe.
Work one round of sc evenly around the complete outer silhouette.
At every major pointed tip, work:
Sc, ch 2, sc into the tip space.
At each smaller intermediate point, work:
Sc, ch 1, sc into the tip.
In each deep valley between lobes, work one sl st instead of sc.
This difference in stitch height sharpens the valleys and keeps the points visually separate.
Continue until the entire leaf edge has been covered.
Do not fasten off if the stem will be worked immediately.
Stem
The stem should extend directly away from the center lobe.
From the bottom center of the leaf:
Stem Foundation: Ch 14.
Beginning in the second chain from the hook, sl st in the first 2 chains.
Sc in the next 9 chains.
Sl st in the final 2 chains.
Attach to the leaf center with sl st.
Turn.
Work one additional row of sl st or loose sc along the opposite side of the stem.
Fasten off, leaving a 10–12 cm yarn tail.
Adding the Raised Center Vein
The pronounced center vein is one of the most important visual features in the reference. Surface crochet provides this structure without adding a separate sewn cord.
Place the leaf right side up.
Insert the hook near the base of the stem and bring a loop of yarn through from the back.
Surface sl st in a straight line through the center of the leaf toward the highest point.
Space the stitches approximately 4–5 mm apart.
Stop one stitch before the center-lobe tip.
Fasten off on the back.
The surface chain should rest on the fabric. It should not pull the leaf inward.
Adding the Side Veins
The reference leaf has branching veins extending from the central line toward the major lobes.
Join yarn approximately one-third of the way up the central vein.
Surface sl st diagonally toward the left lower lobe.
Stop approximately 1 cm before its outer point.
Fasten off.
Repeat toward the right lower lobe.
Add another pair of branches toward the two upper side lobes.
The final pair should begin higher on the central vein than the first pair. This creates the branching structure associated with a maple leaf rather than five unrelated decorative sections.
Creating the Open Vein Spaces
For a more openwork version like the photographed leaf, replace selected stitches beside each vein with chain spaces.
On a future leaf, substitute:
Ch 1, skip 1 stitch
for individual stitches positioned along both sides of the major vein lines.
On the following row, crochet into the chain space instead of the skipped stitch.
Keep the holes narrow. Large chain spaces reduce the stability required for coaster use and can make the lobe edges collapse inward.
Blocking the Maple Leaf
- Place the completed leaf right side up on a blocking mat.
- Pin the central lobe first and align it directly opposite the stem.
- Pin the left and right upper lobes at equal angles from the center.
- Pull the two lower lobes outward until the leaf reaches approximately 15–17 cm across.
- Pin every small intermediate point separately instead of allowing it to overlap a larger lobe.
- Shape each valley inward by approximately 1–2 cm to emphasize the divided silhouette.
- Straighten the central vein and check that the stem continues along the same axis.
- Dampen the cotton according to its care instructions.
- Leave the leaf pinned until completely dry.
- Remove the pins and weave all remaining tails through matching stitches on the back.
The blocked leaf should have one dominant center point, four major side lobes, four smaller intermediate points and one narrow stem.
How to Keep the Maple Leaf Flat
A finished crochet maple leaf should lie flat without pressure. Cupping usually begins at the lobe bases, where several tall stitches are concentrated into a relatively small area.
If the center rises more than approximately 5 mm from a hard surface, inspect the chain spaces first. Tight chains often contract the surrounding fabric.
Another cause is a hook that is too small for the selected cotton. Moving from a 3.5 mm to a 4 mm hook can provide enough additional flexibility without substantially changing the overall dimensions.
Rippling indicates the opposite problem. Reduce unnecessary increases or move down approximately 0.5 mm in hook size.
How to Make Sharp Maple Leaf Points
The reference depends on narrow, defined tips. Simply placing several tall stitches into one location tends to create a rounded fan.
Use a small chain picot at each major tip. The center lobe can take a ch-3 point, while smaller lobes can use ch 2.
During blocking, place the pin through the picot rather than through a treble crochet stitch. Pull only until the stitch structure becomes straight.
Excessive stretching produces long, thin points that no longer match the proportions of the rest of the leaf.
Making the Leaf as a Coaster
Use cotton yarn and maintain a relatively dense stitch structure when the leaf will sit beneath mugs or glasses.
The center and lower lobes form the main contact surface. Decorative open spaces should remain narrow enough that the base of a cup rests primarily on crochet fabric.
A finished width around 13–15 cm works well for many coaster applications. The 15–17 cm version described here provides a more dramatic decorative border around an average mug.
Make one sample before crocheting a complete set. Place the intended mug on the blocked leaf and check that its base does not rock across raised surface-crochet veins.
Making a Smaller Maple Leaf Appliqué
For an appliqué, substitute sport or fingering-weight cotton and use approximately a 2.5–3 mm hook.
The construction can remain unchanged. The thinner yarn reduces the overall dimensions while preserving the five-lobe silhouette.
Leave a 25 cm yarn tail after completing the stem. Use this tail to sew the center of the leaf to a bag, blanket, hat or other crocheted fabric.
Do not sew every outer point flat unless a completely flat appliqué is required. Allowing the tips to remain free gives the leaf more visible definition.
Making a Larger Maple Leaf Table Mat
For a larger decorative mat, use worsted or Aran cotton with a 5–5.5 mm hook.
Test the center before completing all five lobes. Heavier yarn magnifies small tension differences, particularly around the valleys.
Keep the stem relatively short. Increasing the stem at exactly the same ratio as the leaf can create an unnecessarily long section that curls beneath the finished mat.
Color Variations
Deep burgundy most closely reproduces the primary leaf shown in the reference.
Burnt orange produces a traditional late-autumn variation.
Olive green works for an earlier-season maple leaf.
Cream emphasizes the openwork veins and stitch structure rather than botanical realism.
Mustard creates a high-contrast fall table setting when paired with burgundy and rust leaves.
For a coordinated set, keep the yarn brand, hook size and blocked dimensions identical across every color.
7 Technical Tips for Better Crochet Maple Leaves
- Measure the center point. The central lobe should extend approximately 1–2 cm beyond the neighboring upper lobes. Equal-height lobes make the finished piece resemble a five-point flower rather than a maple leaf.
- Keep the stem centered. Align the stem with the center lobe before blocking. A displacement of even 1 cm is easy to see because the vein creates a strong visual axis.
- Control valley tension. Use a relaxed slip stitch at every deep valley. Tight valley stitches pull neighboring lobes together and cause the leaf to cup.
- Limit openwork holes. Keep vein openings approximately 5–8 mm wide on a coaster-sized leaf. Larger holes can leave insufficient support beneath a cup.
- Pin every major point. Use at least nine shaping pins: five for the primary lobes and four for the smaller intermediate points. Pinning only the largest points produces uneven serrations.
- Check surface-crochet tension. The raised center vein should remain the same length as the fabric underneath it. A surface chain that is even 5% shorter can make the center buckle.
- Weave tails along matching structures. Run each yarn tail through at least 4–5 cm of stitches on the back. Avoid carrying tails across the open vein spaces, where they can become visible from the front.
Washing and Reshaping
Follow the care instructions printed on the selected yarn label.
After washing, place the damp leaf on a flat towel or blocking mat. Align the center point and stem first, then reshape the upper and lower side lobes.
Pull the intermediate points outward only enough to restore their definition. Re-form each deep valley with your fingers before leaving the piece to dry flat.
Repeated high-temperature treatment can alter some fibers, so the yarn manufacturer’s instructions take priority over general blocking methods.
Finishing the Crochet Maple Leaf
The strongest maple silhouette comes from controlling unequal lobe heights rather than making five identical points. Crochet one complete test leaf first, block it to approximately 15–17 cm and inspect the center before producing a matching set. The highest lobe should remain directly opposite the stem, the side lobes should mirror one another, and the raised vein stitches should lie flat without contracting the fabric.
Your next step is to make one burgundy sample and record its blocked width, height and yarn consumption. Save the finished crochet maple leaf pattern to Pinterest and share the completed color set on Instagram with #TexturedMapleLeafCrochet. Which version would you make first from the reference: burgundy, burnt orange, cream or olive green?









