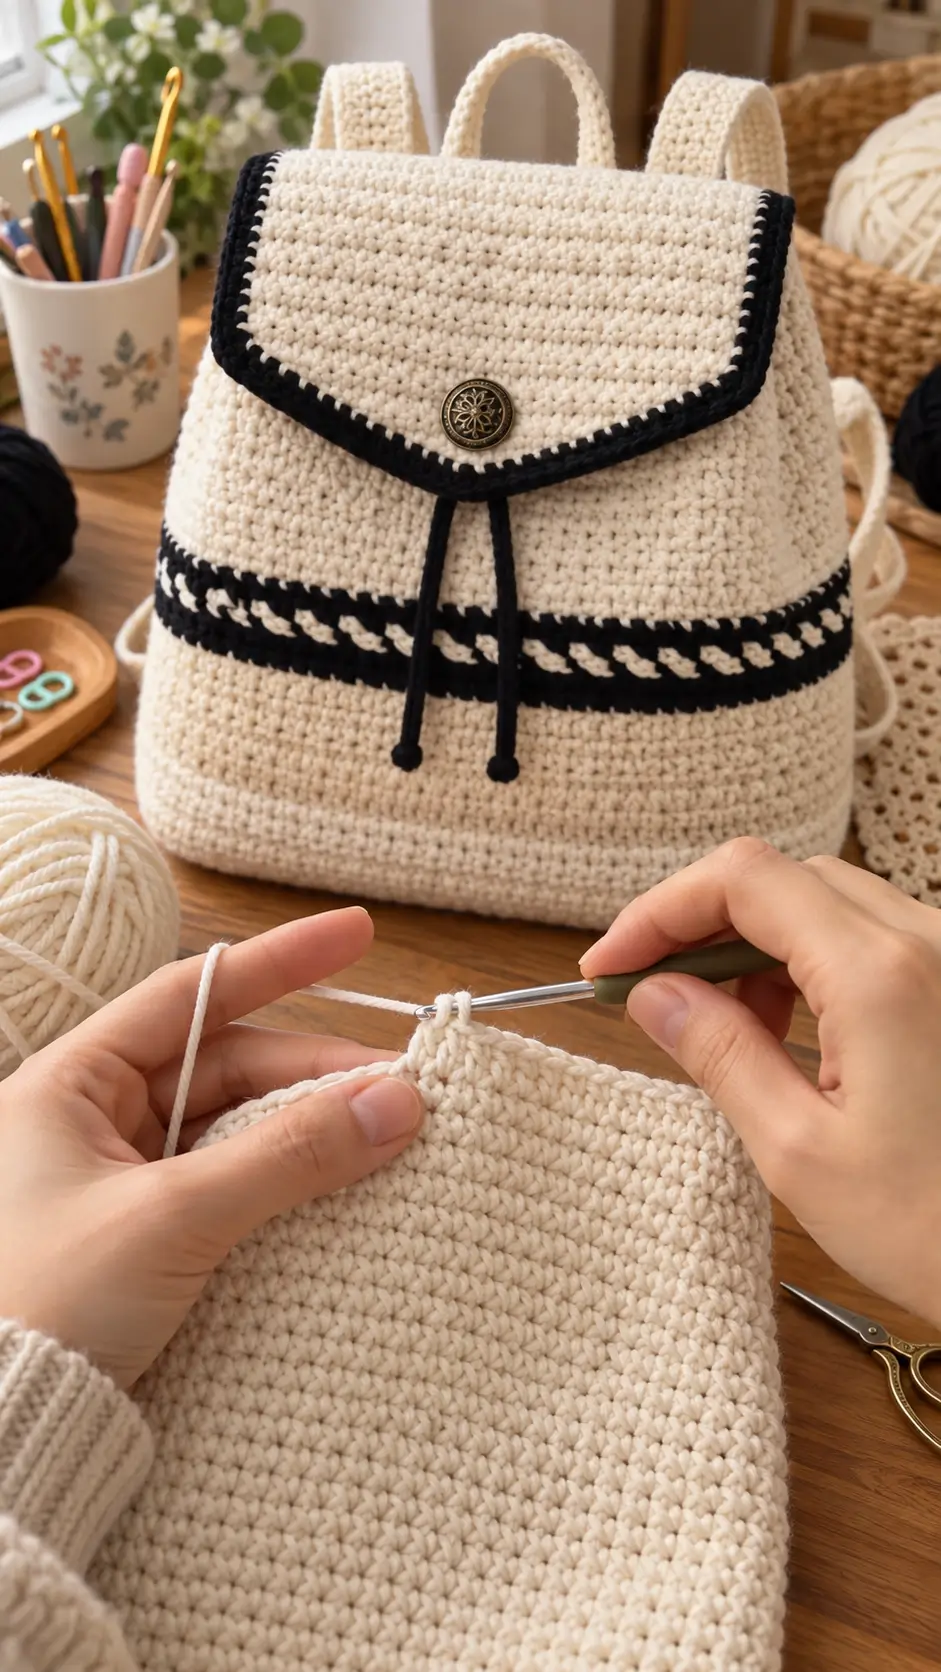
A backpack fails as a backpack if its crocheted base stretches farther than its flap can control. This crochet backpack pattern tackles that problem with dense worsted-weight fabric, a shaped closure, and reinforced straps. Plan for a finished bag near 25 × 30 × 12 cm using a 5 mm hook and intermediate-level construction. The compact dimensions make it practical for carrying small daily items without building an oversized crochet shell.
The Design: What Makes This Backpack Different
Three structural decisions define this cream-and-black rucksack. First, the body uses dense stitches because an open fabric expands under load and lets small objects distort the walls. Second, the flap extends well below the opening; that overlap helps control the mouth of the bag while creating the strong cream-and-black outline visible in the design. Third, the shoulder straps attach across broad areas instead of single points so pulling force is distributed through several stitches.
A common mistake in an easy crochet backpack is treating strap attachment like amigurumi assembly. A bag carries repeated directional load, so a few whip stitches are inadequate. This two-tone crochet backpack also needs the black decorative band positioned level before the flap is installed. Once the flap and straps are attached, correcting a crooked band becomes considerably harder.
Project Info at a Glance
| Skill Level | Time | Finished Size | Hook | Best For |
|---|---|---|---|---|
| Intermediate | 15–20 hours | Approx. 25 × 30 × 12 cm | 5.0 mm | Everyday lightweight backpack |
Materials and Tools
Yarn
- Cream/ecru: worsted/#4 cotton or cotton blend — plan approximately 300 g as a starting quantity.
- Black: matching worsted/#4 cotton or cotton blend — approximately 30–45 g for the border, decorative band, closure, and cord ends.
- Suggested yarn: a firm worsted cotton such as Lily Sugar’n Cream, Bernat Handicrafter Cotton, Knit Picks Dishie, or a comparable yarn that produces dense stitches.
The exact yarn requirement depends on gauge, strap length, yarn composition, and the number of body rounds. Buying a little extra cream yarn is useful because the body, flap, handle, and two shoulder straps all use the main color.
Tools
- 5.0 mm crochet hook
- 20–25 mm decorative button
- Tapestry needle
- Locking stitch markers
- Scissors
- Pins or removable clips
- Tape measure
- Optional fabric lining
- Optional plastic canvas or firm base insert
Abbreviations
- MR — magic ring
- sc — single crochet
- inc — 2 single crochet in one stitch
- dec — single crochet decrease
- sl st — slip stitch
- ch — chain
- BLO — back loop only
- FLO — front loop only
- st/sts — stitch/stitches
- RS — right side
- WS — wrong side
For an invisible decrease, insert the hook through the front loops of the next two stitches before completing one single crochet. This reduces visible bulk on the right side.
Crochet Backpack Pattern — Step by Step
The backpack is predominantly rectangular, so the construction uses rows and rectangular rounds instead of the circular increases normally associated with amigurumi. Keep your tension firm and consistent so the completed backpack can maintain its shape.
Backpack Base
Yarn: cream/ecru.
Ch 31.
Row 1: sc in second ch from hook and across (30).
Row 2: ch 1, turn, sc across (30).
Rows 3–8: ch 1, turn, sc across (30).
The finished base should form a firm rectangle. If the rectangle curves strongly, the foundation chain is probably tighter than the following rows.
Do not fasten off if you want to continue directly into the backpack body.
Main Backpack Body
Yarn: cream/ecru.
Work evenly around the rectangular base. Use approximately 30 stitches along each long edge and 8 stitches along each short edge.
Rnd 1: sc evenly around the base (76).
Rnd 2: BLO sc around (76).
Rnd 3: sc around (76).
Rnd 4: sc around (76).
Rnd 5: sc around (76).
Rnd 6: sc around (76).
Rnd 7: sc around (76).
Rnd 8: sc around (76).
Rnd 9: sc around (76).
Rnd 10: sc around (76).
Rnd 11: sc around (76).
Rnd 12: sc around (76).
Rnd 13: sc around (76).
Rnd 14: sc around (76).
Rnd 15: sc around (76).
Rnd 16: sc around (76).
Rnd 17: sc around (76).
Rnd 18: sc around (76).
Rnd 19: sc around (76).
Rnd 20: sc around (76).
Rnd 21: sc around (76).
Rnd 22: sc around (76).
Rnd 23: sc around (76).
Rnd 24: sc around (76).
Rnd 25: sc around (76).
Rnd 26: sc around (76).
Rnd 27: sc around (76).
Rnd 28: sc around (76).
Rnd 29: sc around (76).
Rnd 30: sc around (76).
Rnd 31: sc around (76).
Rnd 32: sc around (76).
Rnd 33: sc around (76).
Rnd 34: sc around (76).
Rnd 35: sc around (76).
Rnd 36: sc around (76).
Rnd 37: sc around (76).
Rnd 38: sc around (76).
Rnd 39: sc around (76).
Rnd 40: sc around (76).
Rnd 41: sc around (76).
Rnd 42: sc around (76).
Keep the beginning of each round at the center back where possible. The flap will help conceal the transition.
Measure the backpack rather than relying only on the number of rounds. The body should measure approximately 26–27 cm tall before the upper finishing edge.
Fasten off.
Black and Cream Decorative Band
Yarn: black and cream.
Position the decorative band approximately one-third of the way up the backpack body.
Band R1: join black and work sc or surface sl st evenly around (76).
Band R2: sc around with black (76).
Band R3: add evenly spaced cream accent stitches while maintaining 76 working positions.
Band R4: sc around with black (76).
The cream stitches should create a broken horizontal line inside the wider black band. Surface crochet can also be used after completing the main body if you do not want the decorative section to affect the bag circumference.
Fasten off and weave the yarn ends toward the inside.
Front Flap
Yarn: cream/ecru.
Ch 39.
Row 1: sc in second ch from hook and across (38).
Row 2: ch 1, turn, sc across (38).
Rows 3–18: ch 1, turn, sc across (38).
Begin shaping the lower section.
Row 19: dec, sc 34, dec (36).
Row 20: sc across (36).
Row 21: dec, sc 32, dec (34).
Row 22: sc across (34).
Row 23: dec, sc 30, dec (32).
Row 24: sc across (32).
Row 25: dec, sc 28, dec (30).
Row 26: sc across (30).
Fasten off.
Pin the flap against the backpack before adding its border. It should cover most of the front opening without extending excessively beyond the side walls.
Black Flap Border
Yarn: black.
Join the black yarn at one upper corner of the flap.
Border R1: sc evenly down the first side, work 2–3 sc around each lower corner as required, continue across the shaped lower edge, then sc evenly up the opposite side.
Border R2: sc or sl st evenly around the three exposed flap edges.
Watch the shape while working the border. Excess stitches around the corners cause ruffling, while too few stitches pull the flap inward.
Fasten off and leave approximately a 25 cm sewing tail.
Shoulder Straps — Make 2
Yarn: cream/ecru.
Ch 7.
Row 1: sc in second ch from hook and across (6).
Rows 2–85: ch 1, turn, sc across (6).
Test the strap length against the intended wearer before fastening off. Add or remove rows where required.
For a firmer strap, sew cotton webbing to the hidden side. This reduces lengthwise stretching when the backpack is carrying weight.
Fasten off and leave a 30 cm sewing tail at each end.
Top Carrying Handle
Yarn: cream/ecru.
Ch 36.
Row 1: sc in second ch from hook and across (35).
Row 2: ch 1, turn, sc across (35).
Row 3: ch 1, turn, sc across (35).
For a thicker handle, fold the strip lengthwise and seam the long edges together. The finished piece should form a compact arch at the top of the backpack rather than a long shoulder loop.
Fasten off and leave approximately 25 cm at both ends for sewing.
Black Closure Cord
Yarn: black.
Ch 80.
Row 1: sl st in second ch from hook and through every remaining chain (79).
The completed cord should measure approximately 45–55 cm. Adjust the foundation chain if necessary.
Fasten off.
Cord End Stops — Make 2
Yarn: black.
R1: 6 sc in MR (6).
R2: sc around (6).
Insert one end of the closure cord. Pull the crocheted piece tightly around it and stitch through the cord several times so the end stop cannot slide off.
Fasten off and hide the remaining tail inside the small piece.
Button Closure Loop
Yarn: black.
Ch 18.
Row 1: sl st in second ch from hook and across (17).
Fasten off and leave a 20 cm sewing tail.
Form the strip into a narrow loop. Test it around the selected button before sewing the loop permanently to the backpack.
Decorative Button
Use a decorative button approximately 20–25 mm across. Position it on the vertical centerline of the flap, roughly 3–5 cm above its lowest point.
For a metal button with a narrow shank, strong sewing thread is more suitable than thick crochet yarn. A small piece of fabric or felt can also be stitched behind the button as reinforcement.
Assembly
- Block the cream backpack body to the intended dimensions and check that both side walls are the same height.
- Center the flap on the back edge. Pin the entire upper edge before sewing.
- Sew the flap securely to the body with two passes through the attachment area.
- Center the decorative button on the flap and secure it through reinforced fabric.
- Position the black closure cord or button loop and test the closed flap before permanently securing it.
- Pin both shoulder straps to the upper back with equal spacing from the vertical centerline.
- Attach the lower strap ends close to the lower back corners. Stitch across several centimeters rather than through a single stitch.
- Center the carrying handle between the two shoulder straps and sew both ends firmly to the upper body.
- Inspect the black-and-cream decorative band from every side. Correct any loose or uneven stitches before hiding the yarn tails.
- Weave structural tails through several directional changes. Test the backpack with a light load before trimming the final ends or installing an optional lining.
The completed backpack should have a defined rectangular body, centered flap, level decorative stripe, balanced handle, and symmetrical shoulder straps.
7 Technical Tips for a Better Crochet Backpack
- Mark the beginning of every body round. Losing the starting position can move the rear seam several centimeters sideways before the backpack reaches its full height.
- Check the body after every 10 rounds. If the circumference begins expanding even though the stitch count remains at 76, the working tension is becoming looser.
- Use invisible decreases on the shaped flap. Loose conventional decreases can create visible openings along the cream edge, particularly when black trim is added beside them.
- Measure the button from the flap centerline. A placement error of only 10–15 mm can become noticeable because the closure cord creates a strong vertical reference.
- Keep the fabric dense. If individual stitches open significantly when the bag is lightly stretched, reduce the hook by 0.5 mm and make another gauge sample.
- Pin each shoulder strap across at least 3–4 cm of fabric. Attaching a strap through one or two stitches concentrates the load and can distort the upper and lower corners.
- Weave structural tails in multiple directions. Strap, handle, and flap tails worked only parallel to a seam can gradually pull backward when the backpack is repeatedly loaded.
Finishing the Crochet Backpack
Before cutting the final yarn tail, load the backpack lightly and inspect the four shoulder-strap attachment points, handle joins, decorative band, and flap alignment. Any distortion should be corrected before installing a fabric lining.
For the next step, crochet a 10 cm gauge swatch using your chosen worsted cotton and 5 mm hook. Compare its density with the intended 25 × 30 × 12 cm dimensions, then adjust the foundation chain if required.
Save this crochet backpack pattern to Pinterest with clear front-and-back photographs, and share your finished backpack on Instagram using #CreamBlackCrochetBackpack.
Which detail would you change on this backpack: the width of the black-and-cream band, the flap border, or the length of the shoulder straps?









