Introduction
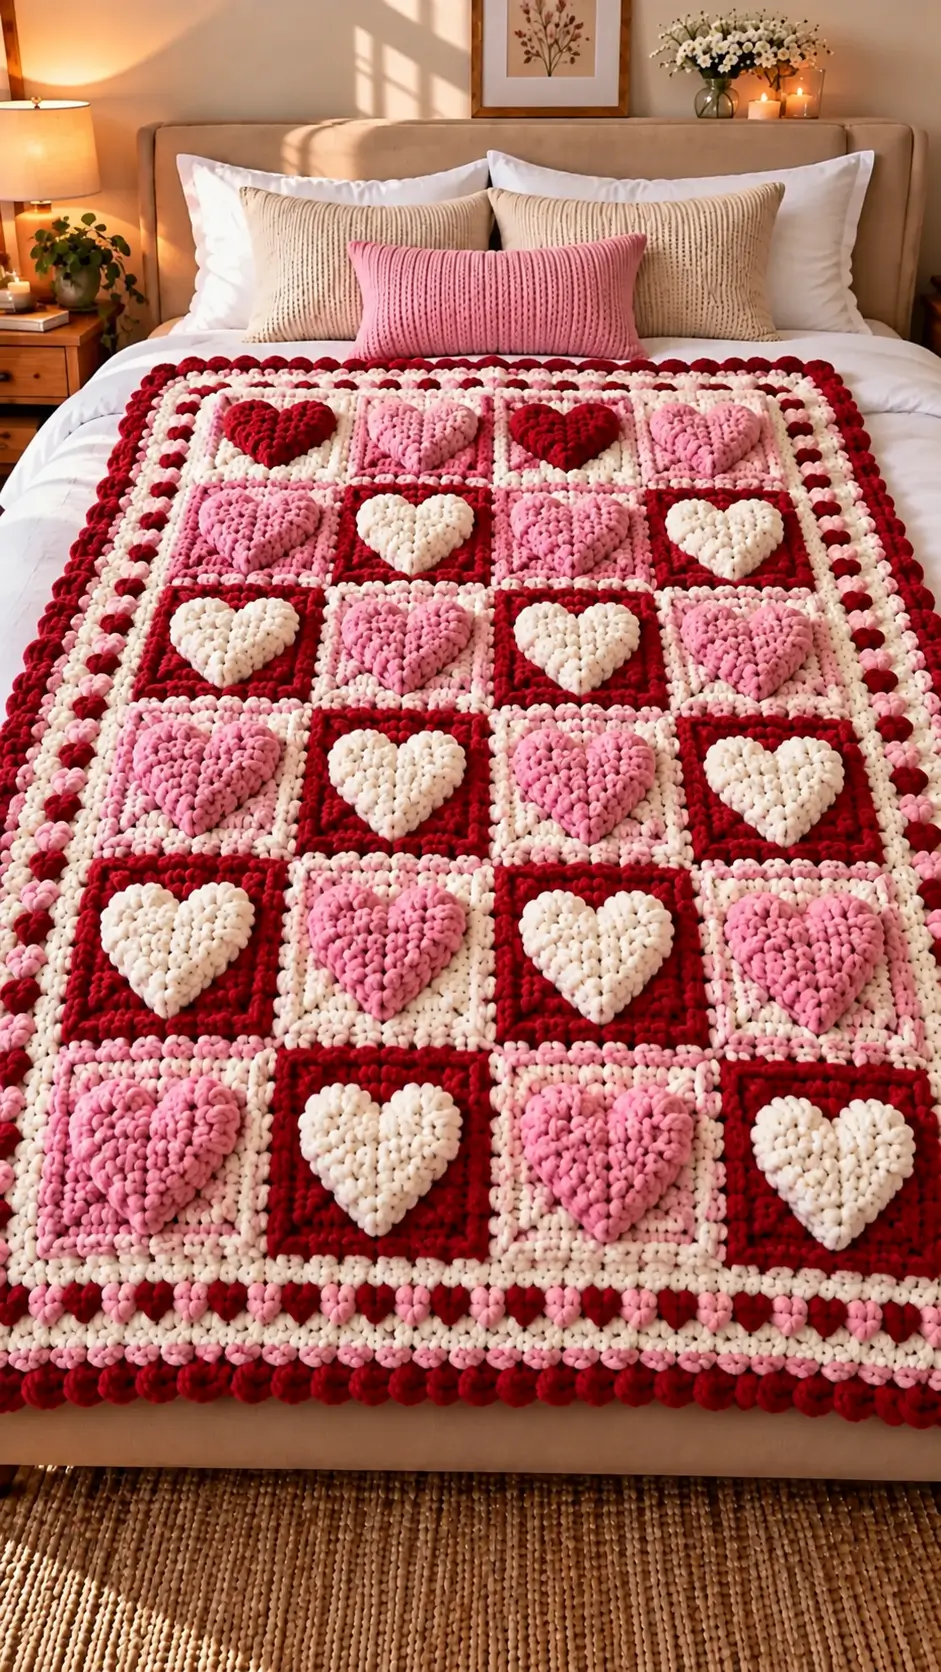
Twenty-four raised hearts create the repeating geometric structure of this red, pink, and ivory crochet heart granny square blanket. This photo-inspired design combines super bulky yarn, an 8 mm hook, and separately crocheted heart appliqués to produce a dimensional patchwork surface. Designed for intermediate crocheters, the proposed blanket measures approximately 120 × 180 cm before edging when each square reaches 30 cm. Individual motifs make the project easier to transport, resize, and repair.
The Design: What Makes This Heart Blanket Different
The defining feature of this 3D crochet heart blanket is the contrast between its flat square foundations and raised heart motifs. Instead of relying entirely on color changes, each heart is crocheted separately and sewn onto its background. This gives the motif a distinct silhouette and allows its edges to remain visible.
The second structural decision is the alternating color arrangement. Red squares support ivory hearts, while pink and ivory backgrounds support contrasting pink or red hearts. Repetition creates the checkerboard effect without requiring every square to have an identical color combination.
A third feature is the textured outer border, which frames the patchwork and adds visual weight around the perimeter.
One common mistake with a raised heart crochet square is attaching the heart too tightly. The stitches pull inward, distort the square, and prevent the motif from lying evenly against its foundation.
Project Info at a Glance
| Feature | Details |
|---|---|
| Skill Level | Intermediate |
| Estimated Time | 30–45 hours |
| Finished Size | Approx. 120 × 180 cm before border |
| Hook Size | 8 mm (proposed) |
| Yarn Weight | Super Bulky #6 |
| Construction | 24 squares, joined in 4 columns and 6 rows |
| Best For | Decorative bed throws and Valentine’s Day crochet projects |
Measurements and time are planning estimates. The pattern has not been physically sample-tested.
Materials and Tools
Yarn
Choose a consistent super bulky #6 yarn. Plush chenille is the closest visual match to the reference photograph.
- Deep red yarn: Super bulky #6, approximately 900–1,200 g planning allowance.
- Dusty pink yarn: Super bulky #6, approximately 1,000–1,300 g planning allowance.
- Ivory white yarn: Super bulky #6, approximately 1,000–1,300 g planning allowance.
These are provisional quantities rather than tested yarn requirements. Weigh a completed sample square and heart to calculate actual consumption before purchasing all the yarn.
Tools
- 8 mm crochet hook, adjusted to match gauge.
- Large-eye yarn needle for assembly.
- Locking stitch markers, at least four.
- Scissors.
- Measuring tape.
- Blocking mats, optional.
- Rustproof pins or removable clips.
- Polyester stuffing, optional for double-layer hearts.
Abbreviations and Special Stitches
| Abbreviation | Meaning |
|---|---|
| MR | Magic ring |
| sc | Single crochet |
| inc | Two single crochet stitches in one stitch |
| dec | Single crochet decrease |
| ch | Chain |
| sl st | Slip stitch |
| hdc | Half double crochet |
| dc | Double crochet |
| BLO | Back loop only |
| st / sts | Stitch / stitches |
| RS / WS | Right side / wrong side |
| FO | Fasten off |
An invisible decrease is made through the front loops of two adjacent stitches, reducing visible bulk compared with a standard single crochet decrease.
Special Stitch: Puff Stitch
Yarn over, insert the hook into the indicated stitch, yarn over, and draw up a loop. Repeat this insertion and draw-up process until seven loops are on the hook. Yarn over and pull through all seven loops, then chain one to secure the puff.
The securing chain does not count as an additional stitch.
Pattern Notes
This photo-inspired pattern uses flat square foundations and separate raised heart appliqués. It is worked in turned rows and joined rounds rather than a continuous spiral.
All instructions use US crochet terminology. Turning chains do not count as stitches unless stated otherwise.
Pattern – Step by Step
Part 1: Square Foundation (Make 24)
Yarn: Deep red, dusty pink, or ivory.
Start with ch 25.
Row 1: Sc in the second chain from the hook and each remaining chain. (24)
Rows 2–24: Ch 1, turn, sc in each stitch across. (24 per row)
At the end of Row 24, measure the width and height. Crochet stitch width and row height differ, so additional plain rows may be required to make the panel square.
Add or remove rows until the foundation has equal width and height. Record the adjusted row count and use it for every remaining square.
Fasten off, leaving a 20 cm tail.
| Foundation Color | Quantity |
|---|---|
| Deep red | 8 |
| Dusty pink | 8 |
| Ivory | 8 |
| Total | 24 |
This equal distribution is a simplified design choice based on the photograph.
Part 2: Raised Heart Appliqué (Make 24)
Yarn: Red, dusty pink, or ivory.
The heart is worked from the bottom point upward, with two separately shaped upper lobes.
Begin with ch 3.
Row 1: Sc in the second chain from the hook and the next chain. (2)
Row 2: Ch 1, turn, inc in each stitch. (4)
Row 3: Ch 1, turn, inc in first stitch, sc 2, inc in last stitch. (6)
Row 4: Ch 1, turn, inc, sc 4, inc. (8)
Row 5: Ch 1, turn, inc, sc 6, inc. (10)
Row 6: Ch 1, turn, inc, sc 8, inc. (12)
Row 7: Ch 1, turn, inc, sc 10, inc. (14)
Row 8: Ch 1, turn, inc, sc 12, inc. (16)
Rows 9–10: Ch 1, turn, sc in each stitch. (16)
First Upper Lobe
Row 11: Ch 1, turn, sc in the first 7 stitches. Leave the remaining 9 stitches unworked. (7)
Row 12: Ch 1, turn, dec, sc 3, dec. (5)
Row 13: Ch 1, turn, dec, sc 1, dec. (3)
Fasten off.
Second Upper Lobe
With the right side facing, skip the two central stitches of Row 10 and join yarn in the next available stitch of the unworked section.
Row 11: Sc across the remaining 7 stitches. (7)
Row 12: Ch 1, turn, dec, sc 3, dec. (5)
Row 13: Ch 1, turn, dec, sc 1, dec. (3)
Fasten off, leaving a 30 cm sewing tail.
The two skipped stitches form the central notch between the heart lobes.
For a more dimensional effect, crochet a second identical heart and join both layers around the edges. Insert a thin layer of polyester stuffing before closing. This optional construction requires 48 heart pieces for 24 completed motifs.
Part 3: Textured Heart Surface
Yarn: Matching heart color.
The reference blanket has a thick, rounded stitch texture. Surface puff stitches can imitate this effect without changing the counted heart foundation.
- Row 4: Add 2 evenly spaced surface puff stitches.
- Row 6: Add 4 evenly spaced surface puff stitches.
- Row 8: Add 6 evenly spaced surface puff stitches.
- Row 10: Add 6 evenly spaced surface puff stitches.
These decorative stitches are worked over the completed heart surface. They do not replace the single crochet stitches in the shaping instructions.
Keep the decorative yarn tension loose enough to prevent the heart from contracting.
Part 4: Square Border (Make 24)
Yarn: Contrasting red, pink, or ivory.
Round 1: Join yarn at one corner. Work sc evenly along the first edge, 3 sc in the corner, and repeat around the remaining edges. Place 3 sc in each corner. Join with sl st.
Round 2: Ch 1. Sc in each stitch around, working 3 sc into the center stitch of each corner group. Join with sl st.
Fasten off, leaving a 25 cm tail.
The stitch total depends on the foundation’s final row count. Measure every bordered square before assembly and correct any significant differences.
Part 5: Attaching the Raised Hearts
Yarn: Matching heart color.
Place one completed heart in the center of each square.
Use stitch markers to identify the horizontal and vertical centerlines. Align the heart’s bottom point with the vertical center.
Measure the spacing from the widest section of the heart to both side borders. Keep these distances equal.
Sew around the outer edge using mattress stitches or small whipstitches. Maintain enough slack to preserve the raised surface.
For stuffed double-layer hearts, attach the perimeter without compressing the center.
Avoid sewing across the entire heart surface because this flattens the dimensional effect.
Part 6: Joining the Squares
Arrange the 24 squares in four columns and six rows.
Use the following proposed color layout. Each entry lists the square background first and the heart color second.
| Column 1 | Column 2 | Column 3 | Column 4 |
|---|---|---|---|
| Red / Pink | Pink / Red | Red / Ivory | Ivory / Pink |
| Pink / Ivory | Red / Pink | Ivory / Red | Red / Ivory |
| Red / Ivory | Ivory / Pink | Red / Pink | Pink / Red |
| Pink / Red | Red / Ivory | Ivory / Pink | Red / Ivory |
| Red / Pink | Pink / Ivory | Ivory / Red | Red / Pink |
| Ivory / Pink | Pink / Red | Ivory / Pink | Pink / Ivory |
Join the squares using mattress stitch or a single crochet seam worked through corresponding edge stitches.
Ivory yarn creates a visible contrasting grid similar to the reference image.
Join the four squares across each row first. Then connect the six completed rows.
Check that all raised hearts face the same direction before closing each seam.
Part 7: Outer Blanket Border
Yarn: Ivory, dusty pink, and deep red.
Round 1 – Ivory: Join yarn at a corner. Sc evenly around the entire blanket, placing 3 sc in each corner. Join with sl st.
Round 2 – Ivory: Ch 1, sc in every stitch around, working 3 sc into the center stitch of each corner group. Join.
Round 3 – Pink: Join pink yarn. Sc around, maintaining the corner increases. Join.
Round 4 – Red: Work sc around, placing 3 sc at each corner. Join.
Round 5 – Decorative Puff Border: Alternate puff stitches and single crochet stitches around the perimeter. Add spacing stitches at the corners as needed to keep the border flat.
Round 6 – Final Red Edge: Work one round of single crochet around the blanket. Adjust corner increases to prevent curling.
Fasten off and weave in all yarn ends.
The final border stitch count depends on the joined blanket’s perimeter and should be checked on a sample before repeating the decorative puff sequence.
Assembly – 10 Steps
- Complete the foundations. Crochet 24 squares with consistent dimensions.
- Border each square. Add two contrasting single crochet rounds.
- Prepare the hearts. Crochet 24 heart appliqués in the selected colors.
- Add texture. Work optional surface puff stitches or make double-layer hearts.
- Position the motifs. Mark the center of each square and align the heart point.
- Sew the hearts. Attach the edges while preserving the raised centers.
- Arrange the layout. Position the squares in four columns and six rows.
- Join the squares. Use consistent seam tension and check motif orientation.
- Work the border. Crochet the ivory, pink, and red rounds.
- Finish the blanket. Weave in the ends, inspect the seams, and measure the completed project.
The completed project consists of 24 joined heart squares surrounded by a continuous decorative border.
7 Technical Tips for Better Results
- Stitch marker placement: Mark the first stitch of every border round and all four corners. A misplaced corner increase can shift the blanket edge by several stitches.
- Stuffing firmness: If using double-layer hearts, add enough filling to raise the center approximately 5–10 mm. Excess filling distorts the heart silhouette.
- Invisible decreases: Use invisible decreases in the upper heart lobes to reduce visible gaps. Standard decreases may create openings in loose chenille stitches.
- Heart placement: Measure the distance from both side borders before sewing. Differences greater than 5 mm can become visible when the squares are joined.
- Chenille tension: Maintain consistent tension throughout each square. Pulling plush yarn too tightly can damage the fibers surrounding the yarn core.
- Pinning and alignment: Secure the upper lobes, side edges, and bottom point before sewing. Without reference points, the heart may rotate or become asymmetrical.
- Tail weaving: Leave 20–30 cm for sewing and finishing tails. Weave ends in more than one direction because plush yarn can slip out of short finishing paths.
Troubleshooting Common Problems
Why Is the Heart Not Symmetrical?
Uneven tension or incorrect decreases can cause one upper lobe to become wider than the other. Check that both lobes begin with seven stitches and decrease to five, then three.
Also examine the central notch. Two unworked stitches should separate the lobes before their edges are shaped.
Why Are the Squares Different Sizes?
Small differences in tension accumulate across repeated rows. Changing yarn colors may also affect gauge if the yarns come from different product ranges.
Measure the first completed square and compare subsequent squares against it. If a square differs by more than 1 cm, adjust the hook size or remake the panel before joining.
Why Does the Blanket Border Curl?
Curling usually indicates insufficient stitches around the outside edge or overly tight tension.
Check the corners and confirm that the increases are positioned consistently. Add evenly distributed stitches along a tight edge if necessary.
Why Are the Hearts Too Flat?
Single-layer hearts provide limited relief compared with the pronounced texture visible in the reference photograph.
A second heart layer with minimal filling adds height. Surface puff stitches can also produce raised texture without a stuffed center.
How to Resize the Blanket
The modular construction allows the finished dimensions to change by increasing or decreasing the number of squares.
The following estimates assume each completed square measures 30 × 30 cm before joining and edging.
| Blanket Size | Layout | Approximate Dimensions |
|---|---|---|
| Small Throw | 3 × 4 = 12 squares | 90 × 120 cm |
| Medium Throw | 4 × 5 = 20 squares | 120 × 150 cm |
| Pictured-Style Layout | 4 × 6 = 24 squares | 120 × 180 cm |
| Large Blanket | 5 × 6 = 30 squares | 150 × 180 cm |
| Oversized Blanket | 6 × 7 = 42 squares | 180 × 210 cm |
These are calculated dimensions rather than tested measurements. Seams, yarn stretch, and border width affect the final size.
For a smaller blanket, reduce the number of squares instead of changing individual heart proportions.
Yarn Substitutions
Worsted-Weight Acrylic
Worsted acrylic produces thinner, lighter squares with clearer stitch definition. It typically requires a smaller hook and is suitable for precise heart shaping.
Cotton Yarn
Cotton produces a firmer surface and clearly defined stitches. However, a large cotton blanket with raised motifs can become relatively heavy.
Bulky Acrylic
Bulky acrylic provides a compromise between visible texture and manageable weight.
When changing yarn weight, complete one square and one heart before calculating the material requirements for the full blanket.
Care and Maintenance
Follow the washing instructions printed on the yarn label, especially when working with chenille or velvet-style fibers.
Support the blanket when wet to prevent its weight from stretching the seams. Avoid hanging it from a narrow line.
Dry the blanket flat where appropriate for the yarn fiber to maintain the square arrangement and reduce distortion of the raised heart motifs.
Inspect the appliqué seams periodically. Loose attachment stitches can be repaired without dismantling the surrounding squares.
Conclusion
This crochet heart granny square blanket uses repeated square foundations, separately shaped heart motifs, and a multicolor border to reproduce the main visual features of the reference design. Consistent square dimensions, controlled appliqué tension, and accurate joining are the primary construction requirements. Before making all 24 squares, complete one sample motif, measure its finished dimensions, and weigh the yarn used. Adjust the hook and material estimate from those results.
Save the finished project to Pinterest and share a photograph on Instagram using #RaisedHeartGrannyBlanket.
For your version, would you keep the alternating ivory and pink hearts, or make every raised heart deep red?








