Introduction
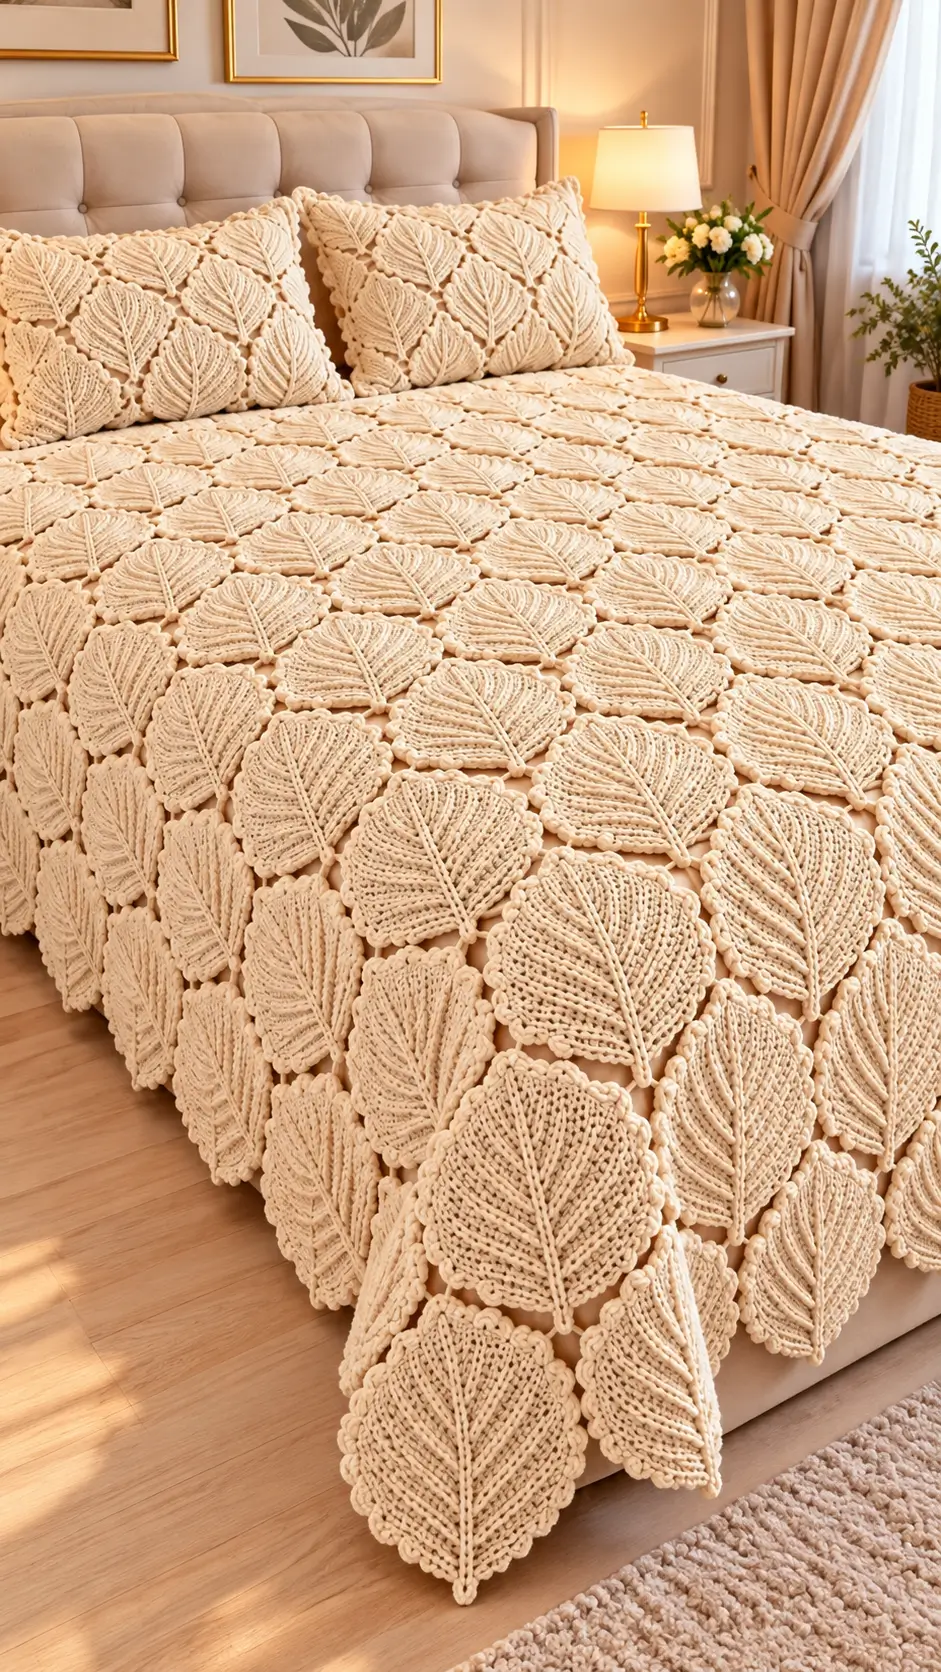
Each leaf on this bedspread has a raised central vein that divides its textured surface into two symmetrical halves. This crochet leaf blanket pattern uses individual botanical motifs, surface crochet, and concealed joining stitches to create a decorative bed covering.
The proposed design uses worsted-weight yarn, a 5 mm hook, and intermediate crochet techniques. Its modular construction allows you to adjust the dimensions for different beds while making matching pillow covers from the same motifs.
The Design: What Makes This Crochet Leaf Blanket Different
The defining feature of this 3D crochet leaf blanket is its modular construction. Instead of repeating conventional granny squares, the design uses individually shaped leaves with pointed ends and rounded sides.
Each motif begins with a foundation chain. Stitches of different heights create the leaf outline, while surface slip stitches form the raised central vein.
The second structural decision concerns joining. Leaves are arranged in staggered rows, with their edges attached at selected points rather than sewn together continuously. This preserves their individual outlines.
The third feature is the decorative perimeter. The leaf tips extend beyond the main fabric, producing a scalloped border without requiring a separate edging pattern.
A common mistake when making a crochet leaf bedspread pattern is joining motifs before checking their dimensions. Even a small difference in motif width can significantly change the final blanket size.
Project Info at a Glance
| Project Detail | Specification |
|---|---|
| Skill Level | Intermediate |
| Estimated Time | 80–140 hours, depending on size and speed |
| Target Finished Size | 230 × 250 cm |
| Crochet Hook | 5 mm |
| Yarn | Worsted-weight cotton blend |
| Main Color | Ivory / Cream |
| Construction | Individual crochet leaf motifs |
| Main Techniques | Chains, single crochet, half double crochet, double crochet, treble crochet, surface crochet |
| Best For | Decorative bedspreads, botanical throws, and matching pillows |
Note: The finished size and working time are planning estimates. This is an original, photo-inspired pattern that should be tested with a sample motif before making the complete bedspread.
Materials and Tools
Yarn
For the photographed appearance, choose a yarn with enough stitch definition to keep the raised leaf veins visible.
- Warm ivory yarn: Worsted weight, approximately 3,500–5,000 g for a large bedspread (preliminary estimate).
- Cream yarn: Worsted weight, optional matching yarn for surface veins.
- Ivory yarn: Worsted weight, additional yarn for matching pillow covers.
A cotton-acrylic blend is a practical option because it combines stitch definition with a lower weight than some pure cotton yarns.
A smooth, medium-weight yarn will make the leaf texture easier to see. Avoid very fuzzy yarn when making the first sample because loose fibers can obscure the spaces needed for joining and surface crochet.
Tools
- 5 mm crochet hook
- 4.5 mm crochet hook for tighter surface details, if needed
- Tapestry needle
- Stitch markers
- Sharp scissors
- Measuring tape
- Blocking pins and mats
- Pillow inserts
- Sewing needle and matching thread if adding fabric pillow backing
Before Buying All the Yarn
Make one complete leaf, including its raised vein and decorative border.
Measure its width and length after blocking. Weigh it using a digital kitchen scale.
Multiply that weight by the number of motifs required, then add approximately 10–15% for joining and finishing.
This method provides a more useful estimate than relying on yarn quantities from an unrelated blanket pattern.
Crochet Abbreviations
The following instructions use US crochet terminology.
| Abbreviation | Meaning |
|---|---|
| ch | Chain |
| sc | Single crochet |
| hdc | Half double crochet |
| dc | Double crochet |
| tr | Treble crochet |
| sl st | Slip stitch |
| st | Stitch |
| sts | Stitches |
| rep | Repeat |
| RS | Right side |
| WS | Wrong side |
| FLO | Front loop only |
| BLO | Back loop only |
| FO | Fasten off |
An invisible decrease is not required for this flat leaf construction.
Pattern Note: Unlike amigurumi, these leaves are worked around a foundation chain rather than in continuous spiral rounds.
Crochet Leaf Blanket Pattern – Step by Step
Part 1: Crochet the Main Leaf Motif
The leaf is worked around both sides of a foundation chain.
Its pointed ends come from short stitches, while taller stitches create the broad center.
Yarn: Warm ivory
Hook: 5 mm
Construction: Worked around a foundation chain
Foundation
Ch 20.
Round 1: First Side
Starting in the second chain from the hook, work:
- 1 sl st
- 2 sc
- 3 hdc
- 7 dc
- 3 hdc
- 2 sc
- 1 sl st
This uses all 19 available foundation-chain positions.
Stitch count: 19 stitches.
Do not turn.
Continue around the opposite side of the foundation chain.
Round 1: Second Side
Work into the unused loops along the opposite side:
- 1 sl st
- 2 sc
- 3 hdc
- 7 dc
- 3 hdc
- 2 sc
- 1 sl st
Stitch count: 19 stitches.
The completed first round contains 38 stitches.
Join with a slip stitch.
Round 2: Leaf Expansion
Ch 1.
Work the following sequence along the first side:
1 sl st, 2 sc, 3 hdc, 2 dc, 7 dc increases, 2 dc, 3 hdc, 2 sc, 1 sl st.
First-side count: 26 stitches.
Repeat the same sequence along the opposite side.
Total count: 52 stitches.
Join with a slip stitch.
The increases widen the central portion while retaining narrower ends.
Round 3: Outer Shaping
Ch 1.
Work along the first side:
1 sl st, 2 sc, 4 hdc, 5 dc, 3 dc increases, 5 dc, 4 hdc, 2 sc, 1 sl st.
First-side count: 29 stitches.
Repeat on the second side.
Total count: 58 stitches.
Join with a slip stitch.
Fasten off, leaving a 15 cm yarn tail.
Construction check: These stitch counts are mathematically consistent, but the motif has not been physically test-crocheted. Make one sample and inspect its shape before producing a full set.
Part 2: Create the Raised Central Leaf Vein
The reference photograph shows a prominent ridge running from the base toward the pointed end of each leaf.
This detail gives the motif its botanical structure.
Yarn: Matching ivory
Hook: 4.5 mm or 5 mm
- Place the leaf with its right side facing upward.
- Identify the center line running between the two ends.
- Attach yarn near the lower tip.
- Insert the hook through the fabric and pull a loop to the front.
- Continue making surface slip stitches along the center line.
- Keep the stitches consistent in size.
- Do not pull them tightly enough to gather the leaf.
- Stop approximately 1 cm before the opposite tip.
- Fasten off on the wrong side.
- Weave the yarn tail through several stitches.
Why Surface Crochet Works
Surface crochet adds a raised line without changing the original stitch count.
The vein can be made with the same yarn as the leaf for a monochromatic result.
For a more pronounced ridge, use a slightly thicker yarn.
Test this adjustment on one motif first because heavy surface stitching can distort the fabric.
Part 3: Add Decorative Side Veins
The photographed leaves have diagonal lines extending from the central ridge toward their edges.
These details can be approximated with short rows of surface slip stitches.
Yarn: Ivory
Hook: 4.5 mm
- Lay the leaf flat.
- Mark three to five positions on each side of the central vein.
- Begin the first diagonal line near the lower third of the leaf.
- Work surface slip stitches diagonally toward the outer edge.
- Stop approximately 1 cm before the border.
- Fasten off on the wrong side.
- Repeat at evenly spaced intervals.
- Angle each line toward the leaf tip.
The diagonal lines should follow the shape of the leaf rather than forming horizontal stripes.
Placement Guidelines
Keep the left and right sides approximately symmetrical.
For a small leaf, three diagonal lines per side may be sufficient.
Larger leaves can accommodate five or more.
Avoid placing too many raised lines close together.
Dense surface crochet increases stiffness and may prevent the motif from lying flat.
Part 4: Crochet the Scalloped Leaf Border
The reference photograph shows a rounded, decorative edge around each leaf.
A simple picot-style border can approximate this detail.
Yarn: Ivory
Hook: 5 mm
- Attach yarn at one pointed end.
- Work the following edging around the leaf:
(1 sc, ch 3, 1 sc in the same stitch), skip 1 stitch.
Repeat around the perimeter.
At the pointed ends, work a smaller decorative loop if the full picot creates excess bulk.
Join with a slip stitch.
Fasten off.
Border Adjustment
If the edge begins to ripple excessively, increase the number of skipped stitches between picots.
If the border pulls inward, reduce the spacing.
The final border should frame the leaf without folding its outer edges.
A slight wave is acceptable for this design because the blanket relies on visible leaf outlines.
Part 5: Block the Crochet Leaves
Blocking should be completed before joining the motifs.
Individual leaves are easier to shape than a fully assembled bedspread.
Blocking Instructions
- Lay the finished leaf on a blocking mat.
- Lightly dampen it according to the yarn manufacturer’s care instructions.
- Pin the lower point.
- Pin the upper point.
- Shape the widest section.
- Adjust both sides for symmetry.
- Allow the motif to dry completely.
- Remove the pins.
- Measure the finished leaf.
- Record its dimensions.
Do not stretch one leaf more than the others.
Consistency matters because the blanket is assembled from repeated units.
Recommended Sample Measurements
For planning purposes, aim for approximately:
- Leaf length: 15 cm
- Leaf width: 9 cm
These are design targets rather than guaranteed dimensions.
Your actual measurements will depend on yarn thickness, hook size, tension, and blocking.
If your sample is substantially smaller, consider a larger hook or a longer foundation chain. Changing the foundation length requires recalculating the stitch distribution.
Part 6: Arrange the Leaf Motifs
The bedspread in the photograph has a dense surface with relatively little visible background between leaves.
To approximate this appearance, arrange the motifs in staggered rows.
Layout Method
Place the first row of leaves on a flat surface.
Position the second row so that its leaves sit between those of the first row.
Continue alternating the placement.
Keep all leaf tips pointing in the same general direction for a consistent botanical design.
Alternatively, rotate every second row by 180 degrees.
This creates a more symmetrical arrangement.
Choosing the Number of Leaves
The required number depends on the effective spacing after the motifs are joined.
For example, suppose each leaf occupies approximately 8 cm of horizontal space and 12 cm of vertical space after overlap.
For a blanket measuring 230 × 250 cm:
230 ÷ 8 = 28.75
250 ÷ 12 = 20.83
A starting layout would therefore be approximately 29 columns by 21 rows.
Estimated total: 609 motifs.
This is a layout calculation, not a verified motif requirement.
A blanket with more overlap may need additional motifs, while a design with wider spacing may need fewer.
Before making hundreds of leaves, assemble a sample panel measuring at least 30 × 30 cm.
Measure its effective coverage and calculate the full blanket from that sample.
Part 7: Join the Crochet Leaves
The joining method determines whether the finished bedspread behaves like a continuous fabric or a collection of loose appliqués.
For the photographed appearance, use discreet connections behind the decorative edges.
Recommended Joining Method
- Place two leaves right side up.
- Overlap their edges slightly.
- Thread a tapestry needle with matching yarn.
- Sew through the back loops of the motifs at the overlap.
- Make several small stitches.
- Secure the yarn on the wrong side.
- Repeat at additional contact points.
Joining Placement
Attach leaves at three or more points wherever they overlap substantially.
Do not connect only the pointed tips.
A single connection allows the leaves to rotate and may create large gaps.
The joins should support the fabric while allowing the raised edges to remain visible.
Alternative: Crochet Joining
For a more flexible connection, use slip stitches through selected back loops.
Work from the wrong side.
Keep the tension loose enough to prevent gathering.
This method is useful when the blanket needs to drape over the sides of a bed.
Structural Consideration
A large bedspread can become heavy.
Test the strength of the joining method on a sample panel before completing the full project.
Lift the panel from one corner and inspect the connection points.
Add additional joins wherever the motifs separate excessively.
Matching Crochet Leaf Pillow Pattern
The photograph includes two pillows covered with the same botanical texture.
Matching pillow covers can be constructed from smaller leaf panels.
Part 8: Make the Pillow Front
Suggested finished size: 45 × 45 cm
Use the same leaf pattern as the blanket.
Make enough motifs to cover a square measuring approximately 45 × 45 cm.
Arrange them in staggered rows.
Join the motifs using the same technique as the bedspread.
Block the completed front panel.
Measure it before making the backing.
If the front is larger than the intended pillow insert, adjust the layout or use a larger insert.
Avoid forcing an oversized crochet panel onto a smaller pillow.
Excess fabric can bunch around the corners.
Part 9: Crochet the Pillow Back
A plain backing gives the textured front additional stability.
Foundation
Chain enough stitches to reach the desired pillow width.
For a 45 cm pillow, calculate the chain length from your actual stitch gauge.
Row 1
Work 1 hdc in the third chain from the hook.
Continue with 1 hdc in each remaining chain.
Turn.
Row 2
Ch 2.
Work 1 hdc in each stitch across.
Turn.
Remaining Rows
Repeat Row 2 until the panel measures approximately 45 cm high.
Fasten off.
Leave a long yarn tail for assembly.
Optional Envelope Closure
Instead of making one solid back panel, create two shorter rectangles.
Overlap them by approximately 8–10 cm.
Attach both sections to the pillow front.
The opening allows the insert to be removed for washing.
Part 10: Assemble the Matching Pillow
- Place the leaf panel and backing together with their wrong sides facing.
- Align the edges.
- Use stitch markers to hold the corners in position.
- Join three sides with single crochet or mattress stitch.
- Insert the pillow form.
- Close the remaining side.
- For a removable cover, use the envelope-back construction instead.
- Inspect the seams for gaps.
- Add a fabric lining if the spaces between the leaf motifs expose too much of the insert.
- Repeat the process for the second pillow.
Assembly: 10 Steps for the Complete Bedspread
- Make one sample leaf. Complete its outline, raised vein, diagonal details, and border before beginning batch production.
- Check the sample measurements. Record the blocked length, width, and weight to estimate yarn requirements.
- Create a test panel. Join several leaves to establish the effective coverage and spacing.
- Calculate the required quantity. Divide the intended blanket dimensions by the measured coverage of the test panel.
- Crochet the remaining motifs. Keep the same hook, yarn, and working tension throughout the project.
- Add the surface details. Work the central and diagonal veins before joining the leaves.
- Block the motifs. Shape them to consistent dimensions and allow them to dry.
- Arrange the full blanket. Place the leaves in staggered rows and adjust the outer perimeter.
- Join the motifs. Secure overlapping sections and reinforce areas that carry more weight.
- Finish the blanket and pillows. Weave in all yarn ends, inspect the joins, and complete the matching pillow covers.
The finished set consists of one modular leaf bedspread and two coordinated botanical pillow covers.
7 Technical Tips for a Better Crochet Leaf Blanket
- Maintain consistent stitch counts. A missed increase can make one side of a leaf narrower than the other. Check that Round 2 contains 52 stitches and Round 3 contains 58 stitches before adding surface details.
- Control surface crochet tension. Tight surface slip stitches can pull the center of a leaf into a ridge that curls upward. If the leaf shortens by more than approximately 5 mm after adding the vein, remake the surface stitches with less tension.
- Use stitch markers during joining. Leaves can shift while their edges are being connected. Place markers at three contact points before sewing each overlapping pair.
- Test the yarn before making hundreds of motifs. Different worsted-weight yarns can produce noticeably different leaf dimensions. Make a complete sample with the intended yarn and hook before purchasing the full project quantity.
- Check the border for excessive ruffling. Too many picots can create a heavily gathered edge. If the border no longer lies approximately flat after blocking, increase the spacing between decorative loops.
- Reinforce high-stress connections. The weight of a large bedspread places extra strain on joins near its hanging edges. Add at least one additional secure connection wherever adjacent leaves separate when the sample panel is lifted.
- Weave in yarn tails securely. Short yarn tails can work loose during washing or handling. Leave approximately 15 cm when fastening off and weave each tail through several stitches in more than one direction.
How Much Yarn Does a Crochet Leaf Bedspread Need?
Yarn consumption is one of the most important planning considerations for a large modular blanket.
The quantity depends on the size and weight of each completed leaf.
A textured motif with surface veins uses more yarn than a plain flat leaf.
Example Calculation
Suppose one finished leaf weighs 7 g.
For 609 motifs:
609 × 7 = 4,263 g
Add 10% for joining and finishing:
4,263 × 1.10 = 4,689.3 g
The estimated total would be approximately 4.7 kg of yarn.
This example is illustrative. The 7 g motif weight has not been established through a physical sample.
A larger motif, denser surface crochet, or heavier yarn could substantially change the total.
Recommended Purchasing Method
- Buy enough yarn for a test panel first.
- Weigh the finished panel.
- Calculate the total quantity from its measured coverage.
- Purchase the remaining yarn from the same dye lot whenever possible.
For a monochromatic cream blanket, differences between dye lots may be visible across large sections.
How to Adjust the Blanket for Different Bed Sizes
A modular design can be adapted to several dimensions.
The measurements below are suggested finished blanket targets, not standard mattress specifications.
| Blanket Type | Suggested Dimensions |
|---|---|
| Baby Blanket | 90 × 110 cm |
| Throw Blanket | 130 × 160 cm |
| Twin Bedspread | 170 × 230 cm |
| Queen Bedspread | 230 × 250 cm |
| King Bedspread | 270 × 260 cm |
Measure the Bed First
Measure the mattress width and length.
Decide how far the blanket should hang over the sides.
Add the desired drop to both sides.
For example, a mattress measuring 150 cm wide with a 35 cm drop on each side requires:
150 + 35 + 35 = 220 cm
The required blanket width would be approximately 220 cm.
Repeat the calculation for the length.
Account for the pillows and whether the blanket will be tucked under the mattress.
Why the Motif Layout Matters
The final width may not be an exact multiple of the leaf spacing.
Rather than forcing the fabric to fit, adjust the overlap between motifs or modify the outer arrangement.
Keep the connections consistent.
An uneven joining pattern can make one section stretch more than another.
Washing and Caring for a Textured Crochet Bedspread
A large crochet bedspread requires more careful handling than a small decorative item.
Follow the yarn manufacturer’s washing instructions.
For machine-washable yarn, use a gentle cycle only if the finished blanket’s weight and construction are suitable for the washing machine.
A wet bedspread can be substantially heavier than a dry one.
Support the fabric when lifting it to avoid stressing the joins.
Dry flat whenever practical.
Do not hang a wet modular blanket from one edge.
The weight can stretch the joining stitches and distort the leaf shapes.
For pillow covers, removable inserts make washing easier.
Inspect the raised veins and decorative borders after laundering.
If necessary, reshape the motifs while damp.
Frequently Asked Questions
Is this crochet leaf blanket suitable for beginners?
The individual stitches are familiar to many beginners, but the complete project requires accurate shaping, surface crochet, blocking, and joining.
Intermediate crochet experience is recommended.
Start with one leaf and a small joined panel before attempting a full bedspread.
Can I use acrylic yarn instead of cotton?
Yes. Acrylic yarn can reduce the finished weight and may be easier to maintain.
However, the final texture and drape will differ from a cotton-rich version.
Make a sample before choosing the yarn for the entire project.
What hook size should I use?
A 5 mm hook is the proposed starting point for worsted-weight yarn.
Comparable botanical crochet patterns also use this combination.
Adjust the hook size according to your tension and the yarn label.
Can I make the leaves larger?
Yes, but increasing the foundation chain requires changing the shaping sequence.
Simply adding chains without recalculating the stitch distribution can distort the leaf.
For a larger version, develop and test a separate motif before beginning production.
How do I keep the leaves from curling?
Check the increase placement, surface crochet tension, and border spacing.
Excessively tight surface stitching can pull the center inward.
Blocking may correct minor curling, but it cannot reliably fix incorrect shaping.
Do the leaves need to be sewn together?
They need secure connections, but sewing is not the only option.
Slip-stitch joining can also be used.
The choice depends on the desired flexibility and how visible the connections should be.
Can I make a smaller version?
Yes. Use the same motif and reduce the number of rows and columns.
A throw-size version is a practical way to test the construction before making a bedspread.
Conclusion
This crochet leaf blanket pattern uses individual botanical motifs, raised surface details, and staggered joining to approximate the textured bedspread shown in the reference photograph. The construction can be adapted for throws, decorative bed coverings, and matching pillow covers.
Before committing to a large project, complete one leaf and a joined sample panel. Measure both pieces, record their yarn consumption, and calculate the number of motifs needed for your bed.
Save the pattern to Pinterest for future reference, or share your finished botanical crochet project on Instagram using #CrochetLeafBlanket.
For this particular design, would you arrange the leaves with all their tips pointing downward or alternate their direction in each row?









