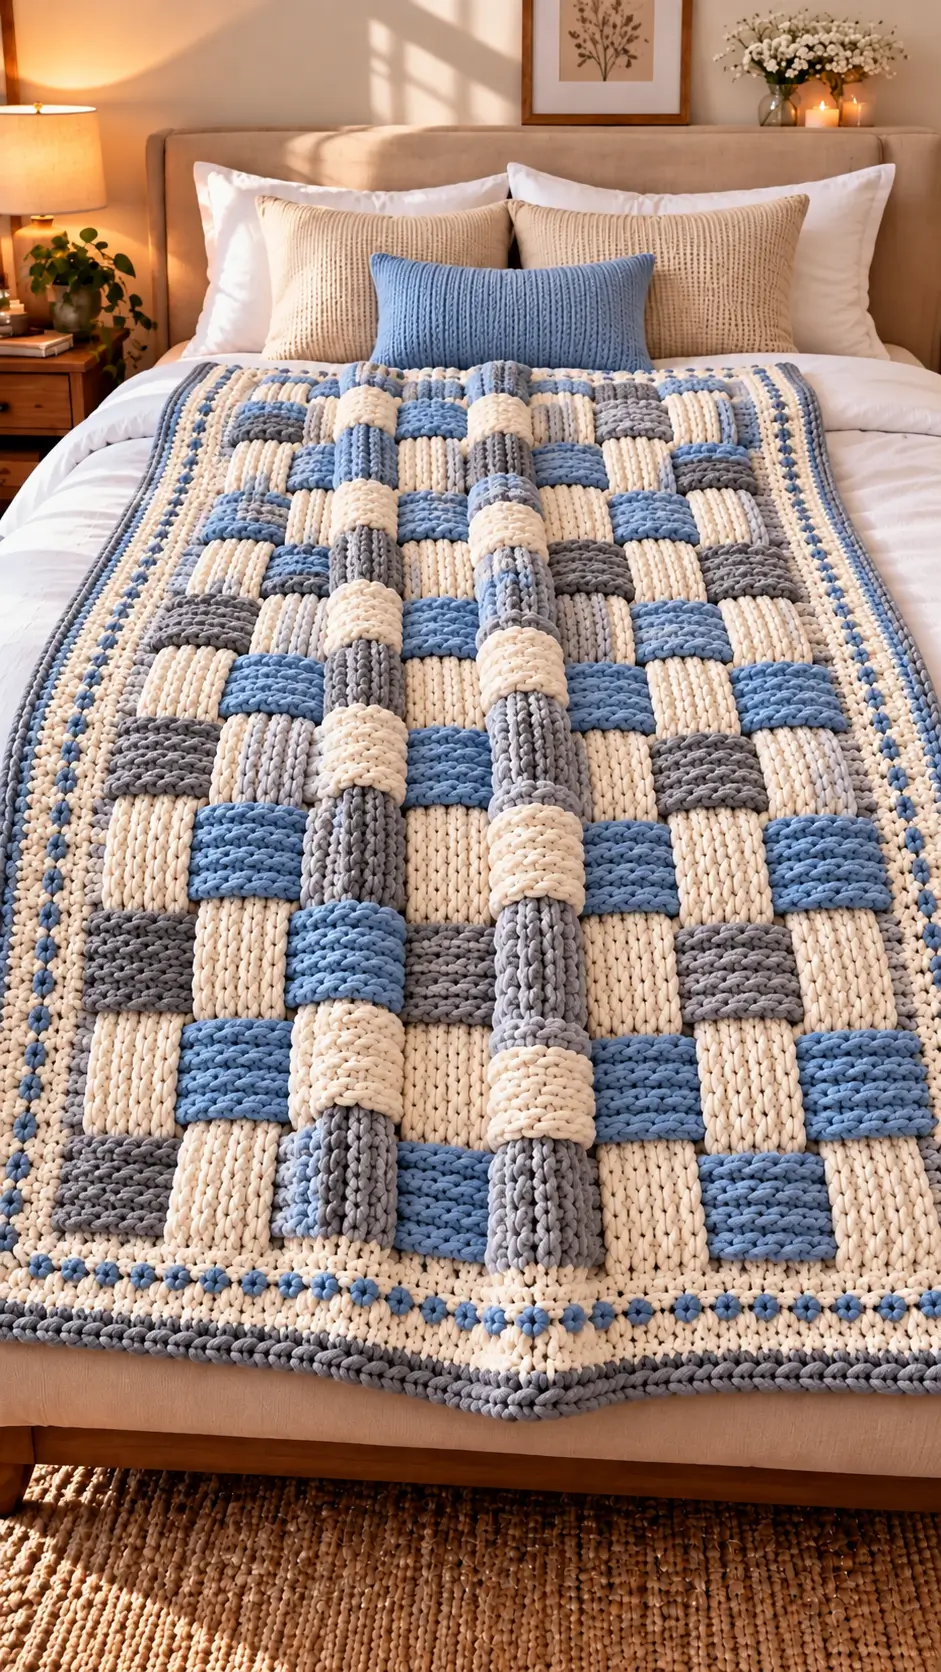
The alternating blue, cream and gray blocks in this blanket are formed by strips crossing above and below one another, rather than by ordinary color changes. This chunky basket weave crochet blanket uses super-bulky yarn, an 8 mm hook and a rectangular woven layout. The proposed finished size is approximately 104 × 136 cm. Intermediate crocheters can use the modular construction to produce a textured bed throw with replaceable individual strips.
The Design: What Makes This Blanket Different
The central feature is a genuine over-under structure. Unlike a traditional basket-weave stitch, which imitates woven fabric through raised crochet posts, this design uses separate crocheted strips that interlace across the blanket.
Three design decisions determine the finished appearance.
First, equal-width strips form a regular grid. Each crossing must remain visible without compressing neighboring sections.
Second, the dusty blue, ivory and gray color distribution creates alternating blocks. The strips can be arranged in a repeating sequence, producing the checkerboard effect without changing yarn at every intersection.
Third, the border anchors the loose strip ends. Without secure perimeter stitching, individual strips may shift during handling.
The most common mistake in a woven crochet blanket pattern is making the crossing strips too short. Accurate gauge measurements and a trial weave are essential before cutting yarn.
Project Info at a Glance
| Detail | Specification |
|---|---|
| Skill Level | Intermediate |
| Estimated Time | 18–30 hours |
| Proposed Finished Size | 104 × 136 cm |
| Hook Size | 8 mm |
| Yarn Weight | Super Bulky #6 |
| Construction | Separate strips woven together |
| Best For | Bed throws and decorative blankets |
Note: These dimensions and the estimated working time are planning targets. The pattern has not been sample-tested.
Materials and Tools
Yarn
Choose super-bulky yarn with a consistent fiber composition and thickness across all colors. Bernat Blanket is one possible yarn range, subject to gauge testing.
- Ivory Cream: Super Bulky #6, main background color.
- Dusty Blue: Super Bulky #6, contrasting woven strips and border details.
- Medium Gray: Super Bulky #6, contrasting strips and outer edging.
- Light Gray: Super Bulky #6, optional additional accent.
The exact yarn quantities depend on the measured gauge, strip dimensions and final border. For reference, a published super-bulky basket-weave blanket measuring approximately 114 × 140 cm uses about 2,126 g of yarn. This is not a verified quantity for the woven-strip construction described here.
Tools
- 8 mm crochet hook
- Large-eye yarn needle
- Locking stitch markers
- Measuring tape
- Sharp scissors
- Flat blocking surface
- Rust-resistant blocking pins
Crochet Abbreviations
- ch: Chain
- sc: Single crochet
- hdc: Half double crochet
- sl st: Slip stitch
- st: Stitch
- RS: Right side
- WS: Wrong side
- rep: Repeat
- FO: Fasten off
An invisible decrease is unnecessary for this rectangular construction because each strip maintains a constant stitch count.
Chunky Basket Weave Crochet Blanket Pattern – Step by Step
Construction note: This is a proposed pattern inspired by the blanket’s visible structure. It is not a tested reproduction of the photographed item. The working target is a woven center measuring approximately 96 × 128 cm, with a border adding approximately 4 cm on each side.
Step 1: Make a Gauge Swatch
Using the 8 mm crochet hook, chain 13.
Row 1: Hdc in the third chain from the hook and each remaining chain (11).
Rows 2–12: Ch 2, turn, hdc in each stitch across (11).
Measure the center of the swatch, excluding the outermost stitches and rows.
The planning gauge for this pattern is:
- 10 hdc stitches = 8 cm wide.
- 8 hdc rows = 8 cm long.
This gauge is a target rather than a verified measurement. If your swatch differs, adjust the strip stitch counts and row numbers before continuing.
Step 2: Crochet the Vertical Strips (Make 12)
Yarn: Ivory cream, dusty blue and medium gray.
Foundation: Ch 12.
Row 1: Hdc in the third chain from the hook and each remaining chain (10).
Row 2: Ch 2, turn, hdc in each stitch across (10).
Rows 3–128: Repeat Row 2 (10).
At the target gauge, each strip should measure approximately 128 cm long and 8 cm wide.
Fasten off, leaving a 25 cm yarn tail.
Repeat until you have 12 strips. Arrange the colors in the following sequence:
- Strip 1: Ivory cream
- Strip 2: Dusty blue
- Strip 3: Medium gray
- Strip 4: Ivory cream
- Strip 5: Dusty blue
- Strip 6: Medium gray
- Strips 7–12: Repeat the same color sequence.
Check each strip against the first completed piece. Inconsistent strip lengths can cause the blanket border to pull unevenly.
Step 3: Crochet the Horizontal Strips (Make 16)
Yarn: Ivory cream, dusty blue and medium gray.
Foundation: Ch 12.
Row 1: Hdc in the third chain from the hook and each remaining chain (10).
Rows 2–96: Ch 2, turn, hdc in each stitch across (10).
Fasten off, leaving a 25 cm yarn tail.
Make 16 horizontal strips in total. Each strip should measure approximately 96 cm at the target gauge.
Distribute the colors throughout the horizontal strips to create a balanced arrangement of blue, cream and gray blocks.
These strips will cross the 12 vertical strips, creating a woven field with 192 intersections.
Step 4: Arrange the Vertical Strips
Place all 12 long strips side by side on a large, flat surface.
Align the top edges and keep the sides touching without overlapping.
Measure the total width. At the proposed gauge, the combined strips should measure approximately 96 cm.
Use locking stitch markers to hold the top and bottom edges in position.
If the strips curl inward, flatten them gently before weaving. Avoid stretching the fabric to force it into the target dimensions.
Step 5: Weave the Horizontal Strips
Take the first horizontal strip and pass it across the vertical strips using an alternating over-under sequence.
Horizontal Strip 1: Pass over Vertical Strip 1, under Strip 2, over Strip 3, under Strip 4, and continue alternating across the blanket.
Horizontal Strip 2: Reverse the sequence. Pass under Vertical Strip 1, over Strip 2, under Strip 3, over Strip 4, and continue alternating.
Repeat these two weaving sequences until all 16 horizontal strips have been installed.
Keep the horizontal strips parallel and push them gently toward the preceding row so the woven blocks touch.
Avoid compressing the fabric excessively. Tight weaving may cause the blanket to curve or bunch around the edges.
Step 6: Square the Woven Center
Once every horizontal strip is in place, measure the woven center in several locations.
- Check the width at the top, middle and bottom.
- Check the length at the left edge, center and right edge.
- Compare the diagonals to identify major distortion.
- Adjust strip positions until the rectangle is regular.
The proposed central measurement is approximately 96 × 128 cm.
Secure the perimeter using locking markers spaced approximately 8–12 cm apart.
Step 7: Secure the Strip Ends
Before adding the border, use the remaining yarn tails to anchor the ends of the strips.
Thread a large-eye yarn needle with one of the tails and work several small securing stitches through the neighboring fabric.
Keep the stitches on the back of the blanket wherever possible.
Repeat until every strip end is secured and cannot slide out of the woven structure.
For a blanket intended for regular use and washing, add concealed anchoring stitches at selected internal crossings. Check that these stitches do not make the fabric rigid.
Step 8: Crochet the Foundation Border
Yarn: Ivory cream.
Join the yarn at one corner of the blanket.
Round 1: Work sc evenly around the entire rectangle, placing 3 sc at each corner.
Join with a sl st to the first sc.
Round 2: Ch 1, work sc in each stitch around, placing 3 sc in the center corner stitch at each corner.
Join with a sl st and fasten off.
The exact number of stitches depends on the measured perimeter and the distribution of strip ends. Count and record the stitches on each side as you work.
Check that the border lies flat before continuing.
Step 9: Add the Blue Accent Border
Yarn: Dusty blue.
Join the blue yarn at a corner.
Round 3: Ch 1, sc around the blanket, placing 3 sc in each corner’s center stitch.
Round 4: Work a decorative sequence of sc and small chain spaces around the perimeter. Maintain the same repeat on corresponding sides and adjust at the corners.
Join with a sl st and fasten off.
For additional texture, evenly spaced bobble stitches can be incorporated into the blue border. The photograph shows small raised blue details, but their exact stitch placement cannot be confirmed.
Step 10: Finish With the Gray Outer Edge
Yarn: Medium gray.
Join the gray yarn at one corner.
Round 5: Work one sc into each available stitch around the perimeter, placing 3 sc at each corner.
Join with a sl st.
Fasten off, leaving a 20 cm yarn tail.
Weave the remaining yarn ends into the back of the border.
Lay the blanket flat and inspect the corners. The edging should follow the rectangular shape without visible pulling or ruffling.
How to Assemble the Woven Crochet Blanket
- Complete all 12 vertical crochet strips.
- Make the 16 horizontal strips to the required length.
- Arrange the vertical strips side by side in the chosen color sequence.
- Insert the first horizontal strip using the over-under sequence.
- Reverse the weaving direction for the second horizontal strip.
- Continue weaving until all horizontal strips are installed.
- Square the rectangle and measure the width and length.
- Anchor the strip ends and selected internal crossings.
- Crochet the cream foundation border, blue accents and gray outer edging.
- Weave in all yarn ends, inspect the corners and measure the completed blanket.
The blanket is complete when all strips are secured and the finished border lies flat.
7 Technical Tips for a Better Basket-Weave Blanket
- Use stitch markers: Place markers every 8–12 cm around the woven perimeter. Missing markers can allow the strips to shift before the first border round is completed.
- Measure strip width: Check every strip against the 8 cm target before weaving. A difference of 5 mm across 12 strips can change the overall width by approximately 6 cm.
- Control strip length: Measure each strip without stretching it. Excessive pulling can cause the fabric to retract and distort the completed rectangle.
- Alternate the weaving direction: Reverse the over-under sequence on every successive horizontal strip. Repeating the same sequence creates stacked crossings instead of a balanced woven structure.
- Maintain consistent yarn tension: Keep the tension uniform, especially with plush polyester yarn. Tight stitches can make strips rigid and difficult to interlace.
- Inspect the border corners: Check for cupping or ruffling after every border round. Too few corner stitches pull the edges inward, while too many create excess fabric.
- Secure yarn tails properly: Leave approximately 20–25 cm for anchoring the strip ends. Short tails may work loose during repeated handling and washing.
Conclusion
The defining feature of this chunky basket weave crochet blanket is its physical interlacing, not simply a raised stitch texture. Consistent strip dimensions, alternating crossing directions and a firmly attached perimeter are the three requirements that control the result.
Before purchasing the full yarn quantity, make a gauge swatch, weave a small four-by-four sample and calculate yarn consumption from its measured weight.
Save this pattern to Pinterest for future reference, or share a completed sample on Instagram using #BlueCreamBasketWeaveBlanket. Include your finished dimensions and hook size so other crocheters can compare results.
Which color would you use for the raised crossing strips: dusty blue, ivory or gray?









