Introduction
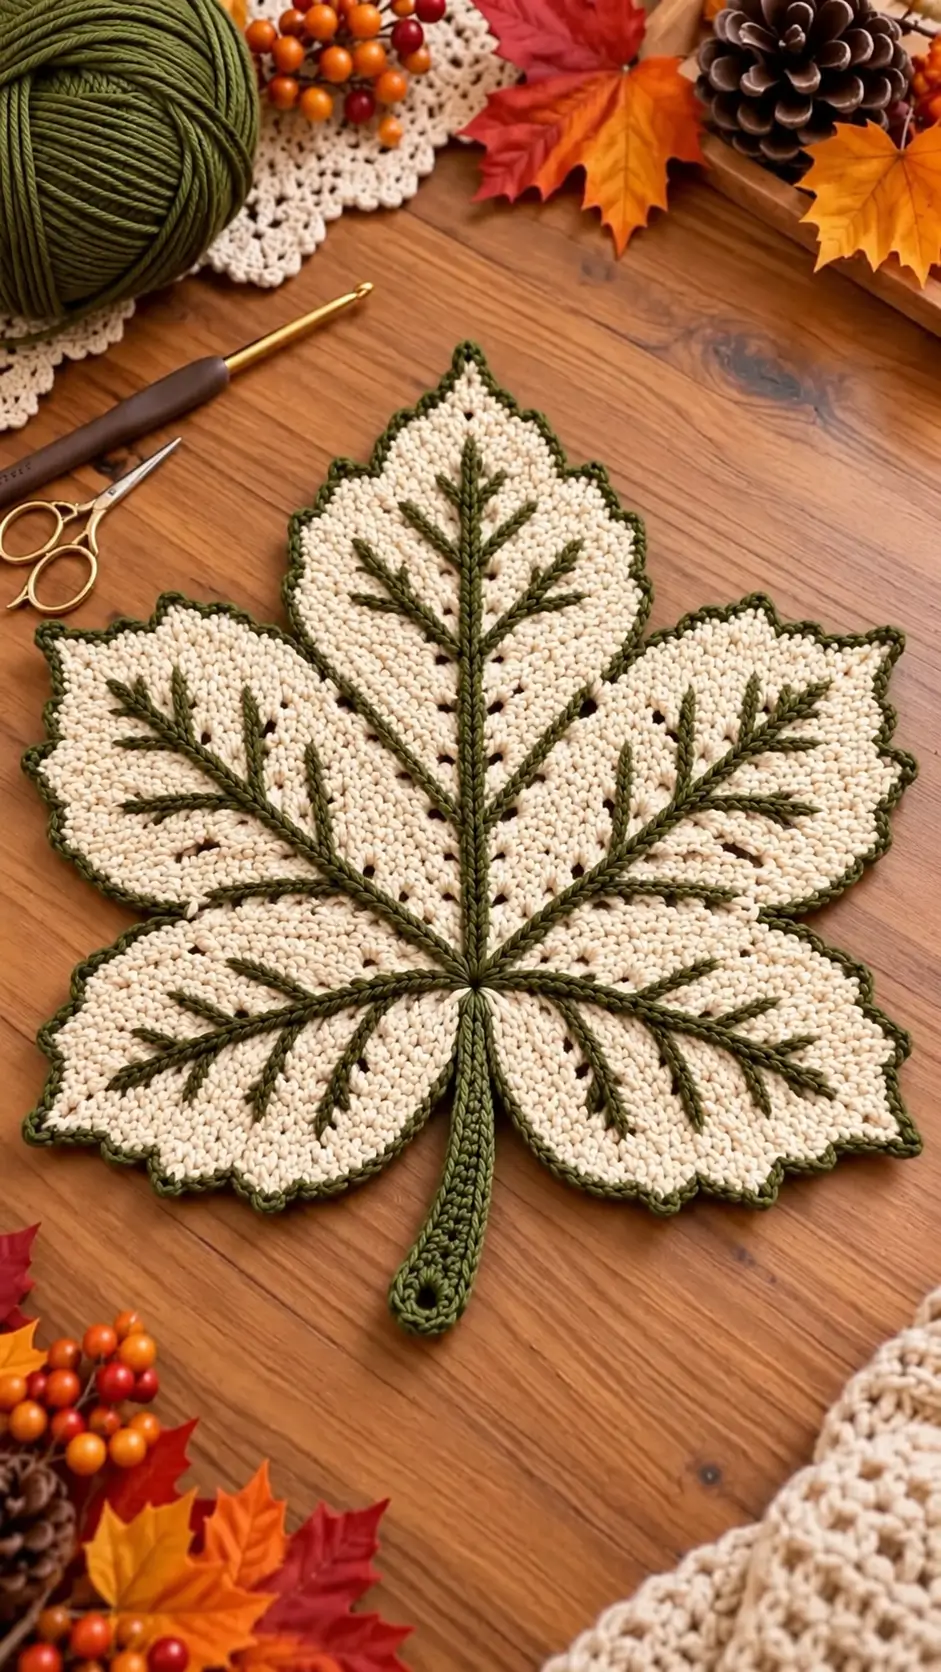
Five primary lobes are not enough for this maple leaf; the smaller teeth between them are what keep the outline botanical instead of star-shaped. This crochet maple leaf placemat pattern recreates the photographed design with a cream body, olive-green raised veins, matching pointed edging and a reinforced stem. Worked in worsted-weight cotton with a 3.5 mm hook, it makes a substantial autumn table mat for intermediate crocheters.
The Design: What Makes This Crochet Maple Leaf Different
The leaf is organized around one central junction where the five major veins meet. A long center lobe rises from that point, two upper side lobes angle outward, and two lower lobes spread toward the stem. Smaller teeth break up the perimeter. Keeping those proportions different is essential; five equal points produce a star rather than a maple silhouette.
The second structural feature is the raised olive vein system. Surface slip stitches travel from the center into every major lobe, then split into shorter branches. The same olive yarn outlines the perimeter, visually connecting the veins to the serrated edge.
Published maple leaf patterns range from small 10 cm motifs to approximately 23 × 25 cm leaves in worsted cotton. The photographed piece reads as a larger table decoration, so this version targets approximately 35–40 cm across, depending on gauge and blocking.
Project Info at a Glance
| Skill Level | Construction | Finished Size | Hook | Best For |
|---|---|---|---|---|
| Intermediate | Flat shaped sections with surface crochet | Approx. 35–40 cm wide | 3.5 mm | Placemat, centerpiece, table decoration |
Finished dimensions are a target for this photo-inspired version rather than measurements taken from the photographed object. Published maple leaf patterns demonstrate that hook and yarn changes can alter dimensions substantially.
Materials and Tools
Yarn
- Warm cream — worsted weight #4 cotton or cotton blend — approximately 80–100 g for the leaf body
- Olive green — worsted weight #4 cotton or cotton blend — approximately 25–35 g for veins, border and stem
A smooth cotton yarn is preferable for this project because it keeps the small perimeter points readable and gives the surface-crochet veins a defined edge. Avoid heavily brushed or fuzzy yarn if reproducing the crisp texture in the photograph.
Tools
- 3.5 mm crochet hook
- Worsted weight #4 cotton yarn
- Yarn needle
- Scissors
- Locking stitch markers
- Blocking mat
- Rust-resistant pins
- Tape measure
Abbreviations
- MR — magic ring
- ch — chain
- sl st — slip stitch
- sc — single crochet
- hdc — half double crochet
- dc — double crochet
- tr — treble crochet
- dtr — double treble crochet
- sp — space
- st/sts — stitch/stitches
Crochet Maple Leaf Placemat Pattern
This is an original, photo-inspired construction rather than a transcription of another designer’s pattern. The cream leaf is formed first. Olive surface crochet is added afterward to reproduce the branching raised veins visible in the image.
Keep the work flat throughout. If the fabric begins cupping strongly before the edging is added, correct the tension or increase distribution before continuing.
Central Foundation
Yarn: warm cream.
Round 1: Make a MR. Ch 1 and work 10 sc into the ring. Pull the ring closed. Join with sl st. (10 sts)
Round 2: Ch 1. Work 2 sc in every stitch around. Join with sl st. (20 sts)
Round 3: Ch 1. Work (sc, 2 sc in next st) around. Join with sl st. (30 sts)
Place five stitch markers approximately evenly around the circle. These positions establish the five principal directions of the leaf.
Building the Five Main Lobes
The five lobes are not identical. The center lobe is longest, the upper side lobes are slightly shorter, and the lower pair are broader and shorter. This difference is required for a recognizable maple outline.
Center Lobe
Continue with cream.
Join at the upper center marked position.
Row 1: Ch 1, sc in next 9 sts. Turn. (9)
Row 2: Ch 1, 2 sc in first st, sc across to last st, 2 sc in last st. Turn. (11)
Row 3: Ch 2, hdc across. Turn. (11)
Row 4: Ch 2, 2 hdc in first st, hdc across to last st, 2 hdc in last st. Turn. (13)
Rows 5–8: Ch 2, hdc across. Turn. (13)
Row 9: Ch 2, hdc2tog, hdc across to final 2 sts, hdc2tog. Turn. (11)
Row 10: Repeat decrease at both ends. (9)
Row 11: Repeat decrease at both ends. (7)
Row 12: Hdc2tog, hdc in next 3 sts, hdc2tog. (5)
Row 13: Hdc2tog, hdc, hdc2tog. (3)
Row 14: Work the remaining 3 stitches together to form the main point.
Fasten off.
Upper Side Lobe — Make 2
Yarn: warm cream.
Join at the marked position beside the center lobe.
Row 1: Sc across 9 attachment stitches. Turn. (9)
Row 2: Increase at both ends. (11)
Row 3: Hdc across. (11)
Row 4: Increase at both ends in hdc. (13)
Rows 5–7: Hdc across. (13)
Row 8: Decrease at both ends. (11)
Row 9: Decrease at both ends. (9)
Row 10: Decrease at both ends. (7)
Row 11: Hdc2tog, hdc in next 3, hdc2tog. (5)
Row 12: Hdc2tog, hdc, hdc2tog. (3)
Row 13: Close the remaining 3 stitches together.
Fasten off. Repeat symmetrically on the opposite side.
Lower Lobe — Make 2
Yarn: warm cream.
The lower lobes should be broad enough to balance the long center point but visibly shorter than the upper side lobes.
Row 1: Sc across 9 attachment stitches. Turn. (9)
Row 2: Increase at both ends. (11)
Row 3: Hdc across. (11)
Row 4: Increase at both ends. (13)
Rows 5–6: Hdc across. (13)
Row 7: Decrease at both ends. (11)
Row 8: Decrease at both ends. (9)
Row 9: Hdc2tog, hdc across, hdc2tog. (7)
Row 10: Hdc2tog, hdc in next 3, hdc2tog. (5)
Row 11: Hdc2tog, hdc, hdc2tog. (3)
Row 12: Close the final 3 stitches together.
Fasten off and repeat on the opposite side.
Filling the Spaces Between the Lobes
The base should now show five distinct cream sections radiating from the center. Small gaps may remain between them.
Join cream yarn at the base of one gap.
Work sc stitches upward along the edge of one lobe. Near the deepest part of the valley, use slip stitches instead of taller stitches. Continue with sc along the adjacent lobe.
Repeat between all five principal sections.
Keep the valleys deep. Filling them too aggressively changes the maple leaf into a nearly circular mat.
Creating the Smaller Maple Leaf Points
The photographed outline contains many secondary teeth. Add them during the perimeter round rather than constructing each tooth as a separate piece.
Join cream at the lower edge near the stem position.
Work sc evenly along the perimeter until reaching a location for a small tooth.
For each small point work:
(sc, hdc, dc, ch 2, sl st in second ch from hook, dc, hdc, sc)
Continue with sc stitches between points.
Place approximately 2–3 secondary points on each large lobe. Keep the points nearest the valleys shorter than those closer to the principal tips.
At each major lobe tip, use a taller point:
(hdc, dc, tr, ch 2, sl st in second ch from hook, tr, dc, hdc)
Continue around the complete leaf.
Fasten off.
Olive Green Pointed Border
Yarn: olive green.
The contrast border should trace the existing silhouette rather than cover it.
Join olive yarn at the base of the leaf.
Work one sc into each available cream edge stitch.
At every small cream point, work:
(sc, ch 2, sl st in second ch from hook, sc)
At each major lobe tip, work:
(sc, ch 3, sl st in second ch from hook, sl st in next ch, sc)
In deep valleys between lobes, use a slip stitch or one tight sc so the indentation remains sharp.
Continue around the complete leaf and fasten off.
The olive edging should measure only a few millimeters in depth. A wide contrast border will visually reduce the cream body and soften the serrated outline.
Raised Central Vein
The branching green vein system is the defining feature of the photographed leaf. It is added with surface slip stitches after the cream body has been completed.
Lay the leaf right side up.
Identify the central junction where all five lobes meet.
Insert the hook from the front near this junction and pull a loop of olive yarn through from the back.
Insert the hook through the fabric approximately one stitch farther toward the center lobe. Pull up another loop and draw it through the loop already on the hook.
Continue working surface slip stitches in a straight line toward the central tip.
Stop approximately 1–2 cm before the outer border.
Fasten off on the wrong side.
Keep the surface stitches loose. Tight surface crochet contracts the cream fabric and can make the central lobe curl upward.
Major Side Veins
Return to the central junction.
Work one olive surface-slip-stitch line toward the tip of the upper left lobe.
Repeat toward the upper right lobe.
Add one line toward each lower lobe.
You should now have five principal raised veins radiating from the same central point.
Compare the left and right sides before adding secondary branches. The major veins should terminate at similar distances from their corresponding tips.
Secondary Branching Veins
The photograph contains multiple smaller branches extending from each main vein.
Beginning approximately one-third of the way along the central vein, join olive yarn and work a short diagonal line toward the outer edge.
Fasten off before reaching the border.
Add a corresponding branch on the opposite side of the central vein.
Repeat farther up the lobe.
For the center lobe, work approximately 3 pairs of secondary veins.
For each upper side lobe, work approximately 2–3 branches.
For each lower lobe, work approximately 2 branches.
Angle the branches toward the perimeter rather than placing them perpendicular to the main vein.
Hide every yarn tail on the wrong side without pulling the surface crochet tighter.
Crochet Stem
Yarn: olive green.
The stem extends directly from the same central junction as the veins.
Foundation: Ch 26.
Row 1: Sc in second ch from hook and across. (25 sts)
Turn and work along the opposite side of the foundation chain.
Row 2: Sc across the opposite side, placing 3 sc around the final chain at the lower tip before continuing back toward the leaf. This creates a rounded stem end.
At the leaf end, work several additional sc stitches around the upper edge to widen the attachment point.
Fasten off, leaving a 25–30 cm sewing tail.
Stem Hanging Loop
The photograph includes a small opening near the stem tip.
To reproduce it, replace the stitches around the lower center of the stem with:
Ch 4, skip 2 sts, sc in next st.
On the return pass, work 4 sc into the ch-4 space.
This creates a reinforced opening approximately 1 cm across, depending on gauge.
Attaching the Stem
Position the broad end of the stem behind the lower center of the leaf.
The stem’s center line should align with the central raised vein.
Pin it before sewing.
Using the long olive tail, sew around the widened stem base. Catch the cream body without bringing large stitches through to the front.
Pass the needle through the central junction several times for reinforcement.
Weave the remaining tail into the back of the stem.
Optional Continuous Central Vein
For a stronger visual connection between leaf and stem, continue the surface crochet over the stem after attachment.
Join olive yarn at the bottom stem tip.
Work surface slip stitches along the middle of the stem toward the leaf.
Continue through the attachment area and directly up the center lobe.
This creates one uninterrupted raised line from the bottom of the stem to the highest leaf point.
Blocking the Maple Leaf
Blocking determines whether the smaller teeth remain sharp or curl inward.
Dampen the finished piece according to the yarn’s care instructions.
Place it right side up on a blocking mat.
Pin the central lobe first.
Next, pin the two upper side lobes at equal angles. Pin the lower pair after checking that the center vein remains vertical.
Pull every small perimeter point outward individually.
Keep the deep valleys between the lobes pushed inward.
Finally, straighten the stem and pin its rounded tip.
Target approximately 35–40 cm across the widest points. Allow the leaf to dry completely before removing the pins.
How to Make a Smaller Maple Leaf
The same color treatment can be used for a coaster or smaller table decoration, but simply shrinking the hook while retaining the full placemat stitch structure may produce overly dense fabric.
For a smaller motif, use DK/#3 yarn and a 3–3.5 mm hook and reduce the number of rows in each lobe.
Published DK maple leaves worked with a 3.5 mm hook can measure approximately 15–17 cm. Smaller sport-weight designs also exist at approximately 10–12 cm.
Keep the central lobe longest regardless of scale. The proportions are more important to the maple silhouette than any single finished measurement.
How to Make a Larger Maple Leaf Placemat
For a larger centerpiece, use medium cotton with a 4–4.5 mm hook or add rows before beginning each lobe’s decreases.
Add the same number of expansion rows to the left and right upper lobes so the leaf remains balanced.
Increasing the center lobe by two rows while leaving the side lobes unchanged produces a taller leaf. Adding two rows to all five lobes increases both height and width.
Make the stem proportionally longer when scaling the body. A very short stem under a 40 cm leaf can appear visually undersized.
Assembly
- Crochet the central cream foundation and mark five evenly distributed lobe positions.
- Complete the long center lobe before making the matching upper side lobes.
- Add the two shorter lower lobes and fill only the necessary gaps between sections.
- Work the secondary cream points around the perimeter while preserving deep valleys.
- Add the narrow olive border around every lobe, tooth and indentation.
- Surface crochet the main center vein from the junction toward the highest point.
- Add four major side veins followed by the smaller diagonal branches.
- Crochet the olive stem, including the optional hanging opening near its lower tip.
- Sew the stem behind the central junction so it aligns with the main vein.
- Block the complete maple leaf, pinning every major and secondary point separately.
The finished piece should lie flat with five clearly different major lobes, a continuous olive outline and raised veins radiating from the stem junction.
7 Technical Tips for a Better Crochet Maple Leaf
- Mark all five lobe directions before crocheting the first point. A position error of only two or three foundation stitches can make one side visibly wider than the other.
- Keep the center lobe approximately 10–15% longer than the upper side lobes. Five lobes of equal length create a star-like outline instead of the elongated maple silhouette shown in the photograph.
- Do not fill the valleys with tall stitches. Double crochet in the deepest indentation rounds off the separation between lobes; use slip stitches or compact single crochet there.
- Stop the surface veins 1–2 cm before the olive perimeter. Running every branch directly into the border makes the vein network look crowded and can distort the small edge points.
- Keep surface slip stitches visibly looser than ordinary slip stitches. Tight surface crochet shortens the cream fabric beneath it and causes a lobe to curl along its vein.
- Pin every secondary tooth during blocking. Leaving even three or four small points unpinned creates rounded sections that interrupt the serrated maple outline.
- Align the stem within 5 mm of the central vein axis before sewing. An off-center stem makes the otherwise symmetrical vein structure appear tilted even when the leaf body itself is correctly shaped.
Choosing Yarn for a Maple Leaf Placemat
Cotton is particularly useful for a flat decorative leaf because it produces crisp stitch definition and responds predictably to blocking. Mercerized cotton gives the raised veins additional definition, while matte cotton creates a softer surface.
Published maple leaf patterns demonstrate a broad range of workable yarns. One sport-weight design uses a 3 mm hook and measures approximately 11.4 × 5 cm, while a thread version worked with a 2.25 mm hook measures approximately 10 × 11.4 cm. Another worsted-weight cotton design uses a 3.5 mm hook and produces a leaf approximately 25 cm tall by 23 cm wide.
Those differences make gauge particularly important when the finished leaf must function as a placemat. Complete and block a small swatch before committing to the full project if a specific table setting requires exact dimensions.
Keeping the Raised Veins Flat
Surface crochet adds yarn to only one face of the fabric. If those stitches are worked tightly, they act like drawstrings and contract the leaf.
After every 8–10 surface slip stitches, place the leaf on the table and check the fabric beneath the new vein.
If the cream section begins puckering, pull the most recent olive stitches slightly larger before proceeding.
Do not attempt to correct severe puckering solely through blocking. Releasing excessive surface-crochet tension produces a more stable result.
The secondary veins need even less tension because they cross shorter distances. Their purpose is to create raised directional lines, not to shape the lobes.
Using the Maple Leaf as Autumn Table Decor
The cream-and-olive palette makes the shape readable without depending on conventional red or orange yarn. It can therefore sit beside pumpkins, pinecones and stronger autumn colors without competing with them.
For a coordinated table set, make several leaves at the same gauge and block them against one paper template. This keeps the lobe angles and stem lengths consistent.
A single larger leaf can be used beneath a centerpiece. Smaller versions can serve as decorative mats or seasonal appliqués.
If the piece will regularly support hot cookware, select a heat-appropriate natural fiber and follow the yarn manufacturer’s temperature and care guidance. Decorative acrylic versions should not be treated as heat-resistant trivets.
Finishing the Crochet Maple Leaf
Inspect the wrong side before the final blocking. Surface-crochet ends should be woven through matching olive stitches rather than carried visibly across the cream background.
Check the five major tips next. Each should terminate in a defined point, with smaller teeth descending toward the valleys.
Lay a ruler along the central vein and stem. Both should follow the same visual axis.
After blocking and drying, flex the mat gently rather than folding it sharply. Store it flat when possible so the secondary points retain their shape.
Conclusion
The branching vein system is what turns this crochet maple leaf placemat pattern from a simple five-point motif into a more botanical table piece. Establish the five unequal cream lobes first, preserve the deep valleys, and add the secondary teeth before outlining everything in olive. Surface crochet the five major veins loosely, then add shorter branches without carrying them all the way to the perimeter. The next practical step is to make and block the cream body before cutting yarn for the raised vein work. Save the finished leaf to Pinterest or share it on Instagram with #OliveVeinMapleLeaf. Would you keep the cream body, or replace it with rust while retaining the olive veins?








