Introduction
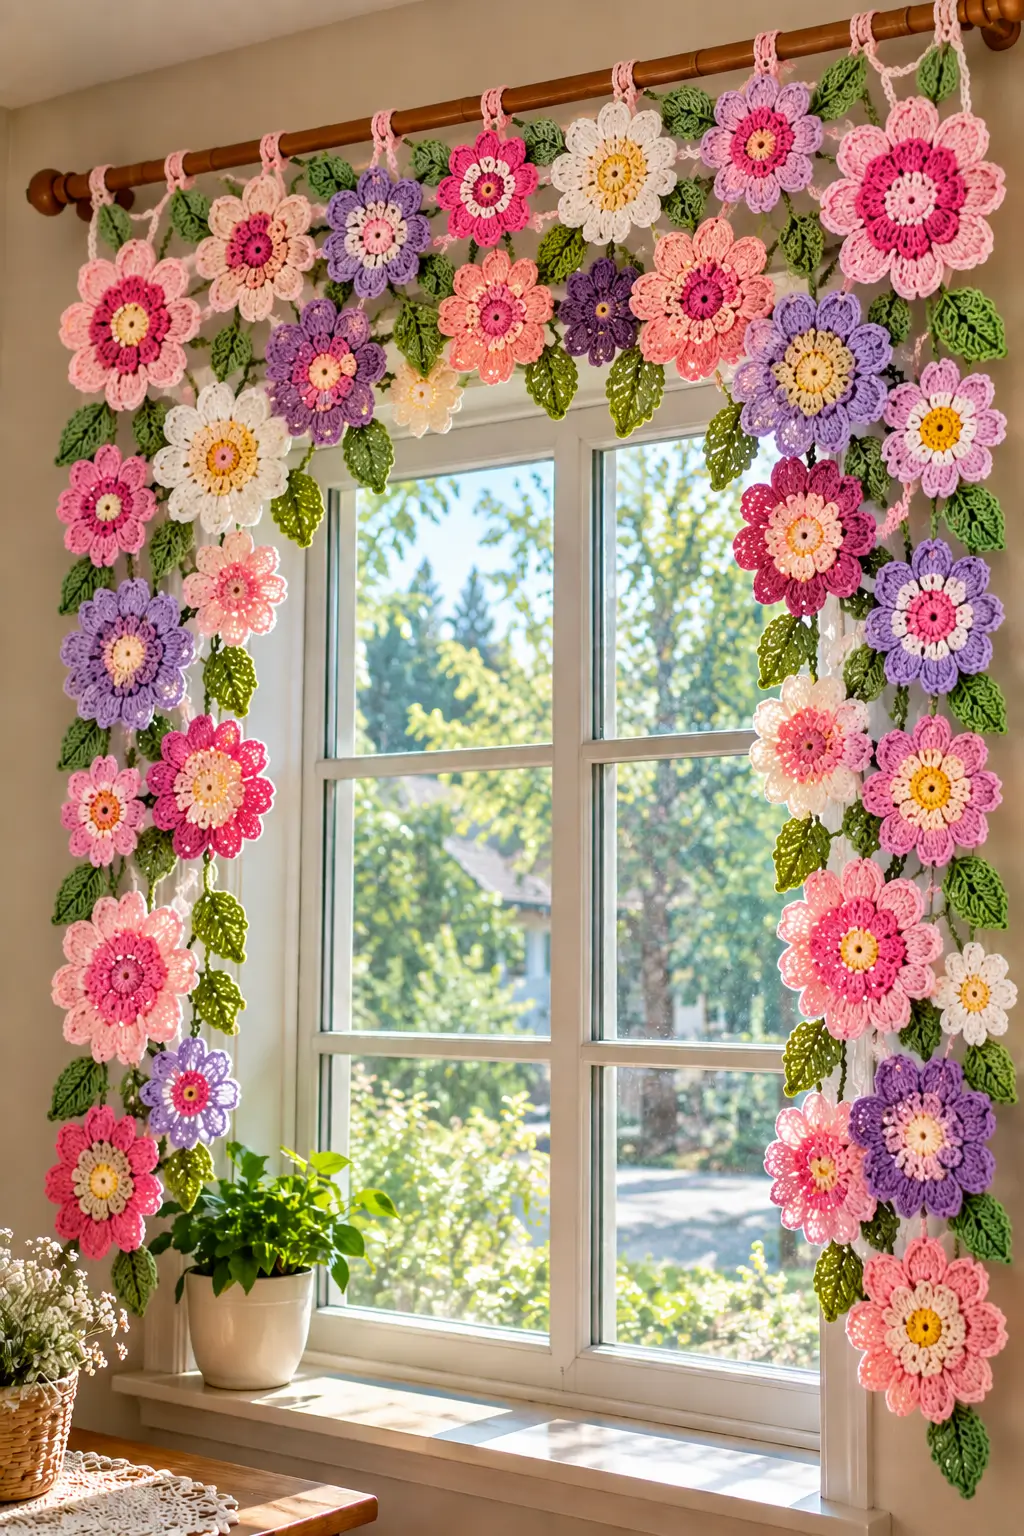
A flower curtain needs more than one petal shape or the window starts reading as a row of identical medallions. This crochet flower garland pattern uses layered blooms, pointed leaves and adjustable chains to reproduce the varied botanical structure in the reference design. Work it in DK cotton with a 3.5 mm hook; large flowers finish near 9–11 cm. The project suits intermediate crocheters and can be resized to fit a specific window.
The Design: What Makes This Flower Garland Different
The arrangement depends on three structural decisions. First, the flowers use contrasting center, inner-petal and outer-petal colors instead of a single flat round. That extra layer creates the visual depth needed for a layered crochet flower pattern.
Second, leaves are distributed between blooms rather than placed only at the ends. Green breaks up neighboring pink and purple motifs and gives the crochet flower curtain a less geometric outline.
Third, flower sizes and colors are intentionally mixed. Repeating every motif at identical intervals would produce a conventional bunting effect rather than a dense floral border. A frequent construction mistake is attaching every flower before testing the garland vertically. Weight changes spacing. Pin the major blooms in position first, then add leaves and smaller flowers to the remaining gaps.
Project Info at a Glance
| Skill Level | Time | Finished Size | Hook | Best For |
|---|---|---|---|---|
| Intermediate | 12–20 hours for a large installation | Large flowers approx. 9–11 cm; customizable garland | 3.5 mm | Windows, wall borders, curtain rods |
Published DK-cotton flower patterns support a 3.5 mm hook, while finished flower dimensions vary according to construction, yarn and tension. For this project, approximately 9–11 cm is a practical target for the largest blooms.
Materials and Tools
Yarn
- Pink — DK cotton — approximately 50–70 g
- Fuchsia — DK cotton — approximately 30–40 g
- Blush or coral — DK cotton — approximately 40–50 g
- Lavender or purple — DK cotton — approximately 40–50 g
- Cream or white — DK cotton — approximately 25–35 g
- Yellow — DK cotton — approximately 10–15 g
- Olive or leaf green — DK cotton — approximately 75–100 g
Yarn quantities are estimates for a curtain-scale arrangement. Actual consumption depends on the dimensions of the window, number of motifs, yarn brand and individual tension.
Tools
- 3.5 mm crochet hook
- Tapestry needle
- Scissors
- Stitch markers
- Rustproof blocking pins
- Blocking mat
- Measuring tape
No stuffing or safety eyes are required for this crochet flower garland.
Abbreviations
- MR — magic ring
- sc — single crochet
- inc — two sc in one stitch
- dec — single crochet decrease
- sl st — slip stitch
- ch — chain
- hdc — half double crochet
- dc — double crochet
- tr — treble crochet
- BLO — back loop only
- sp — space
- st/sts — stitch/stitches
An invisible decrease is formed by catching the front loops of two consecutive stitches before completing one sc. It is not required for the flat flower and leaf motifs in this pattern.
Pattern — Step by Step
The flowers are worked primarily in joined rounds rather than a continuous amigurumi spiral. Each major flower begins with a six-stitch magic-ring foundation to keep the center compact.
Large Layered Flower
Make approximately 18–24 for a large window installation.
Yarn: center color, inner-petal color and outer-petal color.
R1: 6 sc in MR (6)
R2: inc ×6 (12)
R3: (sc, inc) ×6 (18)
Change to the inner-petal color.
R4: Work (sl st in next st, ch 3, 2 dc in next st, ch 3, sl st in next st) around the center, distributing six inner petals evenly.
Fasten off.
Join the outer-petal color behind R4.
R5: Working around the rear of each inner petal, ch 5 and anchor with a sl st between petals. Repeat around to form 6 chain spaces.
R6: In each ch-5 space work (sc, hdc, 3 dc, hdc, sc). Repeat for all 6 petals.
R7: Work a finishing edge around each outer petal using sl st, ch 1 and sc as needed to define the petal crown.
Fasten off. Leave approximately 20 cm of yarn if the flower will be sewn directly to the connecting vine.
Rotate the color combinations instead of making every flower identical. Useful combinations include yellow, cream and pink; fuchsia, blush and coral; pink, cream and lavender; and cream, yellow and white.
Medium Flower
Make 8–12.
Yarn: two or three flower colors.
R1: 6 sc in MR (6)
R2: inc ×6 (12)
Change color.
R3: Create six evenly spaced petals using groups of sl st, ch 2, hdc, dc, hdc, ch 2 and sl st.
Fasten off the first petal layer.
R4: Join contrasting yarn behind the petals. Ch 4 and sl st between adjacent petals. Repeat 6 times.
R5: In each ch-4 space work (sc, hdc, 2 dc, hdc, sc).
Fasten off. Leave a 15–20 cm sewing tail.
Small Accent Flower
Make 5–8.
R1: 6 sc in MR (6)
R2: inc ×6 (12)
R3: Work small petal groups evenly around the center using sl st, ch 2, 2 dc, ch 2 and sl st.
Fasten off and weave in the center tail.
Use the smaller flowers to fill open spaces between the dominant layered blooms. Avoid positioning every small flower at the same height; staggered placement gives the finished border a more botanical structure.
Flower Center Disc
Make one for each bloom that needs an additional raised center.
R1: 6 sc in MR (6)
R2: inc ×6 (12)
R3: (sc, inc) ×6 (18)
Fasten off with a 20 cm tail.
Sew the disc over the main flower center. Catch the back loops or rear portions of the stitches so the attachment thread remains hidden from the front.
Small Decorative Center Patch
The contrasting circular centers visible on many flowers can be worked as separate flat patches.
R1: 6 sc in MR (6)
R2: inc ×6 (12)
Fasten off. Leave approximately 15 cm for sewing.
Use cream, pale pink or yellow against darker flowers. A contrasting center separates the petal tiers and keeps the flower structure readable when several motifs overlap.
Pointed Crochet Leaf
Make approximately 30–45.
Yarn: olive or leaf green.
Foundation: ch 12.
Row 1: Starting in the second ch from the hook, work sl st, sc, hdc, dc in the next 5 ch, hdc, sc and sl st toward the end of the foundation.
Do not turn. Rotate the foundation chain and work along the unused loops on the opposite side.
Row 2: Work sl st, sc, hdc, dc across the central section, followed by hdc, sc and sl st toward the leaf tip.
Vein: ch 1, then surface sl st along the center foundation chain toward the stem.
Stem: ch 4.
Fasten off with a 15 cm tail.
For a more openwork leaf, replace selected dc stitches with ch-1 spaces. The openings reduce the visual density of the foliage and distinguish the leaves from the solid flower petals.
Connecting Vine
Make three principal sections: one upper horizontal section and two vertical side sections.
Use green, pale pink or another coordinating DK cotton.
Foundation: Chain until the cord measures the required window edge plus approximately 20–30 cm for adjustment.
Row 1: Starting in the second chain from the hook, sl st loosely across the full chain.
Fasten off.
For individual hanging branches, join yarn to the main vine and ch 8–25 depending on the required drop.
Attach one flower or leaf through a rear loop using a sl st. Continue chaining if another motif needs to sit farther down the same branch.
Do not make every branch the same length. Alternating short and long drops prevents the finished crochet floral garland from developing a rigid grid.
Curtain-Rod Hanging Loop
Make approximately 6–10 depending on the width and finished weight of the garland.
Foundation: ch 18.
Check the chain around the intended curtain rod before joining.
R1: sl st into the first ch to form a loop.
R2: sl st in each chain around (18).
Fasten off with approximately 20 cm of yarn. Sew the loop securely to the upper connecting vine.
For a thicker curtain rod, add foundation chains until the loop passes around the rod without stretching the cotton.
Assembly
- Block every large and medium flower to its intended diameter before joining. Keep the principal blooms around 9–11 cm for a balanced window-scale arrangement.
- Lay the upper connecting vine flat and position the largest flowers first. Leave intentionally irregular spaces rather than measuring identical intervals.
- Sew contrasting center discs onto selected flowers. Pass the needle through the rear portions of the stitches to keep the joining thread out of sight.
- Position the medium and small flowers between the dominant blooms. Rotate the color combinations so identical flowers rarely sit directly beside one another.
- Pin the leaves beside flower edges with their tips pointing in different directions. Sew primarily through the stems so most of each leaf remains free.
- Construct the left and right vertical sections separately. Measure each section against the window because the motif counts do not need to match exactly.
- Add short chain branches behind crowded flower groups. Use longer branches for isolated leaves and small accent flowers.
- Attach the upper section to both side sections with several secure whip stitches through the connecting cords. Reinforce these junctions because they carry the weight of the vertical garlands.
- Sew the hanging loops across the upper edge. Place additional loops near corners and beneath particularly heavy flower groups.
- Hang the completed piece and check its actual drape. Weave remaining yarn tails through at least 3–4 cm of matching stitches before trimming them.
The completed piece should form a three-sided floral frame with layered blossoms, green foliage and deliberate variation in motif spacing.
7 Technical Tips for a Better Crochet Flower Garland
- Mark the start of every center round. Losing the first stitch can turn a 12-stitch center into 13 stitches, shifting the petal spacing and creating an obvious extra gap.
- Keep the largest flowers near 9–11 cm after blocking. If one expands beyond roughly 12 cm while neighboring flowers remain near 9 cm, reduce the outer-petal height or test a hook approximately 0.5 mm smaller.
- Watch for cupping at the flower center. A center that rises sharply after the third round can indicate excessive tension or an incorrectly worked stitch count.
- Check color contrast before cutting the previous yarn. A dark center placed against an equally dark inner-petal layer can hide the layered construction when the garland is viewed from several feet away.
- Pin each leaf by its stem before sewing. Sewing through the full leaf blade can make the foliage lie rigidly against the vine instead of projecting naturally around the flowers.
- Measure hanging loops on the actual curtain rod. A loop even 5 mm too short may stretch under the finished weight and distort the upper edge.
- Give load-bearing yarn tails extra weaving distance. At hanging loops and corner junctions, weave tails through at least 4 cm of stitches because short tails can work loose under sustained downward tension.
Conclusion
The finished installation works because flower diameter, color order and leaf placement change across the window rather than repeating as a fixed unit. Crochet the large blooms first, block one to approximately 9–11 cm, then use that sample to set the scale for every remaining component. Your next step is to measure the top and both sides of the intended window before calculating motif quantities. Save this crochet flower garland pattern to Pinterest and share the finished arrangement on Instagram with #LayeredFlowerWindowGarland. When planning your version, decide one detail before buying yarn: will the largest flowers stay mainly pink, or will purple become the dominant outer-petal color?









