Introduction
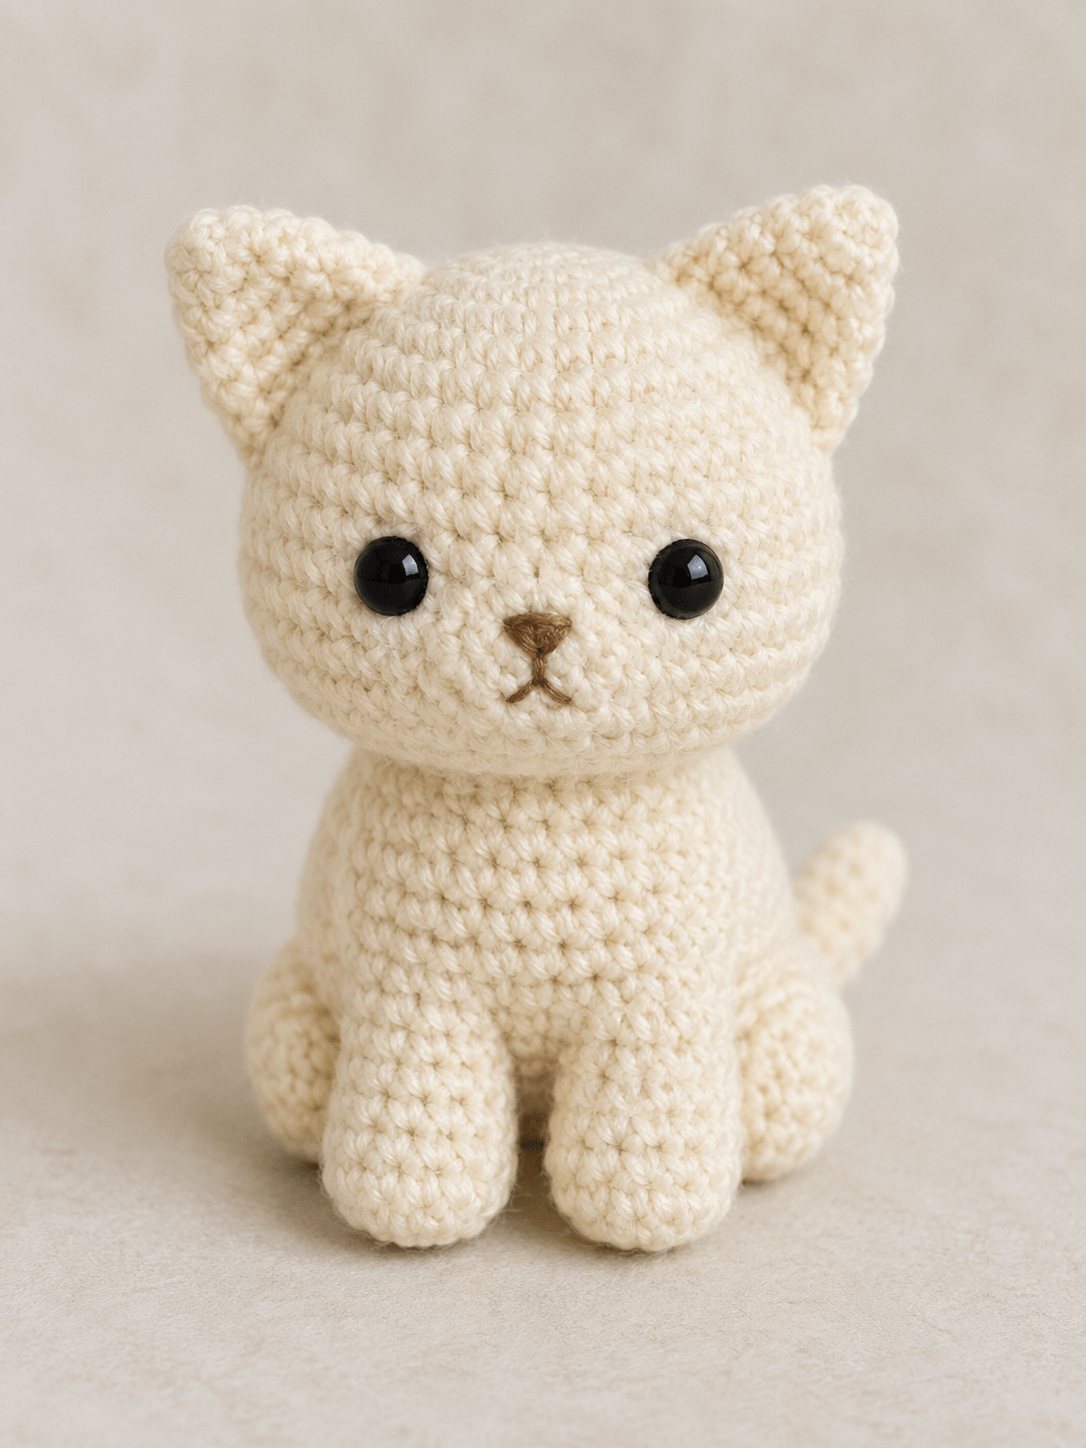
A kitten’s triangular ears must remain visible above a head that is nearly as wide as its seated body. This cat amigurumi crochet pattern uses a 36-stitch head, compact muzzle and broad rear legs to reproduce that proportion. Work it with DK yarn and a 2.5 mm hook for a figure measuring approximately 19 cm. The project suits an intermediate maker and creates a stable photography or display model.
The Design: What Makes This Sitting Kitten Different
The head reaches a 36-stitch plateau and holds that width for eight rounds, producing the broad feline forehead visible in the reference image. A separate muzzle adds projection without forcing the entire face into an elongated shape. Below it, the body narrows at the neck and expands toward the seated base, transferring weight toward the two rounded haunches. The front legs remain narrow and vertical so they do not conceal that body outline. This cream crochet kitten also uses a lightly filled tail that curves upward behind one back leg. Position matters. A frequent error in a sitting cat crochet pattern is attaching the ears directly above the eyes; that arrangement reduces the forehead and makes the face resemble a fox. Here, each ear begins outside the eye line and angles outward by approximately 15 degrees.
Project Information at a Glance
| Skill Level | Time | Finished Size | Hook | Best For |
|---|---|---|---|---|
| Intermediate | 7–9 hours | Approximately 19 cm seated | 2.5 mm | Display, nursery styling and project photography |
A published sport-weight cat measures 19 cm while seated when made with a 2.5 mm hook. Personal tension, fiber content and stuffing pressure may change the final measurement.
Materials and Tools
Yarn
- Warm cream — DK weight — allow 60 g — Paintbox Yarns Cotton DK, Scheepjes Catona held to DK gauge or a comparable smooth yarn
- Light cream — DK weight — allow 3 g — optional cheek patches
- Medium brown — embroidery yarn — allow 2 g — nose and mouth
A published miniature cat lists 50 g of its main worsted-weight color. The 60 g allowance accounts for the larger head, separate muzzle and long tail used in this version.
Tools
- 2.5 mm crochet hook
- Two 10–12 mm black safety eyes
- Polyester stuffing
- Yarn needle
- Embroidery needle
- Locking stitch markers
- Ball-head pins
- Scissors
Replace the plastic eyes with tightly embroidered eyes when the finished cat is intended for a child younger than three years.
Abbreviations
- MR — magic ring
- sc — single crochet
- inc — two single crochets in one stitch
- dec — decrease over two stitches
- sl st — slip stitch
- ch — chain
- BLO — back loop only
- st/sts — stitch/stitches
For an invisible decrease, insert the hook beneath the front loops of the next two stitches, draw up one loop and complete a single crochet through the remaining loops.
Pattern — Step by Step
Work in a continuous spiral unless a section states otherwise. Mark the first stitch of each round.
Head
Yarn: warm cream — original construction using standard amigurumi sphere math.
R1: 6 sc in MR (6)
R2: inc ×6 (12)
R3: (sc, inc) ×6 (18)
R4: (2 sc, inc) ×6 (24)
R5: (3 sc, inc) ×6 (30)
R6: (4 sc, inc) ×6 (36)
R7–R14: sc around (36)
R15: (4 sc, dec) ×6 (30)
R16: sc around (30)
R17: (3 sc, dec) ×6 (24)
Insert the eyes between R10 and R11 with nine visible stitches between their inner edges. Pin the muzzle beneath them before securing the washers.
R18: (2 sc, dec) ×6 (18)
R19: (sc, dec) ×6 (12)
Stuff the sides and crown firmly. Keep the lower front section slightly softer so the muzzle can settle into the surface.
R20: dec ×6 (6)
Fasten off. Leave a 35 cm tail and close the opening through the front loops.
Body
Yarn: warm cream — original tapered body construction.
R1: 6 sc in MR (6)
R2: inc ×6 (12)
R3: (sc, inc) ×6 (18)
R4: (2 sc, inc) ×6 (24)
R5: (3 sc, inc) ×6 (30)
R6: (4 sc, inc) ×6 (36)
R7–R11: sc around (36)
R12: (4 sc, dec) ×6 (30)
R13–R15: sc around (30)
R16: (3 sc, dec) ×6 (24)
R17–R18: sc around (24)
R19: (2 sc, dec) ×6 (18)
Fill the lower half firmly. Add smaller pieces of stuffing above R15 to preserve the narrower neck.
R20: sc around (18)
R21: (sc, dec) ×6 (12)
R22: dec ×6 (6)
Fasten off. Leave a 40 cm tail for joining the body to the head.
Front Legs — Make 2
Yarn: warm cream — original narrow-leg construction.
R1: 6 sc in MR (6)
R2: inc ×6 (12)
R3: (sc, inc) ×6 (18)
R4: BLO sc around (18)
R5–R7: sc around (18)
R8: (sc, dec) ×6 (12)
R9–R16: sc around (12)
Stuff R1–R11 firmly. Leave the upper five rounds lightly filled so each leg can lie against the chest.
Flatten the opening and work 6 sc through both layers (6).
Fasten off. Leave a 30 cm sewing tail.
Back Legs — Make 2
Yarn: warm cream — original rounded-haunch construction.
R1: 6 sc in MR (6)
R2: inc ×6 (12)
R3: (sc, inc) ×6 (18)
R4: (2 sc, inc) ×6 (24)
R5–R7: sc around (24)
R8: (2 sc, dec) ×6 (18)
R9: sc around (18)
R10: (sc, dec) ×6 (12)
R11–R12: sc around (12)
Pack the base firmly and leave the final round unstuffed. Shape the filled section into a low oval rather than a vertical cylinder.
Flatten the opening and work 6 sc through both layers (6).
Fasten off. Leave a 30 cm sewing tail.
Ears — Make 2
Yarn: warm cream — worked in turning rows.
Row 1: ch 2, 2 sc in second ch from hook (2)
Row 2: ch 1, turn, inc ×2 (4)
Row 3: ch 1, turn, sc across (4)
Row 4: ch 1, turn, inc, 2 sc, inc (6)
Row 5: ch 1, turn, sc across (6)
Row 6: ch 1, turn, inc, 4 sc, inc (8)
Row 7: ch 1, turn, sc across (8)
Row 8: ch 1, turn, inc, 6 sc, inc (10)
Work sc evenly down the first side, place 3 sc in the starting point and continue up the second side. Do not crochet across the lower edge.
Do not stuff. Pinch the lower corners toward each other by 5 mm and secure them with one stitch.
Fasten off. Leave a 35 cm sewing tail.
Muzzle
Yarn: warm cream — original shallow oval construction.
R1: 6 sc in MR (6)
R2: inc ×6 (12)
R3: (sc, inc) ×6 (18)
R4–R5: sc around (18)
Add only a thin layer of stuffing. The finished muzzle should project approximately 12 mm from the face.
Fasten off. Leave a 30 cm sewing tail.
Cheek Patches — Make 2
Yarn: light cream — optional low-contrast circles.
R1: 6 sc in MR (6)
R2: inc ×6 (12)
Join with a sl st. Do not stuff.
Fasten off. Leave a 15 cm tail. Use the main cream yarn when a nearly invisible patch is preferred.
Tail
Yarn: warm cream — original tapered tube construction.
R1: 6 sc in MR (6)
R2: inc ×6 (12)
R3–R17: sc around (12)
R18: (2 sc, dec) ×3 (9)
R19–R24: sc around (9)
Stuff the first 17 rounds lightly. Leave R18–R24 empty so the attachment end can sit flat. Shape the filled section into a gradual upward curve while adding fiber.
Flatten the opening and work 4 sc through both layers, leaving one stitch unused (4).
Fasten off. Leave a 30 cm sewing tail.
Nose and Mouth
Yarn: medium brown embroidery yarn.
Mark an inverted triangle measuring 8 mm across and 6 mm high at the center of the muzzle. Fill the triangle with six to eight horizontal stitches.
Bring the yarn down 7 mm from the bottom point. Form one diagonal stitch to the left and another to the right, creating a shallow inverted Y.
Fasten the embroidery yarn inside the head or conceal the end beneath the muzzle seam.
Assembly
- Center the body beneath the head, placing the neck slightly behind the head’s midpoint. Sew around the connection twice.
- Pin the muzzle between R11 and R16 of the head. Its upper edge should sit approximately one round below the eyes.
- Sew around the muzzle, adding the final pinch of stuffing before closing the last 2 cm of the seam.
- Embroider the triangular nose and inverted-Y mouth at the exact center of the muzzle.
- Place the optional cheek patches below and outside the eyes. Sew them flat with matching yarn.
- Pin the front legs vertically against the body with approximately three stitches between their inner edges.
- Attach each back leg beside the lower body, keeping its widest section in contact with the work surface.
- Position the ears between R3 and R8 of the head. Angle each outer point away from the center by approximately 15 degrees before sewing.
- Attach the tail at the rear around R8–R10 of the body. Rotate the curve upward and test the seated balance before completing the seam.
- Weave each yarn end through three stitch directions, trim the excess and press the figure onto a flat surface to set the four contact points.
The completed kitten should rest on both front feet and both back-leg bases without support from the tail.
7 Technical Tips
- Spiral drift: An unmarked round can move the facial center by several stitches. Keep a locking marker in the first stitch and count every increase round before continuing.
- Pointed head: Excess stuffing near the six-stitch closure creates a cone at the crown. Stop adding fiber when the surface compresses by approximately 5 mm under finger pressure.
- Decrease holes: Standard two-loop decreases can expose white stuffing through the cream fabric. Work each head and body decrease through the front loops only.
- Wide eye placement: More than 11 visible stitches between the inner eye edges makes the muzzle appear undersized. Begin with nine visible stitches and inspect the face from one metre away.
- Asymmetrical ears: Sewing the first ear before pinning the second can shift the forehead center. Pin both inner ear corners 18–20 stitches apart and compare their heights with a ruler.
- Rocking base: A back leg attached more than 5 mm higher than the other creates three-point contact. Test all four leg surfaces on a hard table before closing the seams.
- Collapsing tail: Heavy stuffing near the tail base pushes the body forward. Leave the final six tail rounds empty and attach the flattened section across four body stitches.
Conclusion
Measure the ear height and seated base before recording the project as complete. Both ear points should rise evenly above the crown, the muzzle should remain centered between the eyes, and the tail must curve upward without carrying the figure’s weight. Note the yarn brand, hook size and finished height because changing any one of those variables alters the sewing measurements. The next step is to pin both ears and all four legs at the same time, then inspect the silhouette from the front and side. Save this cat amigurumi crochet pattern to a dedicated Pinterest board and share the finished kitten on Instagram with #CreamSittingKitten. Will your cat have the short upright tail shown here or a longer curve around one back paw?









