Introduction
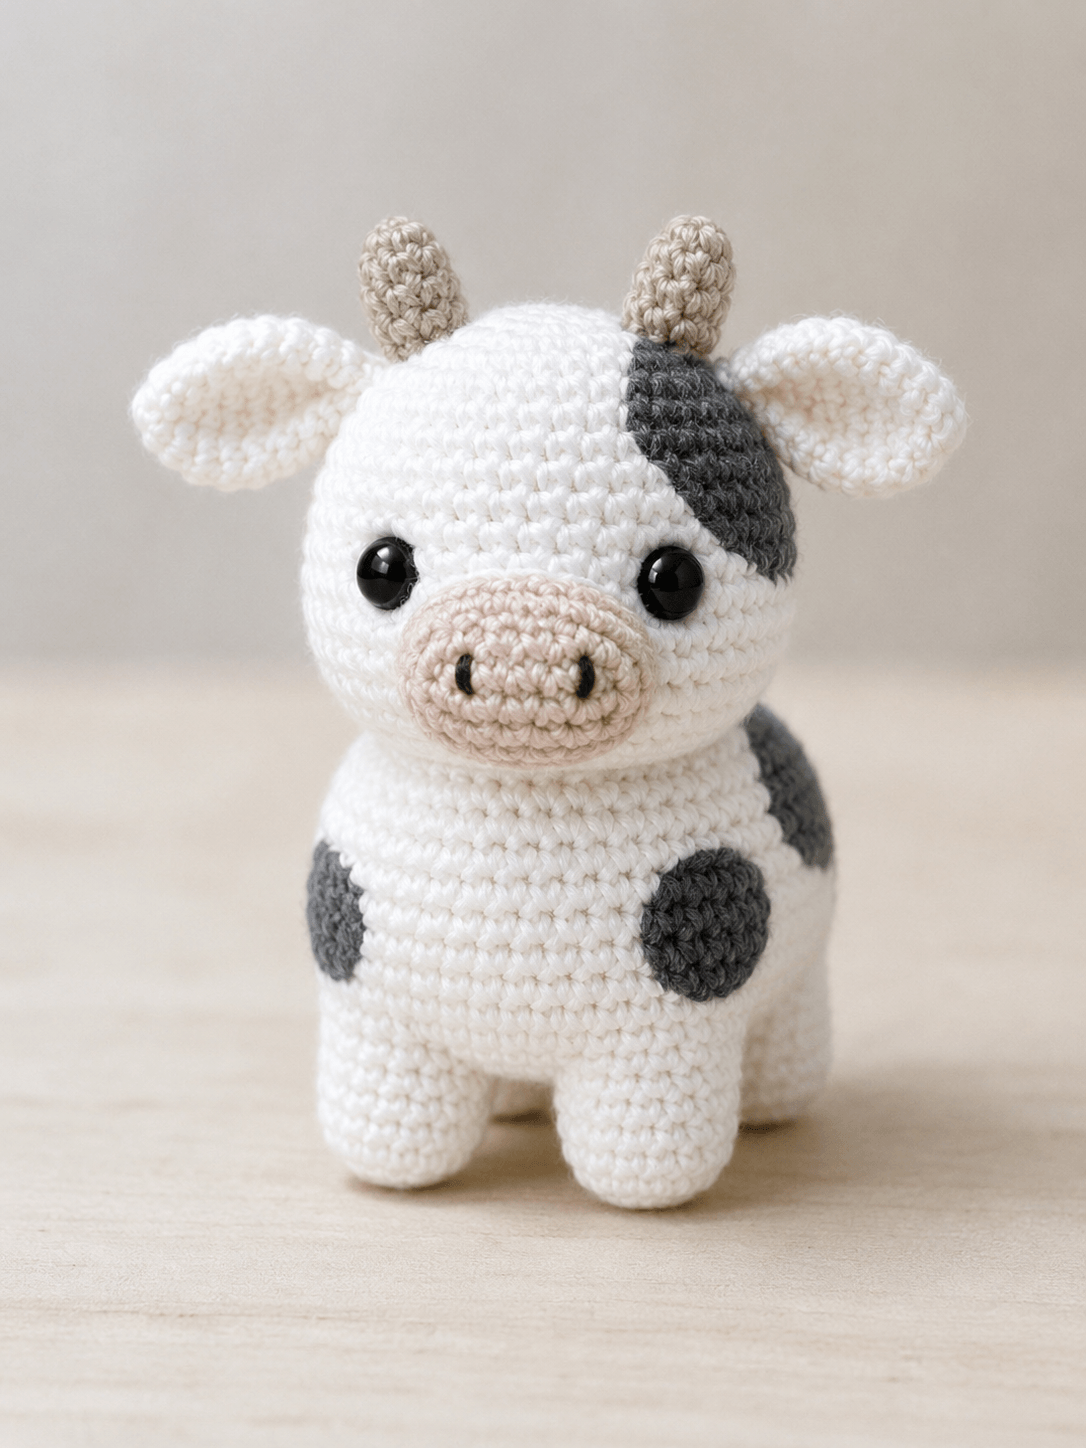
A dairy cow needs two horns, four weight-bearing legs and an irregular forehead patch before the silhouette reads correctly. This cow amigurumi crochet pattern uses worsted yarn, a 3.5 mm hook and separate flat markings to reproduce those features. The finished figure measures approximately 24 cm and requires intermediate assembly skills. Its broad stance provides a stable model for farm displays and product photography.
The Design: What Makes This Cow Different
The head and body both reach 42 stitches, but their plateau lengths differ. A longer head plateau creates the broad bovine face, while the extended body produces a compact barrel shape. The raised oval muzzle is crocheted separately because a flat embroidered snout would disappear beneath the large eyes. Five irregular patches are also added as surface pieces instead of abrupt in-round color changes. This method gives the black and white cow amigurumi controlled markings without carrying dark yarn through the white fabric. One common mistake in a standing crochet cow is placing the horns outside the ears. Realistic spacing requires each horn to sit nearer the crown, with the ear attached beyond it. The maker should pin both pairs simultaneously; from the front, the horns form a narrow inner pair and the ears form a wider horizontal pair.
Project Info at a Glance
| Skill Level | Time | Finished Size | Hook | Best For |
|---|---|---|---|---|
| Intermediate | 8–10 hours | Approximately 24 cm | 3.5 mm | Farm displays, nursery shelves and photography |
The selected size is based on a published worsted-weight cow measuring approximately 23 cm. A 3.5 mm hook and category-four yarn also appear together in a verified 13-inch cow design.
Materials and Tools
Yarn
- White — category-four worsted — approximately 105 g — Paintbox Yarns Simply Aran, Stylecraft Special Aran or similar smooth yarn
- Charcoal gray — category-four worsted — approximately 18 g — matching fiber and twist
- Pale beige — category-four worsted — approximately 7 g — for the muzzle and horns
- Black — DK or embroidery yarn — less than 2 g — for the nostrils
Published cow patterns commonly use category-four yarn. Grace and Yarn reports 150 g of white for a 13-inch cow, so the lower quantity listed here reflects the smaller finished height and compact body. Use the same yarn family for white and charcoal pieces. Different fiber content can change the patch diameter even when the stitch counts match.
Tools
- 3.5 mm crochet hook
- Two 12 mm black safety eyes
- Polyester fiberfill
- Blunt yarn needle
- Locking stitch marker
- Dressmaking pins
- Scissors
Published cow patterns in comparable yarn use eye diameters from 10 to 15 mm. Twelve-millimeter eyes reproduce the photographed ratio without covering the space needed for the muzzle. Replace plastic eyes with embroidery when making an item for a child under three.
Abbreviations
- MR — magic ring
- sc — single crochet
- inc — work two single crochet stitches in one stitch
- dec — single crochet two stitches together
- sl st — slip stitch
- ch — chain
- BLO — back loop only
- FO — fasten off
For an invisible decrease, insert the hook through the front loops of the next two stitches, yarn over, pull through both loops and complete one single crochet.
Pattern — Step by Step
Work all three-dimensional pieces in a continuous spiral unless stated otherwise. Mark the first stitch after every round. The head and body use a 42-stitch large plateau, while each increase or decrease round changes the count by six stitches.
Head
Yarn: white — Source: standard six-increase amigurumi math, shaped to match the photographed cow.
R1: 6 sc in MR (6)
R2: inc ×6 (12)
R3: (sc, inc) ×6 (18)
R4: (2 sc, inc) ×6 (24)
R5: (3 sc, inc) ×6 (30)
R6: (4 sc, inc) ×6 (36)
R7: (5 sc, inc) ×6 (42)
R8–R15: sc around (42)
R16: (5 sc, dec) ×6 (36)
Insert the eyes between R11 and R12. Leave eight visible stitches between their inner edges, then pin the muzzle beneath them before attaching the washers.
R17: sc around (36)
R18: (4 sc, dec) ×6 (30)
R19: (3 sc, dec) ×6 (24)
Stuff the crown and sides firmly. Place smaller pieces around the eye posts to prevent dents.
R20: (2 sc, dec) ×6 (18)
R21: (sc, dec) ×6 (12)
R22: dec ×6 (6)
Fasten off. Leave a 20 cm tail, pass it through the front loops of the remaining six stitches and close the opening.
Body
Yarn: white — Source: standard large-size amigurumi construction with a 42-stitch plateau.
R1: 6 sc in MR (6)
R2: inc ×6 (12)
R3: (sc, inc) ×6 (18)
R4: (2 sc, inc) ×6 (24)
R5: (3 sc, inc) ×6 (30)
R6: (4 sc, inc) ×6 (36)
R7: (5 sc, inc) ×6 (42)
R8–R15: sc around (42)
R16: (5 sc, dec) ×6 (36)
R17–R19: sc around (36)
R20: (4 sc, dec) ×6 (30)
R21: sc around (30)
R22: (3 sc, dec) ×6 (24)
Fill the lower body firmly enough to resist thumb pressure. Use less stuffing through the final three rounds so the neck seam remains manageable.
R23: (2 sc, dec) ×6 (18)
R24: (sc, dec) ×6 (12)
R25: dec ×6 (6)
Fasten off. Leave a 30 cm tail for joining the body to the head.
Front Legs — Make 2
Yarn: white — Source: original cylindrical leg construction.
R1: 6 sc in MR (6)
R2: inc ×6 (12)
R3: (sc, inc) ×6 (18)
R4: BLO sc around (18)
R5–R8: sc around (18)
R9: (sc, dec) ×6 (12)
R10–R13: sc around (12)
Stuff the lower eight rounds firmly. Leave the upper two rounds lightly filled so the seam can follow the body curve.
Flatten the opening and work 6 sc through both layers (6). Fasten off. Leave a 25 cm sewing tail.
Back Legs — Make 2
Yarn: white — Source: original construction with a broader upper section for rear-body support.
R1: 6 sc in MR (6)
R2: inc ×6 (12)
R3: (sc, inc) ×6 (18)
R4: BLO sc around (18)
R5–R9: sc around (18)
R10: (sc, dec) ×6 (12)
R11–R14: sc around (12)
Shape the base into a shallow oval while stuffing. Compare both legs against a flat surface before closing them.
Flatten the opening and work 6 sc through both layers (6). Fasten off. Leave a 30 cm sewing tail.
Ears — Make 2
Yarn: white — Folded cow ears are documented in multiple published cow constructions.
R1: 6 sc in MR (6)
R2: inc ×6 (12)
R3: (sc, inc) ×6 (18)
R4–R5: sc around (18)
R6: (sc, dec) ×6 (12)
R7: sc around (12)
Do not stuff. Flatten each ear, pinch the lower corners together and secure the fold through all four layers.
Fasten off. Leave a 30 cm tail for sewing.
Horns — Make 2
Yarn: pale beige — Place each horn inside its corresponding ear.
R1: 6 sc in MR (6)
R2: sc around (6)
R3: inc ×6 (12)
R4–R6: sc around (12)
R7: (2 sc, dec) ×3 (9)
Stuff lightly with narrow pieces of fiberfill. Keep the base open and the tip rounded.
Fasten off. Leave a 25 cm tail for sewing.
Muzzle
Yarn: pale beige — Source: original raised oval construction.
R1: 6 sc in MR (6)
R2: inc ×6 (12)
R3: (sc, inc) ×6 (18)
R4: (2 sc, inc) ×6 (24)
R5–R6: sc around (24)
R7: (2 sc, dec) ×6 (18)
Add a shallow layer of stuffing. The finished projection should measure approximately 18 mm at the center.
Fasten off. Leave a 35 cm tail for attachment.
Cheek Patches — Make 2
Yarn: white — Source: standard flat-circle math. These subtle pieces are optional because they match the head.
R1: 6 sc in MR (6)
R2: inc ×6 (12)
Join with a sl st. Fasten off and leave a 15 cm sewing tail.
Large Forehead Patch
Yarn: charcoal gray — Work in joined rounds to form an irregular flat marking.
R1: 6 sc in MR, sl st to first sc (6)
R2: ch 1, inc ×6, sl st (12)
R3: ch 1, (sc, inc) ×6, sl st (18)
R4: ch 1, sc, 2 inc, 5 sc, 2 inc, 6 sc, inc, sc, sl st (23)
Fasten off. Leave a 35 cm sewing tail. Stretch one side downward during pinning to create the asymmetrical forehead marking.
Body Patches — Make 4
Yarn: charcoal gray — Make two medium and two small patches.
Medium patches:
R1: 6 sc in MR (6)
R2: inc ×6 (12)
R3: (sc, inc) ×6 (18)
Small patches:
R1: 6 sc in MR (6)
R2: inc ×6 (12)
Join each patch with a sl st. Fasten off and leave a 25 cm sewing tail. Pull one section of each circle outward during sewing so the markings do not appear mechanically round.
Tail
Yarn: white and charcoal gray — Source: compact cow-tail construction.
With white, R1: 6 sc in MR (6)
R2–R8: sc around (6)
Change to charcoal gray.
R9: inc ×6 (12)
R10–R11: sc around (12)
R12: dec ×6 (6)
Stuff only the charcoal tip. Leave the white section unstuffed so the tail can hang naturally.
Fasten off. Leave a 25 cm tail for attachment.
Assembly
- Pin the head to the narrow end of the body with the muzzle area centered over the front legs. Sew one complete circuit through corresponding head and body stitches.
- Add a second neck circuit approximately 3 mm outside the first seam. Keep the joining tension even so the head does not tilt.
- Position the muzzle beneath the eyes with its upper edge one round below the eye line. Sew three-quarters of the perimeter, add the final stuffing and close the remaining edge.
- Embroider two vertical black nostrils measuring approximately 8 mm. Place them 12–14 mm apart and keep both stitches parallel.
- Sew the optional white cheek patches beside the muzzle, catching only their outer loops. Their edges should merge into the head rather than form raised discs.
- Attach the front legs beneath the front third of the body. Leave approximately 15 mm between their inner edges and test both feet on a flat surface.
- Place the back legs behind the body midpoint. Match their lower edges to the front feet before tightening the seams.
- Pin the horns between head rounds 4 and 7, approximately six stitches apart. Attach each ear outside its horn and angle the ear opening slightly forward.
- Arrange the forehead and body patches asymmetrically. Sew them flat with charcoal yarn, then attach the tail at the center back between body rounds 11 and 14.
- Bury all yarn tails through at least 4 cm of stuffed fabric, reshape the muzzle and press all four feet against the work surface.
The completed cow should measure approximately 24 cm from the base of the feet to the horn tips.
7 Technical Tips
- Rotating facial center: Move the stitch marker immediately after the first stitch of every head round. A one-stitch drift can move the forehead patch and muzzle center by more than 8 mm.
- Collapsing body base: Pack the lower seven body rounds until they resist moderate thumb pressure. Loose filling allows the front legs to spread under the body’s weight.
- Visible decrease bars: Work every decrease through front loops only. A standard decrease produces horizontal ridges across the white head where shadows make them conspicuous.
- Late eye installation: Fit the 12 mm eye washers before reducing the head below 36 stitches. The smaller opening restricts finger pressure and can leave one washer partially seated.
- Uneven worsted tension: Keep stretched stitch gaps below 1 mm. Wider openings expose fiberfill around the charcoal forehead patch and pale muzzle.
- Reversed horn spacing: Pin both horns before adding either ear. The horn bases should form the narrower pair, with each ear beginning approximately one stitch farther outward.
- Lifting patch edges: Place anchoring stitches every 4–5 mm around each marking. Wider intervals allow the flat circles to curl away from the curved body.
Conclusion
Record the finished height, muzzle width and distance between the horn bases before changing yarn or hook size. Those measurements identify whether a later variation comes from gauge or assembly. Make the next cow with one controlled change, such as brown patches, shorter horns or embroidered eyes, while retaining the same round counts. Pin this cow amigurumi crochet pattern with a clear front view, then share a side photograph on Instagram using #StandingDairyCowAmigurumi. The side image should show the muzzle projection, ear angle and rear-leg position. Which marking will define your cow: one large forehead patch or several smaller spots around both eyes?
Sources
- Grace and Yarn: cow size, yarn, hook, eye size and yarn quantity
- Ravelry Happy Cow: 23 cm worsted-weight size reference
- StringyDingDing: medium yarn, hook and safety-eye reference
- Memphis the Moo Cow: horn, ear, patch and tail placement reference
- Amigurumi Joys: complete step-by-step cow construction reference









