Introduction
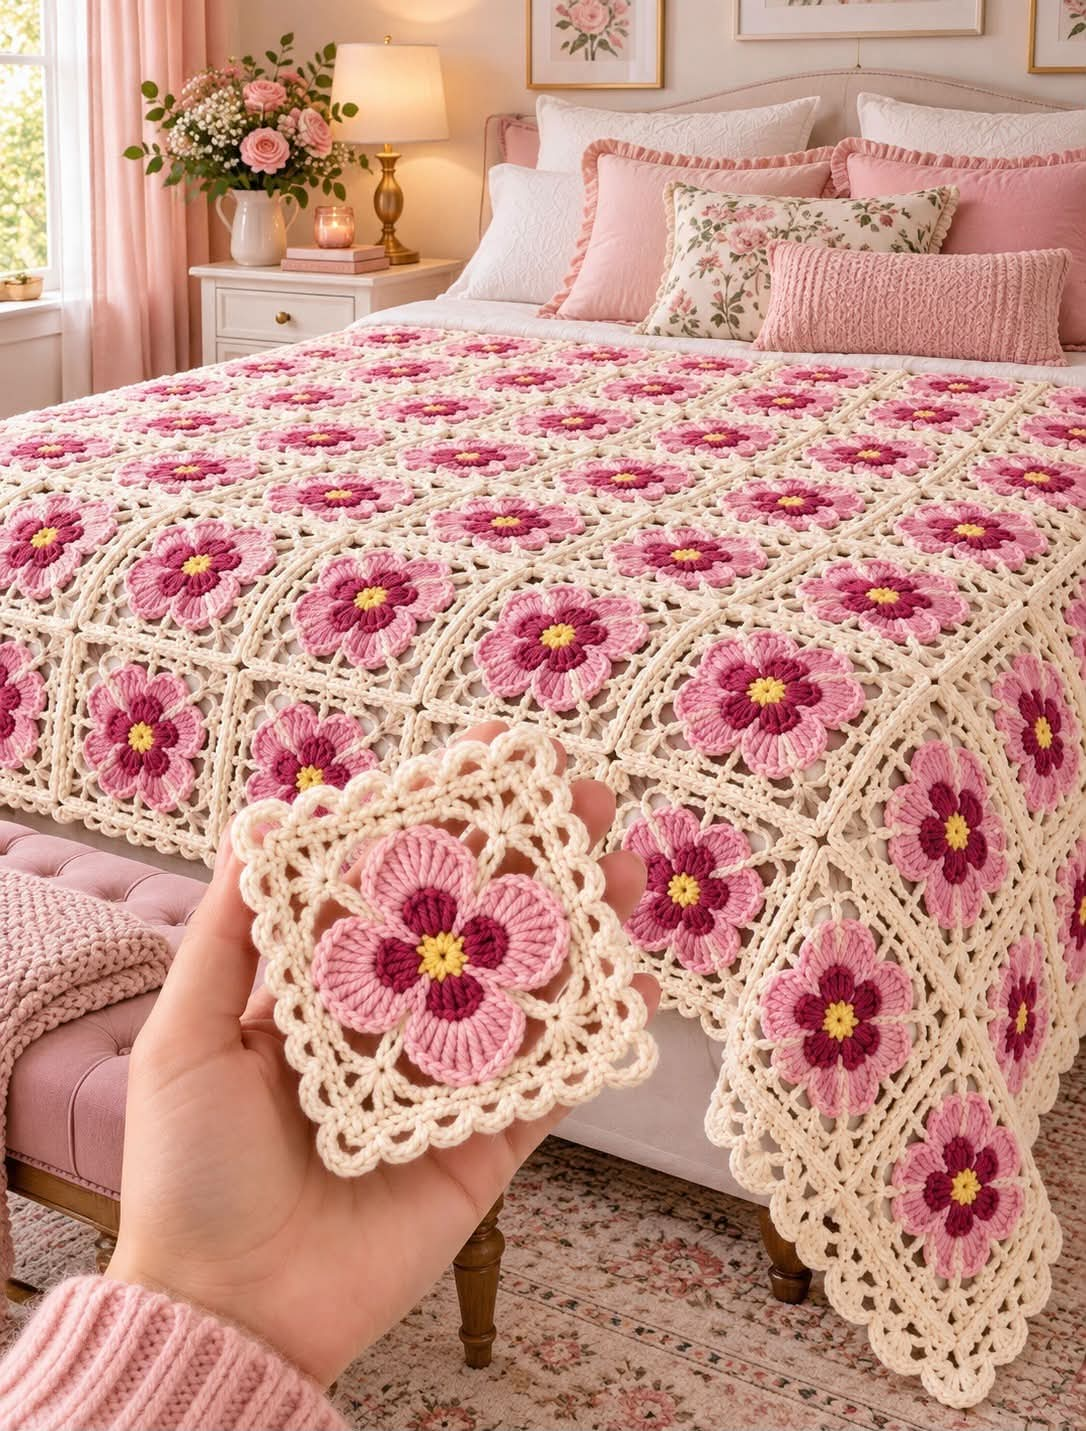
Five dark-pink inner petals and five pale-pink outer petals give each square its distinctive two-tone flower. This pink flower granny square crochet blanket recreates the photographed design with a yellow center, dimensional petals, an open cream lattice and scalloped edging. The motif is worked separately with worsted-weight yarn and a 4.5 mm hook, then blocked and joined into a bedspread. Intermediate crochet skills are recommended for the layered petals and openwork corners.
The Design: What Makes This Flower Granny Square Different
The flower occupies most of the center instead of sitting inside a conventional solid granny square. Five burgundy-pink petals establish the inner layer, while five larger blush-pink petals extend behind them. The contrast makes the flower readable from across a bed without requiring complicated color changes inside each petal.
The cream section serves a different purpose. Rather than filling the background completely, chain spaces create an airy framework between the flower and square perimeter. This reduces bulk when dozens of motifs are joined and produces the lace-like appearance visible in the photograph.
The main failure mode with a crochet flower granny square of this type is an undersized background. If the cream rounds pull too tightly around the flower, the motif cups upward instead of blocking into a flat square.
Project Info at a Glance
| Skill Level | Construction | Finished Square | Hook | Best For |
|---|---|---|---|---|
| Intermediate | Individual joined motifs | Approx. 14–16 cm | 4.5 mm | Throws, bedspreads and decorative covers |
The final square measurement depends on yarn thickness and tension. Make and block one complete motif before calculating how many squares are required for the intended blanket dimensions.
Materials and Tools
Yarn
- Warm cream — worsted weight #4 — background, joining and border
- Blush pink — worsted weight #4 — large outer flower petals
- Deep rose / raspberry — worsted weight #4 — smaller inner petals
- Golden yellow — worsted weight #4 — flower centers
Cream will account for the largest share of the total yarn because it forms the background of every motif, the joins and the final perimeter. Purchase the main color from one dye lot when making a bed-sized blanket.
Tools
- 4.5 mm crochet hook
- Worsted weight #4 yarn
- Yarn needle
- Scissors
- Locking stitch markers
- Tape measure
- Blocking mats
- Rust-resistant blocking pins
Abbreviations
- MR — magic ring
- ch — chain
- sl st — slip stitch
- sc — single crochet
- hdc — half double crochet
- dc — double crochet
- tr — treble crochet
- sp — space
- st/sts — stitch/stitches
Pink Flower Granny Square Crochet Pattern
This photo-inspired motif is constructed from the center outward. The flower has five sections, so the first rounds use stitch counts divisible by five. The cream background then converts the circular flower into a square.
Yellow Flower Center
Yarn: golden yellow.
Round 1: Make a MR. Ch 1 and work 10 sc into the ring. Pull the ring firmly closed. Join with sl st to the first sc. (10 sts)
Fasten off, leaving enough yarn to secure the center.
Ten stitches provide two attachment points for each of the five dark-pink petals.
Deep Rose Inner Petals
Yarn: deep rose or raspberry pink.
Join the yarn to any stitch of the yellow center.
Round 2: Ch 1. Work (sc, hdc, 3 dc, hdc, sc) across the first two center stitches. Sl st between petal sections.
Repeat around until five petals have been formed. (5 petals)
Fasten off.
Arrange all five petals toward the front before beginning the second layer. Each petal should remain distinct rather than overlapping deeply across the yellow center.
Back Loops for the Outer Petals
Yarn: blush pink.
Turn the flower slightly so the backs of the dark-pink petals are accessible.
Join blush yarn behind one petal.
Foundation Round: Ch 1, sc around the available rear structure between petals, ch 4. Repeat around. Join with sl st to the first sc. (5 ch-4 spaces)
These spaces should sit completely behind the dark-pink petals.
Blush Pink Outer Petals
Outer Petal Round: Sl st into the first ch-4 sp.
Work (sc, hdc, 2 dc, 3 tr, 2 dc, hdc, sc) into the same space.
Repeat the complete sequence in each remaining ch-4 space. (5 large petals)
Fasten off.
The pale petals should extend beyond the deep-rose layer by approximately 1–2 cm. If both petal layers finish at nearly the same diameter, the dimensional two-tone effect will be reduced.
Creating the Cream Background
The photographed motif leaves visible negative space around the flower. Avoid filling every available space with solid stitches.
Cream Foundation Round
Yarn: warm cream.
Join cream yarn behind any blush petal.
Round 1: Ch 1, sc into the rear attachment structure, ch 5. Repeat around the flower, positioning the chain loops behind the outer petals. Join with sl st.
Check the motif before proceeding. The chain loops must be loose enough for the flower to remain flat.
Openwork Transition Round
Sl st into the first chain space.
Round 2: Ch 3, 2 dc in same space, ch 3, 3 dc in same space. Ch 3.
In the next chain space work 3 dc, ch 3, 3 dc. Ch 3.
Repeat around and join with sl st.
At this stage the background will still appear approximately circular. The next round establishes four defined corners.
Turning the Flower into a Square
First Squaring Round
Identify four evenly spaced points around the cream foundation. Use locking stitch markers before crocheting if necessary.
Begin at the first marked area.
Round 3: Ch 3. Work dc stitches and chain spaces across the first side while keeping the fabric relaxed.
At the first marked corner work:
(3 dc, ch 3, 3 dc)
Continue across the next side using groups of 3 dc separated by ch 2.
Repeat the corner sequence at each of the remaining three marked points.
Join with sl st to the beginning ch-3.
Lay the motif on a flat surface. All four corners should now extend an equal distance from the center flower.
Second Cream Square Round
Round 4: Sl st into the next available chain space. Ch 3 and work 2 dc into the same space.
Ch 2, then work 3 dc in the next chain space. Repeat across the side.
In each corner space work:
(3 dc, ch 3, 3 dc)
Continue around all four sides and join with sl st.
Maintain equal chain lengths throughout the round. Short chains pull the square inward; loose chains create waves between the corners.
Open Lattice Round
Round 5: Ch 1, sc in the first stitch. Ch 4, skip the next stitch group and sc into the following chain space.
Repeat the ch-4 loops across the side.
At each corner work:
(sc, ch 5, sc)
Continue around and join with sl st.
This round creates the larger openings visible near the perimeter of the photographed motifs.
Final Motif Round
Round 6: Sl st into the first ch-4 space. Ch 3 and work 3 dc into the same space.
Work 4 dc into each ch-4 side space.
In every corner ch-5 space work:
(4 dc, ch 3, 4 dc)
Continue around. Join with sl st and fasten off.
Weave the cream tail through the back of the final round without pulling the edge inward.
Blocking the Flower Squares
Blocking is a structural stage for this design rather than an optional finishing treatment. The open cream lattice can contract after crocheting, while the raised petals naturally push the center upward.
Pin the four corners first. Measure diagonally from corner to corner and adjust until both diagonal measurements match.
Pin the middle of each side next.
Target approximately 14–16 cm square, depending on yarn and tension. Every motif in one blanket should finish at the same measurement.
Do not flatten the flower beneath heavy objects. Arrange the petals by hand while the cream background is pinned flat.
How Many Granny Squares Do You Need?
Calculate the motif count from the blocked square rather than copying the number visible in the photograph.
Use:
Desired blanket width ÷ blocked motif width = squares across
Desired blanket length ÷ blocked motif height = squares down
If one motif measures 15 cm after blocking, ten squares across provide approximately 150 cm before allowing for joining and the outer border.
Twelve rows of 15 cm squares provide approximately 180 cm before the border.
A larger bedspread might therefore use a grid such as 10 × 12 motifs = 120 flower squares. Adjust this count to the mattress dimensions and desired side drop.
Joining the Flower Granny Squares
The photograph shows cream divisions between motifs, so a visible crochet join suits the design.
Arrange all blocked squares on a flat surface before joining. Check that every flower faces the same direction and that no color tails remain exposed.
Flat Slip Stitch Join
Place two squares side by side with their right sides facing upward.
Join cream yarn at corresponding corners.
Insert the hook through the edge loop of the first square and the corresponding loop of the second square.
Work a loose slip stitch.
Continue across, matching one stitch or chain space from each motif before making every join.
Do not tighten the slip stitches. A joining seam that is shorter than the square edge causes the finished blanket to bunch along the grid lines.
Join all squares into horizontal strips first. Then connect the strips using the same technique.
Cream Crochet Blanket Border
Once the complete grid is joined, add a continuous cream border.
Border Round 1
Join cream at one blanket corner.
Ch 1 and work sc evenly around the entire perimeter.
Place enough stitches along each motif edge to keep the border flat. At each blanket corner work:
(2 sc, ch 2, 2 sc)
Join with sl st.
Border Round 2
Ch 3 and dc in each stitch around.
At each corner ch-2 space work:
(2 dc, ch 3, 2 dc)
Join with sl st.
Openwork Border Round
Ch 1, sc in first stitch.
Work ch 3, skip 2 sts, sc in next st repeatedly around each side.
At the corners work:
(sc, ch 5, sc)
Continue around and join.
Scalloped Final Border
Sl st into the first ch-3 space.
Work 5 dc into the chain space, then sl st into the next available anchoring stitch or space.
Repeat around the perimeter.
At each corner, use 7 dc instead of 5 dc if additional width is needed to turn the corner without cupping.
Join and fasten off.
The completed edge should form small rounded cream scallops similar to the decorative perimeter visible in the photograph.
How to Keep the Flower Petals Dimensional
The deep-rose petals should remain above the yellow center while the blush layer spreads farther outward. That difference in height is produced by separate attachment rounds rather than by sewing one finished flower onto another.
When beginning the blush foundation, work only around the rear structure of the first petal layer. Do not insert the hook through the visible face of a dark-pink petal.
Likewise, attach the cream background behind the blush layer. The flower must remain mechanically separate from most of the cream lattice.
After laundering, reshape the petals while the blanket is damp. Pull each pale-pink petal outward and position each deep-rose petal toward the center before drying flat.
Changing the Flower Colors
The photograph uses a controlled four-color palette: yellow, deep rose, blush pink and warm cream. Keeping the background neutral allows the two pink petal layers to remain distinct.
For stronger contrast, pair burgundy inner petals with pale blush outer petals.
For a softer variation, combine dusty rose with shell pink.
A vintage palette can use rust, peach and antique cream, while a cooler version can combine plum, lavender and ivory.
Keep the center substantially lighter or darker than the inner petals. If the center and first petal layer have similar values, the five-petal structure becomes less visible from a distance.
Assembly
- Crochet one complete yellow, deep-rose, blush and cream flower square.
- Block the sample motif and record its exact finished width and height.
- Calculate the required number of motifs from the intended blanket dimensions.
- Make the remaining squares, keeping the petal colors and stitch counts consistent.
- Weave in all yellow and pink yarn tails before joining the motifs.
- Block every square to the same dimensions and allow it to dry completely.
- Arrange the motifs into rows and join them with cream yarn.
- Connect the completed rows to form the full blanket grid.
- Work the cream solid, openwork and scalloped border around the perimeter.
- Lay the blanket flat and reshape every flower before the final measurement.
The finished blanket should form an even cream lattice with one centered five-petal flower repeated consistently across the entire grid.
7 Technical Tips for Better Flower Granny Squares
- Count exactly five petals in both flower layers. Adding a sixth attachment point changes the geometry and makes the cream background more difficult to divide into four equal corners.
- Keep the blush petals approximately 1–2 cm larger than the deep-rose petals. Equal-size layers overlap completely and remove the two-tone dimensional effect.
- Measure both diagonals during blocking. If one diagonal is 1 cm longer than the other, the motif is a diamond or parallelogram rather than a true square.
- Use locking markers to establish all four corners before Round 3. An incorrectly positioned corner shifts the flower away from the center and becomes more obvious after several motifs are joined.
- Keep joining slip stitches loose. A seam even 5 mm shorter than each 15 cm motif edge can accumulate enough tension across a large bedspread to make the center ripple.
- Block the cream background without pinning through the petals. Stretching the flower at the same tension as the square can flatten the raised layers and distort the petal edges.
- Check the scalloped border every 30–40 cm. If the edge begins to wave, reduce the number of shells; if it pulls inward, add an anchoring space before continuing.
Making a Smaller Flower Granny Square Blanket
The same motif can be used for a throw without changing the individual square pattern. Reduce only the number of motifs.
For example, a square measuring approximately 15 cm can be arranged in an 8 × 10 grid for 80 motifs. Before the outer border, that arrangement measures roughly 120 × 150 cm, excluding any dimensional change produced by joining.
A smaller 6 × 8 grid uses 48 motifs and measures approximately 90 × 120 cm before the border when each square blocks to 15 cm.
These calculations are planning examples rather than guaranteed finished dimensions. Measure the actual blocked motif before determining the final grid.
Making the Blanket More Open or More Solid
The cream background controls how much negative space appears between flowers.
For a more open blanket, increase selected chain spaces by one chain while maintaining identical measurements across every motif. Test the modification on one complete square before applying it to the entire project.
For a denser blanket, replace some chain loops with groups of double crochet. Keep the four corners unchanged so the square geometry remains stable.
Do not modify both the petal structure and background structure at the same time. Changing one variable per sample square makes it possible to identify which adjustment altered the final dimensions.
Finishing the Bedspread
Inspect every joining intersection before working the outer border. Four motif corners meet at these points, making them the most likely locations for loose loops or visible gaps.
Secure any questionable joins with matching cream yarn before continuing.
After completing the scalloped border, weave each tail through at least several centimeters of matching stitches and reverse direction once before trimming.
Wash according to the yarn manufacturer’s instructions. Support the full weight of the wet blanket rather than lifting it by one corner because water adds considerable weight to a large crochet bedspread.
Dry the blanket flat when practical. Arrange the scallops and flower petals before the fabric is completely dry.
Conclusion
The five-petal construction is the measurement to establish first in this pink flower granny square crochet blanket. Make one complete motif, block it to approximately 14–16 cm, and use that finished dimension to calculate the bedspread grid before producing the remaining squares. Keep the deep-rose petals forward, the blush petals wider, and the cream background loose enough to lie flat. After joining, use an openwork round and small scallops to reproduce the decorative cream perimeter. Save the pattern to Pinterest or share the completed blanket on Instagram with #PinkFlowerGrannyBlanket. Would you keep the yellow centers, or replace them with cream for an entirely pink-and-ivory flower?








