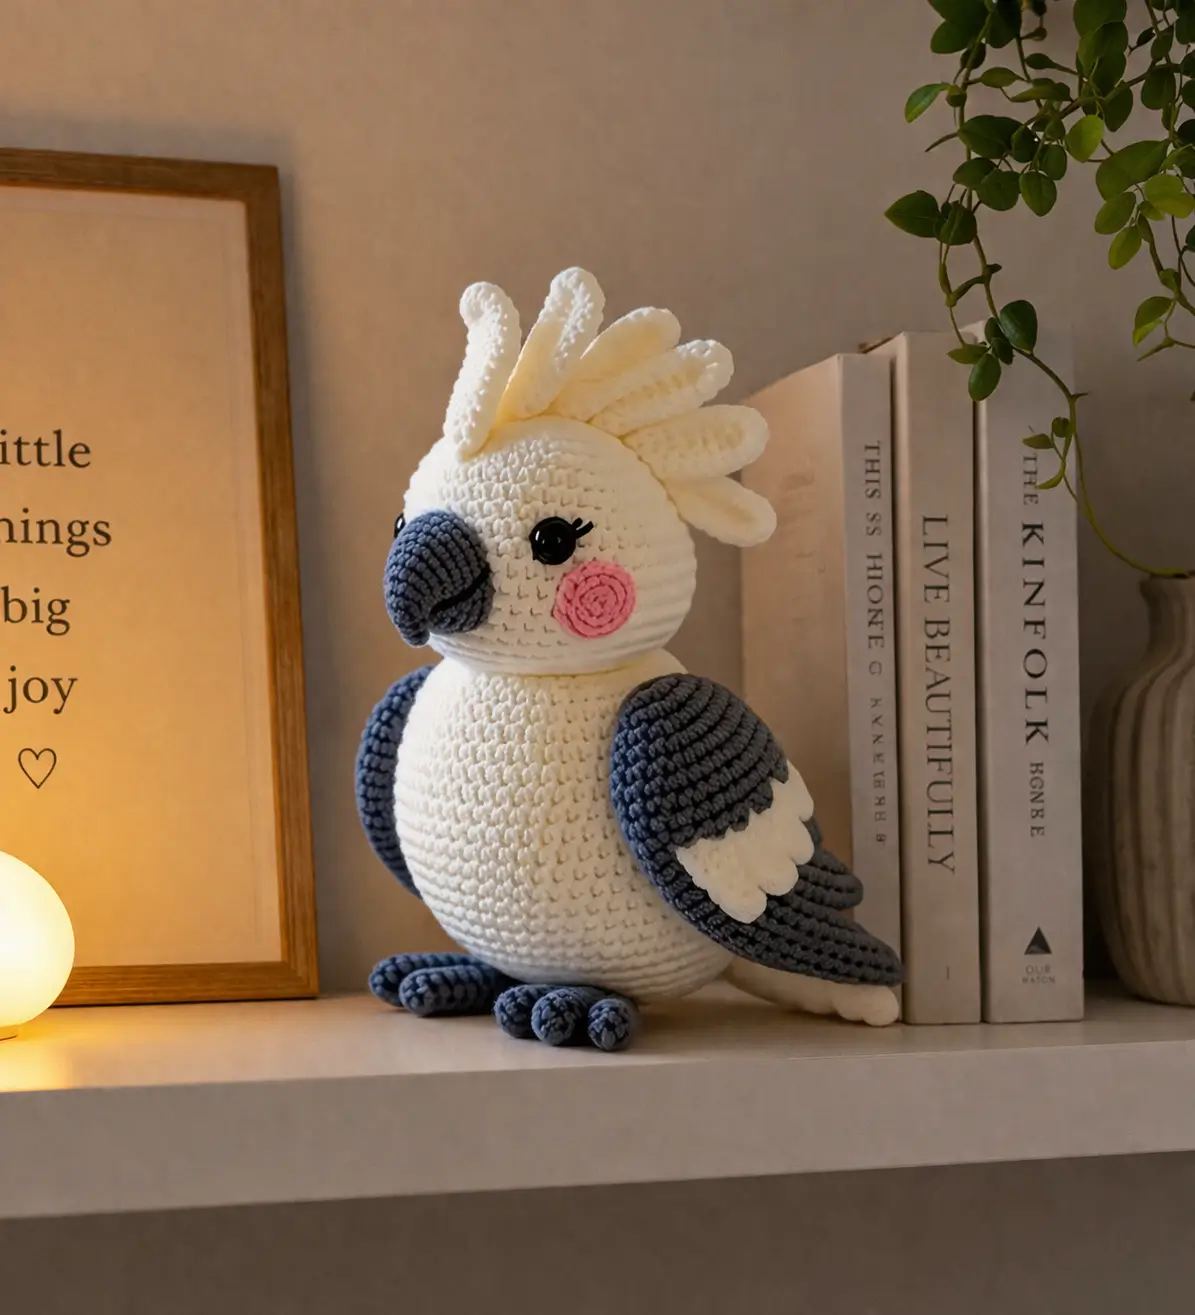
A cockatoo reads wrong the moment the crest sits too low. This cockatoo amigurumi crochet pattern fixes that first, then builds the bird around a round head, compact body, curved beak, and layered wings. The sample uses white, gray, yellow, and pink yarn, lands in the medium display range, and suits an intermediate maker who needs a bird plush that stands out clearly in nursery decor or market tables.
The Design: What Makes This Cockatoo Different
The crest carries the species. That means the head cannot be treated like a generic bird sphere with feathers added later. Here, the head stays broad and clean while six separate crest quills are anchored high and angled forward, which keeps the profile closer to a white cockatoo than a parrot or budgie. The beak also matters more than most bird builds. A longer stuffed beak shifts visual weight toward the face, so the body is drafted as a low, rounded egg to counter it.
Wing layering is the third structural decision. A dark outer wing with a white patch breaks the side silhouette and stops the plush from reading as a snowman with feathers. Many versions of a white cockatoo crochet pattern miss that contrast. A second frequent mistake in bird amigurumi pattern results is placing the cheeks too low, which widens the face and hides the beak curve instead of framing it.
Project Info at a Glance
| Skill Level | Time | Finished Size | Hook | Best For |
|---|---|---|---|---|
| Intermediate | 4–6 hours | about 20 cm seated | 3.5 mm | shelf decor, nursery display, bird-lover gift |
The finished-size range above is aligned with published cockatoo examples that span 9 cm to 18 cm in free versions and about 30 cm in larger paid versions; this draft sits in the middle as a display-scale plush.
Materials and Tools
Yarn
Published cockatoo patterns use sport, DK, worsted, and chenille depending on style; DIY Fluffies documents 15 g white, 5 g yellow, and 5 g dark gray for its small sport version, while other sources show larger birds with heavier yarn and larger hooks.
- White — worsted — about 45 g — Paintbox Cotton Aran or similar
- Blue-gray — worsted — about 20 g — any smooth cotton/acrylic blend
- Pale yellow — worsted — about 8 g — for crest
- Pink — worsted — about 4 g — for cheek patches
- Black — small amount — for lash detail if not using eyelash safety eyes
Tools
- Hook 3.5 mm
- Safety eyes 10–12 mm
- Polyfill stuffing
- Tapestry needle
- Stitch markers
- Small scissors
- Optional fabric glue for cheek circles
The 10–12 mm eye choice fits between published cockatoo examples that use 7 mm, 12 mm, and 15 mm eyes at different finished sizes.
Abbreviations
MR = magic ring, sc = single crochet, inc = increase, dec = decrease, sl st = slip stitch, ch = chain, BLO = back loop only, FLO = front loop only.
Invisible decrease combines the front loops of two stitches and keeps the beak line, head curve, and wing edges from developing open notches.
Pattern — Step by Step
Continuous spiral unless noted.
Head (Make 1)
Yarn: white — Source: standard amigurumi math, image-derived shaping
R1: 6 sc in MR (6)
R2: inc x6 (12)
R3: (sc, inc) x6 (18)
R4: (2 sc, inc) x6 (24)
R5: (3 sc, inc) x6 (30)
R6: (4 sc, inc) x6 (36)
R7-12: sc around (36)
R13: (4 sc, dec) x6 (30)
R14: (3 sc, dec) x6 (24)
Insert safety eyes between R9 and R10, about 8 sts apart. Add lashes now if using thread.
R15: (2 sc, dec) x6 (18)
R16: sc around (18)
Stuff firmly, but do not overpack the lower half or the beak will tip upward.
Fasten off. Leave 25 cm tail.
Body (Make 1)
Yarn: white — Source: standard amigurumi math, with 36-stitch plateau matching published cockatoo proportions
R1: 6 sc in MR (6)
R2: inc x6 (12)
R3: (sc, inc) x6 (18)
R4: (2 sc, inc) x6 (24)
R5: (3 sc, inc) x6 (30)
R6: (4 sc, inc) x6 (36)
R7-11: sc around (36)
R12: (4 sc, dec) x6 (30)
R13: (3 sc, dec) x6 (24)
R14: (2 sc, dec) x6 (18)
R15-16: sc around (18)
Stuff the base hard enough that the plush can sit without flattening sideways.
Fasten off. Leave 30 cm tail.
Wings (Make 2)
Yarn: blue-gray — Source: image-derived shaping with published cockatoo wing construction as reference
R1: 6 sc in MR (6)
R2: inc x6 (12)
R3: (sc, inc) x6 (18)
R4: (2 sc, inc) x6 (24)
R5-6: sc around (24)
R7: (2 sc, dec) x6 (18)
R8: sc around (18)
R9: (sc, dec) x6 (12)
Flatten. sc through both sides across 6 sts to close edge.
Do not stuff. Pin each wing before sewing; the lower tip should angle backward toward the tail.
Fasten off. Leave 25 cm tail.
Wing Patches (Make 2)
Yarn: white — Source: image-derived applique shaping
R1: 6 sc in MR (6)
R2: inc x6 (12)
R3: (sc, inc) x6 (18)
Flatten lightly. Work 3 scallops across one side only: (sl st, ch 2, 2 dc, sl st in next st) x3.
Fasten off. Leave 15 cm tail.
Feet (Make 2)
Yarn: blue-gray — Source: adapted from published cockatoo toe structure
R1: 6 sc in MR (6)
R2: in FLO, (sl st, ch 4, starting in 2nd ch from hook sc 3 back down, sl st in next st) x3
R3: working in BLO of R1, sc around (6)
R4: sc around (6)
Shape the three toes forward before sewing.
Fasten off. Leave 20 cm tail.
Beak (Make 1)
Yarn: blue-gray — Source: image-derived shaping; standard beak math
R1: 6 sc in MR (6)
R2: inc x6 (12)
R3-5: sc around (12)
R6: (sc, dec) x4 (8)
Stuff lightly. Flatten the open edge.
Fasten off. Leave 25 cm tail.
Crest Feathers (Make 6)
Yarn: pale yellow — Source: image-derived crest; separate feather idea supported by published cockatoo crest patterns
R1: 6 sc in MR (6)
R2-7: sc around (6)
Flatten the open end.
Fasten off. Leave 12 cm tail.
Tail Feathers (Make 2)
Yarn: blue-gray — Source: image-derived tail shaping with standard oval build
R1: 6 sc in MR (6)
R2: inc x6 (12)
R3: (sc, inc) x6 (18)
R4-5: sc around (18)
R6: (sc, dec) x6 (12)
Flatten.
Fasten off. Leave 18 cm tail.
Cheek Patches (Make 2)
Yarn: pink — Source: image-derived flat circle
R1: 6 sc in MR (6)
R2: inc x6 (12)
R3: sc around (12)
Fasten off. Leave 15 cm tail.
Eyelash Detail (Optional, Make 2)
Yarn: black — Source: image-derived embroidery detail
With black yarn, embroider 3 short lashes on the outer upper eye edge.
Fasten off neatly on the inside of the head.
Assembly
- Sew the head to the body, matching the 18-stitch neck openings.
- Center the beak between the eyes, with the top edge sitting across rounds 10 to 13 of the head.
- Sew the cheek patches one round below the outer eye corners, leaving about 2 visible stitches between beak edge and cheek circle.
- Add the eyelash detail if your safety eyes do not already have lashes.
- Attach the wings to the upper side body, beginning about two rounds below the neck seam.
- Sew one wing patch onto each wing, keeping the scalloped edge toward the back.
- Attach the tail feathers low on the back so they peek out beneath the wing line.
- Sew the feet to the front underside of the body with the toes projecting forward.
- Pin the crest feathers first, then sew all six to the top-back of the head in a fan, with the center pair most upright.
- Weave in all tails inside the body and adjust stuffing by hand through the neck seam if needed.
The completed plush should sit upright with the beak projecting forward and the crest reading clearly from profile view.
7 Technical Tips
- Mark round 1 from the start of the head. Losing the head-round count by even one round pushes the eyes too high and shortens the forehead needed for the crest base.
- Stuff the body firmer than the head. A soft lower body makes the cockatoo tilt backward once the beak and crest add forward and upper weight.
- Use invisible decreases on the beak and head only. Standard decreases there create pinholes that stand out against light yarn.
- Install eyes before the final head decrease rounds. On this size, place them between R9 and R10, 8 stitches apart, or the face starts to read as owl-like instead of cockatoo-like.
- Pin all six crest feathers before sewing any of them down. If the outer feathers sit lower than the inner pair, the silhouette flattens and loses the cockatoo crest line.
- Keep wing placement off the exact side center. Drop the top wing edge about 2 rounds below the neck seam, or the wing will crowd the cheek patch.
- Weave tails back through at least 4 cm of internal stuffing. Short tail weaving on a display plush often works loose at the crest base and feet because those parts take the most handling stress.
Conclusion
This cockatoo amigurumi crochet pattern works because the structure stays species-specific: high crest base, broad face, large curved beak, and layered wings. The next step is simple. Make one sample in worsted yarn, check the crest angle from the side, then adjust only the feather spacing before producing more. Share the result on Pinterest and Instagram with a side-profile photo and a front-view photo so the cheek placement reads clearly. Use #CockatooAmigurumiPattern. One question matters for this bird more than most: did your crest sit forward enough to read as cockatoo before the viewer even noticed the beak?









