Introduction
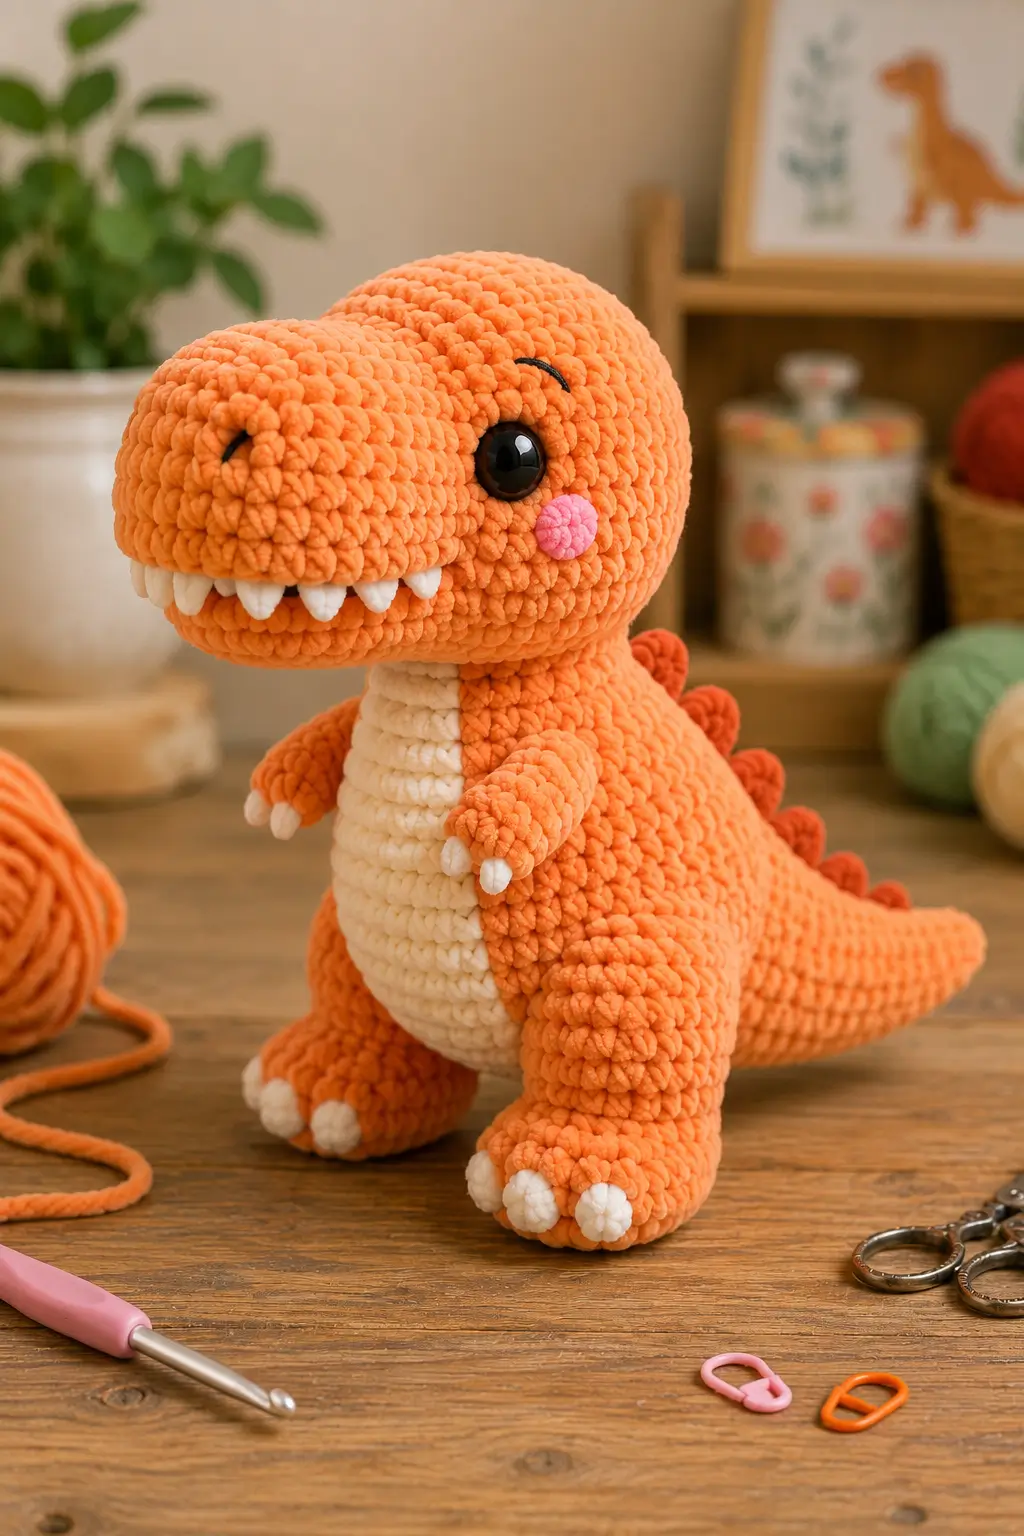
A Tyrannosaurus head must project far enough beyond its tiny arms that the six cream teeth remain visible from the front. This T-Rex amigurumi crochet pattern uses chunky chenille, a 5 mm hook and approximately 16–18 mm safety eyes for a dinosaur around 30–36 cm tall. An oversized muzzle, cream belly, short forearms, large feet, dorsal spikes and tapered tail reproduce the photographed proportions.
The Design: What Makes This T-Rex Different
The head carries more visual mass than the torso, so it uses a wider 42-stitch plateau and an extended muzzle rather than a simple sphere. The body narrows below the neck and expands toward the hips, giving the hind legs enough width to support the forward-heavy skull. A separate cream belly panel keeps the orange body construction clean while matching the teeth and claws. The chunky dinosaur amigurumi also uses individual dorsal spikes instead of a continuous ridge, allowing each point to follow the curve from neck to tail. Very short forearms reinforce the T-Rex silhouette without interfering with the belly. One frequent maker error is placing the hind feet directly beneath the body center. With an oversized head, the feet need to sit slightly forward and wide apart or the finished dinosaur tips toward its muzzle.
Project Information at a Glance
| Skill Level | Time | Finished Size | Hook | Best For |
|---|---|---|---|---|
| Intermediate | 8–11 hours | Approx. 30–36 cm tall | 5.0 mm | Dinosaur collections, display plush and age-appropriate toys |
Published T-Rex amigurumi patterns span a large size range, from miniature 9 cm designs through 15–20 cm worsted toys. The reference image is built from visibly thicker chenille and has much larger feet, head and tail, so the working dimensions here target a substantially larger plush.
Materials and Tools
Yarn
- Pumpkin orange chunky chenille — approximately 250–320 g — head, body, muzzle, arms, legs and tail
- Warm cream chunky chenille — approximately 50–70 g — belly, teeth and claws
- Dark orange-red chunky yarn — approximately 20–30 g — dorsal spikes
- Bright pink yarn — approximately 5 g — cheek patches
- Black embroidery yarn — small amount — nostrils and eyebrows
Tools
- 5.0 mm crochet hook
- 16–18 mm safety eyes ×2
- Polyester fiberfill
- Large-eye yarn needle
- Long doll needle
- Locking stitch markers
- Sharp scissors
- Rust-resistant pins
For a toy intended for a child under three, substitute securely embroidered eyes for plastic safety-eye components.
Abbreviations
- MR — magic ring
- sc — single crochet
- inc — 2 sc in one stitch
- dec — single-crochet decrease
- sl st — slip stitch
- ch — chain
- hdc — half double crochet
- dc — double crochet
- BLO — back loop only
For an invisible decrease, insert the hook through the front loops of the next two stitches and complete both loops together as one single crochet.
Pattern — Step by Step
Work all stuffed parts in continuous spirals unless a section states otherwise. Mark the first stitch of every round because chenille makes round transitions difficult to see.
Head
Yarn: pumpkin orange — photo-matched construction using standard six-stitch amigurumi increases.
R1: 6 sc in MR (6)
R2: inc ×6 (12)
R3: (sc, inc) ×6 (18)
R4: (2 sc, inc) ×6 (24)
R5: (3 sc, inc) ×6 (30)
R6: (4 sc, inc) ×6 (36)
R7: (5 sc, inc) ×6 (42)
R8: sc around (42)
R9: sc around (42)
R10: sc around (42)
R11: sc around (42)
R12: sc around (42)
Insert the eyes between R9 and R10, approximately 9–10 visible stitches apart. Do not lock the washers until both eyes appear level from the front.
R13: sc around (42)
R14: (5 sc, dec) ×6 (36)
R15: sc around (36)
R16: (4 sc, dec) ×6 (30)
R17: (3 sc, dec) ×6 (24)
Stuff firmly, concentrating fiberfill around the sides rather than forcing a lump into the face.
R18: (2 sc, dec) ×6 (18)
R19: (sc, dec) ×6 (12)
R20: dec ×6 (6)
Fasten off and close.
Broad Muzzle
Yarn: pumpkin orange.
Ch 8.
R1: starting in second ch, 6 sc, 3 sc in final ch; work along opposite side, 5 sc, inc in last ch (16)
R2: inc, 5 sc, inc ×3 across end, 5 sc, inc ×2 (22)
R3: sc around (22)
R4: sc around (22)
R5: sc around (22)
Add a moderate amount of stuffing.
Fasten off with a 35 cm sewing tail.
Flatten the underside slightly before attachment so the muzzle remains broad rather than cylindrical.
Lower Jaw
Yarn: pumpkin orange.
Ch 8.
Row 1: 7 sc, ch 1, turn (7)
Row 2: inc, 5 sc, inc (9)
Row 3: 9 sc (9)
Row 4: 9 sc (9)
Fasten off with a long tail.
Attach beneath the muzzle, leaving the front edge slightly visible below the teeth.
Teeth — Make 6
Yarn: cream.
R1: 6 sc in MR (6)
R2: sc around (6)
R3: (sc, dec) ×2 (4)
Fasten off.
Do not stuff.
Pin the teeth along the upper mouth line before sewing. The middle pair should point almost straight downward; the outer pairs may angle slightly outward.
Body
Yarn: pumpkin orange.
R1: 6 sc in MR (6)
R2: inc ×6 (12)
R3: (sc, inc) ×6 (18)
R4: (2 sc, inc) ×6 (24)
R5: (3 sc, inc) ×6 (30)
R6: (4 sc, inc) ×6 (36)
R7: sc around (36)
R8: sc around (36)
R9: sc around (36)
R10: sc around (36)
R11: sc around (36)
R12: sc around (36)
R13: sc around (36)
Stuff the lower body firmly enough to support the hind legs.
R14: (4 sc, dec) ×6 (30)
R15: sc around (30)
R16: sc around (30)
R17: (3 sc, dec) ×6 (24)
R18: sc around (24)
R19: (2 sc, dec) ×6 (18)
R20: (sc, dec) ×6 (12)
R21: dec ×6 (6)
Fasten off and close.
Cream Belly Panel
Yarn: cream.
Ch 5.
Row 1: 4 sc, ch 1, turn (4)
Row 2: inc, 2 sc, inc (6)
Row 3: inc, 4 sc, inc (8)
Rows 4–11: 8 sc (8)
Row 12: dec, 4 sc, dec (6)
Row 13: 6 sc (6)
Row 14: dec, 2 sc, dec (4)
Fasten off with a long sewing tail.
Pin vertically along the front of the torso before sewing.
Front Arms — Make 2
Yarn: pumpkin orange.
R1: 6 sc in MR (6)
R2: inc ×6 (12)
R3: sc around (12)
R4: sc around (12)
R5: (sc, dec) ×4 (8)
R6: sc around (8)
R7: sc around (8)
Stuff only the lower half.
Flatten the upper opening and work 4 sc through both layers.
Fasten off with a 25 cm tail.
Small Arm Claws — Make 4
Yarn: cream.
R1: 4 sc in MR (4)
R2: sc around (4)
Fasten off.
Attach two claws to each arm tip.
Hind Legs — Make 2
Yarn: pumpkin orange.
R1: 6 sc in MR (6)
R2: inc ×6 (12)
R3: (sc, inc) ×6 (18)
R4: (2 sc, inc) ×6 (24)
R5: sc around (24)
R6: sc around (24)
R7: sc around (24)
R8: (2 sc, dec) ×6 (18)
R9: sc around (18)
R10: sc around (18)
R11: (sc, dec) ×6 (12)
R12: sc around (12)
Stuff firmly.
Flatten the upper edge and work 6 sc through both layers.
Fasten off with a long sewing tail.
Hind Claws — Make 6
Yarn: cream.
R1: 6 sc in MR (6)
R2: sc around (6)
Fasten off.
Do not stuff.
Attach three claws across each hind foot.
Tail
Yarn: pumpkin orange.
R1: 6 sc in MR (6)
R2: inc ×6 (12)
R3: (sc, inc) ×6 (18)
R4: (2 sc, inc) ×6 (24)
R5: (3 sc, inc) ×6 (30)
R6: sc around (30)
R7: sc around (30)
R8: (3 sc, dec) ×6 (24)
R9: sc around (24)
R10: sc around (24)
R11: (2 sc, dec) ×6 (18)
R12: sc around (18)
R13: sc around (18)
R14: (sc, dec) ×6 (12)
R15: sc around (12)
R16: sc around (12)
R17: sc around (12)
R18: dec ×6 (6)
Stuff firmly near R1–R10 and progressively lighter toward the point.
Fasten off and close.
Dorsal Spikes — Make 7
Yarn: darker orange-red.
R1: 6 sc in MR (6)
R2: sc around (6)
R3: (sc, inc) ×3 (9)
R4: sc around (9)
Fasten off with a 20 cm sewing tail.
Use slightly fewer stitches or omit R4 for the smallest spikes near the tail.
Cheek Patches — Make 2
Yarn: bright pink.
R1: 6 sc in MR (6)
R2: inc ×6 (12)
Fasten off.
Flatten before attaching.
Eyebrows
Yarn: black embroidery yarn.
Make one curved surface stitch approximately 2–2.5 cm long above each eye.
Angle both outer ends upward slightly rather than making straight horizontal lines.
Nostrils
Yarn: black embroidery yarn.
Embroider two short vertical or slightly diagonal stitches near the front of the muzzle.
Keep each nostril approximately 6–8 mm long.
Assembly
- Sew the stuffed head to the narrow top of the body, tilting the face slightly forward so the T-Rex does not appear to look upward.
- Center the broad muzzle on the lower half of the face and sew around its full perimeter before attaching the lower jaw beneath it.
- Pin all six cream teeth along the upper mouth edge, check their spacing from the front, then sew each tooth individually.
- Attach the cream belly panel vertically from the neck base toward the lower abdomen and keep its side edges symmetrical.
- Sew the two short arms to the upper sides of the torso and place their tips slightly forward of the belly panel.
- Attach the hind legs low and wide on the body, positioning the feet slightly in front of the hip center so the large head remains balanced.
- Sew the tail across the lower rear body over a broad attachment area and shape it almost horizontally before allowing the tip to rise slightly.
- Position seven dorsal spikes from the back of the neck toward the upper tail, decreasing their size gradually after the hips.
- Attach three cream claws to each hind foot, two claws to each arm, both pink cheeks below the eyes, and embroider the eyebrows and nostrils.
- Place the completed dinosaur on a flat surface, adjust the feet and tail until it stands without support, then weave every remaining yarn tail into matching-color stitches.
The completed T-Rex should stand on both hind feet with the tail acting as rear counterweight while the oversized muzzle remains clearly forward of the tiny arms.
7 Technical Tips
- Forward tipping: If the head pulls the dinosaur onto its muzzle, move the hind feet approximately 1–2 cm farther forward before sewing them permanently. The tail should also rest close enough to the surface to act as a third balance point.
- Muzzle collapse: A lightly stuffed 22-stitch snout loses the rectangular T-Rex profile. Pack the side walls firmly while keeping the underside slightly flatter than the top.
- Eye misalignment: Large 16–18 mm eyes make a one-round error obvious. Place both between the same rounds and compare them from directly above before locking the backs.
- Tooth crowding: Six teeth need visible orange gaps between their bases. Leave approximately 5–8 mm between neighboring teeth instead of sewing their cream edges together.
- Leg rotation: Hind feet pointing sideways reduce the standing footprint. Pin both legs while the body is upright and keep the three claws facing within approximately 15 degrees of straight forward.
- Tail droop: Overstuffing only the base creates a hinge near the 18-to-12-stitch transition. Add small pieces of fiberfill throughout the narrowing section while keeping the final tip flexible.
- Chenille gaps: Visible stuffing between stitches indicates loose tension or an oversized hook. Test a 4.5 mm hook on one leg before changing any round counts.
Shaping the Oversized T-Rex Head
The skull is the first feature that separates this design from a generic dinosaur. Its maximum circumference reaches 42 stitches, larger than the 36-stitch body, and the added muzzle projects well beyond that sphere.
The separate muzzle also controls the silhouette from the side. Working the snout as part of a simple round head often creates a short, blunt face. The oval foundation-chain construction produces more horizontal length without expanding the entire skull.
Stuff the back and sides of the head firmly, but keep the area directly behind the eyes slightly softer. That allows the face to remain broad without forcing the safety eyes outward.
Building a Stable Standing Body
A standing plush T-Rex requires different proportions from miniature patterns. Small designs can rely on a tail or compressed feet, but the photographed dinosaur has large hind legs that form the main support structure.
The body uses a 36-stitch maximum rather than matching the 42-stitch head. This creates the characteristic large-head silhouette while leaving enough width around the hips for substantial leg seams.
Before sewing anything permanently, place the stuffed head, body, legs and tail together with pins. The toy should remain upright for at least several seconds without hand support.
Making the Cream Belly Panel
The photograph uses a separate pale abdominal strip instead of continuous color changes in the body rounds. That construction has two practical benefits: the orange torso remains simple to crochet, and the cream shape can be positioned after the final posture is established.
The panel widens through the upper-middle section and narrows toward both ends. Pin its center line first, then secure the side edges.
Do not stretch the applique enough to compress the orange body underneath. A stretched belly will pull the torso forward and may alter the standing angle.
Constructing the Teeth
Current T-Rex patterns commonly treat teeth as a defining component; Club Crochet gives the teeth their own construction section, while other designs use felt or crocheted teeth depending on scale.
Chunky chenille supports separate crocheted cones well because each tooth remains thick enough to read against the orange muzzle. Six visible teeth match the photograph more closely than a continuous white mouth strip.
Sew the two central teeth first. Add the remaining pairs symmetrically toward the sides while preserving small orange gaps between them.
Choosing Yarn and Hook Size
Published T-Rex amigurumi references commonly use worsted or Aran yarn with a 4 mm hook. Troy the T-Rex uses this combination for a toy around 15 cm tall, while Kristel Koevenig’s worsted version reaches approximately 20 cm.
The supplied photograph shows a markedly thicker plush surface. Chunky chenille with a 5 mm hook better matches the stitch scale and produces a body large enough for separate teeth, claws and dorsal spikes.
Chenille can obscure stitch tops. Use a locking marker at every round transition and count the completed round before beginning the next increase or decrease sequence.
Planning Yarn Quantity
The main orange yarn carries almost the entire structural load: head, muzzle, jaw, body, arms, legs and tail. For the photographed scale, budget approximately 250–320 g before beginning.
Cream consumption is lower but distributed across several components. The belly panel uses the largest portion, followed by six teeth, six hind claws and four small front claws.
Darker orange-red is limited to the dorsal row. One partial skein is generally adequate because each spike contains fewer than a dozen stitches at maximum circumference.
Positioning the Tiny Arms
T-Rex forearms need to remain noticeably smaller than the hind legs. Increasing them beyond a 12-stitch circumference makes the dinosaur read more like a generic theropod plush.
Attach each arm just outside the cream belly and slightly below the neck. The tips should point forward or inward rather than straight down.
Two small cream claws per hand are enough to identify the fingers without making the limbs visually heavier.
Creating the Dorsal Spike Row
The photograph includes a series of small orange-red triangular bumps beginning behind the neck and continuing toward the tail. They are decorative rather than anatomically literal, so consistent spacing matters more than exact paleontological reconstruction.
Place the largest spikes over the upper back. Reduce their height gradually after the hips and stop before the final tail section.
Pin the entire row first. A spike line that drifts even 1–2 cm away from the spine becomes obvious when the dinosaur is viewed from behind.
Competition and Design Position
Current T-Rex crochet patterns cover several construction styles. Pocket Yarnlings offers a miniature continuous-round version, June 2024 tutorials focus on no-sew market plush, and established Ravelry designs commonly use worsted yarn at smaller finished dimensions.
This T-Rex amigurumi crochet pattern targets the structure shown in the photo instead: chunky pumpkin-orange chenille, an oversized separate muzzle, visible crocheted teeth, large load-bearing feet, a cream belly panel, tiny two-clawed arms and a full line of dorsal bumps.
The additional sewing increases assembly time, but each distinctive anatomical feature can be positioned independently before it is fixed permanently.
Finishing Checks
Set the T-Rex on a level surface and inspect the body from the side. The head should project forward without forcing the chest downward.
Look at both hind feet from above. Their outer edges should form a broad support base, and neither leg should rotate enough to point the claws sideways.
Check the six teeth from the front. Their tips should form a slightly irregular natural-looking row while remaining clear of the lower jaw.
Finish by checking the tail line from behind. It should emerge from the body center and taper gradually without twisting toward either hind leg.
Conclusion
Crochet the 42-stitch head and broad muzzle before committing to the body size, because those pieces determine the scale of the entire dinosaur. Pin the hind legs and tail while the T-Rex stands on a table, correct the balance, then attach the small arms, belly and dorsal spikes. Add the teeth only after the muzzle seam is stable. Save the completed T-Rex to Pinterest and share close-up mouth and claw details on Instagram with #PumpkinTRex. For a second T-Rex amigurumi crochet pattern colorway, would you keep the cream belly and teeth or switch those details to pale yellow?
Sources
- Kristel Koevenig — free T-Rex Amigurumi on Ravelry; worsted yarn, 4 mm hook and approximately 8 inches tall.
- Storyland Amis / Holly Lanier — Troy the T-Rex, published February 2024; Aran/worsted yarn, 4 mm hook and approximately 15 cm tall.
- The Loopy Lamb — free Crochetasaurus Rex crochet-along launched April 2024.
- Pocket Yarnlings — free continuous-round T-Rex tutorial covering head, snout, body, limbs and tail.
- Club Crochet — T-Rex construction with separate head, teeth, body and spike sections; 4 mm hook and 6 mm eyes for its miniature version.
- Zsófia Muraközi — Ravelry T-Rex using sport yarn and a 2 mm hook, approximately 16 cm long.
- Amiguruku — 9 cm T-Rex worked with fine yarn and approximately 2.25 mm hook.
- March 2024 free T-Rex reference — worsted yarn, 4 mm hook and 12 mm safety eyes.
- Etsy T-Rex Amigurumi marketplace — current commercial competition and bestseller listings.









