Introduction
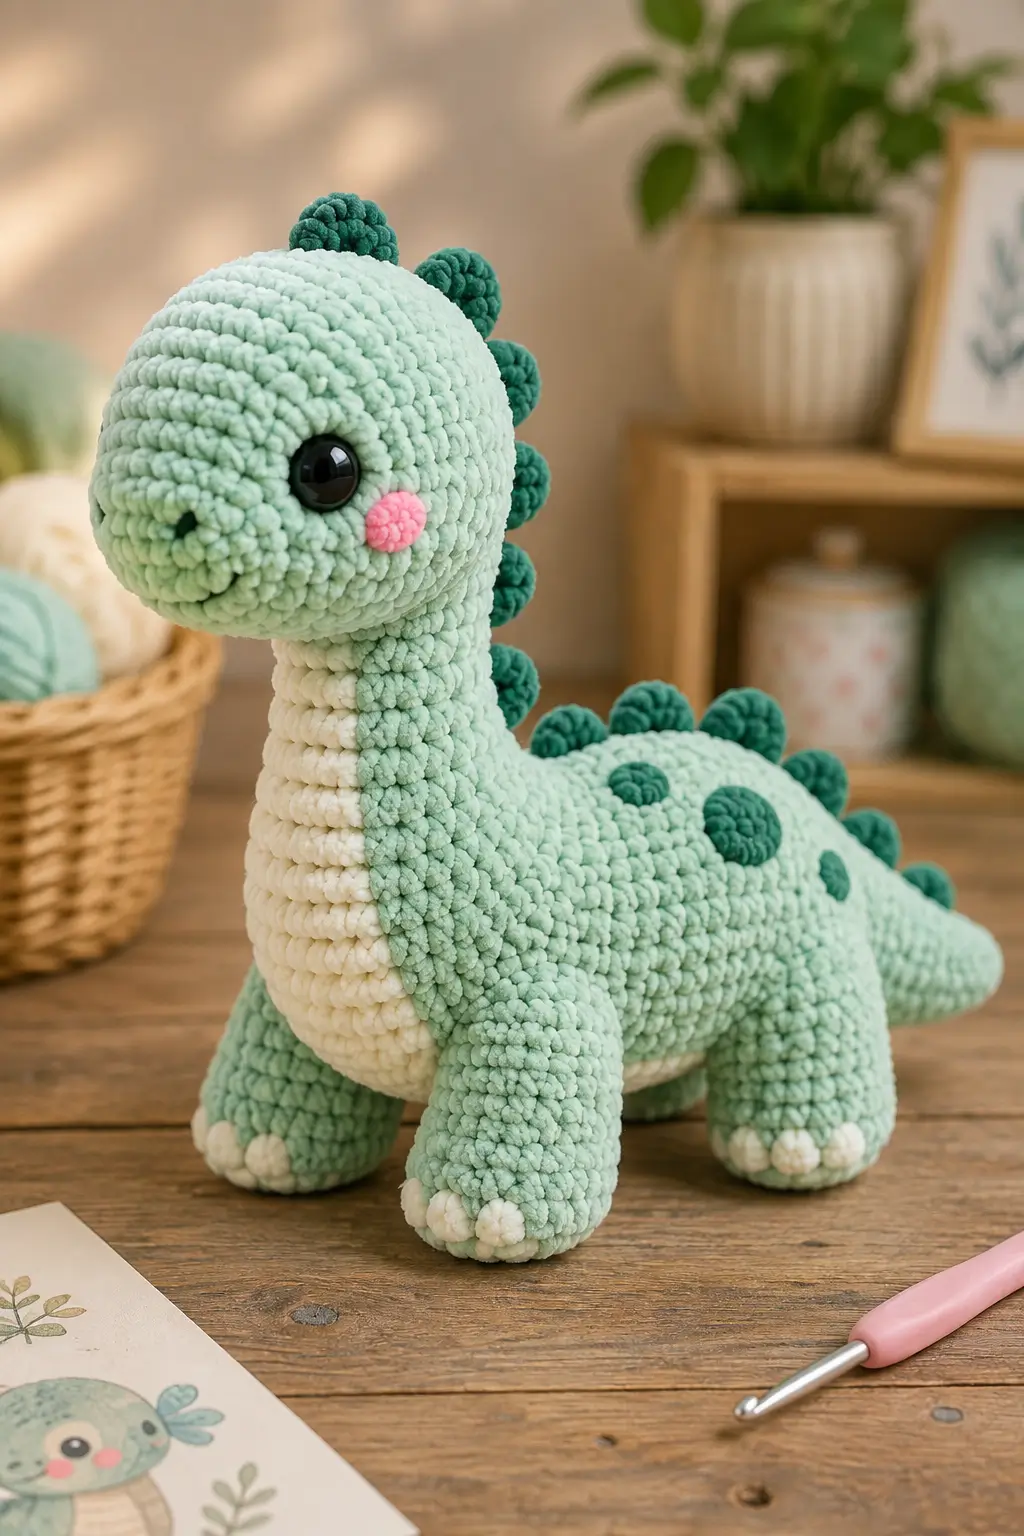
A Brontosaurus loses its silhouette when the neck is only as long as the head is wide. This brontosaurus amigurumi crochet pattern builds a tall mint-green neck above a horizontal four-legged body using super-bulky chenille and a 6 mm hook. The finished dinosaur measures approximately 40–46 cm high, with a cream throat, dark-teal dorsal bumps, raised toes, pink cheeks and 20 mm eyes.
The Design: What Makes This Brontosaurus Different
The long neck carries most of the design work. It rises almost vertically from the front of the torso, then leans forward just enough to position the oversized head above the front legs. A cream panel runs continuously from beneath the jaw down the throat and onto the lower body, reinforcing that vertical line. The crochet brontosaurus plush also uses rounded dark-teal dorsal bumps instead of triangular spikes. Larger bumps begin behind the head, while progressively smaller pieces continue down the neck, across the back and toward the tail. The torso stays horizontal and relatively low despite the tall neck. Four broad feet counter the forward weight of the head. One frequent mistake is overstuffing the neck; a rigid neck can push the head backward and transfer too much weight onto the rear legs.
Project Information at a Glance
| Skill Level | Time | Finished Size | Hook | Best For |
|---|---|---|---|---|
| Intermediate | 10–14 hours | Approx. 40–46 cm high × 45–52 cm long | 6.0 mm | Large dinosaur plush, nursery display and handmade collections |
Materials and Tools
Yarn
- Pale mint green — Super Bulky #6 chenille — approximately 300–380 g — head, neck, body, legs and tail
- Cream / ivory — Super Bulky #6 chenille — approximately 60–80 g — throat panel, belly and toes
- Dark teal green — matching chenille — approximately 45–65 g — dorsal bumps and body spots
- Bubblegum pink — matching chenille — approximately 5–10 g — cheek patches
- Black embroidery yarn — small amount — nostrils and mouth
Tools
- 6.0 mm crochet hook
- 20 mm safety eyes ×2
- Polyester fiberfill
- Large-eye yarn needle
- Long upholstery needle
- Locking stitch markers
- Rust-resistant pins
- Sharp scissors
Use embroidered eyes instead of plastic safety eyes when the finished dinosaur is intended for a child under three.
Abbreviations
- MR — magic ring
- sc — single crochet
- inc — 2 sc in one stitch
- dec — decrease
- sl st — slip stitch
- ch — chain
- hdc — half double crochet
- BLO — back loop only
For an invisible decrease, insert the hook through the front loops of the next two stitches and complete them together as one single crochet.
Pattern — Step by Step
Work stuffed pieces in continuous spirals unless a section states otherwise. Move the stitch marker at the end of every round.
Head
Yarn: pale mint green.
R1: 6 sc in MR (6)
R2: inc ×6 (12)
R3: (sc, inc) ×6 (18)
R4: (2 sc, inc) ×6 (24)
R5: (3 sc, inc) ×6 (30)
R6: (4 sc, inc) ×6 (36)
R7: (5 sc, inc) ×6 (42)
R8: sc around (42)
R9: sc around (42)
R10: sc around (42)
R11: sc around (42)
R12: sc around (42)
R13: sc around (42)
R14: sc around (42)
Insert 20 mm safety eyes between R10 and R11, approximately 9–10 visible stitches apart. Angle them slightly toward the forward half of the head.
R15: (5 sc, dec) ×6 (36)
R16: (4 sc, dec) ×6 (30)
R17: (3 sc, dec) ×6 (24)
Stuff firmly around the eyes and upper skull. Add slightly less filling at the muzzle so the front can be compressed into a broad oval.
R18: (2 sc, dec) ×6 (18)
R19: (sc, dec) ×6 (12)
R20: dec ×6 (6)
Fasten off and close.
Neck
Yarn: pale mint green.
R1: 6 sc in MR (6)
R2: inc ×6 (12)
R3: (sc, inc) ×6 (18)
R4: (2 sc, inc) ×6 (24)
R5: sc around (24)
R6: sc around (24)
R7: sc around (24)
R8: sc around (24)
R9: sc around (24)
R10: sc around (24)
R11: sc around (24)
R12: sc around (24)
R13: sc around (24)
R14: sc around (24)
R15: sc around (24)
R16: sc around (24)
R17: sc around (24)
R18: (2 sc, dec) ×6 (18)
R19: sc around (18)
R20: sc around (18)
R21: sc around (18)
R22: sc around (18)
R23: sc around (18)
R24: sc around (18)
R25: sc around (18)
R26: sc around (18)
Stuff the lower half firmly. Reduce stuffing through the upper 8–10 cm so the neck can lean slightly forward beneath the head.
Fasten off with a 45 cm sewing tail.
Body
Yarn: pale mint green.
R1: 6 sc in MR (6)
R2: inc ×6 (12)
R3: (sc, inc) ×6 (18)
R4: (2 sc, inc) ×6 (24)
R5: (3 sc, inc) ×6 (30)
R6: (4 sc, inc) ×6 (36)
R7: (5 sc, inc) ×6 (42)
R8: sc around (42)
R9: sc around (42)
R10: sc around (42)
R11: sc around (42)
R12: sc around (42)
R13: sc around (42)
R14: sc around (42)
R15: sc around (42)
R16: sc around (42)
R17: sc around (42)
R18: sc around (42)
Stuff in small portions and press the body into a horizontal oval as you fill.
R19: (5 sc, dec) ×6 (36)
R20: sc around (36)
R21: (4 sc, dec) ×6 (30)
R22: sc around (30)
R23: (3 sc, dec) ×6 (24)
R24: (2 sc, dec) ×6 (18)
R25: (sc, dec) ×6 (12)
R26: dec ×6 (6)
Fasten off and close.
Front Legs — Make 2
Yarn: pale mint green.
R1: 6 sc in MR (6)
R2: inc ×6 (12)
R3: (sc, inc) ×6 (18)
R4: (2 sc, inc) ×6 (24)
R5: sc around (24)
R6: sc around (24)
R7: (2 sc, dec) ×6 (18)
R8: sc around (18)
R9: sc around (18)
R10: sc around (18)
R11: sc around (18)
R12: (sc, dec) ×6 (12)
R13: sc around (12)
Stuff firmly through the foot and lower leg, then more lightly at the flattened sewing edge.
Fasten off with a 35 cm sewing tail.
Back Legs — Make 2
Yarn: pale mint green.
R1: 6 sc in MR (6)
R2: inc ×6 (12)
R3: (sc, inc) ×6 (18)
R4: (2 sc, inc) ×6 (24)
R5: (3 sc, inc) ×6 (30)
R6: sc around (30)
R7: sc around (30)
R8: (3 sc, dec) ×6 (24)
R9: sc around (24)
R10: (2 sc, dec) ×6 (18)
R11: sc around (18)
R12: sc around (18)
R13: (sc, dec) ×6 (12)
Stuff firmly through the lower two-thirds.
Flatten the upper opening.
Fasten off with a 35 cm sewing tail.
Tail
Yarn: pale mint green.
R1: 6 sc in MR (6)
R2: inc ×6 (12)
R3: (sc, inc) ×6 (18)
R4: (2 sc, inc) ×6 (24)
R5: sc around (24)
R6: sc around (24)
R7: (2 sc, dec) ×6 (18)
R8: sc around (18)
R9: sc around (18)
R10: sc around (18)
R11: (sc, dec) ×6 (12)
R12: sc around (12)
R13: sc around (12)
R14: sc around (12)
R15: sc around (12)
R16: sc around (12)
R17: sc around (12)
R18: (sc, dec) ×4 (8)
R19: sc around (8)
R20: sc around (8)
R21: sc around (8)
R22: sc around (8)
R23: sc around (8)
R24: (2 sc, dec) ×2 (6)
R25: sc around (6)
R26: sc around (6)
Stuff firmly at the 24-stitch base, moderately through the center and very lightly near the final six-stitch section.
Fasten off with a long sewing tail.
Cream Throat and Belly Panel
Yarn: cream / ivory.
Ch 32.
Row 1: starting in second ch from hook, 31 sc (31)
Row 2: ch 1, turn, 31 sc (31)
Row 3: ch 1, turn, dec, 27 sc, dec (29)
Row 4: ch 1, turn, 29 sc (29)
Row 5: ch 1, turn, dec, 25 sc, dec (27)
Row 6: ch 1, turn, 27 sc (27)
Row 7: ch 1, turn, dec, 23 sc, dec (25)
Row 8: ch 1, turn, 25 sc (25)
Fasten off with a long sewing tail.
The panel should run from directly under the lower jaw, down the front of the neck and onto the upper underside of the body.
Large Dorsal Bumps — Make 4
Yarn: dark teal green.
R1: 6 sc in MR (6)
R2: inc ×6 (12)
R3: (sc, inc) ×6 (18)
R4: sc around (18)
R5: (sc, dec) ×6 (12)
R6: dec ×6 (6)
Stuff lightly.
Fasten off with a 20 cm sewing tail.
Medium Dorsal Bumps — Make 5
Yarn: dark teal green.
R1: 6 sc in MR (6)
R2: inc ×6 (12)
R3: sc around (12)
R4: (sc, dec) ×4 (8)
R5: dec ×4 (4)
Stuff lightly.
Fasten off with a sewing tail.
Small Tail Bumps — Make 4
Yarn: dark teal green.
R1: 6 sc in MR (6)
R2: sc around (6)
R3: dec ×3 (3)
Fasten off with a sewing tail.
Do not stuff the smallest pieces.
Dark-Teal Body Spots — Make 5
Yarn: dark teal green.
Large spots — make 2:
R1: 6 sc in MR (6)
R2: inc ×6 (12)
R3: (sc, inc) ×6 (18)
Fasten off.
Small spots — make 3:
R1: 6 sc in MR (6)
R2: inc ×6 (12)
Fasten off.
Do not stuff.
Cream Toe Bumps — Make 12
Yarn: cream / ivory.
R1: 6 sc in MR (6)
R2: sc around (6)
Fasten off.
Do not stuff.
Use three toe bumps on each foot.
Pink Cheek Patches — Make 2
Yarn: bubblegum pink.
R1: 6 sc in MR (6)
R2: inc ×6 (12)
Join with sl st and fasten off.
Nostrils and Mouth
Yarn: black embroidery yarn.
Make one short nostril stitch approximately 6–8 mm long on each side of the front muzzle.
Embroider a shallow curved mouth approximately 2–3 cm wide below the nostrils.
Assembly
- Sew the neck to the front-upper section of the body with a contact area approximately 7–8 cm wide, keeping the neck close to vertical.
- Attach the head to the 18-stitch upper neck opening so the muzzle angles forward rather than pointing directly upward.
- Pin the cream panel from beneath the jaw down the front of the neck and onto the belly, then sew around its complete perimeter with relaxed stitches.
- Attach the front legs directly below the neck/body junction and test that both feet touch a flat surface before tightening the seams.
- Sew the larger rear legs under the widest back section, keeping the body approximately level from shoulder to hip.
- Attach the tail centrally behind the body and shape its lightly stuffed final 8–10 cm into a gradual horizontal taper.
- Sew three cream toe bumps across the front of each foot with approximately 5–8 mm between adjacent centers.
- Pin the large dorsal bumps from the top/back of the head down the neck, then continue with medium and small bumps across the body and tail.
- Attach the dark-teal spots irregularly to the upper torso and sew the pink cheek patches below and slightly behind the eyes.
- Embroider the nostrils and mouth, weave every yarn tail into matching-color stitches, then stand the dinosaur on a level surface and correct the neck, feet and tail alignment.
The finished dinosaur should carry its head above the front legs, keep all four feet on the ground and show one uninterrupted decreasing line of dark-teal dorsal bumps from head to tail.
7 Technical Tips
- Neck collapse: A 25 cm chenille neck filled too softly will bend at the body seam. Pack the lowest 8–10 cm firmly, then reduce stuffing toward the head.
- Head tipping backward: Overfilling the upper neck creates a rigid vertical column. Leave the final 6–8 cm moderately filled so the head can lean forward several degrees.
- Body rocking: One leg mounted more than about 2 cm higher than its opposite partner can lift a foot off the surface. Pin all four legs before making any final sewing pass.
- Dorsal-bump crowding: Large bumps placed edge-to-edge read as one ridge. Leave approximately 1–1.5 cm of mint fabric visible between the four largest pieces.
- Throat-panel puckering: Pulling the cream sewing yarn too tightly narrows the neck. Catch only outer chenille loops and stop tightening when the panel lies flat.
- Tail droop: Dense filling through the final 8–10 cm creates unnecessary rear weight. Reduce stuffing sharply after the tail reaches the eight-stitch section.
- Spot distortion: Sewing a flat 18-stitch circle through deep body stitches creates a depression. Catch surface loops only and keep the applique edge level with the surrounding mint fabric.
Shaping the Long Neck
The neck is the measurement that separates this design from a compact dinosaur plush. It needs enough height to place the head clearly above the torso while remaining wide enough to support a heavily stuffed chenille head.
The lower section therefore stays at 24 stitches for fourteen rounds before narrowing to 18. That change creates a subtle taper rather than a thin tube.
Stuff from the bottom upward in small pieces. A dense lower column carries the weight, while the softer upper section gives you enough movement to angle the head slightly forward during assembly.
Balancing the Head Against the Body
A long-neck dinosaur can tip forward even when every stitch count is correct. The problem is mechanical: the stuffed head sits far from the torso’s center of gravity.
Place the rear legs under the widest portion of the body and keep the tail moderately filled. The tail provides visual length without adding a large counterweight.
Before sewing the head permanently, pin it to the neck and stand the unfinished body on all four legs. Shift the head backward or forward by approximately 1 cm until the stance remains stable.
Constructing the Cream Throat Stripe
The cream section is not simply a small belly patch. In the photograph it forms a vertical stripe that begins beneath the jaw and follows the entire visible front surface of the neck.
Sew the upper edge first. Center it under the head, then pin downward every 3–4 cm before working the perimeter seam.
Do not stretch the panel lengthwise. Excess tension can pull the head downward and curve the neck toward the chest.
Building the Graduated Dorsal Bumps
The dark-teal ridge is made from rounded forms rather than triangular plates. Size reduction provides the movement.
Position the largest bump near the rear top of the head and continue with several large pieces down the upper neck. Medium bumps belong on the lower neck and central torso. The smallest pieces continue toward the tail.
Make every bump before assembly and arrange the complete sequence with pins. The ridge should read as one decreasing line when viewed from the side.
Positioning the Four Legs
The front pair should sit close to the base of the neck because that is where the greatest forward load occurs. The larger hind legs support the broad rear torso.
Use the 24-stitch front feet and 30-stitch rear feet as wide foundations. Stuff the actual feet firmly but reduce fiberfill near the sewing openings.
Stand the dinosaur on a hard surface after pinning. All four contact patches should sit flat without pressing one leg downward by hand.
Choosing Yarn and Hook Size
A 6 mm hook suits the large chenille scale shown in the reference. The objective is dense fabric that still bends enough to shape the neck and body.
Crochet the first 42-stitch head section and stretch it lightly over your fingers. If gaps expose stuffing, repeat it with a 5.5 mm hook.
If the fabric feels difficult to compress or the stitches become hard to enter, return to 6 mm rather than pulling the yarn tighter.
Placing the Dark-Green Spots
The torso carries only a few dark spots, so placement matters more than exact quantity. Concentrate them across the upper side of the body beneath the dorsal ridge.
Use two diameters. Larger circles belong around the shoulder and center body; smaller pieces work closer to the rear.
Leave the neck mostly clear. Too many spots there compete with the cream throat stripe and the descending dorsal bumps.
Making the Raised Cream Toes
The photograph uses individual cream bumps instead of a flat color-change round. Each foot receives three small pieces.
Attach the middle toe first, then position the two outer toes around it. Keep the three pieces confined to the forward face of the foot.
These components remain unstuffed because their six-stitch tubes are already thick enough in chenille to produce a raised claw shape.
Planning Yarn Quantity
Main-color chenille accounts for most of the project because the head, 26-round neck, body, four legs and tail all use mint yarn. Buying an extra main-color skein is more practical than trying to match a later dye lot.
Cream consumption is smaller but distributed across the long throat panel and twelve separate toes. Dark teal covers thirteen dorsal pieces plus several torso circles.
For a closer personal estimate, weigh the completed head and neck before starting the torso. Record that mass, then track the first front leg and one dorsal bump to calculate how quickly each accent color is being consumed.
Competition and Design Position
Published Brontosaurus patterns currently span tiny three-inch cotton toys, small market plush, medium worsted animals and much taller pieces around 40–43 cm. This pattern belongs to the large chenille category.
Its construction differs visually from many compact no-sew dinosaurs because the neck is treated as a major standalone component. The photograph also uses a full cream throat stripe and separate rounded dorsal pieces rather than one short row of pointed spikes.
The low horizontal torso provides another distinction. The dinosaur reads as a four-legged sauropod rather than a sitting upright character.
Finishing Checks
Place the finished dinosaur on a level table. The four feet should carry the body without the belly pressing firmly against the surface.
View the animal directly from the front. The head should sit approximately above the space between the front feet, not several centimeters to either side.
Move to the side profile. The neck should rise before leaning slightly forward, while the tail should continue almost horizontally from the rear body.
Check the dorsal ridge last. Large bumps should begin near the head and reduce gradually; a single small piece placed between two large pieces interrupts the intended size progression.
Conclusion
Crochet the neck and head before committing to the four-leg assembly because their combined weight determines where the front feet need to sit. Record the neck height, lower-neck diameter and head width so this brontosaurus amigurumi crochet pattern keeps its long-neck proportions during any second version. Pin the complete dorsal ridge before sewing, then add the dark spots and cream toes after the stance is stable. Photograph one side profile and one front view, save the project to Pinterest and share it on Instagram with #MintLongNeckBrontosaurus. For another dinosaur, would you keep the dorsal bumps dark teal or switch them to lavender?
Sources
- StringyDingDing — free intermediate Dinosaur Brontosaurus Amigurumi; medium-weight yarn, 4 mm hook and 12 mm eyes.
- Mohu — free Brontosaurus Dinosaur Amigurumi; approximately 24 cm with worsted yarn and 3.75 mm hook, or about 40 cm with doubled medium yarn and a 6 mm hook.
- Simply Hooked / Marcy Made — large Brontosaurus reference; super-bulky yarn, 6 mm hook, 20 mm eyes and approximately 17-inch finished height.
- Club Crochet — small Brontosaurus tutorial; cotton yarn, 4 mm hook, 6 mm eyes and separate contrast spikes.
- Ribblr / Eri’s Art — Small Brontosaurus; 3.75 mm hook and more than 2,000 public saves at research time.
- The Crafty Wren — 2026 one-piece Brontosaurus tutorial using chenille yarn and a 5 mm hook.









