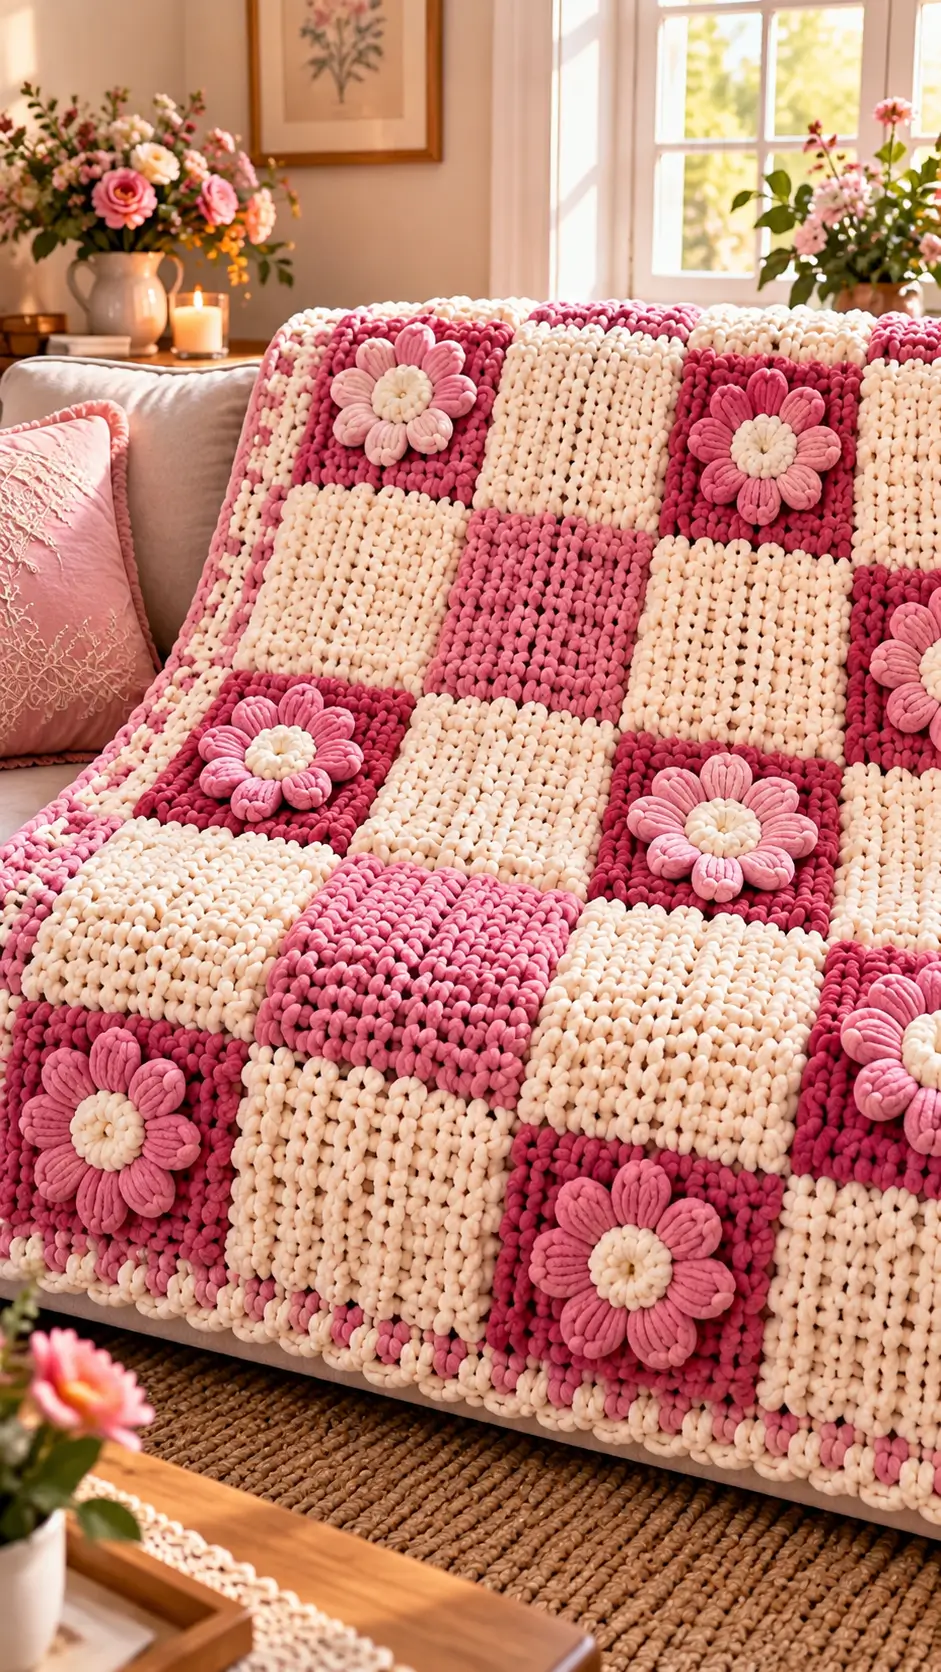
A daisy cannot stay flat if its petals are supposed to rise above a raspberry square. This chunky daisy granny square blanket solves that construction problem with separately formed dimensional petals, bulky yarn and controlled square sizing. Plan on an 8 mm hook, category #5 yarn and roughly 20 cm motifs; the project suits an intermediate crocheter. Modular construction also makes damaged or stained squares individually replaceable.
The Design: What Makes This Daisy Blanket Different
The photographed blanket combines two structures rather than repeating one floral motif everywhere. Plain cream and raspberry blocks establish the checkerboard first; selected raspberry blocks then carry dimensional flowers. That decision matters because covering every square with petals would substantially increase weight and obscure the geometric layout.
The 3D daisy granny square also needs a compact center. An oversized center pushes the petals outward and can make the flower exceed the square boundaries. Eight thick petals give this photo-inspired version enough volume without requiring a dense 12- or 16-petal ring.
Finally, the pink daisy crochet blanket uses a restrained three-color family rather than the traditional yellow, white and green combination. A frequent mistake is making raised petals before checking the blocked square measurement. That can produce flowers wider than the motif they decorate.
Project Info at a Glance
| Skill Level | Time | Finished Size | Hook | Best For |
|---|---|---|---|---|
| Intermediate | Variable by square count | Reference: 125 × 150 cm | 8 mm | Sofa throw |
The finished-size reference comes from a bulky-yarn daisy blanket using 42 squares. Individual motifs measuring approximately 20 × 20 cm provide a useful target for planning the checkerboard layout.
Materials and Tools
Yarn
- Cream/ivory — category #5 bulky — approximately 650–800 g — washable bulky or bulky chenille yarn.
- Deep raspberry — category #5 bulky — approximately 500–700 g depending on the layout.
- Rose pink — category #5 bulky — approximately 200–300 g for petals and accent squares.
- Pale blush/cream — category #5 bulky — approximately 100–150 g for flower centers and optional color variations.
Yarn quantities are planning estimates for this photo-inspired arrangement. Make one complete test square and weigh it before purchasing yarn for a large blanket.
Tools
- 8 mm crochet hook
- Large tapestry needle
- Locking stitch markers
- Sharp scissors
- Tape measure
- Blocking mats and rustproof pins
Abbreviations
- MR — magic ring
- sc — single crochet
- hdc — half double crochet
- dc — double crochet
- dc3tog — double crochet three together
- inc — increase
- sl st — slip stitch
- ch — chain
- BLO — back loop only
- st/sts — stitch/stitches
- sp — space
- FO — fasten off
Decreases are not required for the main blanket construction. If an invisible decrease is used for an optional stuffed embellishment, work through the front loops of the next two stitches before completing one sc.
Chunky Daisy Granny Square Blanket Pattern
The blanket is constructed from separate motifs rather than as one continuous piece. Make the plain squares first, add dimensional flowers to selected squares, arrange the checkerboard, join the motifs and finish with the border.
Plain Cream Square
Yarn: cream.
R1: MR, ch 3, 2 dc, ch 2; *3 dc, ch 2* three times into MR. Join with sl st.
R2: Sl st to corner. Ch 3, 2 dc, ch 2, 3 dc in same corner; *ch 1, (3 dc, ch 2, 3 dc) in next corner* three times. Ch 1, join.
R3: Sl st to corner. Work (ch 3, 2 dc, ch 2, 3 dc) in corner. *Ch 1, 3 dc in next ch-1 sp, ch 1, (3 dc, ch 2, 3 dc) in corner* around. Join.
R4: Repeat the established granny-square sequence, placing one 3-dc group in every side ch-1 space and (3 dc, ch 2, 3 dc) in each corner.
R5: Repeat R4.
Measure the square without stretching it. If it has reached approximately 20 cm, stop. If necessary, add another granny round to reach the target measurement.
Fasten off. Leave approximately a 20 cm tail when the square will be sewn to neighboring motifs.
Plain Raspberry Square
Yarn: deep raspberry.
Work R1–R5 exactly as for the Plain Cream Square.
Using the same construction for both colors helps maintain identical dimensions. Changing the stitch formula between the cream and raspberry motifs can produce mismatched edges even when both yarns have the same labeled weight.
Fasten off when the square measures approximately 20 cm.
Daisy Center
Make one center for each flower square. Yarn: cream or pale blush.
R1: 8 sc in MR. Join with sl st. (8)
R2: 2 hdc in each st around. Join. (16)
Fasten off, leaving approximately a 25 cm tail for attaching the flower.
Keep the center compact. The dimensional petals should form most of the flower diameter rather than an oversized center circle.
Raised Daisy Petals
Make 8 petals per flower. Yarn: rose pink.
Attach rose yarn to one of eight evenly spaced anchor positions around the center.
Petal 1: Ch 6. Beginning in the second ch from the hook, work sl st, sc, hdc, dc, hdc. Sl st back into the same anchor area.
Petals 2–8: Move evenly around the center and repeat the same five-stitch petal sequence at each anchor.
Fasten off after Petal 8.
The elongated petal shape produces the raised floral appearance seen in the blanket. Keep all eight chains at the same length so one side of the flower does not become wider than the other.
Optional Padded Petal Layer
For thicker flowers, add a shorter second petal layer behind the first.
Join yarn behind Petal 1.
Petal: Ch 5. Beginning in the second chain from the hook, work sl st, sc, hdc, dc. Sl st to the next anchor.
Repeat until eight secondary petals have been formed.
Keep this layer behind the longer petals. With very thick chenille yarn, make one test flower first because two layers can become too bulky for a functional throw.
Flower Background Square
Yarn: deep raspberry.
Make one Plain Raspberry Square through R5.
Measure and shape it to match the cream motifs before attaching the flower. Keeping decoration separate from the structural square prevents the raised petals from affecting the square’s gauge.
Position the completed flower in the center of the square. Aim to keep the tips of the petals approximately 15–25 mm inside the square edges.
Use the center tail to sew the flower center firmly to the square.
Add one small anchoring stitch close to the base of each petal when working with slippery yarn. Do not stitch around the entire perimeter of each petal because the upper sections need to remain raised.
Alternate Pink Flower Square
Yarn: medium rose background, pale blush petals and cream center.
Work the background square using the same R1–R5 construction.
Make the center in cream and the eight petals in pale blush. Attach the flower using the same positioning measurements as the raspberry version.
Repeating the construction while changing only the colors creates variation without introducing differently sized motifs.
Checkerboard Layout
Arrange all completed squares on a flat surface before joining them. For motifs measuring approximately 20 cm, a six-square-wide arrangement creates a useful throw-width starting point before seams and the border are added.
A basic repeating layout can be arranged as follows:
Row A: Cream / Raspberry Flower / Cream / Raspberry / Cream / Raspberry Flower
Row B: Raspberry / Cream / Raspberry / Cream / Raspberry / Cream
Repeat Rows A and B for the required blanket length.
Move some flower positions between repeats instead of placing every daisy in a rigid vertical column. The photographed blanket uses flowers selectively, allowing plain cream and raspberry areas to remain visually distinct.
Joining the Granny Squares
Place two matching squares side by side with their edges aligned.
For a flat join, insert the hook through corresponding stitches from both squares and work a slip stitch. Continue across the edge while matching every stitch and chain space with its partner on the neighboring motif.
Join individual squares into complete horizontal rows first. Once all rows are assembled, join those strips vertically.
Do not pull the joining stitches tighter than the square stitches. A tight seam shortens the joined edge and can cause the blanket to ripple where four corners meet.
Outer Border
Join cream yarn at any outer corner after all squares have been assembled.
Border R1: Sc evenly around the entire blanket, placing 3 sc in each outer corner. Join with sl st.
Change to rose pink.
Border R2: Hdc in each st around. Place 3 hdc in each corner stitch. Join.
Change back to cream.
Border R3: Sc in each st around. Place 3 sc in each corner. Join.
Fasten off and weave the yarn tail through approximately 8–10 cm of neighboring bulky stitches before trimming.
The alternating cream and pink rounds reproduce the narrow striped effect around the edge while keeping the border secondary to the raised flowers.
Assembly
- Complete every cream, raspberry and rose square before beginning the permanent joining process.
- Measure each motif and separate any square that differs from the target dimension by more than approximately 10 mm.
- Block or hand-shape the motifs when appropriate for the yarn fiber and care instructions.
- Make all flower centers and raised petals as separate components.
- Pin each flower to its designated square with the center aligned to the square’s horizontal and vertical axes.
- Sew each flower center securely and anchor only the lower portion of each petal.
- Arrange every square on a flat surface and photograph the final checkerboard arrangement before moving the pieces.
- Join the squares into horizontal rows, then join the completed rows vertically.
- Work the three border rounds and check the blanket after every round for corner flare or edge cupping.
- Weave each yarn tail in more than one direction before trimming the excess.
The completed construction forms a chunky checkerboard blanket with dimensional daisy appliqués and a contrasting striped border.
7 Technical Tips for a Chunky Daisy Granny Square Blanket
- Mark every corner before joining. A missed corner space can leave the next square one stitch out of alignment. Place a locking marker in all four corners before beginning a long seam.
- Do not stuff the flower centers. Thick yarn and layered stitches already create height. Fiberfill beneath an appliqué can produce a firm lump on the reverse of the blanket.
- Keep the square edges structurally consistent. Introducing decreases or extra stitches along one motif edge changes its length. Use the same final-round formula on every square of the same size.
- Measure before attaching the flowers. For a target square of approximately 20 cm, check the motif first. A large appliqué can visually hide a background square that is already 1–2 cm undersized.
- Control chenille tension around the magic ring. Pulling a bulky chenille ring too hard can damage the yarn core. Close the center gradually and stop as soon as the opening disappears.
- Pin all eight petals before sewing. Position them at approximately 12, 1:30, 3, 4:30, 6, 7:30, 9 and 10:30. Uneven angular spacing can make a correctly centered flower appear crooked.
- Weave bulky yarn tails through at least 8–10 cm. Reverse the tail once before trimming it. Short tails can work their way out of loose plush stitches during handling or washing.
Finishing the Blanket
Lay the completed blanket flat and inspect the joins before trimming any remaining tails. Correct a loose seam immediately rather than relying on the border to stabilize it.
Check each dimensional daisy as well. The center should be securely attached, while the upper portions of the petals remain free enough to retain their raised shape.
Before making a full-size version, complete one raspberry square and one flower first. Confirm that the motif reaches the intended measurement with your chosen yarn and 8 mm hook. Record its yarn weight and finished dimensions, then use those figures to calculate requirements for the complete grid.
The chunky daisy granny square blanket can then be expanded or reduced by changing the number of squares rather than rewriting the individual motif. Save the finished layout to Pinterest or share a completed color variation on Instagram with #ChunkyDaisyGrannySquareBlanket.
Would you keep the flower centers cream like the photographed blanket, or use yellow centers for stronger contrast against the pink petals?









