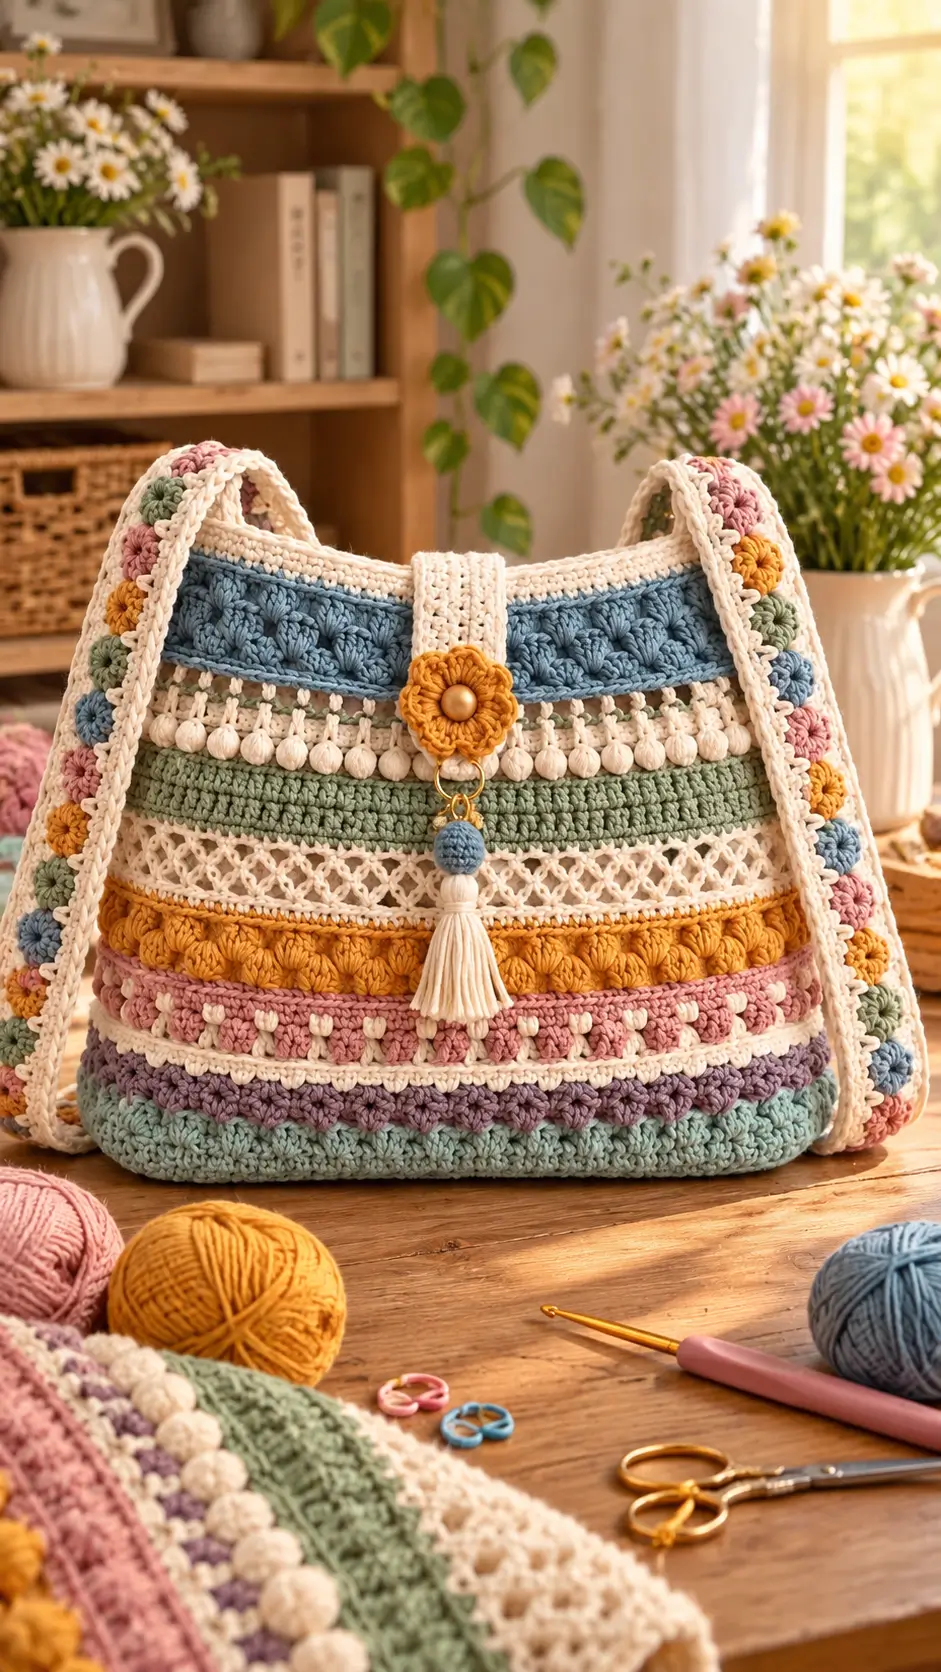
Crochet Boho Shoulder Bag Pattern With Textured Stripes
Introduction
Seven horizontal stitch bands make this bag structurally different from a standard crochet tote. This crochet boho shoulder bag pattern translates the photographed design into a DK-cotton project measuring about 23 × 33 cm, using a 4 mm hook and intermediate-level techniques. The mixed textures add body without requiring a rigid shell, while the long strap makes the finished piece practical for everyday carrying.
The Design: What Makes This Boho Bag Different
The bag depends on three structural decisions. First, a dense lower section supports the openwork and raised decorative rows above it; placing mesh too close to the base would increase stretch under load. Second, the color changes run horizontally, so the eye reads the body as one continuous shape even though several stitch families are used.
The third decision is the strap. A broad crocheted strap distributes weight better than a narrow chain and visually balances the substantial body. The flower closure and tassel form a centered vertical line against those horizontal bands.
A common mistake in a textured crochet bag pattern is changing hook size every time stitch height changes. Keep one working hook unless gauge becomes visibly distorted. For this boho crochet bag, consistency matters more than making every decorative row identical in height.
Project Info at a Glance
| Skill Level | Time | Finished Size | Hook | Best For |
|---|---|---|---|---|
| Intermediate | 10–14 hours | Approx. 23 × 33 cm | 4 mm | Shoulder bag / everyday purse |
Materials and Tools
Yarn
Keep the entire palette within one yarn line where possible so thickness and twist remain consistent.
- Cream/ivory — DK cotton or cotton blend — approximately 80–100 g
- Dusty blue — DK — approximately 35–45 g
- Sage green — DK — approximately 30–40 g
- Mustard — DK — approximately 25–35 g
- Dusty rose — DK — approximately 25–35 g
- Muted lavender — DK — approximately 15–25 g
- Pale aqua — DK — approximately 20–30 g
Individual yarn amounts are working estimates for this image-inspired construction. Buy additional yarn for gauge differences and swatching.
Tools
- 4 mm crochet hook
- Tapestry needle
- Locking stitch markers
- Scissors
- Tape measure
- Polyester or cotton lining fabric — optional
- Magnetic snap — optional
- 20–25 mm decorative button or bead
- 20–25 mm metal ring
- Sewing needle and thread — if adding a lining
Abbreviations
- MR — magic ring
- sc — single crochet
- inc — 2 sc in one stitch
- dec — single crochet decrease
- sl st — slip stitch
- ch — chain
- hdc — half double crochet
- dc — double crochet
- BLO — back loop only
- FPdc — front post double crochet
- puff — puff stitch
- sp — space
- st/sts — stitch/stitches
An invisible decrease is primarily an amigurumi technique and is not required for the main bag body. Where shaping is needed, use standard decreases unless the instructions specify otherwise.
Pattern — Step by Step
Construction: This shoulder bag begins with a rectangular base rather than a magic ring. The body is then worked upward using continuous textured bands.
Bag Base
Yarn: pale aqua.
Foundation: Ch 49.
Row 1: Starting in second ch from hook, sc 48. Ch 1, turn. (48)
Rows 2–8: Sc across. Ch 1, turn. (48)
After Row 8, do not fasten off.
Work one round around the rectangle: 48 sc across the long edge, 8 sc along the short edge, 48 sc across the opposite long edge and 8 sc along the remaining short edge. (112)
Place a stitch marker in the first stitch.
The rectangle forms the bottom of the bag. Check its width before continuing because correcting the dimensions becomes considerably harder after the walls have been worked.
Lower Aqua Texture Band
Yarn: pale aqua.
Rounds 1–3: Sc around. (112)
Round 4: BLO sc around. (112)
Round 5: Hdc around. (112)
Round 6: Sc around. (112)
Fasten off.
Lavender Raised Band
Yarn: muted lavender.
Round 7: Join yarn and sc around. (112)
Round 8: Ch 2, alternate FPdc around the posts of the previous round with dc in the next stitch, maintaining 112 working positions.
Round 9: Sc around. (112)
Fasten off.
Keep this section compact. An excessively tall decorative band near the bottom can cause the finished bag to fold outward when loaded.
Dusty Rose Textured Band
Yarn: dusty rose.
Round 10: Sc around. (112)
Round 11: *Sc 3, puff in next st.* Repeat around. (112 working positions)
Round 12: Sc around. (112)
Round 13: BLO hdc around. (112)
Round 14: Sc around. (112)
Fasten off.
Keep the puff loops at a consistent height. Oversized puffs consume additional yarn and may cause the band to contract.
Mustard Cluster Band
Yarn: mustard.
Round 15: Sc around. (112)
Round 16: Ch 2 and work the textured cluster sequence evenly around while maintaining 112 working positions.
Round 17: Sc around. (112)
Round 18: Hdc around. (112)
Fasten off.
If your chosen cluster variation requires a specific stitch multiple, position any adjustment at the sides of the bag rather than across the center front.
Cream Openwork Band
Yarn: cream.
Round 19: Sc around. (112)
Round 20: *Ch 3, skip 1 st, sc in next st.* Repeat around. (56 loops)
Round 21: Sl st into first ch-3 sp, *ch 3, sc in next ch-3 sp.* Repeat around. (56 loops)
Rounds 22–24: Repeat Round 21. (56 loops)
Round 25: Work 2 sc into each ch-3 sp. (112)
Round 26: Sc around. (112)
Do not pull the chain loops tightly. This section needs visible openwork while retaining the same overall circumference as the surrounding bands.
Sage Green Structural Band
Yarn: sage green.
Round 27: Sc around. (112)
Rounds 28–31: Hdc around. (112)
Round 32: BLO sc around. (112)
Round 33: Sc around. (112)
Fasten off.
This dense section provides structural support between the openwork and upper decorative bands.
Cream Bobble Band
Yarn: cream.
Round 34: Sc around. (112)
Round 35: *Sc 3, bobble in next st.* Repeat around. (112 working positions)
Round 36: Sc around. (112)
Round 37: Hdc around. (112)
Fasten off.
Push each bobble toward the outside of the bag before making the following stitch.
Dusty Blue Upper Band
Yarn: dusty blue.
Round 38: Sc around. (112)
Round 39: Hdc around. (112)
Round 40: Work alternating FPdc and standard dc around while maintaining 112 working positions.
Round 41: Sc around. (112)
Round 42: Repeat the textured post-stitch sequence. (112 working positions)
Round 43: Sc around. (112)
Fasten off.
The blue section is one of the widest decorative bands. Add one additional plain round if the bag remains shorter than the target height.
Cream Top Edge
Yarn: cream.
Rounds 44–46: Sc around. (112)
Round 47: BLO sc around. (112)
Round 48: Sc around. (112)
Fasten off and weave the yarn tail securely through several dense stitches.
Shoulder Strap
Yarn: cream.
Foundation: Ch 8.
Row 1: Sc in second ch from hook and across. (7)
Rows 2–160: Ch 1, turn, sc 7. (7)
Measure the strap against the intended wearer before fastening off. Add or remove rows to adjust the shoulder drop.
Fasten off, leaving a 30 cm sewing tail at each end.
For the floral side treatment, make small flower motifs in sage, dusty blue, rose and mustard. Sew them at spaced intervals along the strap after the strap has been attached to the bag.
Small Strap Flowers
Make 10–14 in assorted accent colors.
Round 1: 6 sc in MR. (6)
Round 2: *(Sl st, ch 3, 2 dc, ch 3, sl st) in next st.* Repeat six times to create six petals.
Fasten off. Leave a 15 cm tail for sewing.
Front Closure Tab
Yarn: cream.
Foundation: Ch 9.
Row 1: Sc in second ch from hook and across. (8)
Rows 2–22: Ch 1, turn, sc across. (8)
Row 23: Ch 1, sc 2, ch 4, skip 4, sc 2.
Row 24: Ch 1, sc 2, work 4 sc into ch-4 space, sc 2. (8)
Rows 25–27: Sc across. (8)
Fasten off with a 25 cm tail.
The button loop can be omitted when installing a magnetic closure.
Closure Flower
Yarn: mustard.
Round 1: 6 sc in MR. (6)
Round 2: Inc ×6. (12)
Round 3: *Sc 1, inc.* Repeat ×6. (18)
Round 4: *Sl st in next st, ch 3, 2 dc in next st, ch 3, sl st in next st.* Repeat around to form the petal edge.
Fasten off with a 20 cm tail.
Attach the decorative button or bead at the flower center after the flower has been firmly sewn to the closure tab.
Tassel
Yarn: cream with dusty-blue accent.
Cut approximately 30 cream strands, each 20 cm long. Fold the strands through the metal ring and bind them approximately 15–20 mm below the fold.
Trim the completed tassel to approximately 8–9 cm.
Make the small dusty-blue crochet bead as follows:
Round 1: 6 sc in MR. (6)
Round 2: Inc ×6. (12)
Rounds 3–5: Sc around. (12)
Round 6: Dec ×6. (6)
Fasten off. Thread the ring connection through the crocheted ball and secure it directly above the tassel.
Optional Fabric Lining
Cut two lining panels approximately 1.5 cm larger than the finished crochet body on each seam edge.
Sew the side and bottom seams. Press the upper seam allowance inward, insert the lining into the bag and hand-sew it immediately below the cream top edge.
A lining is particularly useful for this design because the openwork section can allow small objects to protrude through the crochet fabric.
Assembly
- Block the empty bag body to the intended dimensions, keeping the rectangular base flat and avoiding excessive stretching at the opening.
- Center the strap ends over both side sections. Sew each end through several rows of dense crochet rather than attaching it to only the final top round.
- Position the closure tab at the center back. Sew approximately 4–5 cm of the tab securely to the bag.
- Fold the tab across the opening and mark its landing position on the front before installing the button, snap or decorative flower.
- Sew the mustard flower to the outer surface of the tab. Secure the button or bead through both the flower and the dense tab fabric.
- Attach the metal ring below the flower. Check that it hangs centrally without pulling the closure toward either side.
- Add the dusty-blue crocheted bead and cream tassel to the ring. Keep the complete hanging decoration proportional to the bag body.
- Pin the multicolor flowers along the outer strap edges before sewing. Compare both sides to check the spacing.
- Insert the optional fabric lining and hand-sew it below the upper edge without catching visible decorative stitches.
- Weave every yarn tail through at least 4–5 cm of dense crochet, reverse direction once, trim the excess and test both strap attachments under moderate load.
The completed bag should have a stable lower body, flexible upper opening and centered closure assembly.
7 Technical Tips for a Better Crochet Shoulder Bag
- Mark the first stitch of every body round. Losing the round boundary shifts color changes diagonally and can create a visible jog across the front of the bag.
- Keep stuffing out of this project. If the bag collapses excessively, add a fabric lining or lightweight interfacing rather than filling the crochet body.
- Do not add accidental decreases to the decorative bands. Dropping below the 112-stitch circumference can cause one colored section to cinch inward.
- Attach each strap end across at least 4–5 cm of dense fabric. Sewing into only the final top round concentrates the carrying load and can stretch the rim.
- Maintain consistent tension throughout the openwork section. Tight chain-3 loops can reduce the circumference and make the cream mesh noticeably narrower than the sage band.
- Pin every strap flower before sewing. A spacing difference of 2–3 cm becomes increasingly visible over the full length of the strap.
- Weave structural tails through dense rows and reverse direction. A yarn end hidden only through the open mesh has less friction and can work loose during regular use.
Conclusion
Measure the body before attaching the strap; the target for this version is approximately 23 × 33 cm, but gauge and cotton choice can change both dimensions. Test the strap attachment with weight inside the lined bag before adding the final flowers and tassel. That sequence prevents decorative details from covering a structural problem. Save this crochet boho shoulder bag pattern to Pinterest, then share your finished color combination on Instagram with #TexturedBohoShoulderBag. Keep cream as the dominant neutral if you want to reproduce the photographed palette, distributing dusty blue, sage, mustard and rose across separate bands. Which feature would you change first: the blue upper band, cream openwork section or flower-trimmed strap?









