Introduction
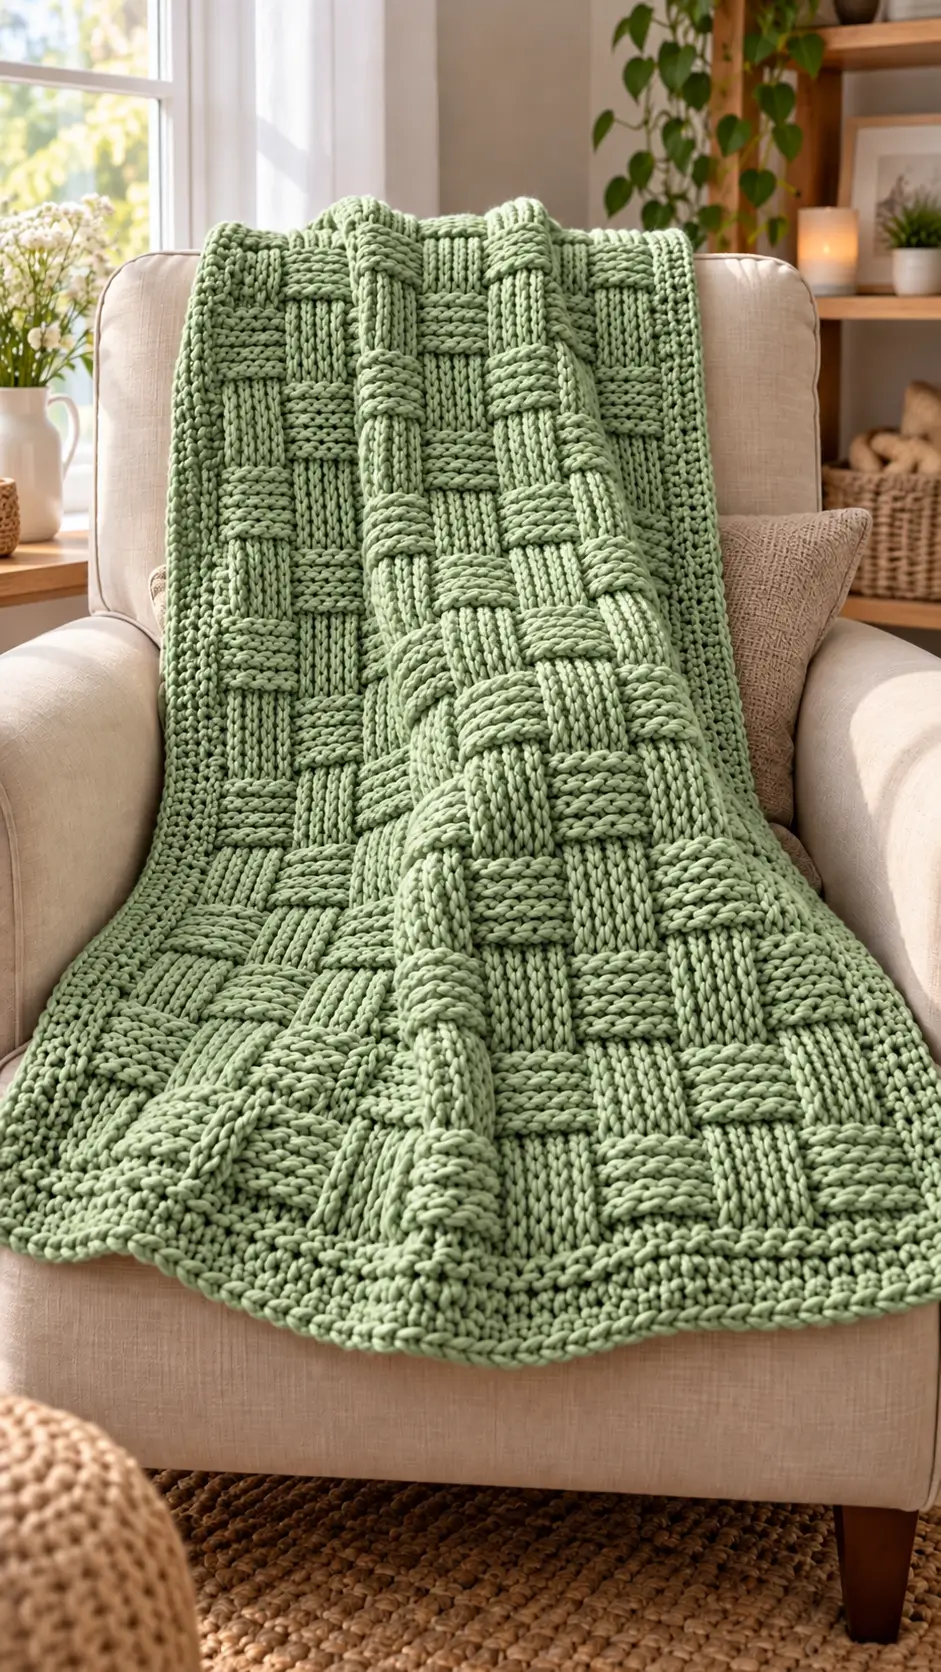
A basketweave blanket only looks woven because neighboring blocks reverse which stitches dominate the surface. This chunky basketweave blanket knitting pattern recreates the large sage-green grid visible in the reference design using super-bulky yarn, 10 mm needles, and an approximately 106 × 120 cm format. It suits an advanced beginner who can knit and purl. The single-piece construction also removes seaming from a large household project.
The Design: What Makes This Basketweave Blanket Different
The design depends on scale. Tiny four-stitch checks would produce a busy surface, while this blanket uses broad rectangles that remain identifiable from across a room. Large knit-and-purl sections are therefore the first structural decision.
Second, the outside edge needs its own texture. An integrated border controls the edges while visually separating the basket field from the perimeter. A finished size of approximately 106 × 120 cm creates a practical throw without requiring separate panels.
Finally, this basket weave knitting pattern is worked flat on a long circular needle. The cable carries the width without changing the technique to circular knitting. A common error in a textured blanket knitting pattern is reversing the blocks one row too early, which turns rectangles into irregular bars.
Project Info at a Glance
| Skill Level | Time | Finished Size | Needle | Best For |
|---|---|---|---|---|
| Advanced beginner | Multi-session project | Approx. 106 × 120 cm | 10 mm circular | Throw / lap blanket |
Actual dimensions depend on yarn choice, gauge, knitting tension, and blocking. Make and measure a gauge swatch before beginning the full blanket.
Materials and Tools
Yarn
- Sage green — CYC #6 Super Bulky — approximately 1,360 g
- Suggested yarn: Lion Brand Wool-Ease Thick & Quick or a gauge-matched super-bulky substitute
A round, plied super-bulky yarn gives the basket sections clear definition. A plush substitute can produce a softer-looking surface, but equal yarn-weight classifications do not always produce equal gauge.
Tools
- 10 mm / US 15 circular knitting needle with approximately 75–100 cm cable
- Large-eye tapestry needle
- Scissors
- Locking stitch markers
- Tape measure
- Gauge ruler
- Optional blocking mats
The circular needle is used to hold the large number of stitches while the blanket is knitted back and forth. The work is not joined in the round.
Abbreviations
- CO — cast on
- BO — bind off
- K — knit
- P — purl
- st(s) — stitch(es)
- RS — right side
- WS — wrong side
- rep — repeat
- PM — place marker
- SM — slip marker
This blanket does not require increases or decreases. Its rectangular shape comes from maintaining the same stitch count from cast-on to bind-off.
Gauge and Sizing
A useful target gauge for this super bulky blanket pattern is approximately 9.5 stitches and 13 rows per 10 cm in the established basketweave fabric when using 10 mm needles.
Make a swatch larger than 10 cm square because basketweave texture can contract differently from plain stockinette. Measure the central 10 cm rather than including the edge stitches.
At 9.5 stitches per 10 cm, a 100-stitch cast-on produces a width close to 105 cm before differences caused by individual tension, yarn composition, and border behavior.
Changing yarn requires another gauge calculation. Do not assume that every CYC #6 yarn will produce the same dimensions on a 10 mm needle.
Chunky Basketweave Blanket Pattern
Construction: Work the entire blanket flat. The circular needle functions as a long straight needle and provides enough cable length to hold all 100 stitches. Do not join the cast-on edge.
This is a photo-inspired basketweave construction. Gauge and finished measurements should be checked against your own swatch before committing the full yarn quantity.
Cast On and Lower Border
With sage-green yarn, CO 100 sts.
Place a marker after the first 5 stitches and another marker before the final 5 stitches. These stitches form the integrated side borders.
Row 1 (RS): *K1, P1; rep from * across. (100 sts)
Row 2 (WS): Work each knit stitch as a purl and each purl stitch as a knit. (100 sts)
Rows 3–6: Repeat Row 2, maintaining seed stitch. (100 sts)
Keep the cast-on and border tension relaxed. A tight lower edge can make the finished blanket narrower at the bottom than through the main basketweave section.
Basketweave Setup
The central 90 stitches create the principal basketweave field. Five stitches remain at each side to form the integrated border.
The center is divided into 15-stitch sections. Alternating knit-facing and purl-facing sections create the visual impression of woven rectangular blocks.
Block Section A
Row 1 (RS): Work 5 sts in established seed stitch. *K15, P15; repeat from * across the 90 center stitches. Work the final 5 sts in established seed stitch. (100 sts)
Row 2 (WS): Work 5 border sts in seed stitch. Work the center stitches as they present, knitting the knit-facing stitches and purling the purl-facing stitches. Work the final 5 border sts in seed stitch. (100 sts)
Rows 3–12: Continue the established 15-stitch sections while maintaining five seed-stitch border stitches at each side. (100 sts)
Use removable markers between blocks if necessary. Thick yarn can make the transition between adjacent sections harder to identify when the blanket is gathered onto the needle cable.
Block Section B
The direction of the texture now reverses.
Row 13 (RS): Work 5 sts in seed stitch. Over each previous knit block, purl 15 stitches. Over each previous purl block, knit 15 stitches. Continue across all 90 center stitches. Work the final 5 sts in seed stitch. (100 sts)
Row 14 (WS): Maintain each block as established while continuing the seed-stitch borders. (100 sts)
Rows 15–24: Continue the established reversed blocks. Keep the total stitch count at 100. (100 sts)
Rows 1–24 form one complete basketweave cycle.
Main Blanket
Repeat the complete 24-row basketweave cycle until the blanket measures approximately 114 cm from the cast-on edge. End after a complete block section where possible.
Lay the blanket on a flat surface before measuring. Do not stretch the fabric lengthwise while taking the measurement.
For a target finished length of approximately 120 cm, reserve about 5–6 cm for the final border. Row gauge can change significantly between different super-bulky yarns, so physical measurement is more dependable than specifying a fixed number of repeats.
Upper Border
Once the main basketweave field reaches the required length, stop reversing the blocks.
Work 6 rows in seed stitch across all 100 stitches.
Match the tension of the lower border as closely as possible. The upper and lower borders should have similar depth after the blanket is laid flat.
Bind Off
Bind off all 100 stitches in pattern. Keep the bind-off loose enough to match the width of the cast-on edge.
Do not tighten the working yarn aggressively after each bound-off stitch. A compressed upper edge can pull the corners inward and distort an otherwise rectangular blanket.
Cut the yarn, leaving a 15–20 cm tail. Pull the tail through the final stitch.
Why the Basketweave Effect Works
Basketweave knitting is based on controlled contrast between knit-facing and purl-facing areas. No strips of knitted fabric actually pass over or underneath one another.
The eye interprets the raised sections as separate woven pieces because neighboring rectangles change orientation. With super-bulky yarn, that contrast becomes much more pronounced because each individual stitch contributes substantial depth.
The larger 15-stitch sections are particularly useful for a throw blanket. Small basket repeats can look like checks from a distance, while oversized sections retain the woven appearance across a larger surface.
Basketweave is also a family of stitch patterns rather than one fixed formula. Different patterns may use four-, six-, eight-, twelve-, or larger stitch sections. The correct repeat depends on the required block proportions and finished dimensions.
How to Adjust the Blanket Width
Start with gauge rather than choosing an arbitrary number of stitches.
At approximately 9.5 stitches per 10 cm, a target width of 106 cm requires roughly:
9.5 × 10.6 = approximately 101 stitches.
A 100-stitch cast-on therefore provides a practical target for a blanket close to the dimensions described here.
The photo-inspired construction uses 90 center stitches + 10 border stitches = 100 stitches total.
The 90 center stitches divide evenly into six 15-stitch sections. Keeping complete sections is important because an incomplete block at one edge would make the basketweave field asymmetrical.
For a wider blanket, one option is:
120 center stitches + 10 border stitches = 130 stitches total.
That produces eight complete 15-stitch sections. Yarn requirements will rise substantially, so calculate additional yardage before casting on.
Choosing Yarn for a Sage-Green Basketweave Blanket
Solid yarn is the strongest choice for this design because frequent color changes can hide the boundaries between the knit and purl blocks. Sage green works particularly well because the single color leaves the raised geometry responsible for the visual pattern.
Yarn construction also affects stitch definition. A round, plied super-bulky yarn gives individual knit columns and purl bumps clear edges. Highly fuzzy yarn softens those boundaries.
Chenille-style blanket yarn creates a plush fabric, but the basketweave geometry may appear less sharply defined. If the objective is a pronounced architectural grid, test a plied super-bulky yarn first.
Fiber composition changes drape as well. Wool blends can behave differently from acrylic or polyester blanket yarns even when all three carry the same yarn-weight classification.
Make a swatch with the actual yarn and needle combination. Measure it after any washing or blocking treatment that will later be applied to the finished blanket.
Yarn Quantity and Substitution
Plan on approximately 1,360 g of super-bulky yarn for a blanket around the stated dimensions when the replacement yarn closely matches the target gauge and meterage.
Purchase additional yarn when changing the blanket dimensions or when the substitute yarn has fewer meters per gram. Grams alone cannot accurately predict how much yarn a project requires.
For example, two skeins may both weigh 170 g but contain significantly different lengths of yarn. The shorter yarn will require more skeins to cover the same knitted area.
Check three figures before substituting: yarn weight category, meterage per ball, and measured gauge.
When using dyed yarn, buying the required quantity from the same dye lot reduces the risk of visible shade changes through the middle of the blanket.
Finishing the Blanket
Thread the cast-on tail onto a large-eye tapestry needle. Weave it through the wrong side of the border for several centimeters, change direction, and pass through another section before trimming.
Repeat the process for the bind-off tail and every yarn join.
Next, lay the blanket completely flat and measure both diagonals. Similar diagonal measurements indicate that the blanket is square rather than skewed toward one side.
If the yarn label permits blocking, shape the blanket to approximately 106 × 120 cm. Avoid aggressively stretching the textured blocks because excessive tension can flatten the basketweave relief.
Allow the blanket to dry completely in its final dimensions before folding or storing it.
7 Technical Tips for Better Basketweave Knitting
- Prevent marker drift: Keep the markers exactly five stitches from both outside edges. Moving either marker by one stitch changes the border width and becomes increasingly visible as the blanket grows.
- Check for a compressed cast-on: Compare the cast-on width with the blanket after approximately 10 cm of knitting. If the starting edge is more than 2–3 cm narrower, a looser or more elastic cast-on may be required.
- Mark every block reversal: Attach a removable marker to the first row of each new basket section. Reversing the texture one or two rows early produces blocks of visibly different heights.
- Read the wrong-side stitches: A knit stitch presents a V-shaped face. Accidentally purling into a knit-facing block at the wrong point creates an interruption that is particularly noticeable with thick yarn.
- Measure gauge after treatment: Check a washed or blocked swatch rather than relying only on the needle recommendation. A difference of one stitch per 10 cm can create roughly ten stitches of discrepancy across a meter-wide blanket.
- Maintain equal side borders: Keep exactly five border stitches on both sides from the first basket row to the last. Allowing one border stitch to migrate into the center makes the blanket appear unbalanced.
- Secure bulky yarn tails: Weave each tail approximately 8–10 cm through the wrong-side structure and reverse direction at least once. Super-bulky fabric contains fewer stitches per centimeter, leaving fewer friction points for a very short tail.
Care and Shape Maintenance
Follow the washing instructions printed on the selected yarn label. Fiber content determines whether machine washing, hand washing, or another treatment is appropriate.
A large basketweave blanket becomes substantially heavier when wet. Support the full fabric rather than lifting it from one corner, which can place unnecessary tension on wet stitches.
After washing, return the blanket to its intended rectangular dimensions. Align the side borders and check the corners before drying.
Avoid excessive heat unless the yarn manufacturer specifically permits it. Heat can permanently alter some synthetic fibers and reduce the definition of the raised basket texture.
Conclusion
Measure a 10 cm swatch before buying the full yarn quantity; that measurement determines whether the 100-stitch plan will produce the intended width. Once gauge is established, mark every basket transition and record completed sections rather than recounting them across a large blanket. Photograph the finished sage version flat so the alternating block direction remains visible, then share it on Pinterest or Instagram with #SageBasketweaveBlanket. For another size, recalculate the center in complete 15-stitch sections before adding the borders. This keeps the chunky basketweave blanket knitting pattern proportional as its dimensions change. Which version would you make: large rectangular baskets or a smaller square grid?









