Introduction
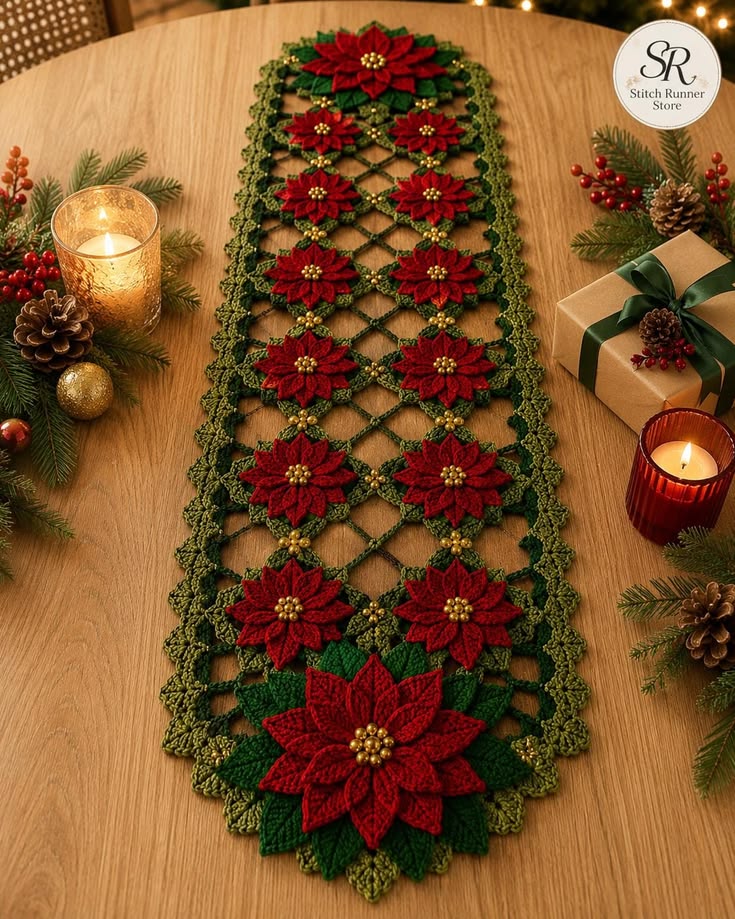
Fourteen red poinsettias march through a green diamond lattice while two oversized flowers anchor the ends of the runner. This Christmas poinsettia crochet table runner pattern uses worsted cotton, a 4 mm hook, separate pointed bracts, green leaf motifs, and an open joined framework. The intermediate reconstruction targets approximately 38 × 145 cm, producing a long holiday centerpiece without a solid fabric panel beneath the flowers.
The instructions below are an original photo-inspired reconstruction based on visible structure; published patterns cited later are used only for sizing, gauge, and material benchmarks.
The Design: What Makes This Poinsettia Runner Different
The central engineering feature is negative space. Instead of sewing flowers onto a rectangular background, this runner suspends paired poinsettias inside a green diamond lattice, leaving the tabletop visible through large openings. Two oversized end flowers carry additional green leaves and create wider terminal medallions, while smaller red flowers repeat through the center. Olive scallops reinforce both long edges without filling the lattice. The crochet poinsettia table runner therefore needs firm connections at flower bases and lattice intersections rather than a heavy foundation fabric. Each poinsettia also uses pointed layered bracts instead of rounded shell petals. One common mistake is attaching a dimensional flower through only one lattice junction. Its weight can distort the diamond, so every medium flower should distribute its load across at least three neighboring connections.
Project Info at a Glance
| Skill Level | Time | Finished Size | Hook | Best For |
|---|---|---|---|---|
| Intermediate | Reconstruction estimate: 22–30 hours | Reconstruction target: 36–40 × 140–150 cm | 4 mm main work; 3.5 mm flowers | Christmas dining tables, sideboards, long coffee tables |
Published patterns confirm that medium-weight yarn is practical for dimensional poinsettia decor. Mary Maxim’s Poinsettia Table Runner specifies Aran-weight yarn, a 5 mm hook, and 1,100–1,300 yards. Regina Rioux’s three-poinsettia runner also uses Aran yarn and a 5 mm hook. June Gilbank’s standalone poinsettia uses worsted yarn with a 3.5 mm hook and measures approximately 5–6 inches, while Dani West’s 2025 worsted poinsettia uses a 5 mm hook and measures about 10 cm across.
Materials and Tools
Yarn
- Deep Christmas red — worsted #4 cotton or cotton blend — reconstruction estimate: 260–320 g
- Dark forest green — worsted #4 — reconstruction estimate: 180–220 g
- Olive green — worsted #4 — reconstruction estimate: 220–270 g
- Antique gold — DK or worsted yarn — reconstruction estimate: 25–35 g
A smooth cotton or cotton-blend yarn gives the pointed bracts and leaves enough definition to remain readable against the open lattice. Naztazia’s published poinsettia similarly specifies worsted 100% cotton with a 4 mm hook, while June Gilbank’s benchmark uses worsted yarn and a 3.5 mm hook.
Tools
- 4 mm crochet hook for lattice and border
- 3.5 mm crochet hook for flowers and leaves
- Tapestry needle
- Locking stitch markers
- Blocking mats
- Rust-resistant pins
- Scissors
- Measuring tape
- Optional 6–8 mm metallic-gold beads
Abbreviations
- MR — magic ring
- ch — chain
- sl st — slip stitch
- sc — single crochet
- hdc — half double crochet
- dc — double crochet
- tr — treble crochet
- sp — space
- st/sts — stitch/stitches
- RS — right side
An invisible decrease works through the front loops of two adjacent stitches before completing one single crochet; decreases are not required for the flat motifs in this reconstruction.
Reconstruction Layout
The photograph shows two oversized terminal poinsettias and a central procession of smaller flowers. Perspective obscures some of the upper motifs, so the following inventory is a reconstruction choice rather than a claimed exact photographic count.
- Large end poinsettia ×2
- Medium poinsettia ×12
- Large dark-green leaves ×16
- Small olive leaf units ×24
- Gold lattice junctions distributed between flower groups
- Olive scalloped side borders ×2
Arrange the twelve medium flowers as six paired stations. Together with the two large end flowers, this creates a long composition close to the photographed density.
Pattern — Step by Step
Medium Poinsettia Foundation — Make 12
Hook: 3.5 mm. Yarn: deep red.
R1: 6 sc in MR. (6)
R2: Inc ×6. (12)
R3: (Sc, inc) ×6. (18)
R4: (2 sc, inc) ×6. (24)
Fasten off with a 35 cm tail.
This flat disc is hidden beneath the bracts and supplies a stable sewing surface for attaching the flower to several lattice strands.
Medium Outer Red Bract — Make 72
Each medium flower receives six outer bracts.
Ch 14.
Starting in the second chain, work into the next 12 chains, leaving the final chain for the pointed turn:
Sl st in 1, sc in 2, hdc in 2, dc in 3, tr in 2, dc in 1, hdc in 1. (12)
Work 5 sc in the final chain.
Continue down the opposite side with the exact reverse sequence:
Hdc in 1, dc in 1, tr in 2, dc in 3, hdc in 2, sc in 2, sl st in 1. (12)
Fasten off with a 20 cm sewing tail.
Each bract contains exactly 29 stitches: 12 + 5 + 12.
Medium Inner Red Bract — Make 72
Ch 11.
Starting in the second chain, work into the next nine chains, leaving the final chain for the point:
Sl st in 1, sc in 2, hdc in 2, dc in 2, hdc in 1, sc in 1. (9)
Work 3 sc in the final chain.
Mirror the nine-stitch sequence down the opposite side.
Fasten off with a sewing tail.
Each medium poinsettia requires six inner bracts.
Assemble the Medium Poinsettias
Pin six outer bracts around one 24-stitch foundation disc. Position the six bases approximately four foundation stitches apart.
Sew only the lower 2–2.5 cm of each bract.
Add six small bracts over the first layer, rotating the second set approximately 30 degrees so its points occupy the gaps between the outer layer.
Keep the outer halves free.
Finished reconstruction diameter should be approximately 12–14 cm after blocking.
Large End Poinsettia Foundation — Make 2
R1: 6 sc in MR. (6)
R2: Inc ×6. (12)
R3: (Sc, inc) ×6. (18)
R4: (2 sc, inc) ×6. (24)
R5: (3 sc, inc) ×6. (30)
R6: (4 sc, inc) ×6. (36)
Fasten off with a 50 cm tail.
Large Outer Bract — Make 12
Ch 18.
Starting in the second chain, work into the next 16 chains, leaving the final chain for the tip:
Sl st in 1, sc in 2, hdc in 3, dc in 4, tr in 4, dc in 1, hdc in 1. (16)
Work 5 sc in the final chain.
Mirror the 16-stitch sequence along the opposite side.
Fasten off.
Each large outer bract contains 37 stitches.
Large Middle Bract — Make 12
Repeat the 14-chain medium outer-bract pattern.
Make six for each large flower.
Large Inner Bract — Make 12
Repeat the 11-chain medium inner-bract pattern.
Make six for each large flower.
Assemble Each Large Poinsettia
Sew six large bracts to the outer section of the 36-stitch disc.
Add six medium bracts rotated 30 degrees from the first layer.
Position six small bracts as the upper layer.
Press only the bract bases during blocking. Leave the points slightly raised.
The completed red flower should measure approximately 18–20 cm before green foliage is added.
Large Forest-Green Leaf — Make 16
Hook: 3.5 mm. Reconstruction target: approximately 10–12 cm.
Ch 22.
Starting in the second chain, work into the next 20 chains while leaving the final chain untouched for the point:
Sl st in 1, sc in 2, hdc in 3, dc in 4, tr in 7, dc in 2, hdc in 1. (20)
Work 5 sc in the final foundation chain.
Along the opposite side work:
Hdc in 1, dc in 2, tr in 7, dc in 4, hdc in 3, sc in 2, sl st in 1. (20)
Fasten off with a 35 cm tail.
The leaf contains exactly 45 stitches: 20 + 5 + 20.
Leaf Center Vein
Join dark green at the base of a completed leaf.
Surface slip stitch along the visible foundation-chain ridge toward the tip.
Stop approximately 1 cm before the point.
Fasten off without tightening the vein.
Small Olive Leaf Unit — Make 24
Ch 11.
Starting in the second chain, work into the next nine chains while retaining the final chain for the tip:
Sl st in 1, sc in 2, hdc in 2, dc in 2, hdc in 1, sc in 1. (9)
Work 3 sc in the final chain.
Mirror the nine-stitch sequence along the second side.
Fasten off.
These smaller leaves sit behind the medium poinsettias and help connect the flower bases to the lattice.
Gold Flower Center — Make 14
If metallic beads are not being used, make a crocheted center for every poinsettia.
R1: With antique gold, work 6 sc in MR. (6)
R2: Work (sl st, ch 2, sl st) in each stitch. (6 raised points)
Fasten off with a 20 cm tail.
Sew one center over the middle of each flower.
For a closer visual match, replace the crocheted center with a tightly grouped cluster of approximately 7–9 gold beads. Secure each bead individually rather than running one exposed thread through the complete cluster.
Building the Central Diamond Lattice
The runner does not require a solid foundation. Build the framework from dark green connecting cords after blocking the flowers.
With the 4 mm hook, ch 17.
Beginning in the second chain, sl st loosely across all 16 chains. (16)
Fasten off with a 15 cm tail.
Make 44 connector cords.
At the target gauge, each blocked connector should measure approximately 8–9 cm.
These cords form the sides of the open diamonds visible between the flowers.
Creating One Diamond
Arrange four 16-stitch connector cords into a diamond approximately 11–12 cm high × 8–9 cm wide.
Overlap cord ends by approximately 1 cm.
Sew through both cord ends with matching green yarn.
Cover the intersection with a gold center knot or small crocheted gold disc.
Do not stretch the cords during assembly; tension should come from blocking the finished runner rather than pulling the connectors tight.
Center-Lattice Layout
Lay out six pairs of medium poinsettias along a center line.
Within each pair, leave approximately 8–10 cm between flower centers horizontally.
Leave approximately 17–19 cm between successive paired stations along the length.
Connect adjacent flower bases diagonally with the 16-stitch cords.
The crossed diagonals create the repeating diamonds shown through the center of the reference.
Place one gold junction at each major crossing.
Attaching Medium Flowers to the Lattice
Each medium flower should touch at least three green structural points.
Sew the foundation disc to the upper-left connector, upper-right connector, and lower junction.
Add a fourth concealed stitch where the geometry permits.
Do not sew through the pointed halves of the red bracts.
The flower should appear to sit above the lattice rather than become flattened into it.
Adding Small Green Leaves Behind Medium Flowers
Use two small olive leaves behind each medium poinsettia.
Place the leaves at approximately 4 o’clock and 8 o’clock relative to the flower center.
Sew each leaf through its base and lower center only.
The pointed upper half remains free.
The 24 leaves provide exactly two for each of the 12 medium flowers.
End Flower Foliage
Use eight large dark-green leaves around each oversized end flower.
Arrange the leaves radially at approximately 45-degree intervals.
Allow the upper four leaves to overlap the beginning of the lattice by 2–3 cm.
Sew each leaf through approximately the lower 4 cm of its center ridge.
Place the assembled large poinsettia over the leaf bases and secure the 36-stitch foundation disc at eight evenly distributed points.
Connecting the End Flowers
Position one large flower at each end of the central lattice.
Overlap the first and final diamond structures beneath the upper green leaves.
Sew at four separate connection points.
The completed central structure should measure approximately 125–130 cm before the side edging is installed.
Olive Side Foundation — Make 2
The photograph uses a substantial olive-green edging along both long sides.
With the runner pinned to the reconstruction dimensions, join olive yarn at the upper end.
Work along the lattice edge, placing 3 sc around every exposed connector cord and 2 sc into every structural junction.
Continue to the opposite end.
The precise total depends on the final number of exposed connector sections, so both side foundations must be worked from the same assembled runner rather than calculated independently.
Mark every sixth foundation stitch before beginning the scallops.
Olive Scalloped Edge
Row 1: Ch 1, turn, sc in each foundation stitch.
Row 2: Ch 1, turn. *Sl st in next st, skip 2 sts, 7 dc in next st, skip 2 sts*; repeat across.
The repeat consumes six foundation stitches.
If the final side foundation is not divisible by six, remove or add the necessary stitches during Row 1 by working evenly distributed sc2tog or increases. Make both sides identical.
Row 3: Change to dark forest green. Ch 1, turn. Sc in every stitch across, working (sc, ch 2, sc) in the center dc of each 7-dc shell.
Fasten off.
Bottom and Top Scallops
Continue the olive border around the outer halves of the large end-flower leaves rather than forcing a straight short edge.
Work groups of 7 dc into spaces between adjacent leaf points.
Anchor each shell with a slip stitch near the next leaf base.
Change to dark green for the final single-crochet definition round.
The terminal border should follow the radial end medallion rather than creating a rectangular cap.
Gold Border Accents
With antique gold, add one small knot or three-chain picot at the center of selected olive scallops.
Space accents approximately 10–12 cm apart.
Avoid adding gold to every scallop. The photograph concentrates metallic color around flower centers and lattice junctions.
Blocking the Flowers
Block individual red bracts before flower assembly.
Pin each bract along a straight center axis and define its pointed end.
After assembly, steam or damp-block only the outer bract tips.
Do not press the complete flower flat.
Block green leaves separately with the foundation-chain ridge centered between their outer edges.
Blocking the Lattice
Pin the assembled flower-and-lattice structure before adding the long side borders.
Set the center line straight.
Adjust every diamond to approximately the same width and height.
Measure across several paired-flower stations. Keep the unbordered width within approximately 2 cm from one station to another.
Assembly
- Crochet 12 medium poinsettia foundation discs, 72 medium outer bracts, 72 medium inner bracts, and assemble each flower with six bracts in each of two offset layers.
- Make two 36-stitch large foundations plus 12 large, 12 medium, and 12 small bracts, then assemble the two oversized terminal poinsettias in three graduated layers.
- Crochet 16 large forest-green leaves and 24 small olive leaves, add loose surface-slip-stitch veins where required, and block every leaf before joining.
- Make 44 dark-green connector cords, block them to approximately 8–9 cm, and arrange them into a repeating diamond lattice on a measured work surface.
- Pin the 12 medium poinsettias as six pairs, connect every flower foundation to at least three structural points, and place two small leaves beneath each flower.
- Arrange eight large leaves around each oversized end flower, overlap their upper leaves with the first and final lattice sections, and sew each end medallion at four or more structural points.
- Add the 14 gold flower centers and the smaller gold junction accents only after the red flowers and green framework have been permanently joined.
- Pin the complete central structure to approximately 125–130 cm long, correct distorted diamonds, and work matching olive foundation rows down both long sides.
- Add the six-stitch-repeat olive scallops, dark-green definition round, terminal leaf-following shells, and selected antique-gold border accents.
- Weave every tail through at least 5 cm of matching fabric, block the finished runner to approximately 36–40 × 140–150 cm, and reshape all free poinsettia points after drying.
The finished reconstruction consists of fourteen dimensional poinsettias, forty green leaves, an open diamond framework, two scalloped side borders, and two enlarged floral end medallions.
7 Technical Tips
- The diamond lattice collapses sideways: block every 16-stitch connector to approximately 8–9 cm before assembly. Mixing relaxed and stretched connectors can shift a flower pair by more than 2 cm.
- The medium poinsettia looks like a red circle: rotate its six inner bracts approximately 30 degrees from the six outer points. Stacking both layers directly over one another hides half of the flower’s intended radial structure.
- The large end flower sags: sew its 36-stitch foundation through at least eight points and connect the surrounding foliage at four structural junctions. One or two attachment points cannot distribute the weight of an 18–20 cm layered flower.
- A leaf curls along its center: stop the surface-slip-stitch vein approximately 1 cm before the point. A vein shortened by even 5 mm can pull the 22-chain leaf into a permanent cup.
- The two side borders finish at different lengths: mark every sixth foundation stitch before crocheting the first shell. The 7-dc shell repeat consumes exactly six foundation stitches, so an unmatched remainder signals a foundation-count difference.
- The runner narrows through the middle: measure the width at every paired-flower station before installing the side border. Correct any variation greater than approximately 2 cm while the lattice is still pinned and adjustable.
- Gold beads loosen during handling: attach each 6–8 mm bead independently through the crocheted flower center. A single thread passing through an entire cluster can release several beads if one section breaks.
Why an Open Lattice Fits the Reference
The tabletop remains clearly visible between the poinsettias. A solid cream or green foundation would therefore change the defining structure of the photographed piece.
The diamond framework solves two problems simultaneously. It connects individual flowers into a continuous textile and provides large negative spaces that keep a long runner from becoming visually heavy.
Structural strength comes from repetition. Every flower joins several cords, neighboring diamonds share junctions, and the side edging stabilizes the complete length after assembly.
Published Poinsettia Table Runner Benchmarks
Mary Maxim’s published Poinsettia Table Runner uses Aran-weight Red Heart Soft and a 5 mm hook. The listing specifies 1,100–1,300 yards total, including 513 yards of white and 256 yards each of red or wine and green.
Regina Rioux’s Poinsettia Table Runner takes a different modular approach. It is constructed from three poinsettia motifs, uses Aran-weight Malabrigo Worsted with a 5 mm hook, and lists approximately 250–300 yards. Its published Tunisian gauge is 16 stitches × 14 rows per 4 inches.
Published Poinsettia Flower Benchmarks
June Gilbank’s established poinsettia design uses worsted yarn with a 3.5 mm hook. Published finished diameters are approximately 5 inches for the medium version and 6 inches for the large version. The pattern also uses six-part radial groupings, making it a useful scale reference for layered flowers.
Naztazia’s Poinsettia Flower specifies Aran cotton, a 4 mm hook, and approximately 25–75 yards. Dani West’s 2025 Poinsettia uses #4 worsted Bernat Premium with a 5 mm hook, lists approximately 13–15 yards, and gives a finished diameter of 10 cm.
Competition Gap and Reconstruction Strategy
Current published poinsettia runners frequently use a solid or filet foundation, three joined major motifs, or conventional rectangular borders. Marketplace examples also include 3D poinsettia runners around 41 × 15 inches.
The supplied image combines a different set of features: many individually layered flowers, large open diamonds, paired central motifs, enlarged terminal poinsettias, and substantial scalloped green edges. Reconstructing those visible structural features requires treating the runner as a joined floral lattice rather than adapting a standard solid table-runner rectangle.
Changing the Runner Length
One paired medium-flower station adds approximately 17–19 cm to the reconstruction.
For a shorter table, remove one pair of medium poinsettias, four small leaves, and the associated connector diamonds.
For a longer table, add another flower pair and duplicate one complete lattice station.
Extend both long borders only after the revised central structure has been assembled and blocked.
Changing the Width
Reduce the connector cords from 16 slip stitches to approximately 12–13 stitches for a narrower lattice.
Test four cords as one diamond before batch-making the rest.
For a wider runner, increase connector length rather than making the flowers larger. Oversized medium flowers reduce the visible negative space that defines this design.
Making a Bead-Free Version
Use the crocheted gold centers instead of metallic beads.
At lattice intersections, make tiny gold knots by chaining three, slip stitching into the first chain, and sewing the resulting nub over the junction.
This substitution keeps the runner fully textile-based and removes detachable hard components.
Making a Flatter Runner
Omit the inner red-bract layer from the 12 medium poinsettias.
Retain all three layers only on the two large end flowers.
Sew the lower third of each remaining bract to its foundation rather than attaching only the base.
This decreases the height through the central serving area while preserving the more dimensional terminal medallions.
Yarn Planning
Make one medium flower, two small leaves, four connector cords, and a 20 cm sample of side edging before purchasing supplemental yarn.
Weigh those components separately.
Multiply the flower weight by 12 and the leaf weight by 24. Calculate the two large end arrangements independently because their bract and leaf counts are substantially higher.
Add approximately 15% to the resulting yarn estimate for tails, border adjustments, gauge differences, and replacement motifs.
Care and Storage
Follow the yarn manufacturer’s laundering instructions. Remove detachable bead components before washing if they were not permanently sewn.
Support the wet runner from underneath because the open lattice can stretch under the weight of saturated cotton flowers.
Dry flat to the measured dimensions. Reshape every diamond before adjusting the flower points.
For storage, roll the runner loosely around a wide cardboard or fabric-covered tube. Folding through the oversized end poinsettias can crease the layered bracts and distort the surrounding lattice.
Sources
Ravelry — Poinsettia Table Runner by Mary Maxim — Aran yarn, 5 mm hook, 1,100–1,300 yards total, with published white, red/wine, and green yardage.
Ravelry — Poinsettia Table Runner by Regina Rioux — three-motif construction, Aran yarn, 5 mm hook, 250–300 yards, and 16 × 14 stitch/row Tunisian gauge.
Ravelry — Poinsettia Table Runner by Raine Eimre — size-10 cotton, 1.75 mm hook, 320 yards, and approximately 22 × 10.5 inch finished dimensions.
Ravelry — Poinsettia by June Gilbank — worsted yarn, 3.5 mm hook, and approximately 5–6 inch flower-size benchmark.
PlanetJune — Poinsettia Crochet Pattern — six-part assembly reference and worsted-yarn poinsettia sizing information.
Ravelry — Poinsettia Flower by Naztazia — Aran cotton, 4 mm hook, 25–75 yards, and dimensional flower construction benchmark.
Ravelry — Poinsettia by Dani West — 2025 worsted-weight pattern using a 5 mm hook, 13–15 yards, and a published 10 cm finished diameter.
Etsy — 3D Poinsettia Crochet Table Runner — current dimensional runner benchmark measuring approximately 41 × 15 inches.
Conclusion
The diamond framework determines the final geometry, so build and block one complete flower pair with its surrounding connectors before producing the entire lattice. Check that the medium poinsettias remain around 12–14 cm and that each 16-stitch connector blocks to approximately 8–9 cm. Once those measurements agree, batch the remaining motifs and assemble from the center outward. The next practical step is to crochet one medium poinsettia plus four test connectors. Save this Christmas poinsettia crochet table runner pattern to Pinterest or share the finished runner on Instagram with #PoinsettiaLatticeRunner. Would you retain the gold centers shown in the reference or replace them with crocheted yellow knots? “`0









