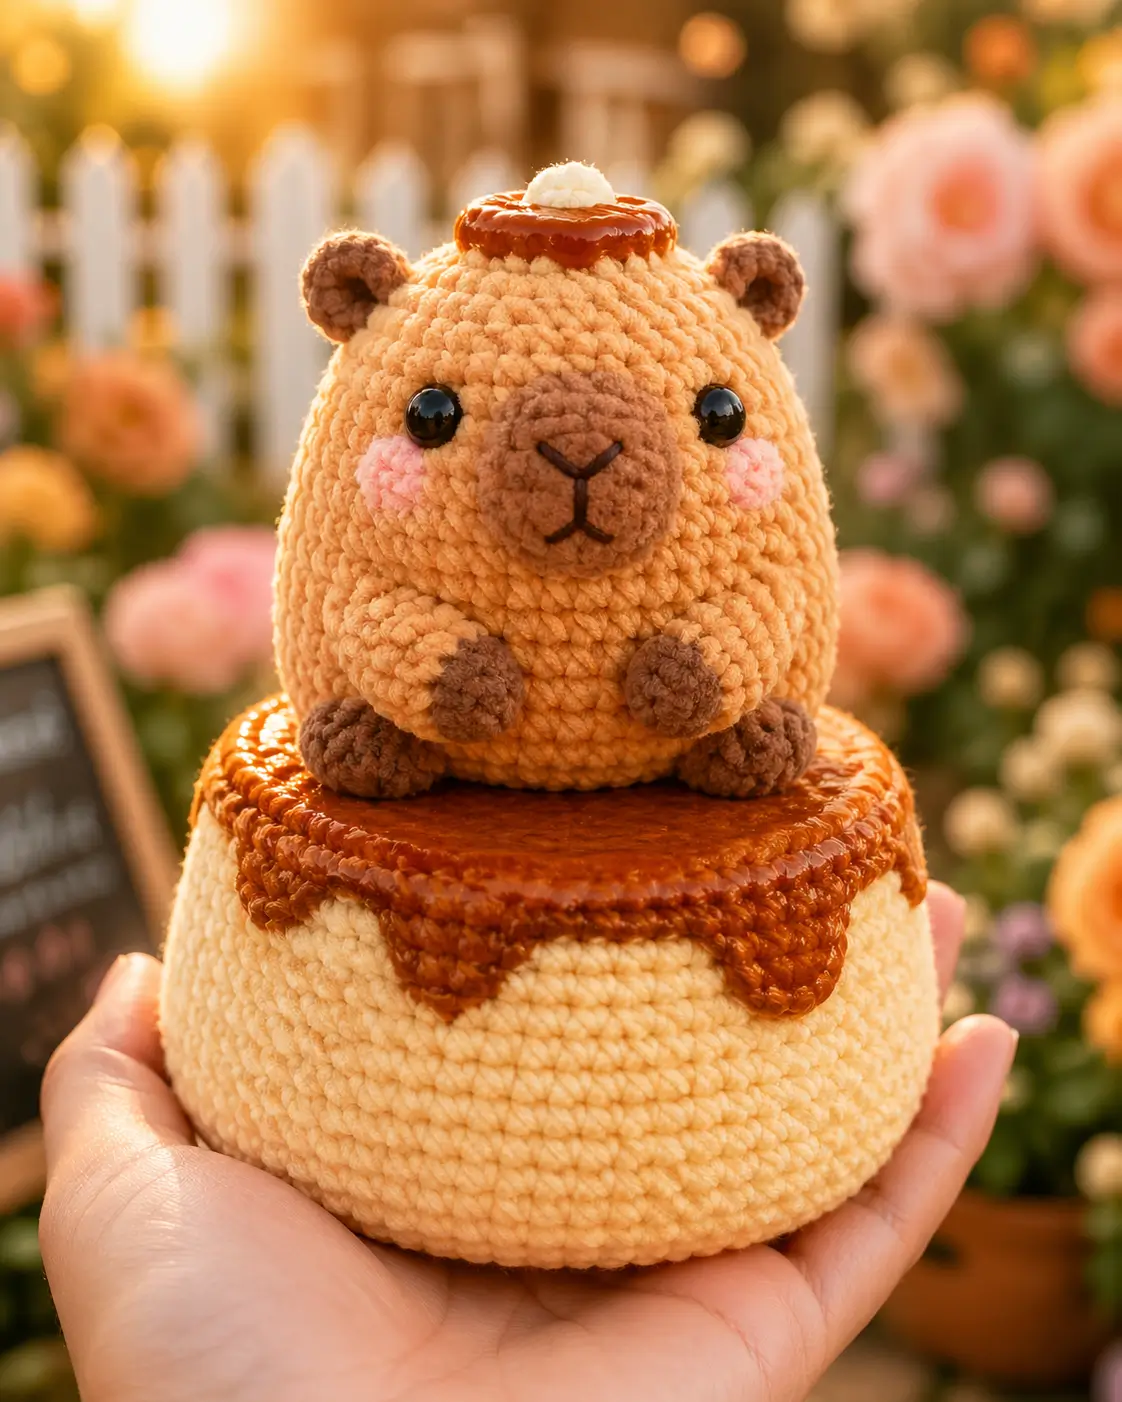
Capybaras need the snout to read as flat, not mouse-pointed, especially when caramel sits on their head. This capybara amigurumi crochet pattern uses velvet yarn, a 5 mm hook, 8 mm safety eyes, and a pudding base to make a 12 cm capybara display piece. Skill level is confident beginner. The wide base keeps the plush upright for markets, shelf styling, and photo props.
The Design: What Makes This Capybara Different
A capybara crochet pattern fails quickly when the head turns into a bear shape. Here, the snout is a separate low oval, sewn across the lower face so the muzzle stays broad and blunt. The ears sit low and wide, not at the crown, because capybara ears are small rounded disks rather than tall animal ears. Front legs are short, dark-tipped cylinders placed on the belly; that keeps the character grounded and stops the toy from reading as a teddy. The pudding amigurumi base adds the second design problem: balance. A flat-bottom cylinder carries the weight, while caramel patches cover the rim without adding bulky seams. Many makers place the eyes too high on this animal. That mistake makes the capybara plush crochet face look surprised instead of calm.
Project Info at a Glance
| Skill Level | Time | Finished Size | Hook | Best For |
|---|---|---|---|---|
| Confident beginner | One long session | 12 cm capybara reference; larger with pudding base | 5 mm for plush/chunky yarn | Shelf display, market table samples, photo props |
Published capybara references confirm wide size variation by yarn choice, from 8.5 cm to about 20 cm, with hook sizes ranging from 1.5 mm sport-yarn work to 5 mm plush-yarn work.
Materials and Tools
Yarn
- Golden tan — chunky velvet chenille — 70–90 g — Hobbii Honey Bunny, Himalaya Dolphin Baby, or similar plush yarn
- Dark brown — chunky velvet chenille — 20–30 g — for snout, ears, paws, and feet
- Caramel brown — chunky velvet chenille or smooth worsted held double — 30–40 g — for pudding caramel top and drips
- Cream — chunky velvet chenille — 80–110 g — for pudding base and whipped cream dot
- Pink — worsted or chenille scrap — under 5 g — for cheek patches
- Black embroidery thread — small amount — for nose and mouth
Tools
- Hook 5 mm
- 8 mm safety eyes
- Polyester stuffing
- Yarn needle
- Embroidery needle
- Locking stitch markers
- Sewing pins
- Scissors
Abbreviations
- MR = magic ring
- sc = single crochet
- inc = 2 sc in one stitch
- dec = invisible decrease
- sl st = slip stitch
- ch = chain
- BLO = back loop only
- FLO = front loop only
Invisible decrease is worked through front loops only; it reduces visible holes on closing rounds, especially with velvet yarn.
Pattern — Step by Step
Continuous spiral unless noted. Use a stitch marker in the first stitch of every round.
Head
Yarn: golden tan — Source: Standard amigurumi math
R1: 6 sc in MR (6)
R2: inc ×6 (12)
R3: (sc, inc) ×6 (18)
R4: (2 sc, inc) ×6 (24)
R5: (3 sc, inc) ×6 (30)
R6: (4 sc, inc) ×6 (36)
R7: (5 sc, inc) ×6 (42)
R8–R14: sc around (42)
R15: (5 sc, dec) ×6 (36)
R16: sc around (36)
R17: (4 sc, dec) ×6 (30)
R18: (3 sc, dec) ×6 (24)
R19: (2 sc, dec) ×6 (18)
R20: (sc, dec) ×6 (12)
R21: dec ×6 (6)
Insert safety eyes between R10 and R11, about 8–9 stitches apart, before closing. Stuff firmly but keep the lower face wide.
Fasten off. Leave a 20 cm tail for closing.
Body
Yarn: golden tan — Source: Standard amigurumi math
R1: 6 sc in MR (6)
R2: inc ×6 (12)
R3: (sc, inc) ×6 (18)
R4: (2 sc, inc) ×6 (24)
R5: (3 sc, inc) ×6 (30)
R6: (4 sc, inc) ×6 (36)
R7: (5 sc, inc) ×6 (42)
R8–R14: sc around (42)
R15: (5 sc, dec) ×6 (36)
R16: sc around (36)
R17: (4 sc, dec) ×6 (30)
R18: sc around (30)
R19: (3 sc, dec) ×6 (24)
R20: (2 sc, dec) ×6 (18)
R21: (sc, dec) ×6 (12)
R22: dec ×6 (6)
Stuff more firmly at the base than at the neck so the capybara can sit on the pudding top without tipping.
Fasten off. Leave a 25 cm tail.
Front Legs / Arms (Make 2)
Yarn: dark brown, then golden tan — Source: Standard amigurumi math
R1: dark brown, 6 sc in MR (6)
R2: inc ×6 (12)
R3: sc around (12)
R4: change to golden tan, sc around (12)
R5–R6: sc around (12)
R7: dec ×6 (6)
Do not overstuff. These should sit flat against the belly.
Fasten off. Leave a 20 cm tail on each arm.
Back Legs (Make 2)
Yarn: dark brown — Source: Standard amigurumi math
R1: 6 sc in MR (6)
R2: inc ×6 (12)
R3: (sc, inc) ×6 (18)
R4–R5: sc around (18)
R6: (sc, dec) ×6 (12)
R7: sc around (12)
R8: dec ×6 (6)
Stuff lightly at R6 only. Flatten the last round before sewing so the feet point forward.
Fasten off. Leave a 25 cm tail.
Ears (Make 2)
Yarn: dark brown — Source: Standard amigurumi math
R1: 6 sc in MR (6)
R2: inc ×6 (12)
R3: sc around (12)
Do not stuff. Fold the disk slightly and pinch the bottom edge to make a rounded ear.
Fasten off. Leave a 20 cm tail.
Snout
Yarn: dark brown — Source: Standard amigurumi math
R1: 6 sc in MR (6)
R2: inc ×6 (12)
R3: (sc, inc) ×6 (18)
R4: sc around (18)
Add only a thin layer of stuffing. Sew it as a horizontal oval across the lower face, then embroider a Y-shaped nose and mouth with black thread.
Fasten off. Leave a 25 cm tail.
Cheek Patches (Make 2)
Yarn: pink — Source: Standard amigurumi math
R1: 6 sc in MR (6)
R2: inc ×6 (12)
Keep both patches flat. They should sit level with the lower half of the eyes, not under the snout.
Fasten off. Leave a 15 cm tail.
Caramel Pudding Top for Head
Yarn: caramel brown — Source: Standard amigurumi math
R1: 6 sc in MR (6)
R2: inc ×6 (12)
R3: (sc, inc) ×6 (18)
R4: (2 sc, inc) ×6 (24)
This disk sits on the crown, centered between the ears. Pin it before sewing so it does not slide toward one eye.
Fasten off. Leave a 25 cm tail.
Cream Dollop for Head
Yarn: cream — Source: Standard amigurumi math
R1: 6 sc in MR (6)
R2: inc ×6 (12)
R3: sc around (12)
R4: dec ×6 (6)
Stuff with a pea-sized amount of fiberfill. Sew the dollop to the center of the caramel head disk.
Fasten off. Leave a 15 cm tail.
Pudding Base
Yarn: cream — Source: Standard amigurumi math
R1: 6 sc in MR (6)
R2: inc ×6 (12)
R3: (sc, inc) ×6 (18)
R4: (2 sc, inc) ×6 (24)
R5: (3 sc, inc) ×6 (30)
R6: (4 sc, inc) ×6 (36)
R7: (5 sc, inc) ×6 (42)
R8: BLO sc around (42)
R9–R15: sc around (42)
R16: (5 sc, dec) ×6 (36)
R17: (4 sc, dec) ×6 (30)
R18: (3 sc, dec) ×6 (24)
R19: (2 sc, dec) ×6 (18)
R20: (sc, dec) ×6 (12)
R21: dec ×6 (6)
Stuff firmly from R15 onward. Press the bottom on a table before closing so the base dries into a level cylinder shape.
Fasten off. Weave in the tail through the center.
Caramel Top for Pudding Base
Yarn: caramel brown — Source: Standard amigurumi math
R1: 6 sc in MR (6)
R2: inc ×6 (12)
R3: (sc, inc) ×6 (18)
R4: (2 sc, inc) ×6 (24)
R5: (3 sc, inc) ×6 (30)
R6: (4 sc, inc) ×6 (36)
R7: (5 sc, inc) ×6 (42)
This disk covers the top of the cream base. Sew through the back loops of the edge stitches for a cleaner rim.
Fasten off. Leave a 35 cm tail.
Caramel Drip Patches (Make 5)
Yarn: caramel brown — Source: Standard amigurumi math
Small drips, make 3:
R1: 6 sc in MR (6)
R2: inc ×6 (12)
Large drips, make 2:
R1: 6 sc in MR (6)
R2: inc ×6 (12)
R3: (sc, inc) ×6 (18)
Fold each patch into a half circle and sew it under the caramel disk edge. Place one large drip at the front center, two small drips beside it, and two mixed sizes toward the sides.
Fasten off. Leave a 20 cm tail on each patch.
Assembly
- Sew the head to the body first, matching the center front of the head to the center front of the belly.
- Sew the body to the caramel top of the pudding base, keeping the capybara centered over the disk.
- Attach the snout across the lower face between R11 and R15 of the head.
- Embroider the nose as a short dark V with one vertical line down to the mouth split.
- Sew the cheek patches to the left and right of the snout, aligned with the lower edge of the eyes.
- Sew the front legs to the belly between body R9 and R14, with dark tips facing forward.
- Sew the back legs low on the body between R15 and R18 so they rest on the caramel top.
- Attach the ears to the head between R5 and R7, spaced wide and slightly forward.
- Sew the caramel head disk to the crown, then sew the cream dollop to its center.
- Sew the caramel drips around the pudding rim, then hide every tail inside the base or body.
The capybara pudding amigurumi is complete when the base stands level without hand support.
7 Technical Tips
- Stitch marker drift: If the marker moves more than 2 stitches off center by head R14, the snout will twist to one side. Reset the marker at the back of the head before starting R15 decreases.
- Stuffing firmness: A pudding base stuffed under 70% will collapse under the capybara’s weight. Pack the cylinder firmly at R15, then press the bottom flat before closing R21.
- Invisible decrease holes: Standard decreases on velvet yarn can leave six visible gaps on R21 of the head. Work each dec through front loops only and pull the working yarn tight after the second loop is drawn through.
- Eye placement timing: Safety eyes must be locked before head R18 because the opening becomes too small afterward. Place 8 mm eyes between R10 and R11 with 8–9 stitches between them.
- Velvet tension: Loose 5 mm stitches can expose white stuffing on the snout and feet. Make a 5-round test circle; it should measure close to 4–4.5 cm across before stuffing.
- Pinning error: Ears sewn on top of the head make the animal read as a bear. Pin each ear between head R5 and R7, then check the face from the front before sewing.
- Tail weaving: Short tails can pull out from caramel drips because the rim gets handled during assembly. Leave at least 20 cm per drip and weave each tail in a triangle path through the pudding base.
Conclusion
This capybara build depends on three checks: a blunt snout, low ears, and a stable pudding base. Work the animal first, then test the body on the caramel disk before sewing it down. The next practical step is to crochet the pudding base and capybara body in the same sitting so the tension stays matched. Save the finished capybara amigurumi crochet pattern notes to Pinterest, then share the front and side view on Instagram for placement reference. Use #CapybaraPuddingAmigurumi. Which caramel detail should be largest on your version: the head topping, the front drip, or the full pudding rim?









