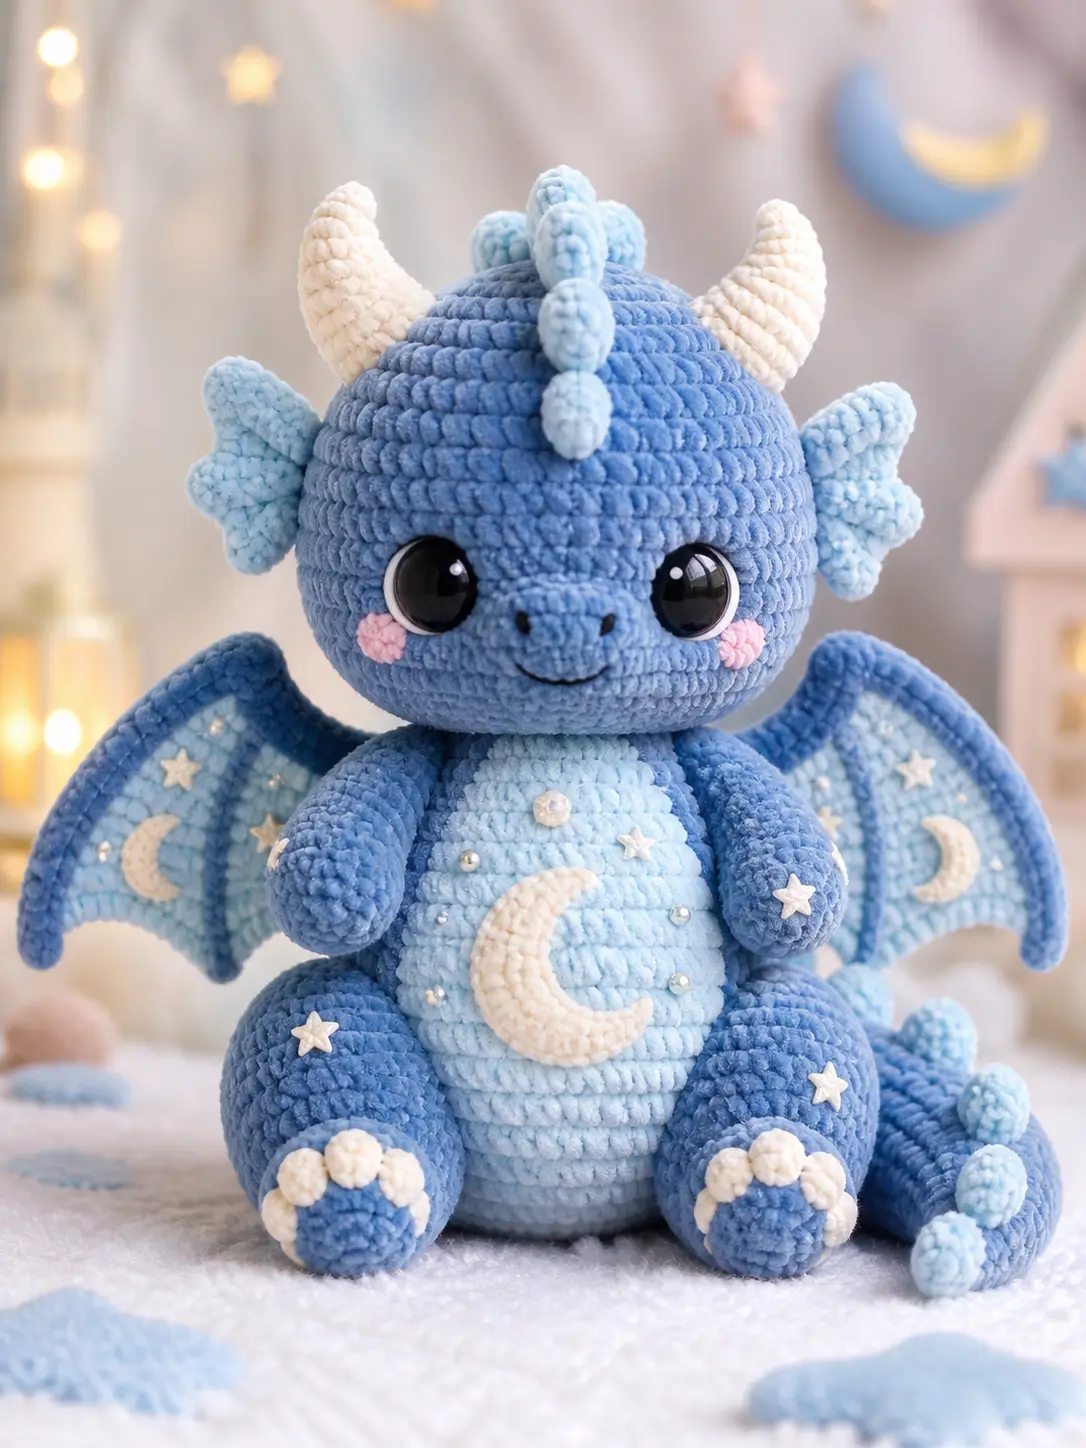
A moon dragon needs horns, wings, and a belly crescent to read before the tail is attached. This blue dragon amigurumi crochet pattern uses chunky velvet yarn, a 5 mm hook, large safety eyes, and appliquéd stars to make a 28 cm seated plush for intermediate makers. Build it when you need a nursery-scale fantasy toy with clear photo-style detailing.
The Design: What Makes This Moon Dragon Different
This build treats the dragon as a seated moon creature, not a generic dinosaur with wings. You shape a wide 42-stitch head so the eyes can sit low and far apart; the snout then attaches as a shallow oval rather than a protruding tube. The body repeats the 42-stitch plateau, which keeps the plush seated when the heavy wings are sewn behind the shoulder line. The maker should keep the crescent appliqué flat and slightly below center, because a high moon crowds the smile and shrinks the belly. Common error: horns are placed too vertical, creating a goat silhouette. Angle them outward by one stitch width. Secondary search terms such as celestial dragon crochet pattern and plush dragon amigurumi pattern belong here because the construction depends on appliqué placement, not color alone.
Project Info at a Glance
| Skill Level | Time | Finished Size | Hook | Best For |
|---|---|---|---|---|
| Intermediate | Two evenings | Approx. 28 cm seated | 5 mm | Display plush with celestial appliqués |
Comparable dragon patterns place finished dragon sizes around 25–29 cm for larger builds, while chenille guidance supports a 5 mm hook for super bulky yarn.
Materials and Tools
Yarn
- Medium blue — chunky velvet / chenille — 200 g — Himalaya Dolphin Baby, Premier Parfait Chunky, or similar
- Pale blue — chunky velvet / chenille — 70 g — belly, wings, fins, spines
- Ivory — chunky velvet / chenille — 35 g — horns, toes, crescent moon
- Pink — chunky velvet / chenille — 5 g — cheek patches
- White — worsted cotton or velvet scraps — 5 g — stars
Tools
- Hook 5 mm
- 24 mm black safety eyes
- Polyester stuffing
- Tapestry needle
- Locking stitch markers
- Straight pins
- Black embroidery thread
- Optional pearl beads
Abbreviations
MR = magic ring; sc = single crochet; inc = increase; dec = decrease; sl st = slip stitch; ch = chain; BLO = back loop only; FLO = front loop only. For an invisible decrease, work through the front loops of the next two stitches before completing one sc so the decrease does not ridge.
Pattern — Step by Step
Continuous spiral unless noted. Counts appear in brackets.
Head
Yarn: medium blue — Source: Standard amigurumi math.
R1: 6 sc in MR (6)
R2: inc ×6 (12)
R3: (sc, inc) ×6 (18)
R4: (2 sc, inc) ×6 (24)
R5: (3 sc, inc) ×6 (30)
R6: (4 sc, inc) ×6 (36)
R7: (5 sc, inc) ×6 (42)
R8–R17: sc around (42)
Place eyes between R12 and R13, 10 stitches apart. Do not attach washers until the snout position is pinned.
R18: (5 sc, dec) ×6 (36)
R19: (4 sc, dec) ×6 (30)
R20: (3 sc, dec) ×6 (24)
R21: (2 sc, dec) ×6 (18)
Stuff firmly at the crown and lightly at the lower face.
R22: (sc, dec) ×6 (12)
R23: dec ×6 (6)
Fasten off. Leave 30 cm tail.
Body
Yarn: medium blue — Source: Standard amigurumi math.
R1: 6 sc in MR (6)
R2: inc ×6 (12)
R3: (sc, inc) ×6 (18)
R4: (2 sc, inc) ×6 (24)
R5: (3 sc, inc) ×6 (30)
R6: (4 sc, inc) ×6 (36)
R7: (5 sc, inc) ×6 (42)
R8–R16: sc around (42)
R17: (5 sc, dec) ×6 (36)
R18–R20: sc around (36)
R21: (4 sc, dec) ×6 (30)
R22–R23: sc around (30)
R24: (3 sc, dec) ×6 (24)
R25: (2 sc, dec) ×6 (18)
Stuff the base firmly enough to sit flat.
R26: (sc, dec) ×6 (12)
R27: dec ×6 (6)
Fasten off. Leave 40 cm tail.
Snout
Yarn: medium blue — Source: Standard amigurumi math.
R1: 6 sc in MR (6)
R2: inc ×6 (12)
R3: (sc, inc) ×6 (18)
R4: (2 sc, inc) ×6 (24)
R5–R6: sc around (24)
R7: (2 sc, dec) ×6 (18)
R8: sc around (18)
Add minimal stuffing. Embroider two nostrils over R3 and a small smile under the snout after sewing.
Fasten off. Leave 25 cm tail.
Arms / Front Legs
Make 2. Yarn: medium blue — Source: Standard amigurumi math.
R1: 6 sc in MR (6)
R2: inc ×6 (12)
R3: (sc, inc) ×6 (18)
R4–R7: sc around (18)
R8: (sc, dec) ×6 (12)
R9–R13: sc around (12)
Stuff the lower half only.
R14: dec ×6 (6)
Fasten off. Leave 25 cm tail.
Back Legs
Make 2. Yarn: medium blue — Source: Standard amigurumi math.
R1: 6 sc in MR (6)
R2: inc ×6 (12)
R3: (sc, inc) ×6 (18)
R4: (2 sc, inc) ×6 (24)
R5–R8: sc around (24)
R9: (2 sc, dec) ×6 (18)
R10: (sc, dec) ×6 (12)
R11–R12: sc around (12)
R13: dec ×6 (6)
Fasten off. Leave 30 cm tail.
Toe Nubs
Make 6. Yarn: ivory — Source: Standard amigurumi math.
R1: 6 sc in MR (6)
R2: inc ×6 (12)
R3: sc around (12)
R4: dec ×6 (6)
Fasten off. Leave 15 cm tail per toe.
Horns
Make 2. Yarn: ivory — Source: Standard amigurumi math.
R1: 6 sc in MR (6)
R2–R3: sc around (6)
R4: inc ×6 (12)
R5–R6: sc around (12)
R7: (sc, inc) ×6 (18)
R8: sc around (18)
Stuff lightly. Curve the tip inward by pulling the starting tail through the base before sewing.
Fasten off. Leave 25 cm tail.
Side Fins / Ears
Make 2. Yarn: pale blue — Source: Standard amigurumi math.
R1: 6 sc in MR (6)
R2: inc ×6 (12)
R3: (sc, inc) ×6 (18)
R4: (2 sc, inc) ×6 (24)
Flatten into a fan. Pinch the center base with three stitches to form the three-lobed side-fin shape.
Fasten off. Leave 20 cm tail.
Wings
Make 2. Yarn: pale blue web, medium blue frame — Source: Flat-row adaptation.
Wing Web
Ch 7.
Row 1: sc in second ch from hook and across (6)
Row 2: inc ×6 (12)
Row 3: sc across (12)
Row 4: (sc, inc) ×6 (18)
Row 5: sc across (18)
Row 6: (2 sc, inc) ×6 (24)
Row 7–Row 8: sc across (24)
Row 9: (2 sc, dec) ×6 (18)
Row 10: sc across (18)
Row 11: (sc, dec) ×6 (12)
Fasten off. Leave 35 cm tail.
Outer Frame
Ch 20.
Row 1: sc in second ch from hook and across (19)
Row 2: sc across (19)
Fasten off. Leave 35 cm tail.
Inner Ribs
Make 2 per wing. Ch 9.
Row 1: sc in second ch from hook and across (8)
Fasten off. Leave 20 cm tail.
Belly Patch
Yarn: pale blue — Source: Standard amigurumi math.
R1: 6 sc in MR (6)
R2: inc ×6 (12)
R3: (sc, inc) ×6 (18)
R4: (2 sc, inc) ×6 (24)
R5: (3 sc, inc) ×6 (30)
R6: (4 sc, inc) ×6 (36)
R7: (5 sc, inc) ×6 (42)
Do not stuff. Block flat under a towel before sewing.
Fasten off. Leave 45 cm tail.
Tail
Yarn: medium blue — Source: Standard amigurumi math.
R1: 6 sc in MR (6)
R2: inc ×6 (12)
R3–R5: sc around (12)
R6: (sc, inc) ×6 (18)
R7–R11: sc around (18)
R12: (2 sc, inc) ×6 (24)
R13–R18: sc around (24)
R19: (3 sc, inc) ×6 (30)
R20–R23: sc around (30)
Stuff the base firmly and the tip lightly.
Fasten off. Leave 40 cm tail.
Head and Tail Spines
Make 7. Yarn: pale blue — Source: Standard amigurumi math.
R1: 6 sc in MR (6)
R2: inc ×6 (12)
R3–R4: sc around (12)
R5: dec ×6 (6)
Fasten off. Leave 18 cm tail.
Cheek Patches
Make 2. Yarn: pink — Source: Standard amigurumi math.
R1: 6 sc in MR (6)
R2: inc ×6 (12)
Sl st to finish (12)
Fasten off. Leave 15 cm tail.
Crescent Moon Appliqué
Yarn: ivory — Source: Tube appliqué adaptation from standard amigurumi math.
R1: 6 sc in MR (6)
R2–R12: sc around (6)
Do not overstuff. Curve into a crescent and tack both tips to the belly patch.
Fasten off. Leave 25 cm tail.
Star Appliqués
Make 6. Yarn: white — Source: Standard flat appliqué method.
R1: 6 sc in MR (6)
R2: [sl st, ch 3, sl st in second ch from hook, sc in next ch, sl st in same base stitch] ×5, sl st in last base stitch (5 points)
Fasten off. Leave 12 cm tail per star.
Assembly
- Sew the body to the lower half of the head, centering the body under the snout line.
- Pin the snout across head R13–R17, then sew through every second stitch.
- Attach the safety-eye washers only after the snout confirms the face width.
- Embroider nostrils with two vertical black stitches and add a shallow smile under the snout.
- Sew the belly patch to the front of the body, with its top edge one round below the neck seam.
- Attach arms at the upper body sides, then sew the back legs low and forward so the plush sits.
- Sew the horns between head R5–R8, angled outward by one stitch width.
- Attach the side fins behind the eyes and sew the spines in a center line from head to tail.
- Sew wings to the back between body R8–R15, then attach the tail at the lower back.
- Add the crescent, stars, cheek patches, toe nubs, and optional pearl beads last.
The finished dragon is a seated celestial plush with visible horns, wings, moon belly, stars, and tail.
7 Technical Tips
- Marker drift: Velvet yarn hides the first stitch, and a shifted marker will twist the face. Move the marker at the end of every round and recount the 42-stitch plateau before placing eyes.
- Stuffing firmness: Understuffed cheeks collapse around 24 mm eyes. Fill the crown firmly, then reduce pressure at the lower face so the snout stays shallow.
- Invisible decrease ridges: Standard decreases create visible bumps across the forehead and body front. Place most decrease joins toward the back and keep the hook under front loops only.
- Eye placement timing: A washer set too early can force the snout too low. Pin eyes between R12 and R13, 10 stitches apart, then check the snout before locking the backs.
- Velvet tension gaps: Loose chenille tension creates white stuffing spots at increase rounds. A 5 mm hook with firm hand tension should close the fabric without making the body board-stiff.
- Wing sag: Heavy wings drop when sewn only along the top edge. Stitch the wing frame to the body over an 8-round vertical seam and tack one inner rib to the body.
- Tail rotation: A tail sewn with a narrow seam can roll sideways after stuffing settles. Use a 6-stitch-wide oval seam at the base and bury each yarn tail at least 8 cm into the body.
Conclusion
Check the wing span before the final seam, because this dragon’s silhouette depends on the wings sitting wider than the body but lower than the horns. The next step is to crochet the head first, pin the snout and eyes, then compare that face width against the belly patch before finishing the limbs. This blue dragon amigurumi crochet pattern works best when the moon, cheeks, and stars are treated as alignment marks, not decoration added at random. Share the finished plush on Pinterest and Instagram with #MoonwingBlueDragon. Which direction will your belly crescent face: toward the dragon’s raised tail or toward the snout?










Den er så sød