Introduction
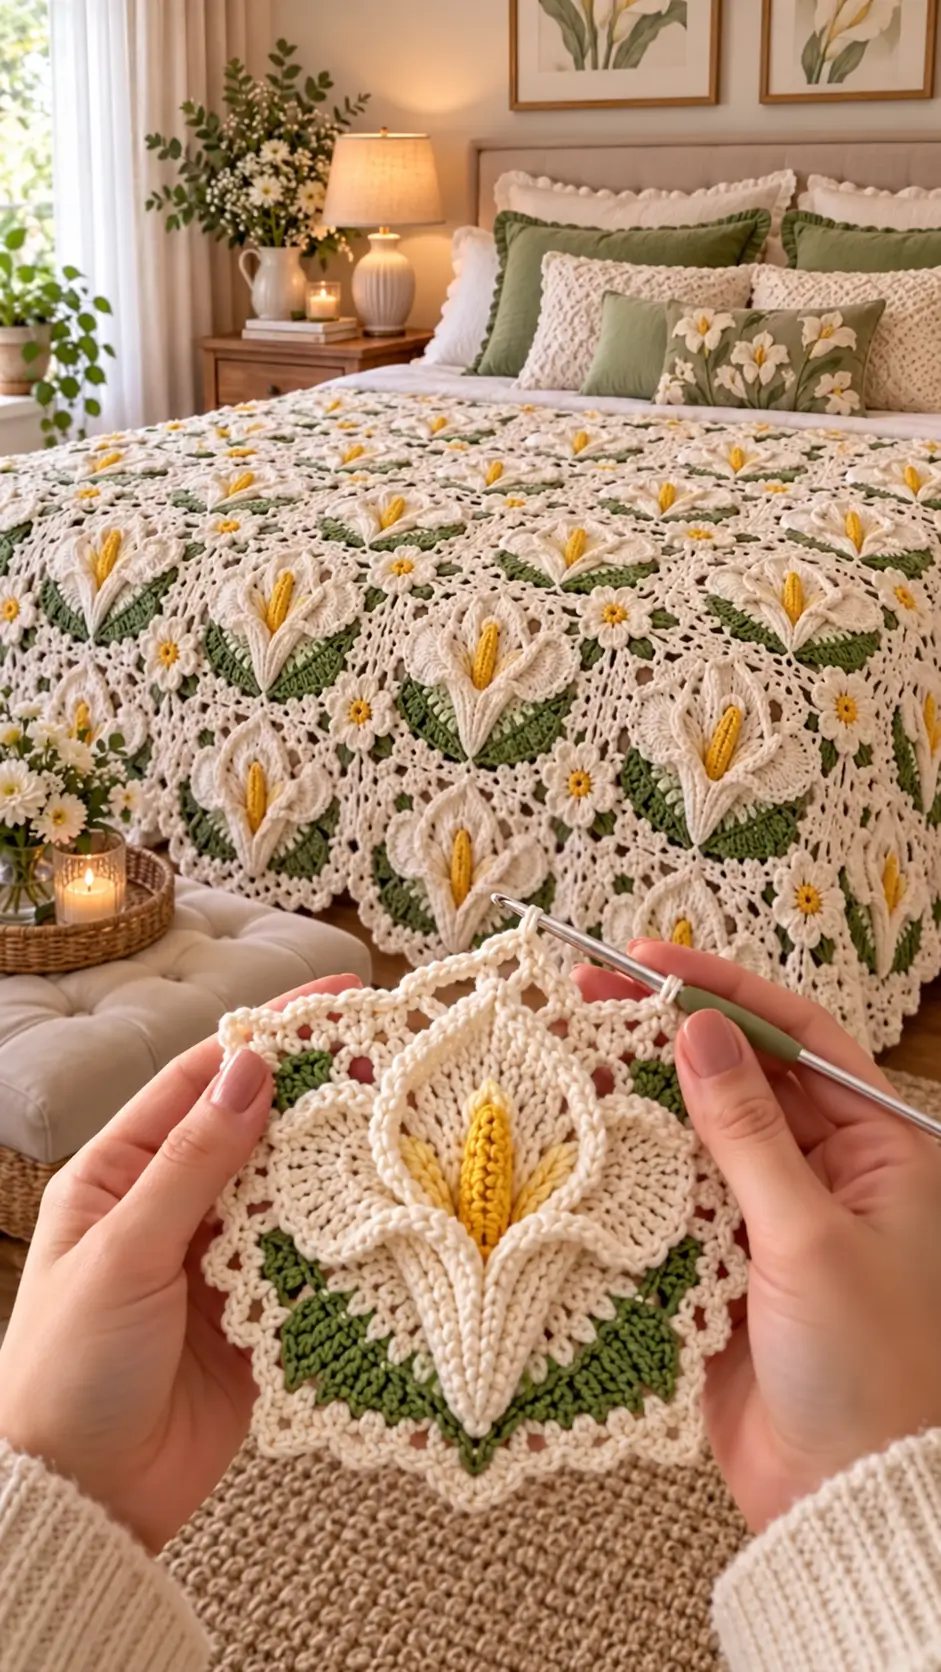
A calla lily has one wrapping spathe around a single upright spadix, so building it like a six-petal lily produces the wrong flower immediately. This calla lily crochet blanket pattern uses DK cotton, a 3.5 mm hook, dimensional ivory flowers, golden centers, green leaves, and openwork square backgrounds. The intermediate motif targets approximately 17–18 cm after blocking and contains no wire, glue, or rigid stems.
The Design: What Makes This Calla Lily Blanket Different
The flower sits above the square instead of being represented by flat color changes. A golden spadix forms the narrow center, while one broad ivory spathe curves around it and crosses near the lower third. Two green leaves create a stable visual base and distribute the flower’s weight across the crochet calla lily square. The surrounding cream lace is intentionally flatter. That height difference keeps the botanical form readable when multiple motifs become a 3D crochet flower blanket. Another structural decision concerns the flower tip: the upper spathe remains open rather than being sewn into a tube. Closing it too far upward is a common failure because the flower begins to resemble a bud or cone instead of a calla lily.
Project Information at a Glance
| Skill Level | Time | Motif Target | Hook | Best For |
|---|---|---|---|---|
| Intermediate | 60–90 minutes per detailed motif | Approx. 17–18 cm square | 3.5 mm | Throws, bedspreads, decorative panels |
The square measurement is a photo-inspired project target rather than a verified measurement of the photographed blanket. Published standalone calla lilies can reach approximately 25 cm high when their long stems are included, but a blanket flower requires shorter, softer components.
Materials and Tools
Yarn
- Warm-ivory DK cotton or cotton blend — square background and calla spathe.
- Sage or olive-green DK cotton — leaves and flower base.
- Golden-yellow DK cotton — central spadix.
Make and weigh one completed motif before purchasing yarn for a bed-size version. The dimensional flower consumes substantially more yarn than a flat square of the same dimensions, and published standalone calla-lily references do not provide a reliable gram figure that can be transferred directly to this blanket construction.
Tools
- 3.5 mm crochet hook
- Tapestry needle
- Sharp scissors
- Locking stitch markers
- Flexible measuring tape
- Blocking mats
- Rustproof pins
Do not insert floral wire, wooden skewers, or hot glue into motifs intended for normal blanket use.
Abbreviations
- MR — magic ring
- ch — chain
- sl st — slip stitch
- sc — single crochet
- hdc — half double crochet
- dc — double crochet
- tr — treble crochet
- inc — two stitches in the indicated stitch
- sp — space
- st/sts — stitch/stitches
- BLO — back loop only
When a decrease is required during shaping, work through the front loops of the next two stitches to reduce bulk on the visible surface.
Pattern — Step by Step
This is an original photo-inspired blanket construction informed by the visible anatomy of the reference image and established calla-lily crochet techniques. It is not a transcription of an unidentified commercial pattern.
Golden Spadix — Make 1 per Flower Square
Yarn: golden yellow.
Ch 13.
Row 1: Starting in the second chain, sc across. (12)
Row 2: Ch 1, turn, sc BLO across. (12)
Row 3: Ch 1, turn, sc BLO across. (12)
Fasten off with a 20 cm sewing tail.
Roll the narrow rectangle lengthwise into a compact cylinder.
Use the sewing tail to secure the long edge.
Keep the top rounded rather than sharply pointed.
The finished center should remain flexible.
Alternative Textured Spadix
For a more pronounced center, ch 14.
Starting in the second chain, work 2 sc into each chain.
The strip will curve slightly.
Roll it tightly around itself and tack through the base.
This method produces more surface texture but also adds thickness, so test one flower before using it throughout a blanket.
Main Ivory Calla Spathe
Yarn: warm ivory.
Ch 21.
Row 1: Starting in the second chain, sc in 3 sts, hdc in 4 sts, dc in 6 sts, hdc in 4 sts, sc in 3 sts. (20)
Row 2: Ch 1, turn. Sc in 3, hdc in 4, dc in 3, 2 dc in each of next 2 sts, dc in 3, hdc in 4, sc in 3. (22)
Row 3: Ch 1, turn. Sc in 3, hdc in 4, dc in 4, 2 dc in each of next 2 sts, dc in 4, hdc in 4, sc in 3. (24)
Row 4: Ch 1, turn. Sc in 4, hdc in 4, dc in 4, 2 dc in each of next 2 sts, dc in 4, hdc in 4, sc in 4. (26)
Row 5: Ch 1, turn. Sc across. (26)
Fasten off with a 35 cm tail.
Spathe Point
Join ivory yarn at the center of one long edge.
Ch 7.
Starting in the second chain work:
sl st, sc, hdc, dc, hdc, sc.
Sl st into the spathe edge.
Fasten off.
This narrow extension creates the characteristic pointed upper tip.
Spathe Edge Cord
The photographed flowers have a strong raised outline around the ivory spathe.
Join ivory yarn at one lower corner.
Work relaxed surface slip stitches along the outer edge.
Continue around the upper point and down the opposite side.
Stop at the second lower corner.
Fasten off.
Do not tighten the surface stitches or the spathe will curl before assembly.
Shaping the Calla Flower
Place the yellow spadix vertically over the lower center of the ivory spathe.
Bring the lower-left corner of the spathe toward the center.
Cross the lower-right corner over it.
The overlap should stop below the midpoint of the yellow center.
Pin both corners temporarily.
Sew through the overlapped lower section for approximately 2–3 cm.
Leave the upper half open.
Curve the upper ivory point slightly backward with your fingers.
Left Green Leaf
Yarn: sage or olive green.
Ch 17.
Starting in the second chain work:
sl st, sc, hdc, dc, dc, tr, tr, tr, dc, dc, hdc, sc, sc, sc, sl st, sc.
At the end work:
(sc, ch 2, sc)
Rotate to the unused loops of the foundation chain.
Work the mirrored sequence back toward the base.
Join with a sl st.
Fasten off with a 25 cm tail.
Right Green Leaf
Repeat the Left Green Leaf.
Before fastening off, check that both leaves have comparable lengths.
A difference greater than approximately 5 mm becomes visible after they are positioned symmetrically beneath the flower.
Raised Leaf Vein — Make 2
Join green yarn at the base of one leaf.
Surface sl st along the foundation-chain line toward the point.
Stop one stitch before the ch-2 tip.
Fasten off.
Repeat on the second leaf.
Flower Base
Yarn: sage green.
Make an MR.
R1: 6 sc in MR. (6)
R2: inc × 6. (12)
R3: (sc, inc) × 6. (18)
Join with a sl st.
Fasten off with a 30 cm sewing tail.
This small disc remains mostly hidden but provides a stable attachment point for the spathe, spadix and two leaves.
Assembling the Botanical Center
Place the two green leaves over the base disc so their lower edges overlap.
Angle one toward the lower-left and one toward the lower-right.
Sew through only the inner third of each leaf.
Place the assembled calla flower over the leaf junction.
The yellow spadix should point upward.
Sew the lower 2–3 cm of the flower firmly to the green disc.
Leave the upper ivory edges free so they retain their dimensional curl.
Ivory Lace Square Foundation
Yarn: warm ivory.
Make an MR.
R1: Ch 3, 2 dc in ring, ch 2; (3 dc, ch 2) three times. Join. Four 3-dc groups.
R2: Sl st to first corner. Ch 3, 2 dc, ch 2, 3 dc in same corner; ch 2. In each remaining corner work (3 dc, ch 2, 3 dc), ch 2. Join.
R3: Sl st to corner. Work (3 dc, ch 2, 3 dc) in corner, ch 3, sc in next ch-2 side space, ch 3. Repeat around, maintaining the four corners.
R4: In each corner work (3 dc, ch 2, 3 dc). Across each side work ch 3, sc into the next ch-space, repeating to the following corner.
R5: Repeat the established lace structure, adding one additional ch-3/sc section to each side as the square expands.
R6: Repeat R5 while maintaining four ch-2 corners.
Measure the motif.
Continue the same expansion if additional size is required.
Solid Final Square Round
The outermost round needs enough stability to support joining.
At a corner join ivory yarn.
Ch 1.
Work sc evenly across every chain space and stitch.
At each corner work:
(2 sc, ch 2, 2 sc)
Continue around.
Join with a sl st.
Fasten off.
Block the square before attaching the flower.
Attaching the Calla Lily to the Square
Place the botanical assembly in the center of the blocked lace square.
The upper ivory point should face one corner rather than one flat side if you want the diagonal orientation shown in the photograph.
Pin the green base first.
Pin both leaves.
Do not pin the upper spathe edges flat.
Sew the green disc securely to the square.
Add two or three hidden tacking stitches through the inner portion of each leaf.
Leave the outer leaf points free.
Small Daisy Accent Motif
The photographed blanket also contains smaller white flowers between the large calla motifs.
Yarn: golden yellow and ivory.
With yellow, make an MR.
R1: 6 sc in MR. (6)
Change to ivory.
R2: In each stitch work: ch 4, 2 dc in same stitch, ch 4, sl st in same stitch.
Repeat six times.
Fasten off with a 20 cm tail.
This produces six simple petals around the yellow center.
Green Base for Daisy Motif
With sage yarn make an MR.
R1: 6 sc. (6)
R2: inc × 6. (12)
Fasten off.
Sew the small daisy over the green circle.
Attach these accents between selected large calla squares rather than placing them over every joining point.
Making a Full Blanket
Make one complete square first.
Wash or block it according to the selected yarn.
Record its finished width and height.
Use those measurements to calculate the number of motifs required.
For example, a blocked 18 cm square arranged 8 motifs wide creates approximately 144 cm of motif width before any outer border is added.
Nine squares create approximately 162 cm.
Calculate the length using the same method.
Suggested Motif Layout
For a large decorative throw, arrange the motifs in alternating orientations.
Row 1 can place the calla points toward the upper-right.
Row 2 can reverse them toward the upper-left.
This prevents every flower from leaning visually in one direction.
Insert small daisy motifs or openwork filler sections where a lighter visual break is required.
Joining the Squares
Block every square to the same measurement before joining.
Place two motifs with right sides facing.
Join ivory yarn at one corner.
Sl st through the corresponding back loops of both squares.
Continue evenly across the complete edge.
Fasten off.
Add the next square using the same method.
Join full rows first, then join the completed rows together.
Flat-Seam Alternative
Place the motifs side by side with right sides facing upward.
Using ivory yarn, insert the hook through one back loop from each square.
Work a slip stitch.
Repeat across.
Keep every joining stitch loose enough that the seam remains flexible.
If the joined edge becomes shorter than the blocked square edge, increase the hook size by 0.5 mm for joining only.
Outer Blanket Border
Join ivory yarn at one blanket corner.
Border Round 1: Sc evenly around, working (2 sc, ch 2, 2 sc) into each corner.
Border Round 2: Ch 3, dc in each stitch around; work (2 dc, ch 2, 2 dc) into each corner.
Border Round 3: Ch 1, sc around, maintaining the ch-2 corner spaces.
Border Round 4: Work (sc, ch 3, sc) in every third stitch for a small scalloped/picot effect.
At corners, adjust spacing so one decorative point lands directly in the corner space.
Fasten off.
Why the Flower Must Remain Wire-Free
Standalone botanical calla lilies often use floral wire to hold the spathe, leaf and stem in realistic positions.
A blanket has different engineering requirements.
Wire can create hard pressure points, complicate washing and eventually migrate through soft crochet fabric.
The dimensional effect here comes from stitch density, overlapping pieces and limited attachment rather than an internal armature.
Controlling the Spathe Curl
The ivory spathe should curve inward near its base and open outward near its top.
If the entire piece rolls into a tube, the lower overlap has been sewn too high.
Remove the upper attachment stitches until at least the top half moves freely.
If the spathe lies completely flat, add one hidden tack approximately 1 cm above the base overlap.
Do not tack both upper edges.
Controlling the Yellow Center
The spadix should remain visible above the crossed lower portion of the ivory spathe.
Position approximately two-thirds of its visible length inside the open flower.
If only the tip is visible, move the center upward before final sewing.
If nearly the complete yellow cylinder is exposed, lower it.
The spathe should remain the dominant component.
Making the Flower Flatter
A bedspread used directly under the body may benefit from less relief.
Omit the rolled edge cord.
Sew approximately half of each ivory side edge to the background rather than only the lower section.
Tack the leaf points approximately 1 cm from their ends.
The botanical silhouette remains recognizable while reducing snagging and bulk.
Making a Wall-Hanging Version
For purely decorative use, increase the dimensional effect.
Leave the leaves attached only at their bases.
Add the raised edge cord around the entire spathe.
Curve the upper point backward after blocking.
Do not add wire unless the piece will never function as bedding and the construction is deliberately designed around a rigid botanical component.
Blocking the Individual Square
Block the lace foundation before sewing on the flower.
Pin all four corners first.
Measure both diagonals.
The two measurements should differ by no more than approximately 5 mm.
Pin the side centers afterward.
Allow the square to dry completely.
Attach the dimensional flower only after the background is square.
Blocking the Flower Components
Shape the ivory spathe separately before assembly.
Pin the lower section flat but leave the upper edges gently curved.
Block both green leaves to matching lengths.
Do not stretch the yellow center.
Once dry, assemble the botanical components and sew them to the blocked square.
Fixing a Flower That Looks Like a Tulip
A tulip appearance usually means the spathe has been closed symmetrically around the center.
Calla lilies are visually asymmetric.
Undo one side of the overlap.
Cross one lower edge farther over the other.
Leave the upper edge open and pull the upper point slightly backward.
The yellow spadix should remain exposed through the resulting opening.
Fixing a Flower That Looks Like an Ordinary Lily
Do not divide the ivory spathe into six equal petals.
A calla lily uses one visually continuous funnel-like spathe.
If decorative ridges accidentally create multiple petal divisions, reduce the surface lines and keep the ivory section broad.
The single wrapping form is the defining structural feature.
Fixing Distorted Squares
A heavy dimensional flower can pull the center of a lace square inward.
First confirm that the foundation was blocked before attachment.
Next, check the green disc.
If all sewing tension is concentrated at one point, remove the stitches and redistribute them around the disc circumference.
Add two hidden leaf tacks to spread the load farther across the square.
Assembly
- Crochet and block the ivory lace square to approximately 17–18 cm, checking that both diagonal measurements agree within about 5 mm.
- Make the golden spadix and secure its rolled seam without inserting wire or a rigid stem.
- Crochet the ivory spathe, add its pointed upper extension, and work the raised edge detail if additional relief is wanted.
- Cross only the lower spathe edges around the yellow center, leaving the upper half open and independently movable.
- Make two matching green leaves, add their surface veins, and sew their inner thirds to the green base disc.
- Attach the calla flower over the leaf junction while keeping the yellow center visible above the lower spathe overlap.
- Sew the complete botanical assembly to the center of the blocked square and add only the minimum hidden tacks needed to stabilize it.
- Repeat the motif to the required blanket dimensions, measuring every blocked square against the original master motif.
- Join completed squares with relaxed ivory slip stitches and check the blanket on a flat surface after every completed row.
- Add the four-round ivory border, weave all tails into matching-color sections, and reshape the dimensional flowers by hand.
The completed blanket should show square lace foundations, raised green foliage, individually recognizable ivory calla spathes, exposed golden spadices and flexible joins without rigid botanical materials.
7 Technical Tips
- Leave at least the upper half of each spathe unattached. Sewing farther upward closes the characteristic calla opening and produces a cone-shaped flower.
- Keep matching leaves within approximately 5 mm of each other. Larger differences shift the flower away from the visual center of its square.
- Measure both square diagonals before attaching the flower. A difference greater than about 5 mm indicates that the lace foundation needs additional blocking.
- Keep the spadix below the spathe tip. A yellow center extending beyond the ivory point changes the flower’s proportions and dominates the motif.
- Use hidden tacks instead of wire for blanket motifs. A loose flower is a snagging failure, while rigid internal supports create hard areas that are unsuitable for ordinary bedding.
- Check the joining seam after every three squares. A seam more than approximately 5 mm shorter than the blocked motif edge will pull the finished blanket into waves.
- Make one complete washed sample before calculating blanket yarn. Even a 1 cm change in blocked square size becomes substantial when eight or ten motifs are repeated across a bedspread.
Yarn Planning
Standalone calla-lily patterns are generally small botanical projects, but the photographed blanket repeats dimensional flowers across a large surface. Published flower yardage therefore cannot be transferred directly to the complete project.
Make one finished calla lily crochet blanket pattern motif first.
Weigh it after blocking.
Then weigh the remaining ivory, green and yellow yarn separately to determine how much of each color the sample consumed.
Multiply those measurements by the required number of motifs.
Add approximately 15 percent to the ivory total for seams, the blanket border, swatching and gauge variation.
Calculating Blanket Size
If one blocked motif measures 18 cm, six motifs produce approximately 108 cm before the outer border.
Eight motifs produce approximately 144 cm.
Nine motifs produce approximately 162 cm.
Ten motifs produce approximately 180 cm.
Use the same calculation vertically.
Do not calculate from the unblocked square because cotton lace can change dimensions after washing and pinning.
Choosing Yarn
DK cotton or a cotton-rich blend provides enough stitch definition for the sculptural spathe without making a bedspread excessively heavy. Published calla-lily patterns successfully use fingering, sport, DK and #4 yarn, so the flower itself is adaptable across several yarn categories.
For this blanket, all three colors should have comparable thickness and washing behavior.
Use a smooth ivory rather than a strongly fuzzy yarn because the raised spathe edge and lace openings need clear definition.
A slightly firmer green helps the leaves maintain their points.
Golden yellow needs only enough body to keep the narrow center upright without internal wire.
Care and Storage
Follow the care instructions supplied with the selected yarn.
Place the blanket in a laundry bag or large pillowcase if machine washing is permitted by the yarn manufacturer.
Avoid washing it with garments containing exposed zippers or hooks because the raised flower edges can snag.
Reshape the calla spathes and green leaves while damp.
Dry flat when required by the fiber label.
For long-term storage, fold the blanket loosely and avoid placing heavy objects directly over the dimensional flowers.
Conclusion
This calla lily crochet blanket pattern converts the flower’s defining anatomy into a washable motif: one ivory wrapping spathe, one visible golden spadix, paired green leaves and a flat lace foundation. Make one complete 17–18 cm square first, block it, and test the flower attachment before committing yarn to the full bedspread. That sample determines both the finished dimensions and the real yarn requirement. Keep the upper spathe free, distribute attachment stitches through the green base, and join only blocked squares. Save the finished blanket to Pinterest or share it on Instagram with #CallaLilyCrochetBlanket. Would you keep every spadix golden yellow, or use pale cream centers for some of the flowers?









