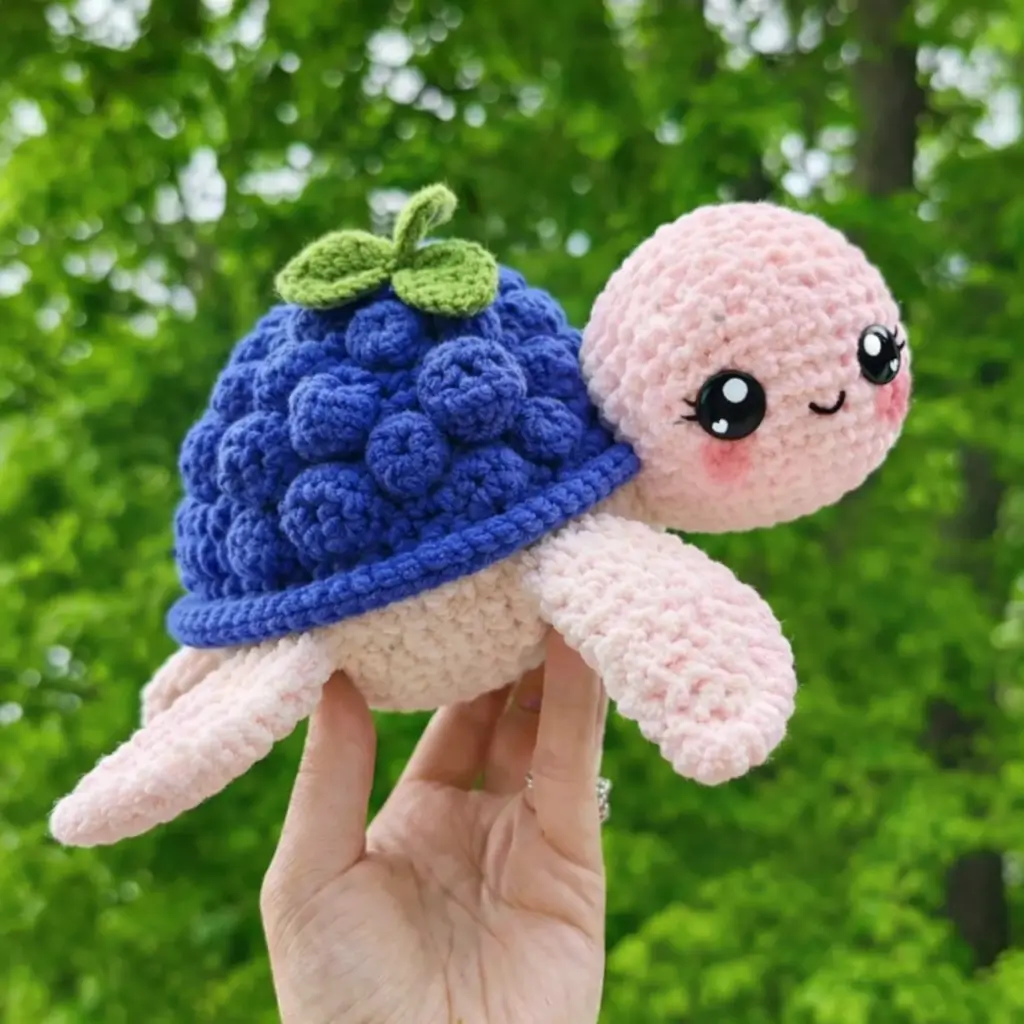
A blueberry shell changes the turtle’s center of gravity. That is the first structural problem this blueberry turtle amigurumi pattern has to solve. The version below is written for plush velvet yarn, uses a 5.0 mm hook, finishes in a medium display size, and suits an intermediate maker. The result works well as a market plush because the silhouette reads clearly from a distance.
The Design: What Makes Blueberry Turtle Different
A standard sea turtle shell sits low and broad. This one does not. The photo shows a higher dome, then a second layer of raised berry forms placed over that dome, which means the shell needs both width and vertical lift. The body has to stay shallow so the shell remains the dominant mass.
The head is also enlarged beyond realistic turtle proportion. That choice shifts the design toward plush display styling, but it also creates a practical issue: too small a neck join makes the head droop forward. For that reason, the head below closes to a narrow neck but keeps a wider attachment span.
Another difference is the shell trim. In many blueberry sea turtle crochet designs, the shell motif is flat or surface-applied. Here, the ridge is pronounced and visible from the side, so the shell edge gets its own finishing round.
The most common mistake with a fruit turtle crochet build is scaling the berry bumps too large. Once that happens, the shell reads like clustered grapes, not blueberries.
Project Info at a Glance
| Skill Level | Time | Finished Size | Hook | Best For |
|---|---|---|---|---|
| Intermediate | 4–6 hours | approx. 22 cm long in velvet yarn; published mini references commonly run 10–14 cm | 5.0 mm | Market plush, shelf display, gift make |
Published blueberry turtle references span roughly 10–14 cm in mini builds, with DK, bulky, and chenille variations all documented in current pattern listings.
Materials and Tools
Yarn
- Pale blush pink — velvet / chenille — about 80 g — Himalaya Dolphin Baby style plush yarn is commonly used in comparable Etsy plush builds.
- Blueberry blue — velvet / chenille — about 70 g — plush builds in the market often use a second full shell color.
- Leaf green — velvet or smooth chenille — about 10 g
- Rose pink — a few meters for cheek tint or use blush powder instead
Tools
- Hook 5.0 mm
- Safety eyes 18–20 mm for the photo-scaled plush
- Stuffing
- Tapestry needle
- Stitch markers
- Black embroidery thread for smile and lashes
Published blueberry turtle patterns commonly list 10–12 mm eyes for smaller DK or bulky versions.
Abbreviations
MR / sc / inc / dec / sl st / ch / BLO / FLO / bobble
Invisible decrease: insert through the front loops of the next two stitches, yarn over, pull through both, then complete one single crochet.
Pattern — Step by Step
Continuous spiral unless noted. This is a photo-derived original pattern written with standard amigurumi stitch math.
Head (Make 1)
Yarn: pale blush pink — Source: Standard amigurumi math
R1: 6 sc in MR (6)
R2: inc x6 (12)
R3: (sc, inc) x6 (18)
R4: (2 sc, inc) x6 (24)
R5: (3 sc, inc) x6 (30)
R6: (4 sc, inc) x6 (36)
R7–11: sc around (36)
R12: (4 sc, dec) x6 (30)
R13: (3 sc, dec) x6 (24)
Insert safety eyes between R8 and R9, about 8 stitches apart. Add lashes before locking the backs.
R14: sc around (24)
R15: (2 sc, dec) x6 (18)
Stuff firmly at the cheeks and crown. Keep the neck area slightly softer.
R16: (sc, dec) x6 (12)
R17: sc around (12)
Fasten off. Leave 20 cm tail.
Body (Make 1)
Yarn: pale blush pink — Source: Standard amigurumi math
R1: 6 sc in MR (6)
R2: inc x6 (12)
R3: (sc, inc) x6 (18)
R4: (2 sc, inc) x6 (24)
R5: (3 sc, inc) x6 (30)
R6: (4 sc, inc) x6 (36)
R7–10: sc around (36)
R11: (4 sc, dec) x6 (30)
R12: sc around (30)
R13: (3 sc, dec) x6 (24)
Stuff the body low and broad. Do not overfill the upper back; the shell will add bulk.
R14: (2 sc, dec) x6 (18)
R15: (sc, dec) x6 (12)
R16: dec x6 (6)
Fasten off. Leave 20 cm tail.
Front Flippers (Make 2)
Yarn: pale blush pink — Source: Standard amigurumi math
R1: 6 sc in MR (6)
R2: inc x6 (12)
R3: (sc, inc) x6 (18)
R4–5: sc around (18)
R6: (sc, dec) x6 (12)
R7–10: sc around (12)
Light stuffing only in the first half. Keep the tip flat.
Flatten and sc through both layers across 6 stitches (6)
Fasten off. Leave 18 cm tail.
Back Flippers (Make 2)
Yarn: pale blush pink — Source: Standard amigurumi math
R1: 6 sc in MR (6)
R2: inc x6 (12)
R3–4: sc around (12)
R5: (sc, dec) x4 (8)
R6–8: sc around (8)
Flatten and sc through both layers across 4 stitches (4)
Fasten off. Leave 16 cm tail.
Tail (Make 1)
Yarn: pale blush pink — Source: Standard amigurumi math
R1: 6 sc in MR (6)
R2: sc around (6)
R3: (sc, inc) x3 (9)
R4–8: sc around (9)
R9: (sc, dec) x3 (6)
Stuff lightly toward the base only.
Fasten off. Leave 14 cm tail.
Shell Base (Make 1)
Yarn: blueberry blue — Source: Standard amigurumi math with photo-derived dome shaping
R1: 6 sc in MR (6)
R2: inc x6 (12)
R3: (sc, inc) x6 (18)
R4: (2 sc, inc) x6 (24)
R5: (3 sc, inc) x6 (30)
R6: (4 sc, inc) x6 (36)
R7: (5 sc, inc) x6 (42)
R8: (6 sc, inc) x6 (48)
R9–12: sc around (48)
R13: BLO sc around (48)
R14: sc around (48)
Fasten off. Leave 24 cm tail.
Shell Rim (Make 1)
Yarn: blueberry blue — Source: photo-derived finishing round
Join yarn to the unused front loops of R13 on shell base.
R1: FLO (2 sc, hdc, 2 dc) in next 5 sts, sl st in next 3 sts; repeat around, adjusting the last repeat to sit flat.
Fasten off. Weave in end.
Blueberry Bobbles (Make 19)
Yarn: blueberry blue — Source: photo-derived modular shell bumps
R1: 6 sc in MR (6)
R2: inc x6 (12)
R3: sc around (12)
R4: (sc, dec) x4 (8)
Stuff each berry very lightly or leave unstuffed for a flatter top.
R5: dec x4 (4)
Fasten off. Leave 20 cm tail for sewing.
Leaf Stem (Make 1)
Yarn: leaf green — Source: standard appliqué shaping
Ch 6.
Starting in 2nd ch from hook: sl st, sc, hdc, sc, sl st.
Working on opposite side of chain: sl st, sc, hdc, sc, sl st.
Fasten off. Leave 10 cm tail.
Leaves (Make 2)
Yarn: leaf green — Source: standard leaf appliqué shaping
Ch 8.
Starting in 2nd ch from hook: sl st, sc, hdc, dc, hdc, sc, sl st.
Work other side of chain: sl st, sc, hdc, dc, hdc, sc, sl st.
Fasten off. Leave 14 cm tail.
Cheek Patches (Make 2)
Yarn: blush pink or use surface blush — Source: standard flat circle math
R1: 6 sc in MR (6)
R2: inc x6 (12)
Fasten off. Leave 10 cm tail.
Smile Detail (Make 1)
Yarn: black embroidery thread
Embroider a shallow curved smile centered two rounds below the eyes.
Add one short anchor stitch at each end to hold the curve.
Assembly
- Sew the head to the front third of the body, using the 12-stitch neck opening as the join line.
- Attach the front flippers slightly below the head seam, angled forward.
- Sew the back flippers near the rear body third, angled out and back.
- Attach the tail to the center back of the body.
- Center the shell base on the body and sew it down after pinning front, back, left, and right points.
- Place the blueberry bobbles over the shell in staggered rows: one at the top center, then ring outward until the dome is covered. Keep the shell rim exposed.
- Sew the two leaves together at their narrow bases with the stem sandwiched between them.
- Attach the leaf cluster to the top center of the shell, leaning slightly backward.
- Sew or felt the cheek patches below the eyes, then embroider the smile and any lash touch-ups.
- Weave in every tail through the body or shell interior, then shape the plush by hand so the head sits slightly raised.
The finished plush should rest on the body and shell, with the flippers acting as visual stabilizers rather than weight-bearing supports.
7 Technical Tips
- Use a marker on every increase round. Velvet yarn hides the first stitch, and missing one increase shifts the shell from 48 to 47 stitches, which throws off the rim immediately.
- Keep head stuffing firmer than body stuffing. A soft head collapses around 18–20 mm eyes and makes the face tilt downward after one day on display.
- Place the eyes before the final neck decreases. On a 36-stitch head plateau, moving the eyes even one stitch outward makes the smile look too small.
- Do not overstuff the shell dome before adding bobbles. The sewn berries add bulk; overfilling first makes the shell sit too high and roll sideways.
- Pin all 19 bobbles before sewing. Random placement creates visible gaps near the shell rim and breaks the blueberry read from side view.
- Keep the front flippers flatter than the back flippers. Thick stuffing at the front rotates them downward and makes the turtle look like it is falling forward.
- Weave tails at least 5 cm through a second direction change. Chenille yarn slips out more easily than cotton, especially on shell add-ons and leaf stems.
Conclusion
The blueberry shell is what makes this build work or fail. Keep the dome broad, keep the berry bumps moderate, and keep the head large enough to balance the visual weight. That combination is what gives a blueberry turtle amigurumi pattern its specific read instead of turning it into a generic plush turtle with a themed cap. The next step is practical: make one shell base, pin all berry positions before sewing, and judge the spacing from three angles. Share the finished version on Pinterest and Instagram with #BlueberryTurtlePattern. One question remains useful for future edits: did your shell look more like berries or more like one solid mound?









