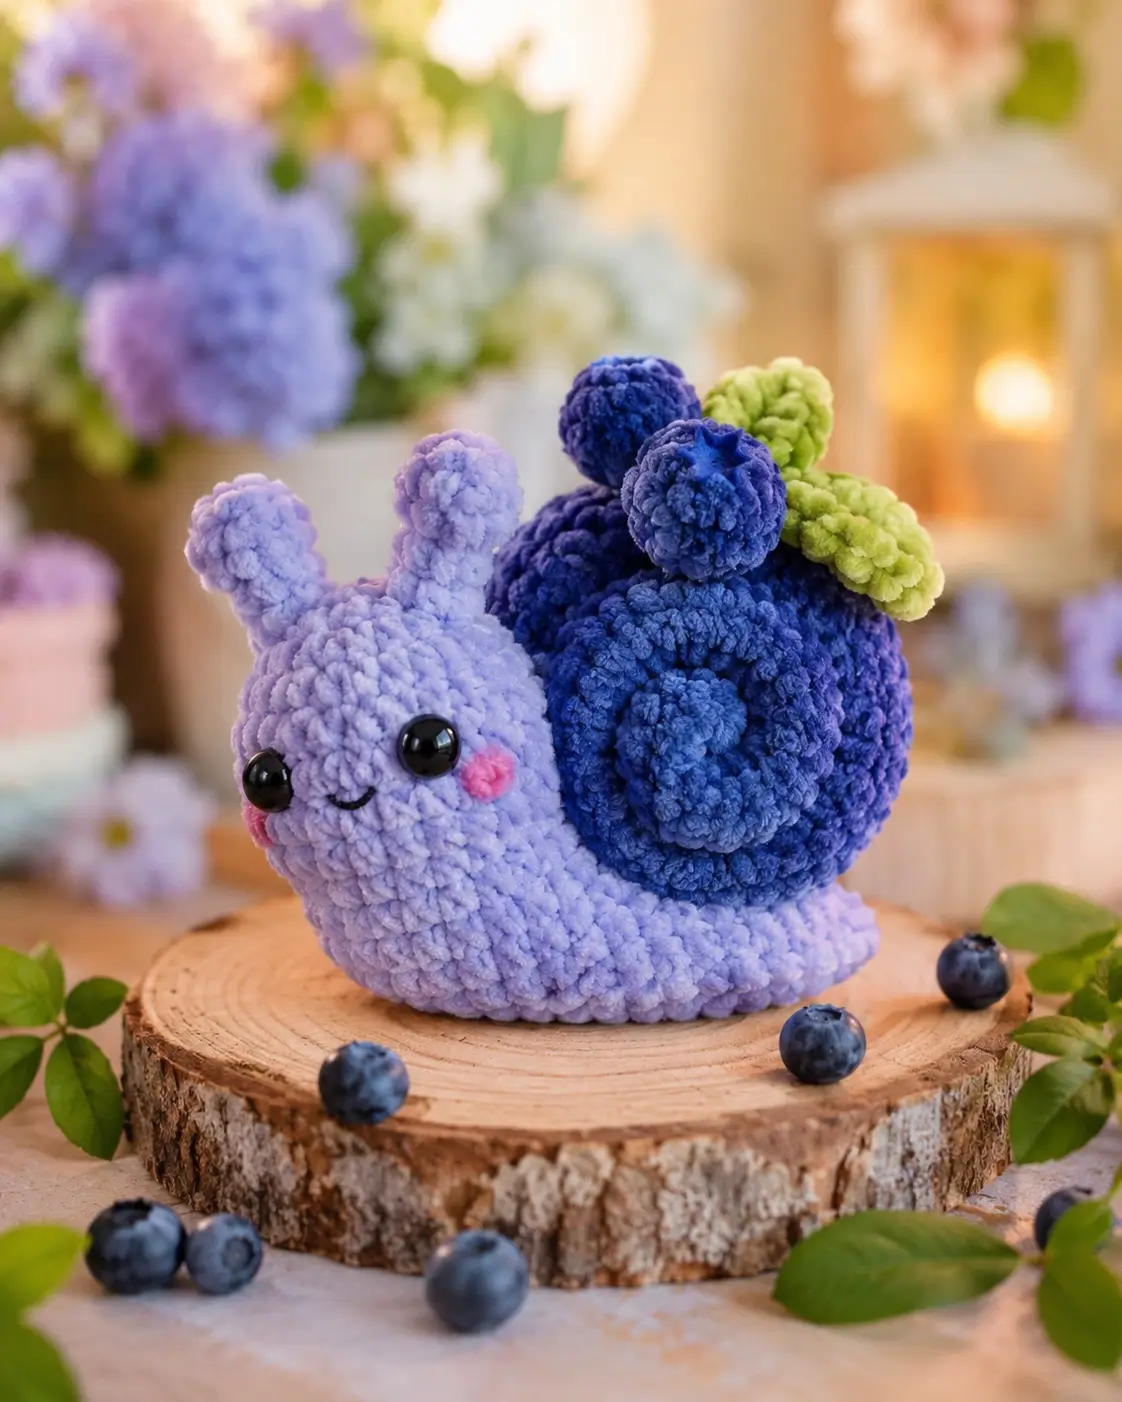
A blueberry shell pulls a snail’s center of gravity behind its eyes. This blueberry snail amigurumi crochet pattern builds a lavender foot, rounded face, stacked berry shell, leaves, blush circles, and raised spiral ridge at about 13 cm tall. The skill level is intermediate because chenille hides stitches and the shell needs balanced attachment. Make it as a market-table plush that sits flat without wire.
The Design: What Makes This Blueberry Snail Different
Blueberry snails fail when the shell reads as a plain ball, so this design separates three features: a large blue sphere, a raised spiral cord, and small top berries. The sphere gives mass. The cord makes the shell read as a snail, not a blueberry pile. Leaves sit high and slightly off-center because berry stems cluster near the crown, while the shell still needs a flat contact zone against the body.
The lavender body stays long with a blunt face; a tapered tail would tip under the shell. A common error in crochet snail plush work is placing the shell too far back. In chenille snail amigurumi, the attachment line should cross the body’s highest third. For a blueberry crochet pattern, that single seam controls balance and profile.
Project Info at a Glance
| Skill Level | Time | Finished Size | Hook | Best For |
|---|---|---|---|---|
| Intermediate | 3 hours | About 13 cm tall × 18 cm long | 4.0 mm | Market-table plush and shelf display |
Materials and Tools
Yarn
- Pale lavender body yarn — bulky velvet chenille — 70 g — Premier Parfait Chunky, YarnArt Dolce, or similar.
- Dark blueberry shell yarn — bulky velvet chenille — 55 g — deep navy or blueberry blue.
- Medium blue spiral and berries — bulky velvet chenille — 20 g — brighter blue for contrast.
- Lime green leaves — bulky velvet chenille — 8 g — spring green.
- Pink cheek yarn — chenille or worsted scrap — 2 g — blush pink.
- Black embroidery thread — small amount — smile only.
Tools
- Hook 4.0 mm
- 12 mm black safety eyes
- Polyester stuffing
- Yarn needle
- Stitch markers
- Pins
- Scissors
For toys intended for babies or toddlers, embroider the eyes instead of using plastic safety eyes.
Abbreviations
MR = magic ring; sc = single crochet; inc = 2 sc in one stitch; dec = invisible decrease; sl st = slip stitch; ch = chain; BLO = back loop only.
Invisible decrease worked through the front loops pulls the closure inward and reduces chenille gaps.
Pattern — Step by Step
Continuous spiral unless noted. Count every round before moving on.
Head
Yarn: pale lavender.
R1: 6 sc in MR (6)
R2: inc ×6 (12)
R3: (sc, inc) ×6 (18)
R4: (2 sc, inc) ×6 (24)
R5: (3 sc, inc) ×6 (30)
R6: (4 sc, inc) ×6 (36)
R7–R12: sc around (36)
R13: (4 sc, dec) ×6 (30)
R14: (3 sc, dec) ×6 (24)
R15: (2 sc, dec) ×6 (18)
R16: (sc, dec) ×6 (12)
R17: dec ×6 (6)
Insert 12 mm eyes between R8 and R9, 8 sts apart, before stuffing closes the head. Stuff firmly through R16.
Fasten off. Leave 25 cm tail.
Body
Yarn: pale lavender.
R1: 6 sc in MR (6)
R2: inc ×6 (12)
R3: (sc, inc) ×6 (18)
R4: (2 sc, inc) ×6 (24)
R5: (3 sc, inc) ×6 (30)
R6: (4 sc, inc) ×6 (36)
R7–R20: sc around (36)
R21: (4 sc, dec) ×6 (30)
R22: (3 sc, dec) ×6 (24)
R23: (2 sc, dec) ×6 (18)
R24: (sc, dec) ×6 (12)
R25: dec ×6 (6)
Stuff the body more densely under the shell area than at the tail. Flatten the underside by pressing it on the table before the final closure.
Fasten off. Leave 30 cm tail.
Front Foot Pads
Yarn: pale lavender. Make 2.
R1: 6 sc in MR (6)
R2: inc ×6 (12)
R3–R4: sc around (12)
R5: dec ×6 (6)
Do not overstuff. These are small underside pads for front stability, not visible animal legs.
Fasten off. Leave 15 cm tail.
Back Foot Pads
Yarn: pale lavender. Make 2.
R1: 6 sc in MR (6)
R2: inc ×6 (12)
R3–R4: sc around (12)
R5: dec ×6 (6)
Place these under the shell zone so the heavy berry shell does not roll the body backward.
Fasten off. Leave 15 cm tail.
Antennae
Yarn: pale lavender. Make 2.
R1: 6 sc in MR (6)
R2: inc ×6 (12)
R3–R4: sc around (12)
R5: dec ×6 (6)
R6–R10: sc around (6)
Stuff only the rounded tip. Leave the stem flexible so it can curve forward.
Fasten off. Leave 18 cm tail.
Cheek Patches
Yarn: pink. Make 2.
R1: 6 sc in MR (6)
R2: inc ×6, sl st to first st (12)
Keep patches flat. Do not stuff.
Fasten off. Leave 12 cm tail.
Blueberry Shell
Yarn: dark blueberry blue.
R1: 6 sc in MR (6)
R2: inc ×6 (12)
R3: (sc, inc) ×6 (18)
R4: (2 sc, inc) ×6 (24)
R5: (3 sc, inc) ×6 (30)
R6: (4 sc, inc) ×6 (36)
R7: (5 sc, inc) ×6 (42)
R8–R14: sc around (42)
R15: (5 sc, dec) ×6 (36)
R16: (4 sc, dec) ×6 (30)
R17: (3 sc, dec) ×6 (24)
R18: (2 sc, dec) ×6 (18)
R19: (sc, dec) ×6 (12)
R20: dec ×6 (6)
Stuff very firmly. A soft shell collapses when the spiral cord is sewn on.
Fasten off. Leave 35 cm tail.
Raised Shell Spiral
Yarn: medium blue.
R1: 6 sc in MR (6)
R2–R40: sc around (6)
Do not stuff. Coil from center outward on the front face of the shell and pin before sewing.
Fasten off. Leave 40 cm tail.
Top Blueberries
Yarn: medium blue and dark blueberry blue. Make 3.
R1: 6 sc in MR (6)
R2: inc ×6 (12)
R3: (sc, inc) ×6 (18)
R4–R5: sc around (18)
R6: (sc, dec) ×6 (12)
R7: dec ×6 (6)
Stuff lightly. Pull a small star indentation at the top with matching yarn.
Fasten off. Leave 18 cm tail.
Leaves
Yarn: lime green. Make 3.
R1: ch 8 (8)
R2: starting in 2nd ch from hook: sl st, sc, hdc, dc, hdc, sc, sl st; work along opposite side: sl st, sc, hdc, dc, hdc, sc, sl st (14)
Pin leaves behind the top berries, with two leaves angled right and one leaf angled left.
Fasten off. Leave 18 cm tail.
Smile
Yarn: black embroidery thread.
Make one shallow curved stitch across 3 sts below the eyes.
Anchor the thread inside the head, not through the cheek patches.
Fasten off inside the head.
Assembly
- Sew the head to the front end of the body with the eye line level and the lower head touching the table line.
- Shape the body by pressing the underside flat; add a few hidden tacking stitches from body to head.
- Sew the cheek patches one round below the eyes, then embroider the smile between them.
- Attach the front foot pads under the head-body join, 2 cm apart.
- Attach the back foot pads under the shell zone, centered below the future shell seam.
- Sew antennae to the top of the head between R4 and R6, angled slightly forward.
- Pin the blueberry shell to the body so its lower edge sits 1 cm above the table line.
- Sew the shell through at least two body rounds and two shell rounds per stitch.
- Coil and sew the raised spiral on the visible shell face, then add the three top berries.
- Sew leaves behind the berries, weave all tails through the interior, and trim chenille ends short.
The completed plush should sit level with the shell upright and the face tilted forward.
7 Technical Tips
- Marker drift creates a twisted shell spiral. Move the stitch marker at the start of every round and recount each 36-st or 42-st plateau before any decrease round.
- Understuffing makes the blueberry shell dent under the spiral. Pack the shell until the 42-st plateau springs back after finger pressure.
- A visible decrease ridge breaks the velvet surface. Work every dec through front loops only from R15 to R20 on the shell and from R13 to R17 on the head.
- Late eye placement fails because washers cannot pass through packed stuffing. Insert 12 mm safety eyes before closing R13 of the head, with 8 sts between posts.
- Loose velvet tension opens holes beside the cheeks. Hold the chenille with one extra tension wrap and keep the hook head facing down when pulling through.
- Poor pinning makes the shell roll backward. Pin at 8 points and keep the lower shell edge 1 cm above the flat table line.
- Short chenille tails shed out of seams. Leave at least 18 cm on small parts and weave through three internal stitches before trimming.
Conclusion
The finished plush depends on three checks: a flattened body base, a shell seam placed across the upper third of the body, and leaves that sit above rather than behind the berries. Photograph the side view before weaving the final shell tail; that image shows tilt problems faster than measuring tape. For posting, add a tight crop of the spiral shell to Pinterest and one assembly reel to Instagram. The next concrete step is to test the shell with the full berry topper pinned on before sewing. This blueberry snail amigurumi crochet pattern should sit with the face level and the shell upright. Tag it #BlueberrySnailPattern. Which top berry did you place closest to the spiral center?









