Introduction
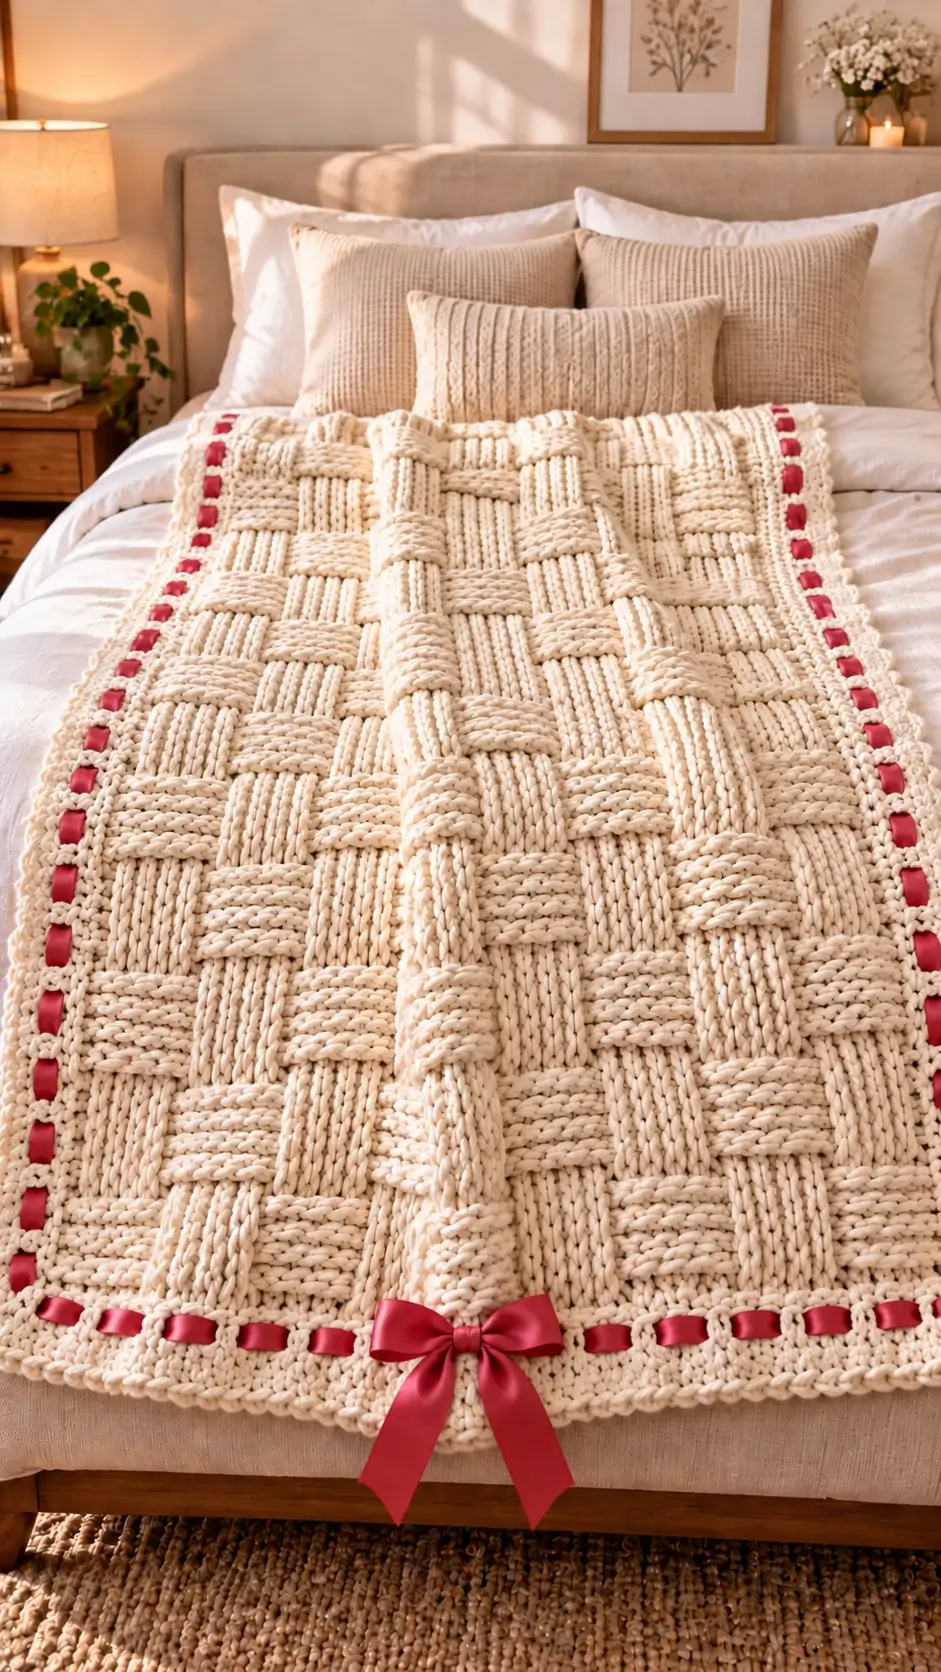
Six raised columns crossing six recessed columns give this blanket its oversized woven architecture. This basket weave crochet blanket uses super-bulky cream yarn, a 9 mm reference hook and a 127 × 144.5 cm target size. The construction suits an intermediate crocheter familiar with post stitches. Its repeated 12-stitch geometry makes the width easy to modify while retaining the large blocks visible in the reference photograph.
The Design: What Makes This Basket Weave Blanket Different
The scale of the blocks controls this design. Groups of six front-post and six back-post double crochet stitches create broad raised sections instead of a smaller basket texture. The 84-stitch construction divides the width into fourteen 6-stitch blocks, creating the large checkerboard proportions seen in the reference image.
The second structural decision is the monochrome body. Keeping the chunky crochet blanket pattern in cream makes changes in stitch direction provide the contrast instead of color changes. Finally, the border separates the dense basketweave crochet stitch from the red ribbon with a flatter transition round.
A frequent error is losing one stitch at an edge while concentrating on FPdc and BPdc placement. Mark both edge stitches before working the textured rows.
Project Info at a Glance
| Skill Level | Time | Finished Size | Hook | Best For |
|---|---|---|---|---|
| Intermediate | Varies with gauge and working speed | 127 × 144.5 cm reference size | 9 mm | Bed-end throw / large lap blanket |
The finished dimensions and hook size are reference specifications for a super-bulky basket-weave blanket. Always check the dimensions produced by your own yarn, hook and tension before committing to the full blanket.
Materials and Tools
Yarn
- Cream / ivory yarn — Super Bulky — approximately 2,400 g for the reference dimensions.
- Accent yarn — none required for the photographed version.
- Red satin ribbon — approximately 25–38 mm wide as a visual starting range.
The photograph has the appearance of a smooth, substantial chunky yarn. Substitute yarn according to gauge and finished fabric behavior rather than relying only on the printed yarn-weight category.
Tools
- 9 mm crochet hook
- Yarn needle
- Locking stitch markers
- Scissors
- Tape measure
- Large safety pin or bodkin for threading ribbon
- Red satin ribbon
- Blocking mats if suitable for the selected fiber
Abbreviations
- ch — chain
- sc — single crochet
- dc — double crochet
- FPdc — front post double crochet
- BPdc — back post double crochet
- sl st — slip stitch
- st / sts — stitch / stitches
- sp — space
- RS — right side
- WS — wrong side
FPdc and BPdc are worked around the vertical post of the stitch below rather than through its two top loops. Alternating front-post and back-post groups pushes sections toward opposite faces of the fabric and creates the woven appearance.
Basket Weave Crochet Blanket Pattern
This blanket is worked flat in rows. Groups of six stitches are used to reproduce the broad checkerboard proportions visible in the reference photograph.
Gauge Swatch
Yarn: cream, super bulky.
Foundation: Ch 20.
Row 1: Dc in 3rd ch from hook and across.
Rows 2–7: Work 6 FPdc, then 6 BPdc across the central test section, keeping the remaining edge stitches in dc.
Measure the swatch without stretching it. The important measurement is the width and height of one completed six-stitch basket block with your selected yarn.
If appropriate for the fiber, wash or block the swatch according to the yarn manufacturer’s care instructions before calculating the final blanket dimensions.
Main Blanket Body
Yarn: cream.
Foundation: Ch 86.
Setup Row: Dc in 3rd ch from hook and in each chain across. Turn. (84 dc)
Place a locking stitch marker in the first and last stitch.
The body contains fourteen blocks across. Each pair consists of six front-post stitches followed by six back-post stitches:
6 + 6 = 12 stitches
Seven repeats give:
7 × 12 = 84 stitches
No increases or decreases are worked in the rectangular body.
Basket Section A
Row 2: Ch 2, turn. *FPdc around next 6 sts, BPdc around next 6 sts.* Repeat from * to * 7 times. (84)
Row 3: Ch 2, turn. Work the posts so the same blocks remain raised on the intended face: *BPdc around next 6 sts, FPdc around next 6 sts.* Repeat 7 times. (84)
Row 4: Repeat Row 2. (84)
Row 5: Repeat Row 3. (84)
Row 6: Repeat Row 2. (84)
Row 7: Repeat Row 3. (84)
Six textured rows now form the first basket-block height.
Basket Section B
The next section reverses the raised and recessed blocks to create the woven checkerboard effect.
Row 8: Ch 2, turn. *BPdc around next 6 sts, FPdc around next 6 sts.* Repeat 7 times. (84)
Row 9: Ch 2, turn. *FPdc around next 6 sts, BPdc around next 6 sts.* Repeat 7 times. (84)
Row 10: Repeat Row 8. (84)
Row 11: Repeat Row 9. (84)
Row 12: Repeat Row 8. (84)
Row 13: Repeat Row 9. (84)
Rows 2–13 form one complete 12-row basket cycle.
Repeat the Body
Repeat Rows 2–13 until the blanket approaches the required length. Stop after a complete six-row block whenever possible so the upper edge does not interrupt the checkerboard structure.
Maintain 84 stitches in every body row.
For a photo-matched result, determine the final length from the physical blanket rather than assuming a universal row count. Different super-bulky yarns can produce significantly different stitch heights.
A practical reference finished size is approximately 127 × 144.5 cm. Measure frequently once the blanket approaches the required length.
Fasten off after completing the final basket section.
Foundation Border
Yarn: cream.
Join the cream yarn at one corner.
Round 1: Ch 1. Sc evenly around all four edges, working 3 sc in each corner. Join with sl st.
Do not force a predetermined stitch count onto the long sides. Distribute the stitches consistently so the border lies flat.
Round 2: Ch 1. Sc in each st around, working 3 sc in the center corner stitch at each corner. Join with sl st.
These two rounds create a stable transition between the heavily textured blanket body and the decorative ribbon border.
Ribbon Channel
Yarn: cream. The satin ribbon is inserted after all crochet is complete.
Round 3: Ch 3. *Dc in next 2 sts, ch 2, skip next 2 sts.* Repeat around the border.
Adjust the repeat near each corner when necessary so the openings remain balanced. At the corners, provide enough stitches or chain space for the border to turn without pulling inward.
The repeated chain spaces create openings through which the satin ribbon will be threaded.
The exact number of openings depends on the final dimensions and stitch count of the blanket. Fit the repeat to the completed perimeter instead of forcing an arbitrary total.
Outer Scalloped Edge
Round 4: Ch 1. Sc around the ribbon-channel round, working into both dc stitches and chain spaces. Work 3 sc at each corner.
Round 5: *Skip 1 st, 5 dc in next st, skip 1 st, sl st in next st.* Repeat around.
Near each corner, alter the spacing by one stitch if necessary to position a shell close to the corner. The finished edge should remain flat rather than forming waves.
Fasten off. Leave a 15 cm yarn tail and weave it through several dense border stitches in alternating directions.
Adding the Satin Ribbon
Measure the completed blanket perimeter before cutting the ribbon. Add sufficient extra length for the center bow and its two tails.
Attach one end of the ribbon to a large safety pin or bodkin. Thread it over and under the openings created in the ribbon-channel round.
Keep the ribbon flat throughout the perimeter. Check each section before continuing because a half twist becomes highly visible against the cream crochet.
For the centered bow shown in the reference photograph, position both ribbon ends at the midpoint of one short edge.
Redistribute the ribbon around the entire perimeter before tying the bow. The ribbon must remain loose enough for the crochet border to lie completely flat.
Tie the ends into a structured bow and trim both tails to an equal length.
Assembly and Finishing
- Lay the completed blanket body on a flat surface and check all four edges for accidental stitch losses.
- Arrange the basket sections squarely without stretching the raised post stitches.
- Work the stabilizing border around the complete rectangle.
- Add the ribbon-channel round and check each side for evenly distributed openings.
- Complete the outer scalloped edging before inserting the ribbon.
- Measure the finished perimeter and calculate the additional ribbon required for the bow.
- Thread the red satin ribbon through alternating openings with a bodkin or large safety pin.
- Redistribute the ribbon until no section pulls or gathers the crocheted border.
- Form the bow at the midpoint of the lower short edge and trim the tails evenly.
- Weave all yarn tails through dense border stitches and trim them only after they are secure.
The finished blanket has a cream basketweave field, structured border, contrasting ribbon channel and removable satin bow.
7 Technical Tips for a Better Basket Weave Blanket
- Mark both edge stitches. Losing even one stitch changes the 84-stitch repeat and moves every subsequent six-stitch block out of alignment.
- Count after every six-row section. The body should still contain exactly 84 stitches before the basket orientation is reversed.
- Check where the hook enters. An FPdc or BPdc is worked around the post; accidentally inserting through the top loops creates a flat interruption in the raised block.
- Measure one six-stitch block. If a block is substantially wider than it is tall after six rows, alter the number of rows in each section before making the full blanket.
- Keep the ribbon channel relaxed. If ribbon insertion reduces an edge by even 2–3 cm, the border can begin to cup instead of lying flat.
- Check all four corners on a flat surface. A corner that waves usually has excess stitches, while a corner pulling inward generally needs additional spacing.
- Leave at least a 15 cm finishing tail. Thick yarn provides fewer stitches for weaving, so a short tail has less internal path length and can work loose.
Conclusion
Measure the first completed six-row block before committing the full yarn supply to this project. That measurement determines whether the 84-stitch body produces the required width while keeping the large basket proportions consistent. After completing the body, build the border separately and measure its actual perimeter before cutting the satin ribbon. This sequence reduces wasted ribbon and prevents a tight decorative channel from distorting the crochet. Save this basket weave crochet blanket pattern to Pinterest and share the finished blanket on Instagram with #RibbonBasketWeaveBlanket. Would you keep the reference blanket’s red ribbon or use a different accent color with the ivory basketweave field?









