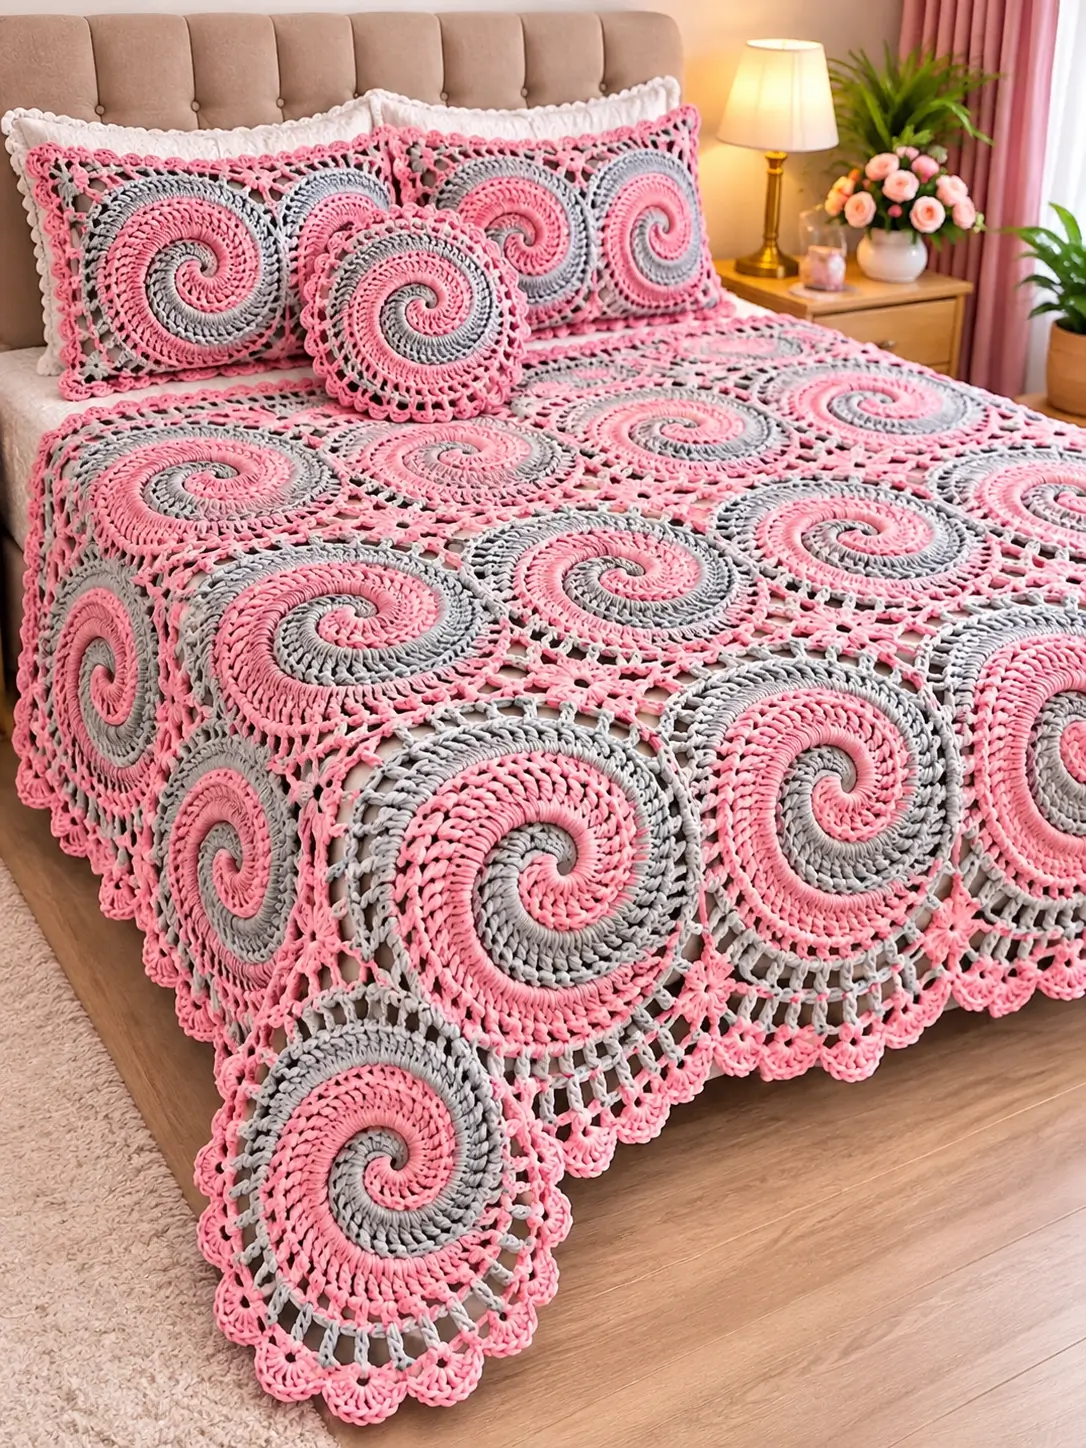
A spiral motif only works when both colors advance at exactly the same rate around the center. This pink and gray spiral crochet bedspread pattern uses large circular two-color motifs surrounded by open lace, then joins them into a continuous bed covering. Soft pink and silver gray create the rotating effect, while the scalloped pink edging repeats the curves of the spiral. Matching cushions can be made from the same motif.
The Design: What Makes This Spiral Bedspread Different
The visual center of the project is a large two-color spiral rather than a conventional flower or granny square. Pink and gray sections rotate together from a compact center and gradually widen until they form a substantial circular medallion.
The second structural decision is the open lace surrounding each medallion. A dense spiral can become heavy, so the chain-space rounds reduce weight and provide flexible joining points between motifs. Finally, a pink scalloped edge finishes the outside perimeter and repeats the circular character of the central design.
The main technical risk is distortion. If one spiral section gains stitches faster than the other, the dividing line stops rotating smoothly. Count both sections separately and compare them after every increase round.
Project Information at a Glance
| Skill Level | Construction | Target Motif Size | Suggested Hook | Best For |
|---|---|---|---|---|
| Intermediate–Advanced | Two-color spiral medallions with lace surrounds | Approximately 28–32 cm | 4.5–5.0 mm | Bedspreads, throws and matching cushions |
Materials and Tools
Yarn
- Soft Pink — DK #3 or light worsted #4 — main spiral color, lace and edging
- Silver Gray — DK #3 or light worsted #4 — contrasting spiral color and lace details
Choose two yarns from the same range whenever possible. Matching fiber content and thickness helps both halves of the spiral grow at the same rate.
Tools
- 4.5–5.0 mm crochet hook
- Yarn needle
- Scissors
- Stitch markers in two colors
- Measuring tape
- Blocking mats
- Rust-resistant pins
Abbreviations
- MR — magic ring
- ch — chain
- sc — single crochet
- hdc — half double crochet
- dc — double crochet
- tr — treble crochet
- sl st — slip stitch
- inc — increase
- sp — space
- st/sts — stitch/stitches
- RS — right side
Construction Overview
Each large unit is made in three stages. First, crochet the pink-and-gray spiral center. Second, add several transition rounds that stabilize the circle. Third, work an open lace surround that provides joining points.
The spiral is worked without cutting the two colors after every section. Keep both yarns attached and alternate between them as instructed. Place one stitch marker in the active loop of each color whenever that color is resting.
Two-Color Spiral Center
Starting the Spiral
With pink, make an MR.
Work into the ring:
1 sc, 1 hdc, 2 dc.
Pull the active pink loop long and secure it with a marker.
Join gray into the same MR.
Work:
1 sc, 1 hdc, 2 dc.
Pull the gray loop long and mark it.
Tighten the magic ring carefully. The two color sections should sit beside each other rather than on top of one another.
Spiral Round 2
Return to pink.
Work 2 dc into each available gray stitch until the pink section reaches the gray working loop.
Secure pink.
Return to gray and work 2 dc into each available pink stitch until the gray section reaches the pink loop.
Both colors should now have advanced by the same amount.
Spiral Round 3
With pink:
*1 dc in next st, 2 dc in next st.*
Repeat across the gray section.
Secure pink.
With gray, repeat the same sequence across the pink section.
Spiral Round 4
With each color in turn:
*1 dc in each of next 2 sts, 2 dc in next st.*
Repeat across the active section.
Spiral Round 5
With each color:
*1 dc in each of next 3 sts, 2 dc in next st.*
Repeat across.
Spiral Round 6
With each color:
*1 dc in each of next 4 sts, 2 dc in next st.*
Repeat across.
Spiral Round 7
With each color:
*1 dc in each of next 5 sts, 2 dc in next st.*
Repeat across.
Spiral Round 8
With each color:
*1 dc in each of next 6 sts, 2 dc in next st.*
Repeat across.
At this stage, lay the medallion on a flat surface. The fabric should remain flat without a pronounced bowl or ruffle.
Extending the Spiral
Continue using the same increase principle:
- Next round: 7 dc between increases
- Following round: 8 dc between increases
- Next round: 9 dc between increases
- Continue increasing the interval by one stitch per expansion round
Both colors must use the same increase sequence.
Stop the dense spiral when it measures approximately 20–24 cm across, depending on the planned final motif size.
Finishing the Spiral Arms
Abruptly stopping both colors can leave a visible step. Taper each spiral arm instead.
For the final section of pink, work:
dc across most of the section, then 2 hdc, 2 sc, 1 sl st.
Fasten off.
Repeat the same taper with gray.
The edge should now read as a continuous circle.
Stabilizing the Circular Medallion
Round 1
Join gray at any point.
Ch 1 and work sc evenly around.
Do not add automatic increases. Add only enough stitches to keep the circle flat.
Round 2
Join pink.
Ch 3 and work dc around.
Where necessary, distribute occasional increases evenly rather than concentrating them in one area.
Round 3
With gray:
*Sc in next st, ch 2, skip 1 st.*
Repeat around.
Join with sl st.
Open Lace Surround
The lace section changes the dense spiral into a lighter bedspread motif.
Lace Round 1
Join pink into a ch-2 space.
Ch 3.
Work:
2 dc in same space, ch 3.
Work 3 dc in next ch-2 space, ch 3.
Repeat around.
Lace Round 2
Sl st to the next chain space.
Work:
(2 dc, ch 2, 2 dc) in the space.
Ch 3.
Repeat the shell in the next space.
Continue around.
Lace Round 3
Join gray.
Work sc in the center of the next shell.
Ch 5.
Sc into the center of the following shell.
Repeat around.
Lace Round 4
Join pink.
Into each ch-5 space work:
(sc, hdc, 3 dc, hdc, sc).
Repeat around.
Creating Joining Points
A completely circular motif leaves large spaces when several units meet. The final lace rounds therefore need selected joining points.
Mark four positions around the motif at approximately 90-degree intervals.
These marks represent the primary joining directions.
Joining Foundation Round
Work around in pink:
*Ch 4, sc into the next suitable space.*
At each marked joining position, replace the normal ch-4 loop with:
ch 6.
The larger loops provide enough room for connecting neighboring motifs.
Target Motif Measurement
After blocking, aim for approximately 28–32 cm from one primary joining point to the opposite point.
Do not force a motif to a predetermined measurement if the fabric begins stretching.
Instead, record the natural blocked size of the first successful unit and make every following motif match it.
Making the Remaining Motifs
Use the first completed unit as the master motif.
Check three measurements on every new piece:
- Diameter of the dense spiral
- Diameter after the lace rounds
- Distance between opposite joining points
A difference of several centimeters becomes highly visible after multiple motifs are connected.
Joining the Spiral Motifs
Arrange the motifs on a large flat surface before joining.
Keep every spiral rotating in the same visual direction for an orderly layout. Alternatively, alternate clockwise and counterclockwise-looking units if you want a more varied arrangement.
Join-as-You-Go Method
On the final lace round of a new motif, work toward a joining loop.
Instead of completing the entire chain loop, work:
ch 2, sl st into corresponding loop of completed motif, ch 2.
Continue around the new motif.
Connect additional points where the two circles naturally meet.
Do not connect every available chain space. Too many connections make the lace rigid.
Filling the Space Between Four Motifs
Where four circular motifs meet, a small central opening may remain.
This can become a decorative feature rather than being closed completely.
Join pink into one motif.
Ch 4 and sc into the neighboring motif.
Ch 4 and connect to the third motif.
Repeat for the fourth motif.
Join back to the starting point.
On the following round, work small shells or chain loops into these spaces.
This produces the airy connecting network visible between the large spirals.
Bedspread Layout
The number of motifs depends on the blocked diameter.
If a finished unit measures approximately 30 cm between joining points, the following grid provides a useful planning reference:
| Layout | Approximate Motif Area Before Outer Border |
|---|---|
| 5 × 6 motifs | 150 × 180 cm |
| 6 × 7 motifs | 180 × 210 cm |
| 7 × 8 motifs | 210 × 240 cm |
| 8 × 9 motifs | 240 × 270 cm |
Actual dimensions depend on the joining method and the amount of open space between motifs. Measure a joined sample of four units before calculating the final bedspread dimensions.
Yarn Quantity Calculation
Because the spiral center is dense while the outer rounds are open, calculating yarn only from surface area can be inaccurate.
Make one complete motif and weigh it.
Then separate the estimate by color if possible.
For example, if one finished motif uses 95 g total and the bedspread requires 42 motifs:
95 × 42 = 3990 g
This is a calculation example rather than a fixed yarn requirement.
Add approximately 10–15% to your own measured quantity for joining, border work, swatching and corrections.
Pink Scalloped Outer Border
The bedspread in the reference image finishes with a strongly defined pink scalloped edge.
Border Foundation
Join pink at one corner.
Work sc evenly around the entire assembled bedspread.
Across irregular lace sections, place stitches into chain spaces rather than forcing a stitch into every chain.
Border Round 2
*Ch 4, skip approximately 2 sts, sc in next st.*
Repeat around.
Adjust spacing slightly near corners so the border lies flat.
Scallop Round
Into each ch-4 space work:
(sc, hdc, 4 dc, hdc, sc).
Repeat around.
Optional Final Definition
Work one loose round of sc around the scallops if a firmer perimeter is required.
Do not tighten this round. A tight final edge can make the entire bedspread curl upward.
Matching Spiral Cushion Covers
The same medallion can form the front of a round cushion or be adapted into a square cushion.
Round Cushion
Make one complete spiral medallion.
Stop before the widest bedspread lace rounds.
Make a second plain circular panel of equal diameter.
Place both pieces together and join around the edge, leaving an opening for the cushion insert.
Square Cushion
Make one spiral center.
After the circular section, mark four positions at 90-degree intervals.
Use progressively taller stitches toward those marked positions to begin forming four corners.
Add open chain-space rounds until the panel reaches the required cushion dimensions.
Finish with a pink scalloped border.
Blocking the Bedspread
Block individual motifs before joining whenever possible.
Once the entire bedspread is assembled, perform a lighter final blocking.
First straighten the rows of spiral centers.
Next open the chain-space connectors evenly.
Shape the outer scallops last.
Avoid stretching the open lace farther than the dense spiral centers can support.
Color Variations
The spiral construction becomes particularly visible when the two colors have clear contrast.
- Pink + Silver Gray — matches the photographed design
- Navy + Ivory — strong graphic contrast
- Sage + Cream — softer botanical palette
- Lavender + White — light floral interpretation
- Terracotta + Beige — warm autumn version
- Black + Cream — high-contrast geometric version
Assembly
- Make one complete two-color spiral and confirm that both color sections grow at the same rate.
- Add the stabilizing rounds and open lace until the master motif reaches the chosen blocked measurement.
- Make the remaining motifs, checking the spiral diameter and joining-point distance regularly.
- Block all motifs to the dimensions established by the master unit.
- Arrange the complete motif layout on a flat surface with the spiral directions positioned consistently.
- Join neighboring motifs through the designated lace loops without pulling the circular edges together.
- Add small connecting sections where four motifs meet if the central openings are larger than desired.
- Check the assembled bedspread for straight rows before beginning the perimeter.
- Work the pink foundation border followed by the openwork and scalloped finishing rounds.
- Weave yarn tails into dense spiral or border stitches, then complete the final blocking.
The finished piece should display evenly sized spiral medallions, balanced pink and gray sections, open connecting lace and an uninterrupted scalloped perimeter.
7 Technical Tips
- Spiral line becoming uneven: one color has usually gained or lost an increase. Mark the first stitch of each color and compare the increase sequence before beginning the next round.
- Center forming a bowl: the circumference is increasing too slowly. Correct the increase distribution while the problem is limited to one or two rounds rather than trying to flatten the motif during blocking.
- Medallion developing waves: excessive increases are creating more circumference than the fabric needs. Remove increases evenly from the first round where the ripple appears.
- Color change producing a visible step: taper the final stitches from dc to hdc, sc and sl st. Cutting both spiral arms immediately after tall stitches leaves a noticeable interruption in the circular edge.
- Lace joining becoming rigid: connecting every chain loop removes the flexibility of the openwork. Use only the structural joining points required to hold neighboring motifs at the correct distance.
- Different motif diameters: compare every finished spiral with the master motif before adding the final lace. A 1 cm difference can multiply into a visibly uneven row across six or seven units.
- Scalloped border curling: check the edge after every 20–30 cm of work. Reduce shells if the edge waves outward or increase the foundation spacing slightly if it pulls inward.
Care and Finishing
Follow the washing instructions specified for the selected yarn.
Support the entire bedspread when it is wet. Dense spiral centers absorb more water and become considerably heavier than the surrounding lace.
Dry the project flat whenever practical.
Reshape each circular motif and open the lace connectors with your fingers before the fabric dries completely.
Check the scalloped edge and correct any folded shells during drying.
Conclusion
This pink and gray spiral crochet bedspread pattern depends on controlled increases rather than complicated assembly. Make the first two-color spiral slowly, record its finished measurements, and use it as the standard for every subsequent motif. Once several units are complete, join four as a test section before committing to the full bedspread layout; this confirms the actual spacing and finished dimensions. The same spiral can then be adapted for matching square or round cushion covers. Save the design to Pinterest or share your finished version on Instagram with #PinkGraySpiralBedspread. Would you arrange every spiral in the same direction, or alternate their rotation across the bed?









