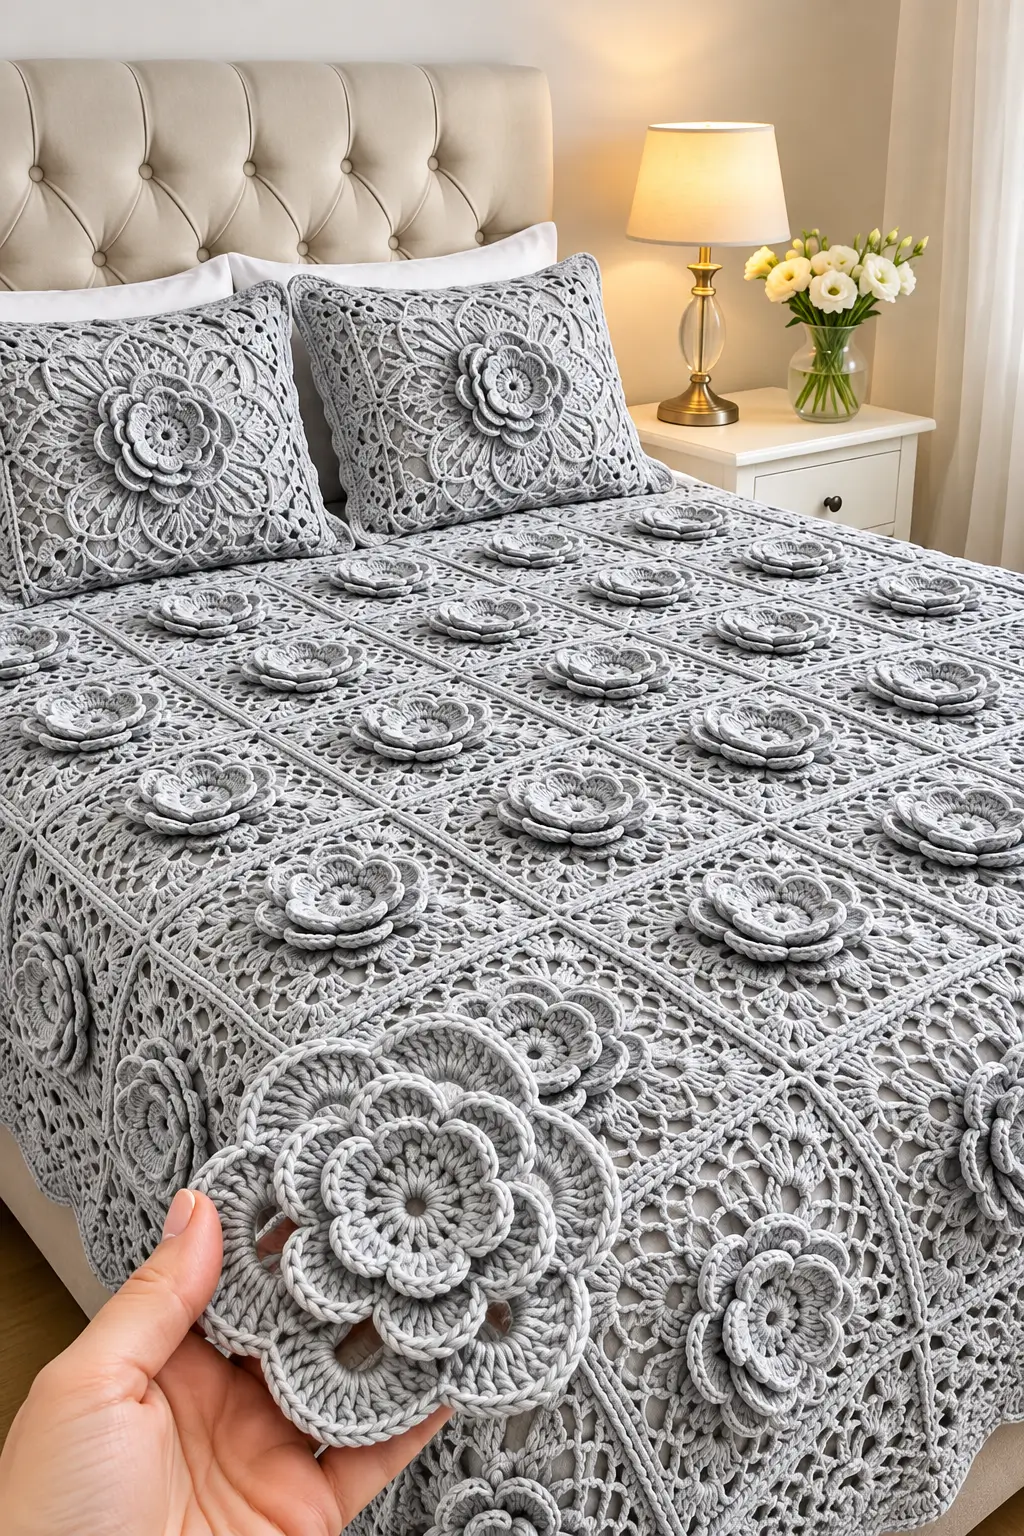
A raised rose this deep cannot share its tension with the lace square underneath it. This 3D rose crochet bedspread pattern therefore separates the dimensional flower from the openwork foundation, allowing the petals to remain sculptural while the square stays flat enough for joining. Worked in silver gray yarn, the finished design combines large floral motifs, airy lace panels, straight joining lines, and matching decorative pillow covers.
The Design: What Makes This Floral Bedspread Different
The bedspread is built from repeating square panels rather than crocheted as one enormous piece. Each panel has three structural zones: a stable center for attaching the flower, an open lace field, and a firmer perimeter used for joining.
The rose is made separately in several graduated petal layers. Only its central base is stitched firmly to the square. The outer petals remain comparatively free, which creates the pronounced relief visible across the bedspread.
The main construction mistake with this type of project is attaching every petal edge to the background. That flattens the rose and can pull the lace inward. Another common problem is making the decorative mesh too loose near the joining round. A firmer final frame prevents adjacent squares from stretching apart.
Project Information at a Glance
| Skill Level | Construction | Target Motif Size | Suggested Hook | Best For |
|---|---|---|---|---|
| Intermediate–Advanced | Modular lace squares | Approximately 22–26 cm | 4.0–4.5 mm | Bedspreads and pillow covers |
Materials and Tools
Yarn
- Silver Gray — DK #3 or light worsted #4 — main square, roses, joining, and border
A smooth yarn with clear stitch definition works best for the layered flowers and open mesh. Cotton, cotton-blend, or a smooth acrylic can be used. Make one complete sample square before purchasing the full quantity because yarn consumption changes substantially with flower depth and bed size.
Tools
- 4.0–4.5 mm crochet hook
- Yarn needle
- Stitch markers
- Scissors
- Measuring tape
- Blocking mats
- Rust-resistant blocking pins
Abbreviations
- MR — magic ring
- ch — chain
- sc — single crochet
- hdc — half double crochet
- dc — double crochet
- tr — treble crochet
- sl st — slip stitch
- sp — space
- st/sts — stitch/stitches
- BLO — back loop only
- FLO — front loop only
- RS — right side
Construction Overview
Make one complete master motif before beginning production.
The recommended order is:
- Crochet and block the lace square.
- Make the layered rose separately.
- Attach the rose to the blocked square.
- Repeat until the required number of motifs is complete.
- Join the squares through their structural outer rounds.
- Add the full bedspread border.
This sequence keeps the raised flowers away from the joining seams.
Master Lace Square
The following construction is designed as a photo-inspired openwork foundation rather than an exact reproduction of a commercial pattern.
Round 1
Make an MR.
Ch 3, work 15 dc into the ring.
Join with sl st to the top of the beginning ch.
16 dc total.
Round 2
Ch 1.
Work sc in the same stitch.
*Ch 3, skip 1 st, sc in next st.*
Repeat around.
Join with sl st.
This creates eight small chain spaces around the center.
Round 3
Sl st into the first ch-3 sp.
Ch 3, work 3 dc in the same space.
Ch 2.
Work 4 dc in the next ch-3 sp.
Continue around, working 4 dc into each chain space with ch 2 between groups.
Join.
Round 4 — Beginning the Square
Four of the spaces now become corners.
In the first corner space work:
(3 dc, ch 3, 3 dc).
In the next space work:
3 dc, ch 2, 3 dc.
Repeat this arrangement around, placing the larger ch-3 corner treatment at four evenly spaced positions.
Check that the four corners sit at approximately 90-degree intervals before continuing.
Building the Open Lace Field
Round 5
Sl st to the first corner.
Work:
(2 dc, ch 3, 2 dc) in each corner.
Across each side, alternate:
ch 3, sc in next available space.
Continue to the next corner.
Round 6
Work the same corner structure.
Across each side:
ch 4, sc in next ch-3 sp.
Repeat across.
The longer chains begin opening the lace field.
Round 7
In each corner work:
(3 dc, ch 3, 3 dc).
Across each side, work:
3 dc in next chain space, ch 2.
Repeat to the next corner.
Round 8
Work:
(2 dc, ch 3, 2 dc) in each corner.
Across the sides:
*Ch 4, sc in next ch-2 sp.*
Repeat across.
Round 9
Repeat the open mesh structure, adding enough chain length to allow the square to lie flat.
If the square cups upward, the mesh needs slightly more length. If the edges ripple, reduce the chain length or remove excess spaces.
Decorative Lace Fans
The reference design has denser floral or fan-like details distributed between the center and outer frame. These can be added without changing the structural joining edge.
Fan Round
In selected mesh spaces work:
(2 dc, 3 tr, 2 dc) in the same space.
Sc into the next mesh space.
Repeat the fan placement symmetrically on all four sides.
Keep the same number of fans on every side.
Structural Outer Frame
The final rounds should be firmer than the lace center.
Frame Round 1
Work sc evenly around the entire square.
In each corner work:
(sc, ch 2, sc).
Frame Round 2
Work hdc in each stitch.
In each corner ch-2 space work:
(2 hdc, ch 2, 2 hdc).
Frame Round 3
Work sc around.
Maintain the corner spaces.
Fasten off.
Blocking the Master Square
Block the square before adding the rose.
A practical target is approximately 22–26 cm per square, but your finished measurement should be determined by yarn, hook, and tension.
Measure all four sides.
Then measure both diagonals.
The difference between the diagonals should ideally remain within approximately 5 mm on the master motif.
Record the blocked measurement. Every subsequent square should match this measurement rather than an assumed size.
Large Layered Crochet Rose
The flower is constructed separately. This makes it easier to control petal depth and keeps the lace square flat during blocking.
Rose Center — Round 1
Make an MR.
Ch 3 and work 11 dc into the ring.
Join.
12 dc total.
Round 2
Work 2 dc in each stitch around.
24 dc total.
Round 3 — First Petal Foundation
*Sl st in next st, ch 4, skip 2 sts.*
Repeat around to create evenly distributed petal loops.
Inner Petals
Into each ch-4 loop work:
(sc, hdc, 3 dc, hdc, sc).
Repeat around.
These petals form the compact center layer.
Second Petal Layer
Turn the flower slightly so the back of the first layer is accessible.
Attach yarn behind the petals.
Work foundation loops around the back:
ch 5, anchor with sc between two petals.
Repeat around.
Into each ch-5 loop work:
(sc, hdc, 2 dc, 2 tr, 2 dc, hdc, sc).
The second layer should extend beyond the inner petals.
Third Petal Layer
Create another set of loops behind the second layer using approximately ch 7.
Into each loop work:
(sc, hdc, 2 dc, 3 tr, 2 dc, hdc, sc).
Allow these petals to curve naturally rather than forcing them completely flat.
Large Outer Petals
The largest flowers in the design have a pronounced final layer.
Create another foundation behind the existing petals:
ch 9, anchor between the previous petals.
Into each loop work:
(sc, 2 hdc, 3 dc, 4 tr, 3 dc, 2 hdc, sc).
Repeat around.
Fasten off with a long tail.
Shaping the Rose
Arrange the inner petals slightly upright.
The second layer should overlap the spaces between the first petals.
Pull the third layer outward.
Allow the largest petals to sit lower against the background.
A finished large rose can project approximately 2–4 cm above the square depending on yarn thickness and blocking.
Attaching the Rose to the Square
Place the rose exactly at the center of the blocked lace square.
Pin the center before sewing.
Sew through the central flower base and the denser central section of the square.
Secure approximately the inner 4–6 cm of the flower.
Do not sew every outer petal to the lace.
Add one or two discreet anchoring stitches beneath selected outer petals only if the flower moves excessively.
Optional Raised Petal Outline
For stronger definition, surface crochet around selected petal edges.
Insert the hook through the edge and work a loose chain or slip-stitch outline.
Keep this edging relaxed. Tight surface crochet can curl the petals sharply inward.
Calculating the Number of Squares
Use the actual blocked size of the master square.
If one motif blocks to 24 cm, a simple starting calculation is:
| Layout | Motif Area Before Border |
|---|---|
| 6 × 8 squares | 144 × 192 cm |
| 7 × 9 squares | 168 × 216 cm |
| 8 × 10 squares | 192 × 240 cm |
| 9 × 11 squares | 216 × 264 cm |
| 10 × 12 squares | 240 × 288 cm |
These measurements exclude the final border.
Measure the mattress and decide how much drop you want on each side before selecting a layout.
Estimating Yarn for the Bedspread
Complete one fully finished square, including its rose.
Weigh it with a digital scale.
Multiply that weight by the number of required squares.
Then add yarn for joining and the outer border.
For example, if one completed motif weighs 75 g and the project requires 80 motifs:
75 × 80 = 6000 g
This is only a calculation example, not a fixed yarn requirement.
Add approximately 10–15% to your own measured total for joining, border work, swatching, and possible repairs.
Joining the Lace Squares
Arrange all motifs on a clean floor or large table before joining.
Rotate any squares that show a slight directional difference so the overall surface remains balanced.
Recommended Flat Join
Place two squares with matching edges together.
Work through the corresponding outer-frame stitches using slip stitches.
Keep the joining yarn relaxed.
Join squares into horizontal strips first.
Then join the strips vertically.
The resulting seams should form the straight grid visible across the bedspread.
Alternative Decorative Join
For a slightly wider seam, place the squares side by side with right sides facing upward.
Join yarn through matching corner spaces.
Work:
sc through first square, ch 1, sc through corresponding stitch of second square.
Continue alternately along the seam.
This creates a narrow ladder-like connection between motifs.
Checking the Joined Bedspread
After joining the first two rows, lay the work flat.
Measure across several squares.
The seams should not shorten the motif width.
If the joined section pulls inward, loosen the joining tension.
If the seams form raised loops, use a smaller joining movement or reduce unnecessary chains.
Outer Bedspread Border
The reference design uses a substantial decorative edge. Build it gradually so the heavy center does not overpower the perimeter.
Border Round 1
Work sc evenly around the complete bedspread.
At each outer corner work:
(sc, ch 2, sc).
Border Round 2
Work hdc in each stitch.
In corners work:
(2 hdc, ch 2, 2 hdc).
Border Round 3 — Openwork
*Ch 3, skip 2 sts, sc in next st.*
Repeat around.
Adjust the final repeat before each corner rather than forcing an incomplete repeat.
Border Round 4
Into each ch-3 space work:
(sc, hdc, 3 dc, hdc, sc).
This creates a small shell.
Border Round 5
Work a second openwork foundation between the shells using ch 4 spaces.
Final Scalloped Round
Into each selected chain space work:
(sc, hdc, 2 dc, 3 tr, 2 dc, hdc, sc).
Repeat around.
Use larger corner shells if required to turn the corner without cupping.
Matching 3D Rose Pillow Covers
The pillow covers repeat the same visual language on a smaller surface.
Make one large lace panel sized to the pillow insert or join four smaller squares.
For a dramatic version, attach one large layered rose in the center.
Smaller decorative flowers can be positioned near the corners if desired.
The back of the pillow should remain flatter than the front.
Simple Pillow Back
Work two overlapping rectangles in hdc.
Make each rectangle the same width as the pillow front.
Overlap the inner edges by approximately 8–12 cm.
Join both back pieces to the front around the perimeter.
This creates an envelope opening and allows the pillow insert to be removed.
Making a Smaller Rose
For secondary flowers, stop after the second petal layer.
For medium flowers, complete three layers.
Reserve the four-layer construction for the large focal roses.
This gives you three flower sizes without changing the central construction.
Optional Small Connector Flowers
Small flowers can be positioned where four large squares meet.
Round 1
MR, ch 1, 8 sc into ring.
Join.
Petals
In each stitch work:
(sl st, ch 3, 2 dc, ch 3, sl st).
Repeat around.
Fasten off.
Attach only the flower center to the intersection of the seams.
Keeping the Bedspread Flat
The dimensional flowers add significant weight to the center of every motif.
For that reason, the outer square frame must remain firmer than the decorative mesh.
Do not replace all structural rounds with chains.
At least two compact rounds around every motif provide a reliable joining edge.
Block all squares to the same measurement before assembly rather than trying to correct large size differences during joining.
Making the Design in Two Colors
The monochrome silver version emphasizes shadow and texture, but the construction can also be divided into two colors.
Use light gray for the lace square and charcoal for the flower.
Another option is ivory for the background with dusty rose flowers.
For a botanical version, use cream squares, sage leaves, and muted pink roses.
Keep the joining yarn close to the background color so the grid remains visually controlled.
Assembly
- Make one complete lace square, block it, and record its exact finished dimensions.
- Crochet one four-layer rose and check that its diameter leaves several centimeters of visible lace around it.
- Make the remaining squares to match the master motif and block every unit before adding dimensional flowers.
- Attach each rose through its central base while leaving most outer petals free.
- Arrange all completed motifs according to the required bed dimensions and check their orientation.
- Join individual squares into complete horizontal rows through the structural outer frames.
- Join the horizontal rows together and inspect every four-square intersection for gaps or excessive tension.
- Work the compact foundation rounds of the outer bedspread border before adding decorative openwork.
- Add the shell or scalloped finishing rounds and weave all yarn tails into dense sections rather than exposed chain mesh.
- Block the completed bedspread to straighten the joining grid, then reshape the raised roses by hand after the fabric has dried.
The completed bedspread should have a straight modular grid, flat structural squares, evenly distributed lace openings, and dimensional roses that rise independently from the background.
7 Technical Tips
- Rose center pulling the square inward: attach only the central 4–6 cm of the flower firmly. Sewing every outer petal to the background transfers the flower tension into the lace.
- Different square sizes: block every motif to the measurement established by the first successful square. A difference greater than approximately 5–8 mm becomes difficult to hide across a long joining seam.
- Lace corners curling upward: the corner does not have enough expansion. Increase the corner chain space before adding extra stitches randomly along the sides.
- Outer edges rippling: excessive chains or border stitches are accumulating around the perimeter. Lay the work flat after every border round and correct the first round that begins to wave.
- Joining seams becoming shorter than the squares: tight slip stitches can reduce a 24 cm edge significantly across multiple motifs. Match the joining tension to the blocked edge rather than tightening each slip stitch.
- Petals collapsing after washing: very loose outer petals can lose their position. Add one hidden anchoring stitch beneath selected large petals while leaving the visible edges free.
- Bedspread becoming unexpectedly heavy: weigh the first finished square before making the full set. Multiplying that weight by the planned motif count gives a much more useful estimate than relying only on skein recommendations.
Care and Final Blocking
Follow the care instructions for the selected yarn.
A large dimensional bedspread should be supported fully when wet because lifting it from one edge can stretch the joining seams.
After washing, spread the bedspread flat and straighten the square grid.
Shape the border first.
Then lift and arrange each flower layer individually.
Avoid pressing the roses under heavy weight during drying. The dimensional structure depends on the petals retaining their curved profile.
Conclusion
This 3D rose crochet bedspread pattern works best when the lace square and dimensional flower are treated as two separate structures. Begin with one master motif, block it to a repeatable measurement, weigh it for yarn planning, and test one complete rose before committing to the full bedspread. Once the square dimensions are stable, production becomes a repeatable sequence of lace panels, layered flowers, joining, and border work. The same construction can be reduced to create matching pillow covers or smaller decorative panels. Save the project on Pinterest or share the finished version on Instagram with #SilverRoseCrochetBedspread. Would you keep the roses silver gray, or make the flowers darker than the lace background?









