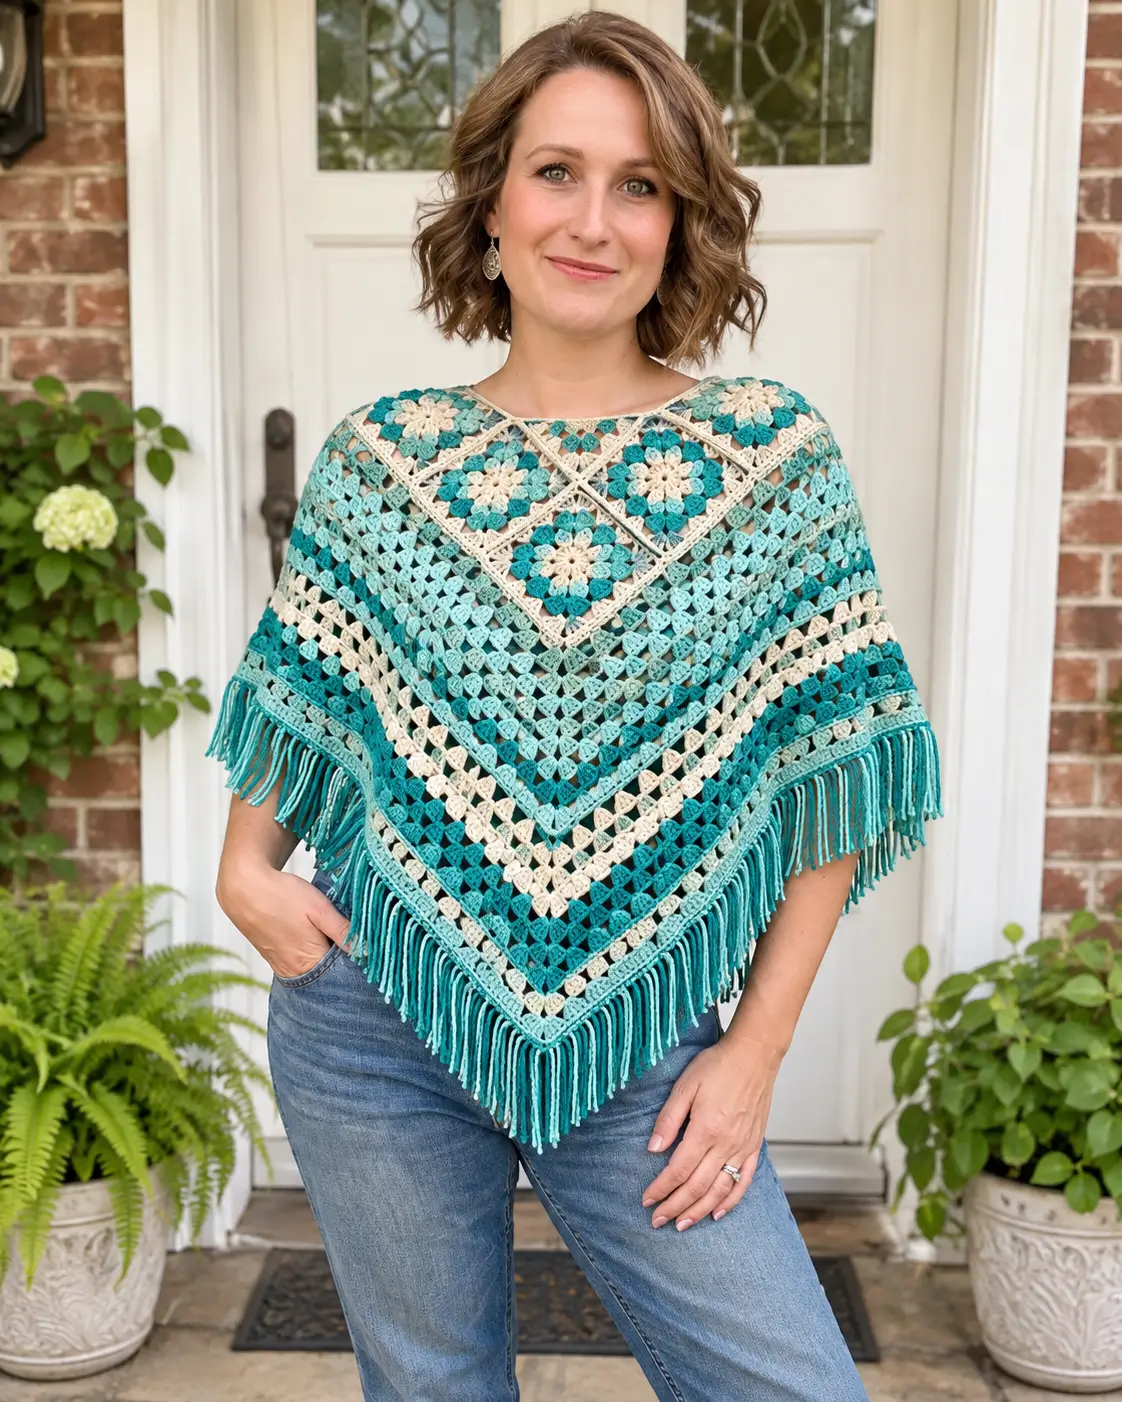
The neckline of this poncho is built from diamond-positioned floral squares rather than a conventional circular yoke. This turquoise granny square crochet poncho pattern combines cream flower motifs, turquoise and aqua granny clusters, open mesh sections, contrasting cream stripes, and a long fringe. The construction is suitable for intermediate crocheters because the final fit depends more on motif placement and shoulder depth than complicated shaping.
The Design: What Makes This Crochet Poncho Different
The garment uses two related structures. Decorative floral granny squares form the upper yoke, while expanding granny-style rows create the main poncho body. The squares are rotated so their corners point upward and downward, producing the diamond arrangement visible across the neckline.
Below the yoke, turquoise, aqua, teal, and cream cluster rows continue toward a centered front point. Increases are concentrated at the front and back so the fabric develops a poncho shape rather than a flat rectangle.
The final fringe follows the lower V-shaped edge. A frequent failure with this construction is making the neckline too wide while joining the floral squares. Assemble the yoke first, try it over the shoulders, and only then begin the body rounds.
Project Information at a Glance
| Skill Level | Construction | Fit | Hook | Suggested Yarn |
|---|---|---|---|---|
| Intermediate | Floral yoke + granny body | Relaxed adult poncho | 4.0–4.5 mm | DK #3 or light worsted |
The measurements below are construction targets rather than exact measurements taken from the photograph. Make one blocked floral square and use its dimensions to adjust the neckline and finished length.
Materials and Tools
Yarn
- Deep Turquoise — DK #3 or light worsted — main body and lower stripes
- Light Aqua — DK #3 or light worsted — yoke and body stripes
- Medium Teal — DK #3 or light worsted — contrast rounds
- Warm Cream — DK #3 or light worsted — flower centers, yoke accents, and body stripes
A soft cotton blend, cotton-acrylic blend, or smooth acrylic works well because the open granny fabric needs enough drape to fall from the shoulders without becoming rigid.
Tools
- 4.0–4.5 mm crochet hook
- Yarn needle
- Scissors
- Stitch markers
- Measuring tape
- Blocking mats and pins
- Cardboard guide for cutting fringe evenly
Abbreviations
- MR — magic ring
- ch — chain
- sc — single crochet
- hdc — half double crochet
- dc — double crochet
- sl st — slip stitch
- sp — space
- st/sts — stitch/stitches
- RS — right side
Gauge and Sizing Strategy
For a motif-based poncho, blocked dimensions are more useful than a fixed stitch gauge. Aim for a floral square measuring approximately 13–15 cm across after blocking.
Make one complete square before producing the full yoke. Record its finished width and both diagonal measurements.
The finished neckline should pass comfortably over the head while remaining close enough to the shoulders to prevent the poncho from sliding outward.
Part 1: Cream Flower Center
Begin each yoke motif with cream.
Round 1
Make an MR.
Ch 3 and work 11 dc into the ring.
Join with sl st. (12 dc including beginning chain)
Round 2 — Cream Petals
In the first stitch work:
(sl st, ch 3, 2 dc, ch 3, sl st).
Skip one stitch.
Repeat the petal sequence in the next stitch.
Continue around to create 6 cream petals.
Fasten off.
Part 2: Turquoise Flower Round
Join deep turquoise between two cream petals.
Ch 3.
Work a 3-dc cluster into the same space.
Ch 2.
Repeat in every space between cream petals.
Join.
You should have six turquoise cluster sections surrounding the cream flower.
Part 3: Converting the Flower into a Square
Change to light aqua.
The flower is circular, but the yoke requires four structural corners. Mark four positions as evenly as possible around the motif before beginning this round.
At each marked corner work:
(3 dc, ch 2, 3 dc)
Between corners, work 3-dc groups into the available spaces with ch 1 between groups.
Do not force the decorative flower repeats to determine the corner positions. The square geometry must control this round.
Part 4: Cream Square Frame
Join cream in a corner.
Work:
(3 dc, ch 2, 3 dc) in each corner.
Across each side, work 3 dc into every available ch-1 space with ch 1 between groups.
Join and fasten off.
Part 5: Final Turquoise Motif Round
Join turquoise.
Work one additional granny round around the complete square.
Keep the corner formula:
(3 dc, ch 2, 3 dc)
Block the completed motif to approximately 13–15 cm.
Making the Floral Yoke
The photograph uses floral motifs arranged diagonally around the neckline. A practical adaptation uses approximately 8–12 squares, depending on motif size and required neckline circumference.
Do not make the complete set before testing the first few motifs.
Lay the squares on a table with one corner pointing upward. Arrange them in a shallow ring or V-shaped shoulder configuration.
Pin adjacent edges together temporarily.
Test the opening over the head and shoulders.
Add or remove motifs until the yoke sits comfortably.
Joining the Yoke Squares
Use cream yarn for the visible joining lines.
Place neighboring motifs with right sides facing upward.
Work a relaxed sl-stitch join through corresponding edge loops.
Do not pull the joining yarn tightly. A short seam will make the squares fold toward one another.
Join the complete upper section before adding the main poncho body.
Finishing the Neckline
Join cream around the inner yoke opening.
Neck Round 1
Work sc evenly around the complete neckline.
At inward corners, decrease carefully by working adjacent stitches together where necessary.
Neck Round 2
Work hdc around.
If the neckline begins to flare, reduce the stitch count by approximately 5–8% across this round.
Neck Round 3
Change to turquoise or aqua and work sc around.
Fasten off.
Part 6: Preparing the Lower Yoke Edge
Join light aqua along the lower edge of the assembled floral section.
Work sc evenly around, treating the bottom points of the diamond motifs as structural landmarks.
Mark the center front and center back.
These two points control all subsequent poncho increases.
Count the available spaces between the front and back markers. The two sides should contain approximately equal stitch counts.
Part 7: Main Granny Poncho Body
The body is worked downward from the yoke.
Body Round 1
Join deep turquoise at the center back.
Ch 3.
Work granny groups of 3 dc into the available spaces, using ch 1 between groups.
At the center front point work:
(3 dc, ch 2, 3 dc)
Continue around.
At the center back point work the same increase:
(3 dc, ch 2, 3 dc)
Join.
Body Round 2
Sl st into the next ch-1 space.
Ch 3 and work 2 dc in the same space.
Ch 1.
Work 3 dc in every ch-1 space around.
Maintain the front and back increases:
(3 dc, ch 2, 3 dc)
Join.
Body Rounds 3–6
Continue the established granny pattern.
Each round gains additional width naturally because of the two V-point increases.
Check the poncho after every two rounds. The fabric should spread over the shoulders without producing a sharp ridge along either side.
Part 8: Aqua Openwork Section
Change to light aqua.
Continue the same granny structure for approximately 4–6 rounds.
Use ch 1 between standard clusters.
At the front and back points continue:
(3 dc, ch 2, 3 dc)
This lighter section produces the open turquoise field visible across the upper body.
Part 9: Cream Accent Stripe
Change to cream.
Work two granny rounds.
Maintain exactly the same front and back increase positions.
The cream stripe should remain narrow. Its purpose is to divide the turquoise sections rather than dominate the body.
Part 10: Teal Stripe
Change to medium teal.
Work approximately 2–3 granny rounds.
Continue increasing at the marked front and back points.
Check the front point after each round. It should remain centered on the body.
Part 11: Second Aqua Section
Change to light aqua.
Work another 4–6 rounds.
For a longer poncho, add additional granny rounds here rather than dramatically increasing the fringe length.
Suggested Color Sequence
| Section | Color | Approximate Rounds |
|---|---|---|
| Floral Yoke | Cream / Turquoise / Aqua | Motif based |
| Upper Body | Light Aqua | 4–6 |
| Contrast | Deep Turquoise | 2–4 |
| Accent | Cream | 2 |
| Middle Section | Aqua | 3–5 |
| Accent | Cream | 2 |
| Lower Section | Deep Turquoise | 3–5 |
| Final Edge | Light Aqua | 1–2 |
These round counts are adjustable. Stop adding body rounds when the front point reaches the intended length.
Finished Length
For a relaxed adult poncho, useful target lengths measured from shoulder to front point are:
| Style | Approximate Length |
|---|---|
| Short | 55–60 cm |
| Standard | 60–70 cm |
| Long | 70–80 cm |
Fringe is measured separately and can add another 10–18 cm.
Final Crochet Edge
Before attaching fringe, work a stable edging around the lower perimeter.
Edge Round 1
With light aqua, work sc evenly around.
At the center front and back points work:
(sc, ch 2, sc)
Edge Round 2
Work hdc around.
Maintain the ch-2 point spaces.
Fasten off.
Adding the Fringe
Cut strands approximately 25–35 cm long. Once folded through the edge, this produces fringe approximately 12–17 cm long.
Use a cardboard template so every strand starts at the same length.
For each fringe group:
- Hold 2–3 strands together.
- Fold them in half.
- Insert the hook through an edge stitch or space.
- Pull the folded loop through.
- Pass the loose ends through the loop.
- Pull gently to secure.
Attach fringe at evenly spaced intervals along both lower sides.
Add one slightly fuller group at the center front point.
Trimming the Fringe
Hang the poncho for several hours before making the final cut. Yarn stretches differently once the weight of the garment is suspended.
Place the garment flat after hanging.
Comb the fringe gently with your fingers and trim the ends to a consistent length.
Avoid trimming it while the poncho is still freshly blocked because the fibers may settle afterward.
Adjusting the Poncho Width
If the garment feels narrow across the arms, continue adding granny rounds. Every body round increases both the length and circumference.
If more width is needed without much additional length, use a slightly taller cluster or increase the chain spaces for several rounds.
If the poncho already reaches the desired length, stop the body and use a short fringe rather than continuing additional rounds.
Adjusting the Neck Opening
A neckline that is too large will cause the poncho to slide toward one shoulder.
Add one or two sc rounds around the neck, decreasing evenly.
For a neckline that is too small, remove the final neck round or use a larger hook for the edging.
The finished opening should pass over the head without stretching the floral yoke aggressively.
Making the Poncho Larger or Smaller
The safest sizing method is based on the floral motif rather than fixed clothing sizes.
For a smaller garment, use fewer yoke squares or make the motifs with DK yarn and a smaller hook.
For a larger garment, increase the number of yoke motifs until the upper section sits correctly around the shoulders. Then work additional body rounds to obtain the required arm coverage.
Always test the joined yoke before beginning the long lower section.
Optional Solid Shoulder Support
If the floral yoke feels too flexible, add one stabilizing sc round along its lower edge before beginning the granny body.
A second hdc round can be added for heavier yarn.
This support row distributes the weight of the lower poncho across the entire yoke instead of concentrating it at the motif corners.
Yarn Quantity Method
The most accurate yarn calculation uses a sample rather than a fixed estimate.
Weigh one blocked floral motif.
Multiply that weight by the number of yoke squares.
Next, crochet several representative body rounds and record their yarn consumption. Later rounds require progressively more yarn because their circumference increases.
Calculate the estimated body requirement, then add yarn for the neckline, final edge, and fringe.
Add approximately 10–15% beyond the calculated amount, especially when working with several colors.
Alternative Color Combinations
Ocean Blue
Use navy, denim blue, pale blue, and ivory.
Sage Botanical
Combine sage green, eucalyptus, cream, and muted olive.
Autumn Version
Use terracotta, rust, warm beige, and dark brown.
Soft Rose
Combine dusty pink, mauve, pale blush, and cream.
Monochrome
Use cream, oatmeal, beige, and taupe while keeping the same stripe sequence.
Assembly
- Make and block one complete floral granny square, then record its width and diagonal measurements.
- Crochet enough matching motifs to form the neckline and upper shoulder yoke.
- Arrange the motifs diagonally, pin them temporarily, and test the opening before permanently joining the seams.
- Join the yoke squares with cream yarn and work the inner neckline edging.
- Prepare the lower yoke edge with an even foundation round and mark the exact center front and center back.
- Work the granny body downward, maintaining identical increase structures at both marked points.
- Follow the turquoise, aqua, teal, and cream stripe sequence until the desired garment length is reached.
- Add the final stabilizing edge around the lower V-shaped perimeter.
- Attach evenly measured fringe, allow the garment to hang, and trim the fringe only after the fibers settle.
- Weave in all remaining ends and complete a light final blocking without stretching the neckline.
The completed poncho should hang from a stable floral yoke, form a centered V at the front and back, and maintain open granny sections without excessive stretching at the shoulders.
7 Technical Tips
- Neckline spreading: if the joined floral yoke is more than approximately 5–8% wider than the required neckline, correct it before beginning the body. The weight of the lower rounds will make an oversized opening stretch even farther.
- Off-center front point: place a locking stitch marker directly inside the ch-2 increase space on every round. Accidentally shifting the increase by one granny space creates a visibly twisted V.
- Yoke seams puckering: the joining seam is too tight. Compare every completed seam against the unjoined side of a blocked motif before connecting the next square.
- Body becoming flat instead of V-shaped: confirm that both the front and back contain (3 dc, ch 2, 3 dc) on every body round. Missing even one increase changes the geometry.
- Uneven color stripes: finish color changes at the same structural point, preferably the center back. This keeps the visible front V free from unnecessary yarn tails and stepped joins.
- Fringe stretching unevenly: cut all strands with one cardboard template and hang the completed garment before the final trim. A difference of 1–2 cm is highly visible along the pointed front edge.
- Shoulders becoming too heavy: stop adding decorative rounds to the yoke once the blocked squares reach the required size. Additional dense rows near the neckline add weight exactly where the garment needs the most stability.
Care and Blocking
Wash according to the fiber manufacturer’s instructions. Support the complete garment when wet because the open granny construction can stretch substantially under its own weight.
Lay the poncho flat and shape the neckline first. Align the center front and center back points, then arrange both sides symmetrically.
Do not stretch the fringe during blocking. Straighten it after the main fabric has dried.
For storage, fold the poncho rather than hanging it for long periods. Continuous hanging can lengthen the openwork body and distort the floral yoke.
Conclusion
The turquoise granny square crochet poncho pattern is easiest to control when the floral yoke is treated as the garment’s structural foundation. Make and block one motif first, build the neckline to the wearer’s actual shoulder measurement, and mark the center front and back before starting the expanding granny rounds. Once the yoke fits correctly, the body length can be adjusted simply by adding or removing stripe rounds. Finish with a stable lower edge before attaching the fringe, then let the garment hang before trimming it. Save the construction idea to Pinterest or share your finished version on Instagram with #TurquoiseGrannyPoncho. Would you keep the turquoise-and-cream palette shown here or replace the aqua sections with navy?









