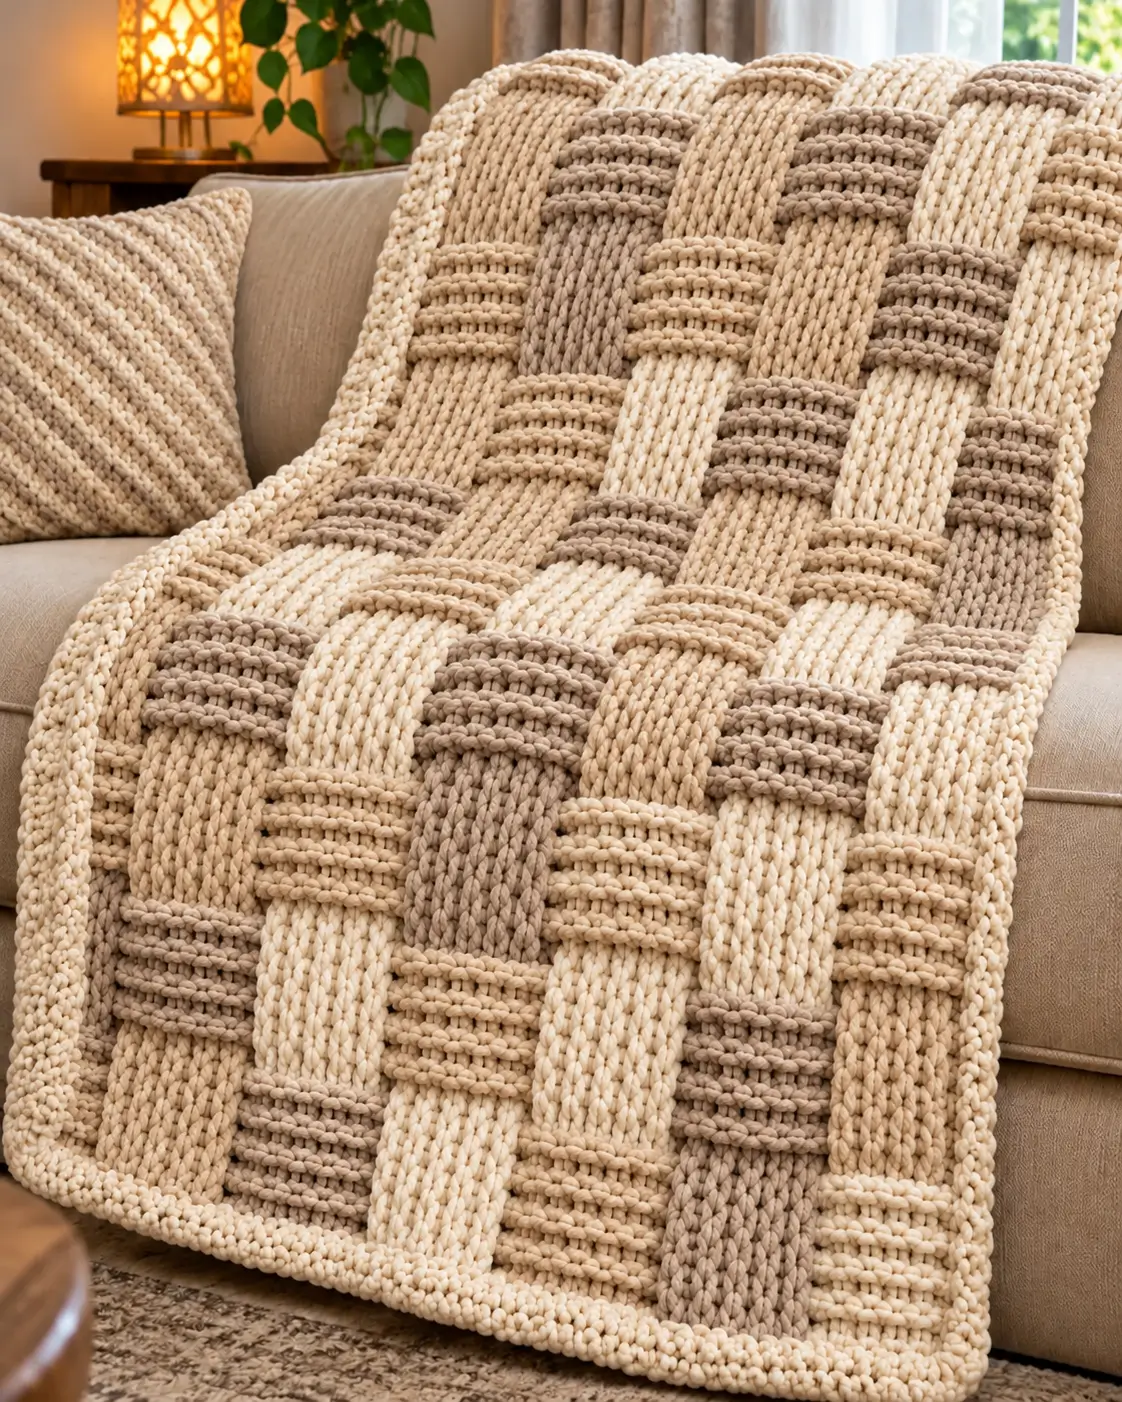
The oversized woven blocks in this blanket must remain deep enough to cast visible shadows without turning the fabric into a rigid mat. This chunky basket weave crochet blanket pattern recreates the large interlaced appearance with alternating raised vertical and horizontal texture sections in cream, oatmeal, and taupe. Super-bulky yarn gives the blanket its substantial structure, while a simple outer border controls the edges. The project is best suited to intermediate crocheters familiar with front-post stitches and consistent tension.
The Design: What Makes This Basket-Weave Blanket Different
The photographed blanket uses an exaggerated basket structure rather than a small traditional basket-weave repeat. Each visual block is broad and heavily raised, creating the impression that thick strips pass over and under neighboring strips. Three closely related neutral shades make the construction easier to read without breaking the continuous woven effect.
The pattern below creates that appearance with large textured blocks arranged in a checkerboard sequence. One block emphasizes vertical ribs with front-post double crochet, while the neighboring block uses horizontal ridges created by back-loop rows. On the following block section, the positions reverse. The main technical risk is inconsistent tension: raised sections consume more yarn and can become shorter than flatter sections, causing the blanket to pull inward.
Project Information at a Glance
| Skill Level | Construction | Finished Size | Hook | Yarn |
|---|---|---|---|---|
| Intermediate | One-piece oversized basket-weave texture | Approx. 120 × 150 cm | 9–10 mm | Super Bulky #6 |
The dimensions are project targets rather than measurements taken from the photograph. Adjust the foundation according to your own blocked gauge.
Materials and Tools
Yarn
- Warm Cream — Super Bulky #6 — approximately 900–1100 g
- Oatmeal Beige — Super Bulky #6 — approximately 700–900 g
- Soft Taupe — Super Bulky #6 — approximately 500–700 g
Plan approximately 2300–2700 g for a sofa-size blanket. Dense post-stitch fabric can consume considerably more yarn than an ordinary double-crochet blanket, so purchasing an additional ball from the same dye lot is practical.
Tools
- 9–10 mm crochet hook
- Large yarn needle
- Locking stitch markers
- Scissors
- Measuring tape
Abbreviations
- ch — chain
- sc — single crochet
- hdc — half double crochet
- dc — double crochet
- fpdc — front post double crochet
- bpdc — back post double crochet
- sl st — slip stitch
- BLO — back loop only
- st/sts — stitch/stitches
- RS — right side
- WS — wrong side
Gauge and Block Size
Make a test swatch before calculating the full foundation. With super-bulky yarn and a 9–10 mm hook, aim for a fabric that is dense enough to hold the raised ribs but flexible enough to fold naturally.
For the oversized appearance, use visual blocks approximately 14–18 cm wide. Six stitches per block is a useful starting repeat with very thick yarn, but the physical measurement matters more than the stitch number.
Work at least three textured blocks in the swatch. A single block cannot show whether the alternating post stitches are changing the overall width.
Understanding the Basket-Weave Layout
The blanket is divided into equal rectangular texture blocks.
Think of the first section as:
Vertical — Horizontal — Vertical — Horizontal — Vertical — Horizontal
The next major section reverses:
Horizontal — Vertical — Horizontal — Vertical — Horizontal — Vertical
Repeating this reversal produces the over-and-under basket appearance.
Choosing the Foundation Width
Decide how many blocks you want across the blanket. For a sofa throw, seven or eight large blocks provide proportions similar to the photographed design.
If each block contains 6 stitches:
- 6 blocks = 36 pattern stitches
- 7 blocks = 42 pattern stitches
- 8 blocks = 48 pattern stitches
- 9 blocks = 54 pattern stitches
Add the required turning chain according to your chosen foundation method.
Do not rely on stitch count alone. Crochet one complete textured repeat, measure it without stretching, and adjust the number of blocks until the width matches the required blanket measurement.
Foundation
With warm cream or the first selected neutral shade, chain a multiple of 6 plus the turning chains required for dc.
For an eight-block-wide sample:
Ch 51.
This provides 48 working stitches when the turning chain is treated according to the method below.
Foundation Row
Dc in the fourth chain from the hook.
Dc in every remaining chain across.
Count carefully. Maintain the same number of working stitches throughout the main blanket.
Vertical Raised Block
The vertical block creates the smooth, rope-like columns visible in alternating sections of the blanket.
Vertical Texture Row — RS
Ch 2 and turn.
For each designated six-stitch vertical block:
Fpdc around each of the next 6 stitches.
Keep the post stitches loose enough that their height matches the surrounding fabric.
Vertical Texture Row — WS
Ch 2 and turn.
Work bpdc around the same six posts.
From the RS, these stitches continue the raised vertical columns.
Repeat the RS and WS treatment for the required height of the block.
Horizontal Ridged Block
The neighboring section needs visible crosswise ridges rather than long vertical columns.
For the six stitches assigned to a horizontal block, work hdc or sc through the back loop. The unused front loop forms a ridge across the face of the fabric.
Horizontal Row 1
Work hdc in BLO across the 6-stitch block.
Horizontal Row 2
Turn and work hdc in BLO across the same block.
Continue the BLO treatment through the complete height of the block section.
The ridges stack horizontally while the neighboring post stitches remain strongly vertical.
First Basket Section
On the RS, divide the row into six-stitch blocks.
For an eight-block blanket, work:
- Block 1 — vertical post texture
- Block 2 — horizontal BLO texture
- Block 3 — vertical post texture
- Block 4 — horizontal BLO texture
- Block 5 — vertical post texture
- Block 6 — horizontal BLO texture
- Block 7 — vertical post texture
- Block 8 — horizontal BLO texture
Place a locking stitch marker between blocks during the first several rows. Super-bulky yarn can hide the boundary between neighboring textures.
Determining the Height of Each Section
Continue the first basket arrangement until its height approximately matches the width of one visual block.
If a six-stitch block measures 15 cm wide, aim for approximately 14–16 cm in height before reversing the texture arrangement.
Measure the actual fabric. Row count can vary significantly with super-bulky yarn.
Transition Row
Before reversing the basket direction, work one controlled transition row.
Ch 1 and turn.
Work one sc in every stitch across.
Do not increase or decrease.
This row stabilizes the boundary and produces the compressed horizontal line visible between some of the oversized woven sections.
Second Basket Section
Reverse the texture placement.
Where the previous section contained vertical post stitches, work horizontal BLO texture.
Where it contained horizontal ridges, work vertical post stitches.
The sequence becomes:
- Block 1 — horizontal texture
- Block 2 — vertical texture
- Block 3 — horizontal texture
- Block 4 — vertical texture
- Block 5 — horizontal texture
- Block 6 — vertical texture
- Block 7 — horizontal texture
- Block 8 — vertical texture
Continue until this section reaches the same measured height as the first.
Repeating the Blanket
Alternate the two basket sections down the entire blanket:
Section A → transition → Section B → transition → Section A → transition → Section B.
For a blanket approximately 150 cm long, continue until the main fabric measures roughly 145–147 cm, leaving room for the top and bottom border.
Stop after a complete block section rather than halfway through one. The balanced final repeat makes the basket structure look intentional at both ends.
Creating the Neutral Color Pattern
The photograph combines warm cream, oatmeal, and soft taupe without creating hard stripes. Reproduce that effect by changing colors at selected block-section boundaries.
A practical sequence is:
- Section 1 — warm cream dominant
- Section 2 — cream with oatmeal blocks
- Section 3 — oatmeal and taupe
- Section 4 — cream and oatmeal
- Section 5 — taupe accents
- Section 6 — warm cream dominant
Another method is to assign individual visual blocks to different neutrals. Keep adjacent shades close in value so the texture remains the dominant feature.
Changing Colors Cleanly
Complete the final yarn-over of the last stitch with the new color.
If the color will be used again only a few rows later, carry it discreetly along the WS edge. For longer distances, cut the yarn and weave the tail through several dense stitches.
Avoid carrying dark taupe behind cream sections where the hidden strand could show between large stitches.
Maintaining Straight Side Edges
Post stitches can make the edge contract even when the stitch count remains correct.
Place a marker in the first and last working stitch of every row.
Measure the width after each complete basket section.
If the center remains correct but the sides pull inward, the turning chains or edge stitches are being worked too tightly. Use a slightly looser loop for the first and final stitch rather than adding extra stitches.
Top and Bottom Structural Bands
Once the main blanket reaches the required length, work a dense finishing band across the final edge.
Band Row 1
Ch 1.
Sc in every stitch across.
Band Row 2
Ch 1, turn.
Sc in every stitch.
Band Row 3
Ch 1, turn.
Hdc in every stitch.
Fasten off if the side border will be added separately.
Repeat a matching treatment along the foundation edge if required so the two ends have comparable weight.
Outer Border
Use warm cream for the border to reproduce the light frame around the neutral basket pattern.
Border Round 1
Join yarn in one corner.
Sc evenly around all four sides.
At each corner work:
(sc, ch 1, sc)
Along row ends, distribute the stitches according to the actual row height rather than forcing one stitch into every visible loop.
Border Round 2
Ch 1.
Sc in every stitch.
At each corner work:
(sc, ch 1, sc)
Border Round 3
Work hdc around.
In each corner space work:
(hdc, ch 1, hdc)
Border Round 4
Work one final round of sc.
Join with sl st and fasten off.
A border approximately 3–5 cm wide is sufficient for a chunky blanket. A much wider border can compete with the oversized woven texture.
Suggested Blanket Sizes
| Use | Approximate Finished Size |
|---|---|
| Baby Blanket | 75 × 95 cm |
| Lap Blanket | 90 × 120 cm |
| Sofa Throw | 120 × 150 cm |
| Large Throw | 140 × 170 cm |
| Bed Throw | 160 × 190 cm |
Calculating Yarn for a Different Size
Because the raised basket texture consumes substantial yarn, calculate from a finished swatch instead of estimating from ordinary crochet yardage.
Make a swatch at least 30 × 30 cm using the complete basket repeat. Weigh it.
For example, if a 30 × 30 cm swatch weighs 120 g:
Swatch area = 900 cm².
A 120 × 150 cm blanket has an area of 18,000 cm².
18,000 ÷ 900 = 20 swatch areas.
20 × 120 g = approximately 2400 g.
Add approximately 10% for the border, gauge variation, joining new balls, and swatching.
This calculation is an example. Use the actual weight of your own swatch before purchasing yarn.
Optional More Dramatic Raised Version
For a stronger three-dimensional appearance, work two fpdc rows over the vertical blocks before alternating with the corresponding WS post treatment.
You can also use a slightly smaller hook for the horizontal ridged blocks. However, changing hook size repeatedly can alter block dimensions, so test the method before applying it across the blanket.
Alternative Construction with Separate Strips
If you want an even more exaggerated woven effect, the blanket can be constructed from separate thick crochet strips.
Make equal-width strips in cream, oatmeal, and taupe. Work some strips with longitudinal ribbing and others with transverse ridges.
Lay one group vertically. Weave the second group horizontally over and under the vertical pieces.
Secure every intersection invisibly from the WS before adding the border.
This method produces greater physical depth but creates more seams and additional weight. For a frequently washed blanket, the one-piece textured method is usually easier to maintain.
Matching Chunky Cushion
The same basket texture can be used for a coordinating cushion.
For a 45 × 45 cm cushion, make two panels slightly smaller than the cushion insert so the finished cover remains full.
Use three or four large basket blocks across each panel.
Work one panel entirely in cream for a quieter look, or repeat the cream, oatmeal, and taupe sequence from the blanket.
Place the panels with wrong sides together and sc around three edges. Insert the cushion, then close the fourth edge with sc or add a removable buttoned back.
Assembly and Finishing
- Make and measure a complete textured gauge swatch before calculating the blanket foundation.
- Choose the number of equal-width blocks required for the finished blanket width.
- Work the foundation row and mark every block boundary with a locking marker.
- Complete the first alternating vertical-and-horizontal texture section.
- Work the stabilizing transition row without changing the stitch count.
- Reverse all texture blocks for the second basket section and continue alternating the two arrangements.
- Change cream, oatmeal, and taupe only at controlled positions so the neutral pattern remains balanced.
- Stop after a complete basket section and add matching structural rows to the top and bottom edges.
- Work the warm-cream border around all four sides, adjusting side-edge stitch spacing if the fabric begins to flare.
- Weave tails through dense sections on the WS, measure opposite sides, and reshape the blanket to its final dimensions.
The finished blanket should lie flat with equal block widths, clearly alternating texture directions, and a stable cream frame.
7 Technical Tips
- Block boundaries disappear: place a locking marker after every six-stitch texture block during the first section. Moving even one post stitch into the neighboring block gradually shifts the entire basket pattern.
- Vertical blocks become shorter: fpdc stitches are being pulled too tightly around the posts. Draw each post stitch up to the full height of the surrounding row before completing it.
- The blanket develops an hourglass shape: edge stitches are contracting while the center remains wider. Measure the blanket after every 14–18 cm section and loosen the first and last stitch when the width begins decreasing.
- Horizontal ridges become weak: the hook is entering both loops instead of BLO. Check the top of every horizontal-texture stitch and leave the front loop visibly unused.
- The fabric becomes excessively stiff: the hook is too small for the selected super-bulky yarn. Increase the hook by 1 mm and compare a 20 cm swatch before continuing the full blanket.
- The border starts ruffling: too many stitches have been placed along the row ends. Remove stitches from the affected side until the border lies flat without stretching the main blanket.
- Neutral color changes look random: map the cream, oatmeal, and taupe blocks before crocheting. Repeat at least one color arrangement elsewhere in the blanket so isolated taupe blocks do not appear accidental.
Care and Blocking
Check the yarn label before washing. A blanket made with more than two kilograms of super-bulky yarn becomes significantly heavier when wet, so support the full fabric when moving it.
Lay the blanket flat and adjust the outer edges to the target dimensions. Align the basket sections rather than stretching individual raised ribs.
Do not press the three-dimensional texture flat with a hot iron. If steam is permitted for the chosen fiber, keep the heat source above the fabric and reshape the blocks by hand.
Conclusion
The chunky basket weave crochet blanket pattern works best when block dimensions are controlled by measurement rather than row count alone. Start with a full texture swatch, establish one consistent block width, and alternate vertical post sections with horizontal ridges at measured intervals. Cream, oatmeal, and taupe keep the large woven structure visible without introducing sharp color divisions. Once the main fabric is finished, add the dense cream border and check all four sides before weaving the final tails. Save the project to Pinterest or share the finished blanket on Instagram with #ChunkyBasketWeaveBlanket. Would you keep all three neutral shades, or work the entire basket texture in one warm cream?









