Introduction
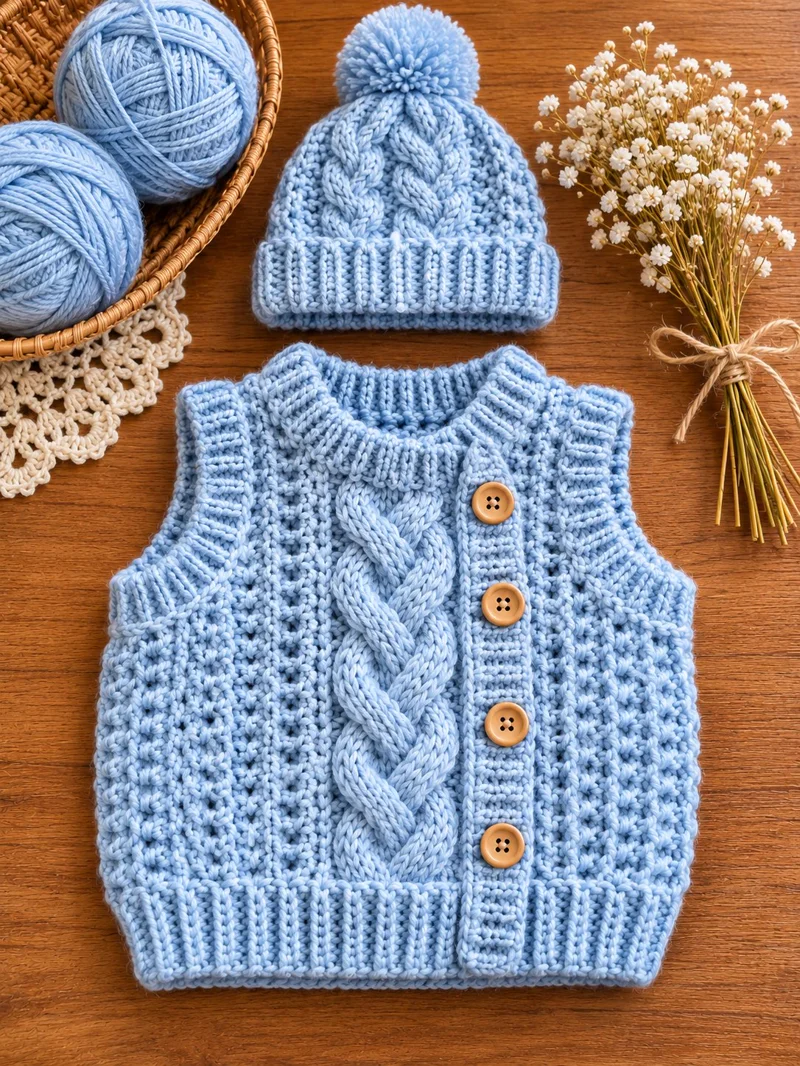
Four wooden buttons and a raised central cable define this baby cable knit vest and hat set. The matching beanie repeats the cable texture and adds a folded ribbed brim with a yarn pom-pom. This intermediate knitting project uses medium-weight yarn, ribbing, cable stitches, and shaped armholes. The guide explains the construction, measurements, materials, and finishing methods needed to develop a coordinated baby outfit.
The Design: What Makes This Baby Knit Set Different?
The vest combines three distinct knitted textures. A raised cable panel runs vertically through the front, textured stitches cover the side sections, and ribbing finishes the lower edge, neckline, and armholes. Each texture serves a structural purpose. The cable provides a central visual feature, while the ribbing allows the garment to stretch around the body.
The four-button opening is another important feature. Unlike a pullover vest, this design can open at the front, reducing the need to pull a fitted neckline over a baby’s head. The matching cable knit baby hat uses a folded brim to provide extra depth around the forehead.
One common mistake when knitting baby cable garments is measuring the width before the cables relax. Cable crossings draw stitches inward. A washed and dried gauge swatch gives a more useful measurement than an unfinished sample.
Project Information at a Glance
| Feature | Details |
|---|---|
| Project | Baby knitted vest and matching beanie |
| Skill Level | Intermediate |
| Technique | Knitting with cables and ribbing |
| Suggested Size | 6–12 months, subject to measurements |
| Suggested Yarn | Medium / worsted weight |
| Suggested Needles | 4 mm and 5 mm |
| Estimated Time | 12–18 hours, depending on experience |
| Construction | Flat knitted vest and circular knitted hat |
Important: These are suggested project specifications, not measurements verified from the photograph. The following instructions are a construction guide rather than a tested, row-by-row reproduction of the pictured garments.
Materials and Tools
Yarn
- Baby blue worsted-weight yarn: Approximately 250–350 g for the vest and hat combined, as a planning allowance.
- Matching blue yarn: Reserve approximately 15–25 g from the total for the pom-pom.
- Fiber suggestion: Smooth, washable merino wool, cotton blend, or baby-friendly acrylic.
Choose yarn with a clear stitch definition. A smooth plied yarn displays cable crossings more clearly than a heavily brushed yarn. Purchase enough from one dye lot to complete both garments.
Tools
- 4 mm knitting needles: For ribbed edges.
- 5 mm knitting needles: Starting point for the main fabric.
- 5 mm circular needles: For knitting the hat in the round.
- Cable needle: For holding stitches during cable crossings.
- Four wooden buttons: Approximately 15–18 mm, with secure attachment suitable for baby clothing.
- Stitch markers: For cable sections and round beginnings.
- Tapestry needle: For seams and weaving in yarn ends.
- Measuring tape: For gauge and garment measurements.
- Pom-pom maker: Optional; use only if the pom-pom can be attached securely and the hat is intended for supervised use.
Knitting Abbreviations
| Abbreviation | Meaning |
|---|---|
| K | Knit |
| P | Purl |
| CO | Cast on |
| BO | Bind off |
| RS | Right side |
| WS | Wrong side |
| St(s) | Stitch(es) |
| K2tog | Knit two stitches together |
| SSK | Slip, slip, knit |
| C4F | Slip two stitches to cable needle, hold in front, knit two, then knit two held stitches |
| C4B | Slip two stitches to cable needle, hold in back, knit two, then knit two held stitches |
| PM | Place marker |
| Rep | Repeat |
Step 1: Prepare the Gauge Swatch
Before beginning the vest, knit a gauge swatch using the selected yarn and 5 mm needles. Work a sample at least 15 cm wide and 15 cm tall, including a section of the intended cable pattern.
Wash the sample according to the yarn label. Allow it to dry flat without stretching. Measure the central 10 cm of the fabric, avoiding the edges.
For planning purposes, a gauge of approximately 18 stitches and 24 rows per 10 cm in stockinette is a reasonable starting target for some worsted-weight yarns. Cable fabric may have a different gauge.
The finished measurements must be calculated from the actual gauge. If the sample contains more stitches than the target, try a larger needle. If it contains fewer, try a smaller needle.
Step 2: Plan the Baby Vest Measurements
Measure the intended wearer or consult a reliable baby sizing chart. Record the chest circumference, garment length, shoulder width, and desired armhole depth.
The vest requires positive ease so it can fit comfortably over a shirt. As a starting design allowance, add approximately 5–8 cm to the measured chest circumference, then evaluate the result against the baby’s clothing.
For example, a 50 cm finished chest at a gauge of 18 stitches per 10 cm corresponds to approximately 90 stitches around the body before adjustments for cables, seams, and button overlap.
This is a sizing calculation, not a final cast-on count. The cable panel and front opening change the number of stitches required.
Step 3: Knit the Ribbed Vest Hem
The photograph shows a deep ribbed hem along the lower edge. This section controls the lower width of the garment and creates a defined transition into the textured body.
- Calculate the cast-on count from the desired finished width and measured ribbing gauge.
- Use 4 mm needles for the ribbed section.
- Work a K2, P2 rib pattern across the row, adjusting edge stitches as needed.
- Continue until the ribbing measures approximately 4–5 cm.
- Change to 5 mm needles for the main fabric.
A tubular or stretchy cast-on may help the hem expand without distortion. Avoid casting on so tightly that the lower edge pulls inward more than intended.
Step 4: Create the Textured Body Panels
The side sections of the pictured vest have a dense, pebbled texture. Seed stitch is a practical option for recreating a similar surface, although the exact stitch pattern cannot be confirmed from the image.
Seed Stitch Pattern
Row 1: *K1, P1; repeat across the section.
Row 2: Knit the purl stitches and purl the knit stitches as they appear from the previous row.
Continue repeating the texture while keeping the stitch pattern aligned. The result should form small alternating raised stitches rather than vertical rib columns.
When a cable panel sits beside seed stitch, place a marker at each boundary. This prevents the textured stitches from drifting into the cable section during repeated crossings.
Step 5: Knit the Central Cable Panel
The central cable is the defining feature of the vest. It appears wider and more complex than a simple four-stitch twist, with multiple strands crossing along the front.
A practical starting point is a 12-stitch cable panel divided into three groups of four stitches. The following is an original sample cable motif, not an exact chart for the photograph.
12-Stitch Cable Sample
Row 1 (RS): K12.
Row 2 (WS): P12.
Row 3: C4F, K4, C4B.
Row 4: P12.
Row 5: K12.
Row 6: P12.
Row 7: K4, C4B, K4.
Row 8: P12.
Repeat Rows 1–8 for a textured cable sample. To obtain the broad braided appearance shown in the photograph, develop and swatch a larger multi-strand cable chart before incorporating it into the final garment.
Keep the cable crossings at regular vertical intervals. Irregular spacing changes the apparent width and can cause the front panel to pull unevenly.
Step 6: Shape the Vest Armholes
Once the body reaches the planned underarm height, divide the work into the back and two front sections.
The back panel generally remains wider than either front panel. Each front also needs sufficient width for the button opening and cable arrangement.
Shape the armholes using bind-offs and decreases appropriate to the stitch count and size. For a small baby garment, gradual shaping is usually preferable to a deep, abrupt cutout.
Work the two front armholes as mirror images. Check that the left and right sides reach the same height before shaping the neckline.
Keep the cable pattern centered on its intended panel as shaping progresses. If decreases approach the cable, replace incomplete cable repeats with stockinette or another stable edge treatment.
Step 7: Shape the Neckline and Shoulders
The pictured vest has a rounded neckline with a ribbed finish. This shape requires a shallower back neck and deeper front neck.
Begin the front neckline below the shoulder line, according to the selected size. Bind off the central neck stitches, then decrease gradually at the inner edges to form a curve.
Work the back neckline closer to the shoulder height. Both shoulder sections must finish with compatible stitch counts for joining.
Use a mattress seam or three-needle bind-off to join the shoulders. Check that the neck opening is large enough for comfortable dressing and that the front opening remains functional.
Step 8: Add the Button Bands
The vest in the photograph has a vertical front band with four wooden buttons. The band should remain flat when the vest is buttoned.
- Pick up stitches evenly along the first front opening.
- Work approximately 2–3 cm of ribbing.
- Bind off without pulling the edge tight.
- Repeat on the opposite front, adding four evenly spaced buttonholes.
- Position the first buttonhole below the neckline and the last above the hem.
Buttonholes can be made using a yarn-over and decrease combination, with the exact method selected according to the button diameter and ribbing structure.
Test each opening with the intended button before attaching the buttons permanently. All buttons must be firmly sewn and checked regularly because detached buttons are a choking hazard.
Step 9: Finish the Neckline and Armholes
Use the smaller needles to pick up stitches around the neckline. Distribute them evenly to prevent the ribbed edge from puckering or flaring.
Work approximately 2–3 cm of K1, P1 ribbing, adjusting the stitch count to suit the circumference. Bind off elastically.
Repeat the finishing process around both armholes. The photograph shows substantial ribbed borders, so a narrow single-row edging would not reproduce the same appearance.
Measure the armhole opening after finishing. It should allow movement without stretching the shoulder seam or pulling the body upward.
Step 10: Knit the Matching Cable Hat
The matching beanie repeats the raised cable texture and includes a wide folded brim. The hat is knitted in the round, with the crown gradually reduced before the pom-pom is attached.
Hat Brim
Measure the baby’s head circumference and calculate the cast-on count using the ribbing gauge. Select a multiple compatible with the ribbing and cable repeats.
Cast on using 4 mm circular needles. Join in the round, taking care not to twist the stitches.
Work K2, P2 ribbing for approximately 8–10 cm if a 4–5 cm folded brim is desired. Fold the brim outward to check the depth before continuing.
Hat Body
Change to 5 mm needles. Arrange the cable motifs around the hat, separating them with purl or textured stitches.
Maintain consistent cable-crossing intervals. The cables should rise vertically from the folded brim toward the crown.
Continue until the hat reaches the planned depth before crown shaping. The depth must be checked against the intended head size rather than estimated solely from the photograph.
Crown Shaping
Divide the stitches into evenly spaced decrease sections. Place markers between the sections.
Decrease using K2tog or SSK at the planned positions. Work additional plain rounds between decrease rounds if needed to obtain a gradual crown.
As the stitch count becomes smaller, discontinue cable crossings that no longer fit the remaining stitches.
When only a small number of stitches remain, cut the yarn, thread the tail through the live stitches, and pull the crown closed. Secure the yarn on the wrong side.
Step 11: Make the Yarn Pom-Pom
The photographed hat has a large, round pom-pom made from matching blue yarn. Its diameter appears substantial relative to the crown, so a pom-pom maker approximately 6–7 cm wide is a useful starting point.
- Wrap matching yarn around the pom-pom maker.
- Continue until the tool is densely filled.
- Cut the wrapped loops.
- Tie the center firmly using strong yarn.
- Remove the pom-pom from the tool.
- Trim the strands into a rounded shape.
- Attach only if the fastening can be made secure and the hat will be used under supervision.
For infant clothing, omitting the pom-pom removes a detachable component and may be the safer choice. Never leave a baby sleeping in a hat or with loose accessories.
Step 12: Assemble and Finish the Set
- Lay the knitted vest pieces flat and check their measurements.
- Block the pieces according to the yarn manufacturer’s care instructions.
- Join the shoulder seams, matching the front and back edges.
- Sew the side seams, leaving the planned armhole openings.
- Complete the neckline and armhole ribbing if not already worked.
- Finish both front button bands and test the buttonhole spacing.
- Attach the four wooden buttons securely.
- Close and finish the hat crown.
- Weave in all yarn ends, removing loose loops and checking every seam.
- Inspect the finished garments for loose buttons, detachable decorations, and fit before use.
The vest and hat are complete when all seams are stable, the measurements have been checked, and the finishing is secure.
7 Technical Tips for Better Results
- Check cable tension: Tight cable crossings can reduce the width of a front panel by several centimeters. Measure the washed cable swatch before calculating the finished chest width.
- Mark each cable boundary: Missing a cable crossing can shift the braid and make the front panel asymmetric. Place stitch markers immediately outside the cable repeat.
- Control ribbing elasticity: A tight bind-off can make the neckline difficult to stretch. Test the finished opening before sewing the shoulder and side seams permanently.
- Measure buttonhole spacing: Uneven spacing may cause the front opening to gape. Mark all four positions before knitting the buttonholes.
- Check the armhole depth: An armhole that is too shallow can restrict movement. Compare the garment measurement with a well-fitting baby vest of the intended size.
- Match hat circumference to gauge: A difference of two stitches per 10 cm can noticeably change the final hat size. Recalculate the cast-on count whenever the yarn or needle size changes.
- Inspect finishing security: Loose buttons and detachable pom-poms present a choking risk. Check attachments before each use and omit decorative components that cannot be secured reliably.
How to Adjust the Vest and Hat Size
Changing the size of a cable knit baby set requires more than adding stitches at random. Cable panels have fixed repeat widths, and the garment must preserve balanced proportions.
Begin with the desired finished chest circumference. Multiply that measurement by the washed gauge in stitches per centimeter. Then distribute the stitches between the back, two fronts, cable sections, and button overlap.
For example, at 1.8 stitches per centimeter, a 54 cm body circumference requires approximately 97 stitches before construction adjustments. The final count should be rounded to fit the selected stitch patterns.
When increasing the garment width, add stitches to the textured side sections rather than expanding the central cable unnecessarily. This keeps the braid proportionate to the rest of the vest.
For the hat, calculate the circumference separately using the hat gauge. The folded brim and cable fabric may have different elasticity, so both sections should be tested.
Yarn Substitutions and Washing Instructions
Worsted-weight yarn is a useful starting point for this design, but yarn labels within the same weight category can produce different fabrics. Compare fiber composition, yardage, recommended needle size, and measured gauge before substituting.
Machine-washable wool may provide elasticity and defined cables. Cotton blends can create a heavier fabric with less recovery, while acrylic blends vary in softness and stretch.
Follow the care instructions for the actual yarn selected. If machine washing is permitted, use the recommended cycle and detergent. Otherwise, hand wash gently and dry flat.
Avoid hanging a wet cable-knit vest. The weight of the water can stretch the body and distort the shoulder seams.
Common Knitting Problems and Solutions
Why does the cable panel look narrower than expected?
Cable crossings pull stitches toward the center. The difference becomes more noticeable when several cable strands cross within a short distance. Measure the cable fabric itself instead of relying only on stockinette gauge.
Why does the button band curl?
A button band may curl if the stitch pickup ratio is incorrect or the edge is worked too tightly. Adjust the pickup count and block the band before attaching buttons.
Why is the hat too tight?
The ribbed brim may have insufficient stretch, or the cable section may contract more than expected. Compare both fabric gauges with the intended head circumference.
Can the set be knitted without a cable needle?
Some knitters cross small groups of stitches without a separate cable needle. For larger cables, a cable needle offers greater control and reduces the risk of dropped stitches.
Can a beginner make this set?
A knitter familiar with knit and purl stitches, ribbing, decreases, and basic garment seams can practice the cable motifs before beginning the vest. The complete set is better treated as an intermediate project because it also involves shaping, buttonholes, and size calculations.
Conclusion
The baby cable knit vest and hat set combines a raised front braid, textured side panels, ribbed borders, four-button fastening, and a matching cable beanie. Accurate gauge measurements are essential because cable crossings change fabric width and elasticity. Before knitting the complete garments, make a washed cable swatch, confirm the intended chest and head measurements, and calculate the stitch counts for each section.
Use the finished photograph as a design reference while developing a tested pattern for the required size. Share your completed project on Pinterest or Instagram with #BabyCableKnitSet. Which cable arrangement would you choose for the vest’s central panel: a wide interlaced braid or two narrower parallel cables?









