Introduction
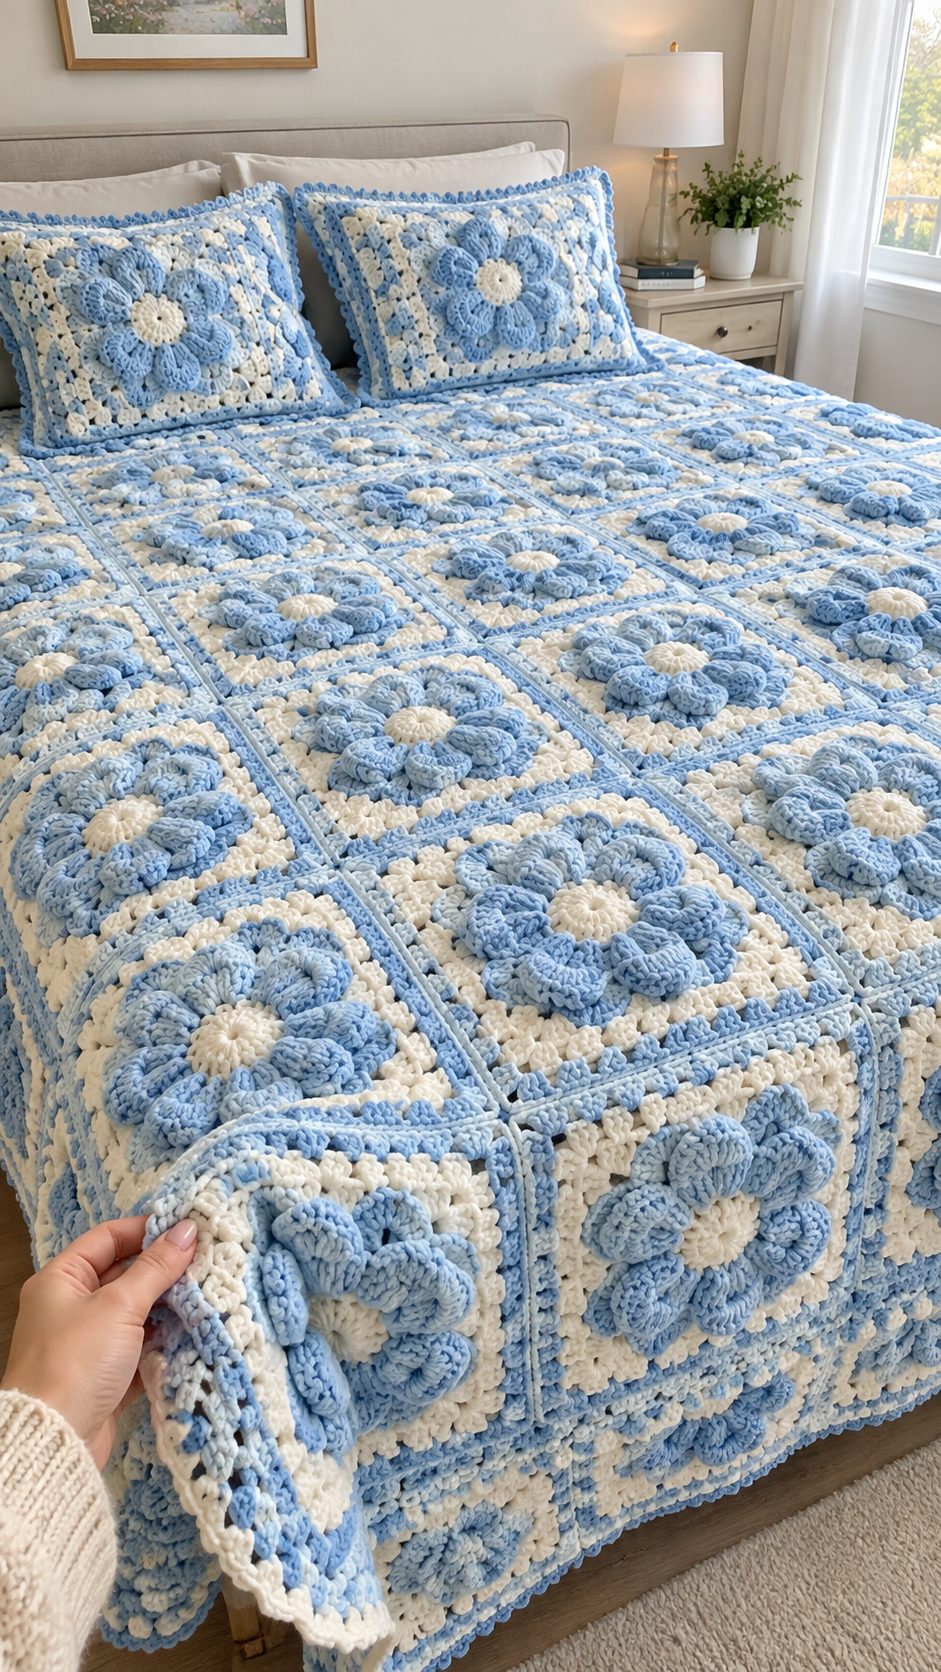
Six raised blue petals surround each ivory center, creating the dimensional floral surface of this 3D flower granny square blanket crochet pattern. The design combines worsted-weight yarn, a 5 mm hook, and modular squares to produce a coordinated bedspread with matching pillow covers. Intended for intermediate crocheters, the project uses approximately 16 cm reference motifs and offers a repeatable construction method for adjusting blanket dimensions without changing the flower design.
The Design: What Makes This Flower Blanket Different
The defining feature of this blue and white crochet blanket is the separation between the decorative flower and its structural square. Each raised flower is worked independently and attached to a stable background. This approach allows the petals to retain their curved profile without distorting the blanket’s joining edges.
A second design decision concerns the flower center. The ivory circle remains relatively compact, while six blue petals extend outward to create the prominent dimensional shape.
Third, the surrounding squares use repeated corner increases to maintain a consistent four-sided structure. The maker can adjust the overall size by changing the number of motifs rather than enlarging individual flowers.
One common mistake when producing a raised flower crochet square is attaching the petals too tightly. That pulls the background inward and produces uneven seams. Controlled attachment points preserve the raised appearance and help the blanket lie flat.
Project Info at a Glance
| Feature | Specification |
|---|---|
| Skill level | Intermediate |
| Construction | Joined modular motifs |
| Estimated time | 45–75 hours for blanket; untested |
| Reference square | Approximately 16 × 16 cm |
| Planned blanket | 112 × 144 cm before border |
| Hook | 5 mm |
| Yarn | Worsted / weight 4 |
| Blanket layout | 7 columns × 9 rows |
| Blanket motifs | 63 |
| Pillow covers | Two optional 3 × 3-square front panels |
| Best for | Bed throws, decorative bedding, floral home décor |
The 16 cm reference is based on a published worsted-weight flower-square pattern. It is not a tested gauge for the original design below.
Materials and Tools
Yarn
Use the same yarn weight and preferably the same yarn range for all colors. Mixing substantially different yarn thicknesses can cause inconsistent square dimensions.
The following quantities are provisional purchasing estimates, not measured consumption from a completed sample.
- Sky blue yarn — worsted weight — approximately 1,500–1,900 g for blanket and two pillow fronts; suggested range: Stylecraft Special Aran.
- Ivory white yarn — worsted weight — approximately 1,000–1,300 g; suggested range: Stylecraft Special Aran.
- Additional blue joining yarn — allow approximately 150–250 g if joining and border yarn is not already included in the main allocation.
For the blanket alone, reduce the total estimate after weighing one complete square. Yarn requirements vary considerably with the raised petals, stitch tension, and border width.
A separate published blanket uses DK yarn and approximately 1,737–1,920 m, demonstrating why yarn quantity should not be transferred directly between designs of different dimensions and textures.
Tools
- 5 mm crochet hook for the motifs.
- 5.5 mm crochet hook as an optional alternative for a looser joining seam.
- Yarn needle with a large eye.
- Locking stitch markers for corners and assembly points.
- Scissors for trimming yarn ends.
- Measuring tape for checking motif dimensions.
- Blocking mats and rust-resistant pins for squaring the motifs.
- Two pillow inserts, approximately 45 × 45 cm if the finished fronts measure 48 cm and that size is suitable for the intended fit.
No safety eyes or stuffing are required for the blanket. Pillow inserts provide the filling for the optional cushions.
Abbreviations
All instructions use US crochet terminology.
| Abbreviation | Meaning |
|---|---|
| MR | Magic ring |
| sc | Single crochet |
| inc | Two sc in the same stitch |
| dec | Single crochet decrease |
| sl st | Slip stitch |
| ch | Chain |
| hdc | Half double crochet |
| dc | Double crochet |
| BLO | Back loop only |
| FLO | Front loop only |
| st / sts | Stitch / stitches |
| RS | Right side |
| WS | Wrong side |
| rep | Repeat |
| FO | Fasten off |
An invisible decrease works through the front loops of two adjacent stitches, but decreases are unnecessary in this flat-square construction.
Pattern — Step by Step
This is an original photo-inspired pattern, not a transcription of the photographed blanket or another designer’s published instructions.
Work the circular centers in joined rounds and the background squares in joined rounds. The raised petals are formed as separate groups around each flower center.
Part 1: Ivory Flower Center (Make 63 for the Blanket)
Yarn: Ivory white — Source: Standard amigurumi circle mathematics, adapted for a flat crochet motif.
- R1: Work 6 sc in MR. Join with sl st to first sc. (6)
- R2: Ch 1, inc ×6. Join with sl st. (12)
Do not cut the yarn until the center is secure. The next stage uses the front loops of the 12 stitches.
Fasten off, leaving a 15 cm tail if making the center independently.
The completed center contains 12 stitches around its outer edge. Six evenly spaced petal attachment positions can therefore be created by working into alternate stitches.
Keep the center flat. If the first round puckers, loosen the magic ring slightly before tightening the final loop.
Part 2: Raised Sky Blue Flower Petals (Make 6 Per Flower)
Yarn: Sky blue — Source: Original petal construction using standard crochet stitches.
Join blue yarn into the front loop of the first stitch of the ivory center.
For each petal, work the following sequence into one front loop:
- R1: Sl st, ch 2, 3 dc, ch 2, sl st into the same front loop. (3 dc and 2 ch-2 arches per petal)
- Skip the next center stitch.
- Repeat the petal sequence in every alternate front loop until six petals are completed.
- R2: Working into each petal’s three dc, place 2 dc in the first dc, 1 dc in the second dc, and 2 dc in the third dc. (5 dc per petal; 30 dc total)
Join the working yarn with a sl st at the base of the final petal.
The second pass adds width to each petal. Keep the base stitches free so the petals can curve upward.
Fasten off, leaving a 20 cm tail.
Do not force the petals flat during finishing. Their curved shape is the primary dimensional element of the design.
For a more prominent flower, add a third petal pass with seven dc distributed across each five-stitch petal. This variation increases yarn consumption and should be tested before making the full set.
Part 3: White Granny Square Background (Make 63)
Yarn: Ivory white — Source: Original square construction based on standard circular increases and four-corner shaping.
This background is crocheted separately from the flower, then the flower is sewn to its center.
- R1: 6 sc in MR. Join. (6)
- R2: Inc ×6. Join. (12)
- R3: (1 sc, inc) ×6. Join. (18)
- R4: (2 sc, inc) ×6. Join. (24)
- R5: (Sc, ch 2, sc) in the next stitch, then sc in the following 5 stitches; repeat ×4. (28 sc + 4 ch-2 corners)
- R6: Work sc in each sc to the next corner, placing (sc, ch 2, sc) into each corner ch-2 space. Join. (36 sc + 4 ch-2 corners)
- R7: Repeat the same corner-increase method. (44 sc + 4 ch-2 corners)
- R8: Repeat. (52 sc + 4 ch-2 corners)
- R9: Repeat. (60 sc + 4 ch-2 corners)
The background is now a square. Each corner adds two sc to the previous round’s total, for eight additional sc per round.
Fasten off, leaving a 20 cm tail.
This compact square is a structural starting point. For a larger motif, continue repeating the R6 corner method, adding eight sc per round, until the background reaches the desired measurement.
A solid-sc square will look denser than the openwork background in the reference photograph. For a closer visual match, substitute a tested granny-cluster square background while retaining the separate raised flower.
Part 4: Sky Blue Square Border (Make 63)
Yarn: Sky blue — Source: Standard four-corner border mathematics.
Attach blue yarn in any corner ch-2 space of the completed background.
- R1: Work (sc, ch 2, sc) into the corner space. Work 1 sc in every sc along the side. Repeat at all four corners. Join. (68 sc + 4 ch-2 corners)
- R2: Repeat the corner method around the square. (76 sc + 4 ch-2 corners)
- R3: Repeat. (84 sc + 4 ch-2 corners)
Fasten off, leaving a 25 cm tail for joining.
The blue border creates a consistent joining surface and separates the white background from adjacent motifs.
Check the width after blocking. A motif intended to finish at 16 cm should be measured across its outermost border, not across the flower.
If the square is too small, continue the established corner-increase method. If it is too large, remove an outer round rather than pulling the fabric inward during assembly.
Part 5: Optional Ivory Cheek-Style Accent Circles (Make 2 Per Flower)
Yarn: Ivory white — Source: Standard six-stitch flat-circle mathematics.
These are optional decorative patches, not features visible as distinct elements in the supplied photograph.
- R1: 6 sc in MR. (6)
- R2: Inc ×6. (12)
Join with sl st. Fasten off, leaving a 15 cm sewing tail.
Place the two circles beneath opposite blue petals only if additional ivory detail is desired. Omit them for the closest visual interpretation of the supplied image.
Part 6: Blanket Joining (63 Squares)
Yarn: Sky blue — Source: Standard slip-stitch joining technique.
Arrange the finished squares into seven columns and nine rows.
Place two squares with their wrong sides together and align the corner spaces.
Join the blue yarn at the first corner.
- J1: Work one sl st through corresponding outer stitches of both squares, continuing along the full side. (One sl st per matched stitch pair)
- J2: At the final corner, fasten off and secure the joining tail.
Repeat until all horizontal rows are joined. Next, join the vertical columns using the same method.
Maintain equal stitch alignment. Do not skip a stitch to compensate for a square that has finished smaller than the others.
When the complete blanket is assembled, lay it flat and inspect every intersection. Four adjoining corners should meet without a raised knot or open gap.
Part 7: Outer Blanket Border
Yarn: Ivory white and sky blue — Source: Original border design using standard corner increases.
Attach ivory yarn at one outer corner.
- R1: Work sc evenly around the entire blanket, placing (sc, ch 2, sc) in each of the four blanket corners. (Perimeter count depends on the finished joined-square edges)
- R2: Work one sc into every sc, again using (sc, ch 2, sc) in each corner space. (Previous sc count +8)
- Change to sky blue.
- R3: Repeat the same sc corner method. (Previous sc count +8)
- R4: Work sc evenly around the perimeter, maintaining the four corner increases. (Previous sc count +8)
For a simple decorative finish, work one final round of slip stitches without tightening the edge.
Fasten off, leaving a 20 cm tail.
The outer border should lie flat after blocking. If the corners curl upward, check that each corner space received its two required sc stitches.
Part 8: Matching Flower Pillow Fronts (Make 2)
Yarn: Sky blue and ivory white — Source: Adaptation of the original blanket motif.
Each pillow front uses nine complete flower squares arranged in a 3 × 3 grid.
- P1: Make 9 complete squares for the first pillow front. (9 motifs)
- P2: Join three squares across to form one row. Repeat for three rows. (3 rows)
- P3: Join the three rows together using the same slip-stitch method as the blanket. (1 panel)
- P4: Work one round of sc around the outside edge, using the established corner method. (Perimeter count depends on panel gauge)
Repeat P1–P4 for the second pillow.
For the back of each cushion, use a coordinating fabric panel or a separately crocheted plain square panel of the same finished dimensions.
Sew three sides together, insert the pillow form, and close the remaining edge. A zipper or envelope closure may be added if a removable cover is required.
If each square measures 16 cm, a three-square pillow front measures approximately 48 × 48 cm before the final edge and seam allowance.
Part 9: Optional Decorative Blue Edge
Yarn: Sky blue — Source: Standard chain-loop edging.
Attach blue yarn along the completed blanket border.
- R1: (Sl st, ch 3, skip 2 stitches) repeat around the edge. (One ch-3 loop per three edge stitches, with adjustments at corners)
At each corner, work an additional ch-3 loop if needed to prevent pulling.
Join with sl st. Fasten off, leaving a 15 cm tail.
This optional edging creates a more decorative outline, although it will not reproduce every detail of the photograph’s layered border.
Assembly — 10 Steps
- Complete the flower centers. Crochet 63 ivory centers for the blanket and additional centers for the matching pillow fronts.
- Make the raised petals. Attach six sky blue petals around every center, checking that their positions remain evenly spaced.
- Crochet the background squares. Produce 63 matching square bases, then add the blue outer rounds.
- Attach the flowers. Center each flower on its square and stitch the center securely to the background without flattening the petals.
- Arrange the blanket. Place seven squares across and nine squares down, with all flower centers facing upward.
- Join the horizontal rows. Use blue slip-stitch seams to connect each row from left to right.
- Connect the vertical columns. Align the existing seams and complete the full rectangular blanket.
- Add the outer border. Work the ivory and blue perimeter rounds, checking each corner for distortion.
- Construct the pillow covers. Assemble the 3 × 3 motif fronts, prepare their backs, and attach the closures or seams.
- Finish and measure. Weave in all yarn tails, block the completed pieces according to the yarn care label, and record the final measurements.
The completed set consists of one modular floral blanket and two coordinated pillow covers.
7 Technical Tips for Better Results
- Mark every corner. Place a locking stitch marker in each ch-2 corner space; missing one corner increase changes the square’s stitch count by two and can distort the joining edge.
- Measure the square after blocking. Use 16 cm as the initial reference measurement, but record the actual width and height of a finished test square before calculating the blanket dimensions.
- Control the raised-petal attachment. Sewing through every outer petal stitch can flatten the flower; attach primarily at the center and selected petal bases.
- Check the magic ring closure. A loose starting ring can leave a visible hole in the ivory center; tighten the six-stitch foundation before securing its tail.
- Watch yarn tension. Plush or chenille-style yarn can conceal stitch tops and make counting difficult; test the proposed hook size with a complete square before purchasing the full yarn quantity.
- Pin motifs before joining. Align all four corners and measure the edges; a difference of more than approximately 5 mm between adjacent squares can cause puckered seams.
- Weave tails through multiple directions. A short, straight tail can work loose during washing; leave at least 15 cm and weave through several stitches before reversing direction.
How to Calculate Blanket Size and Yarn Requirements
The finished size depends on the dimensions of one completed motif and the number of squares joined.
Blanket width = square width × columns
Blanket length = square height × rows
For a reference motif measuring 16 × 16 cm:
| Layout | Motifs | Size before border |
|---|---|---|
| Baby blanket | 5 × 6 = 30 | 80 × 96 cm |
| Small throw | 6 × 8 = 48 | 96 × 128 cm |
| Bed throw | 7 × 9 = 63 | 112 × 144 cm |
| Large blanket | 9 × 11 = 99 | 144 × 176 cm |
These are calculated dimensions, not tested finished measurements. Joining methods and border width may alter the final size.
Yarn consumption calculation
After completing one sample square, weigh its blue and ivory components separately.
Multiply the weight of each color by the total number of motifs, then add an allowance for joining, borders, and yarn variation.
For example, if one square uses 18 g of blue and 12 g of ivory:
- Blue for 63 squares: 1,134 g.
- Ivory for 63 squares: 756 g.
- Combined motif yarn: 1,890 g.
Those numbers are a calculation example, not measured consumption for this design. Add the separately measured border and joining requirements before buying yarn.
Washing and Care
Check the yarn manufacturer’s care instructions before washing the completed blanket.
If the selected yarn is machine washable, place a small test motif through the recommended cycle first. Inspect the flower center, raised petals, and joining seams after drying.
Avoid aggressive wringing because the raised petals can stretch unevenly. Dry the blanket flat when practical, reshape the square edges, and allow the fabric to dry completely before folding or storing.
For pillow covers, removable inserts simplify cleaning. A fabric-backed pillow may require different washing treatment from a fully crocheted cover.
Frequently Asked Questions
Can beginners make this blanket?
The individual stitches are accessible to makers familiar with sc, dc, and slip stitches. Consistent corner shaping, dimensional petals, and joining 63 motifs make the complete project more suitable for an intermediate skill level.
How many squares are needed for a bedspread?
The reference layout uses 63 squares. A larger bedspread may require 99 or more, depending on motif gauge and the amount of mattress coverage desired.
Can chunky yarn replace worsted yarn?
Yes, but the finished squares will generally become larger and thicker. Make a complete sample and calculate the new blanket dimensions before producing all the motifs.
Why are my flower petals curling?
Some curling is intentional. Excessive twisting can occur when the petal stitches are worked too tightly or when the foundation loops are uneven.
Should the flowers be sewn on before joining?
Attaching the flowers before joining makes it easier to position each motif centrally. It also allows the maker to handle individual squares without pulling the completed blanket across the work surface.
Can I make the blanket without matching pillows?
Yes. The pillow fronts use the same flower-square construction and are entirely optional. Omitting them reduces the number of motifs and total yarn consumption.
Conclusion
The sky blue 3D flower granny square blanket crochet pattern combines separate raised flowers, structured square backgrounds, and repeatable joining methods into a coordinated bedding design. Begin with one complete motif, measure its blocked dimensions, and record yarn consumption before producing the remaining squares. This sample determines the actual blanket size, pillow dimensions, and material requirements.
Once the finished project has been measured, photograph the full blanket and a close-up of the raised petals. Share the results on Pinterest and Instagram using #SkyBlueFlowerBlanket, and link back to the pattern for construction details.
Would you keep the six-petal blue flowers shown here, or increase the petal count for a fuller floral surface?









