Introduction
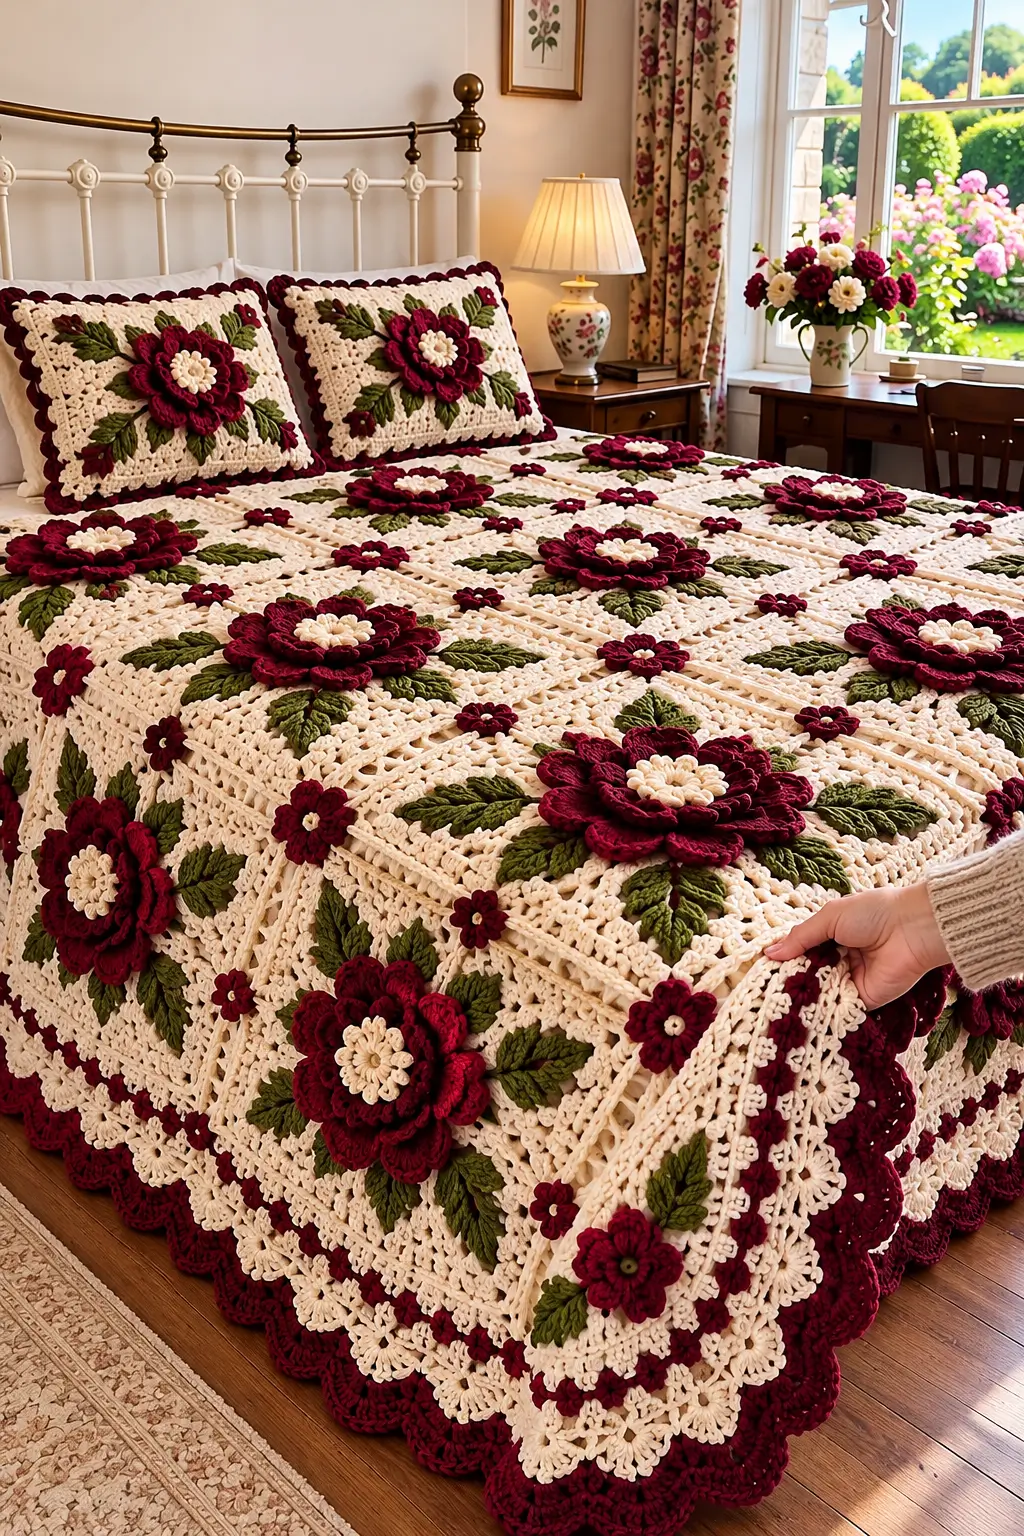
The burgundy roses rise well above the cream lattice, so the flower cannot carry the structural load of this bedspread. This burgundy rose granny square crochet bedspread uses separate layered flowers, olive-green leaves, small burgundy connector blossoms, and an ivory openwork foundation. Designed as a photo-inspired construction, it suits intermediate crocheters and can be adapted from a lap blanket to a full bed covering with matching pillow shams.
The Design: What Makes This Floral Bedspread Different
Three layers create the design. First comes the cream structural square, which controls size and provides stable joining edges. A large burgundy rose is then attached to selected squares, followed by olive leaves arranged around the bloom. Smaller burgundy flowers cover strategic intersections and visually connect neighboring motifs.
This separation matters. Building every dimensional element directly into the joining round can make the squares difficult to block and may pull the seams inward. Here, the decorative pieces remain independent from the structural perimeter.
The border repeats the same hierarchy: cream openwork first, burgundy accents second, then deep scallops along the outer edge. One common mistake is making the rose too wide. Keep at least 2–3 cm between the flower petals and the joining edge.
Project Info at a Glance
| Skill Level | Construction | Square Size | Hook | Best For |
|---|---|---|---|---|
| Intermediate | Joined squares with separate appliqués | Approx. 20–22 cm | 4.5–5.0 mm | Bedspread, throw, pillow shams |
The dimensions are project targets for this original photo-inspired version rather than exact measurements taken from the photograph.
Materials and Tools
Yarn
- Warm ivory or cream — worsted #4 — square foundations, joining and lace border
- Deep burgundy — worsted #4 — large roses, small flowers and outer border
- Olive green — worsted #4 — leaves
- Soft cream — worsted #4 — optional raised rose centers
Tools
- 4.5–5.0 mm crochet hook
- Yarn needle
- Stitch markers
- Scissors
- Tape measure
- Blocking mats and rust-resistant pins
Abbreviations
- MR — magic ring
- ch — chain
- sl st — slip stitch
- sc — single crochet
- hdc — half double crochet
- dc — double crochet
- tr — treble crochet
- sp — space
- st/sts — stitch/stitches
- BLO — back loop only
- FLO — front loop only
Make a Master Square First
Complete one full square, including its flower and leaves, before making the remaining motifs. Block it and record the finished measurement.
A practical target is approximately 20–22 cm per square. More important than the exact number is consistency: finished squares intended for the same bedspread should remain within roughly 5 mm of the master measurement.
Cream Structural Granny Square
Use warm ivory or cream.
Round 1
Make a MR.
Ch 3, work 2 dc into the ring, ch 2.
Repeat (3 dc, ch 2) three more times.
Join with sl st. You now have four 3-dc groups and four corner spaces.
Round 2
Sl st to the first corner.
In each corner work:
(3 dc, ch 2, 3 dc).
Ch 1 between corners.
Join.
Round 3
Sl st to a corner.
Work (3 dc, ch 2, 3 dc) in the corner.
Ch 1.
Work 3 dc in the next side space.
Ch 1.
Repeat around, keeping the same corner construction at all four corners.
Round 4
Continue the granny-square expansion.
Work (3 dc, ch 2, 3 dc) in every corner and 3 dc into each side ch-1 space, with ch 1 between groups.
Round 5 — Openwork Round
At each corner work:
(2 dc, ch 3, 2 dc).
Across each side alternate:
ch 2, skip a suitable section, sc into the next space.
Adjust the final repeat symmetrically so every side contains the same number of openings.
Round 6 — Structural Frame
Work hdc evenly around.
At each corner work:
(2 hdc, ch 2, 2 hdc).
Round 7
Sc in each stitch around.
Work (sc, ch 2, sc) in every corner.
Round 8
Work hdc around, maintaining the four corners.
Fasten off and block the square before deciding whether another structural round is required to reach the target measurement.
Large Burgundy Rose
The rose is made separately and sewn onto the cream square. This keeps the joining edge flat.
Rose Center — Round 1
With cream, make a MR.
Work 10 sc into the ring.
Join. (10)
Round 2
Work 2 sc in each stitch around.
Join. (20)
Round 3
Change to burgundy.
Work one sc in each stitch around. (20)
Inner Burgundy Petals
Work into the front loops of Round 3.
Repeat around:
sl st in next st, 5 dc in next st, sl st in next st.
Distribute the repeats evenly. The petals should cup slightly toward the center.
Second Petal Layer
Join burgundy behind the first petal layer.
Create evenly spaced chain loops around the center using:
ch 4, anchor with sc behind the next petal section.
Continue around.
Into each ch-4 loop work:
sc, hdc, 3 dc, hdc, sc.
These petals should sit behind the first layer.
Third Petal Layer
Create another foundation behind the second layer using slightly larger loops:
ch 6, sc behind the next petal section.
Repeat around.
Into each ch-6 loop work:
sc, hdc, 2 dc, 3 tr, 2 dc, hdc, sc.
Fasten off.
Optional Fourth Rose Layer
For the deeper flowers visible on the bed edge, add another layer behind the existing rose.
Create ch-7 loops around the back.
Into each loop work:
sc, hdc, 2 dc, 4 tr, 2 dc, hdc, sc.
Use this extra layer selectively. A bedspread containing very deep flowers on every square becomes heavy and is more difficult to fold.
Target Rose Diameter
For a 20–22 cm square, aim for a finished rose approximately 11–14 cm across.
Lay the flower on the blocked square before attaching it. The tips of the outer petals should remain at least 2–3 cm inside the structural joining edge.
Olive Crochet Leaf — Make 6 to 8 Per Large Flower
With olive green, ch 10.
Starting in the second chain from the hook work:
sc, hdc, dc, 3 tr, dc, hdc, sc.
Work 3 sc into the final chain to turn around the tip.
Continue along the opposite side of the foundation chain:
sc, hdc, dc, 3 tr, dc, hdc, sc.
Sl st at the base.
Fasten off with a sewing tail.
Adding a Raised Leaf Vein
Join olive yarn at the leaf base.
Surface sl st along the center foundation chain toward the tip.
Fasten off.
This central ridge gives the leaf more definition without increasing its width.
Leaf Placement
Arrange leaves around the rose before sewing anything permanently.
A balanced arrangement can use:
- 2 leaves toward the upper-left section
- 2 leaves toward the upper-right section
- 2 leaves toward the lower portion
- 1 additional leaf on each side for larger squares
Rotate the leaves rather than placing every tip on the same axis.
Attaching the Leaves
Sew the base and central vein of each leaf to the cream square.
Leave the final 1–2 cm near the leaf tip relatively free if a raised effect is desired.
Do not sew through the square’s outer joining round.
Attaching the Large Rose
Place the rose over the inner ends of the leaves.
Sew firmly around the center.
Add hidden stitches through the bases of the second and outer petal layers.
Do not stitch every outer petal flat. The layered relief depends on keeping the upper portions free.
Small Burgundy Connector Flower
These smaller flowers can be placed at selected square intersections and along the decorative border.
Round 1
With cream, make a MR.
Work 6 sc into the ring.
Join. (6)
Petals
Change to burgundy.
In each stitch work:
(sl st, ch 2, 2 dc, ch 2, sl st).
Repeat for all six stitches.
Fasten off.
Alternative Five-Petal Accent Flower
For a smaller decorative blossom, begin with 5 sc in a MR.
Work one petal into each stitch:
sl st, ch 2, hdc, 2 dc, hdc, ch 2, sl st.
Repeat five times.
This version works well around pillow edges and border corners.
Planning the Bedspread Layout
Block several squares before calculating the final layout. Use the actual blocked measurement rather than the intended measurement.
| Square Layout | Approx. Size at 21 cm Per Square | Use |
|---|---|---|
| 5 × 6 | 105 × 126 cm | Small throw |
| 6 × 8 | 126 × 168 cm | Large throw |
| 8 × 10 | 168 × 210 cm | Bed topper |
| 9 × 11 | 189 × 231 cm | Large bedspread |
| 10 × 12 | 210 × 252 cm | Generous bed covering |
The final lace border can add approximately 8–15 cm per side, depending on the number and depth of border rounds.
Decorative Square Arrangement
Not every square needs the same amount of dimensional work.
For a lighter bedspread, alternate large-rose squares with simpler cream lattice squares containing leaves and small flowers.
For the dense floral appearance shown in the reference, use large roses across most visible squares while adding small connector blossoms at selected intersections.
Arrange all completed squares on a flat surface before joining.
Joining the Squares
Use cream yarn so the joins visually merge into the structural framework.
Place two squares with matching edges together.
Join through the corresponding outer loops using a relaxed slip-stitch seam.
Alternatively, use a flat single-crochet join if a visible ridge is desired.
Join squares into complete rows first, then connect the rows.
Controlling the Seams
Measure each completed strip after joining.
If a row of eight blocked squares measures 168 cm before joining but only 160 cm afterward, the seam tension is too tight.
Correct the joining tension before assembling the remaining rows.
Adding Flowers Before or After Joining
The leaves can be attached to individual squares before assembly.
For easier handling, attach the largest roses after the square grid has been joined.
This keeps bulky petals away from the seam while neighboring squares are being connected.
Cream Foundation Border
Join cream yarn at one corner of the assembled bedspread.
Border Round 1
Work sc evenly around all four sides.
At each corner work:
(sc, ch 2, sc).
Use a consistent stitch ratio along every joined edge.
Border Round 2
Work hdc around.
At each corner work:
(2 hdc, ch 2, 2 hdc).
Open Lace Border
Round 3
Repeat around:
sc, ch 3, skip 2 sts.
Adjust only near the corners so the repeat finishes symmetrically.
Round 4
Into each ch-3 space work:
3 dc, ch 1.
At each corner use a larger space such as:
(3 dc, ch 3, 3 dc).
Round 5
Work cream arches across the previous round:
sc in next space, ch 5.
Repeat around.
Keep the corner arches slightly larger.
Burgundy Accent Border
Join burgundy.
Work a decorative round of sc or hdc across the cream lace foundation.
At regular intervals, add small shell groups:
5 dc into one suitable space, sc into the next space.
Repeat around while maintaining flat corners.
Deep Burgundy Scalloped Edge
For the broad lower scallops visible in the design, work larger shells into selected border spaces.
One practical repeat is:
sc in next space, skip one space, 7–9 dc in next space, skip one space, sc in next space.
Test several repeats before completing the entire border.
If the shells overlap, reduce the number of dc. If the edge pulls inward, add spacing between shell anchors.
Cream Lace Overlay
A final cream round can be added above the burgundy scallops to connect the border visually with the square background.
Work small ch-3 or ch-4 arches between selected burgundy shell sections.
Keep this round light so the deep burgundy edge remains visible.
Matching Floral Pillow Sham
The pillow shams use the same rose-and-leaf construction at a larger visual scale.
Make a cream square or rectangular front panel sized to the pillow insert.
Position one large burgundy rose in the center.
Arrange approximately 8 olive leaves around it.
Add small burgundy flowers near selected corners if desired.
Pillow Border
Work several cream structural rounds around the pillow front.
Add a burgundy accent round.
Finish with cream shells or scallops.
For the strong framed appearance in the reference, add a final burgundy scalloped edge behind the cream border.
Pillow Back
A practical pillow back can be crocheted in solid hdc or made from fabric.
For a removable crochet cover, make two overlapping rectangular back panels.
Attach them around the outer perimeter of the decorative front.
The overlap should be deep enough that the pillow insert does not become visible during use.
Estimating Yarn
Dimensional roses consume much more yarn than flat granny squares, so estimate yarn by weight rather than relying only on square count.
Complete one representative square with its rose and leaves.
Weigh it.
Multiply that weight by the planned number of decorated squares.
Then weigh one plain structural square if the design includes alternating motifs.
Add the quantities for joining and the border, followed by approximately 10–15% extra.
Calculate each color separately because cream will normally represent the largest portion of the project.
Reducing the Weight
For a lighter version, use DK #3 yarn with a hook selected from the yarn label and gauge swatch.
Another option is to use three petal layers only on the main roses and two layers on secondary flowers.
A third option is to decorate every second square instead of every square.
Keep the square size consistent even when the decorative treatment changes.
Alternative Colorways
| Flowers | Leaves | Background |
|---|---|---|
| Burgundy | Olive | Warm Ivory |
| Dusty Rose | Sage | Cream |
| Navy | Forest Green | Ivory |
| Terracotta | Olive | Beige |
| Plum | Sage | Soft Cream |
| Blue | Muted Green | White |
Assembly
- Make one complete cream structural square, block it, and record its exact width, height, and diagonal measurements.
- Crochet the required number of cream squares, keeping the outer structural rounds identical on every motif.
- Make the olive leaves and position them on the selected floral squares, keeping all leaf tips clear of the joining edges.
- Crochet the layered burgundy roses and attach each flower through its center and lower petal bases while leaving the upper petal sections raised.
- Arrange the blocked squares on a flat surface and adjust the distribution of roses, plain sections, and small connector flowers before joining.
- Join the squares into horizontal or vertical strips with cream, measure every completed strip, then connect the strips into the full bedspread.
- Add any large roses that were intentionally left off during joining, followed by the small burgundy flowers at selected intersections.
- Work the cream structural border and open lace rounds evenly around the entire bedspread, increasing only at the four corners.
- Add the burgundy accent and scalloped rounds, then make matching pillow fronts using the same rose, leaf, and border construction.
- Weave in all remaining tails, inspect every flower attachment, block the border, and allow the complete bedspread to dry flat before placing it on the bed.
The completed bedspread should have a flat structural grid beneath the decoration, raised burgundy flowers that do not distort the seams, and an outer lace border that lies evenly around all four sides.
7 Technical Tips
- Keep every blocked square within approximately 5 mm of the master square. A 1 cm difference repeated across eight or ten motifs can produce a visibly uneven bedspread edge.
- Leave at least 2–3 cm between the large rose and the joining round. Petals extending into the seam become trapped when neighboring squares are connected.
- Sew each leaf through its base and center vein. Attaching only the leaf base allows a long leaf to twist after washing.
- Support the outer rose layer with several hidden stitches. A flower attached only through its center can sag when the bedspread hangs over the side of the bed.
- Measure a joined strip after the first three squares. If three 21 cm motifs produce a strip substantially shorter than 63 cm before normal seam allowance, loosen the joining tension.
- Check the border after every complete round. A ruffled edge indicates excess stitches, while corners that lift from the floor indicate insufficient expansion.
- Weave tails through at least 5–7 cm of dense crochet. Avoid hiding important structural tails only inside open chain spaces because repeated washing can loosen them.
Care and Blocking
Follow the care instructions for the selected yarn. A large dimensional bedspread becomes extremely heavy when saturated, so support the complete piece when moving it during washing.
Do not lift a wet bedspread by one corner.
After washing, arrange it on a large flat surface. Square the main grid first, then shape the border.
Lift and arrange each burgundy rose while the crochet is still damp. Straighten the olive leaves and keep the petal layers separated.
Allow the project to dry completely before folding it. Store folded rather than hanging so the weight of the flowers does not stretch the upper sections.
Conclusion
The structural cream squares are the foundation of this burgundy rose granny square crochet bedspread; the roses and olive leaves should remain decorative layers rather than joining points. Begin with one blocked master square, confirm the rose diameter, and weigh the completed motif before purchasing yarn for a full bed-size project. Join the structural grid before adding the heaviest remaining flowers, then finish with cream lace and deep burgundy scallops. Matching pillow shams can repeat one enlarged central floral composition. Share the finished project on Pinterest or Instagram with #BurgundyRoseCrochetBedspread. Would you use the large layered rose on every square or alternate it with simpler floral motifs?









