Introduction
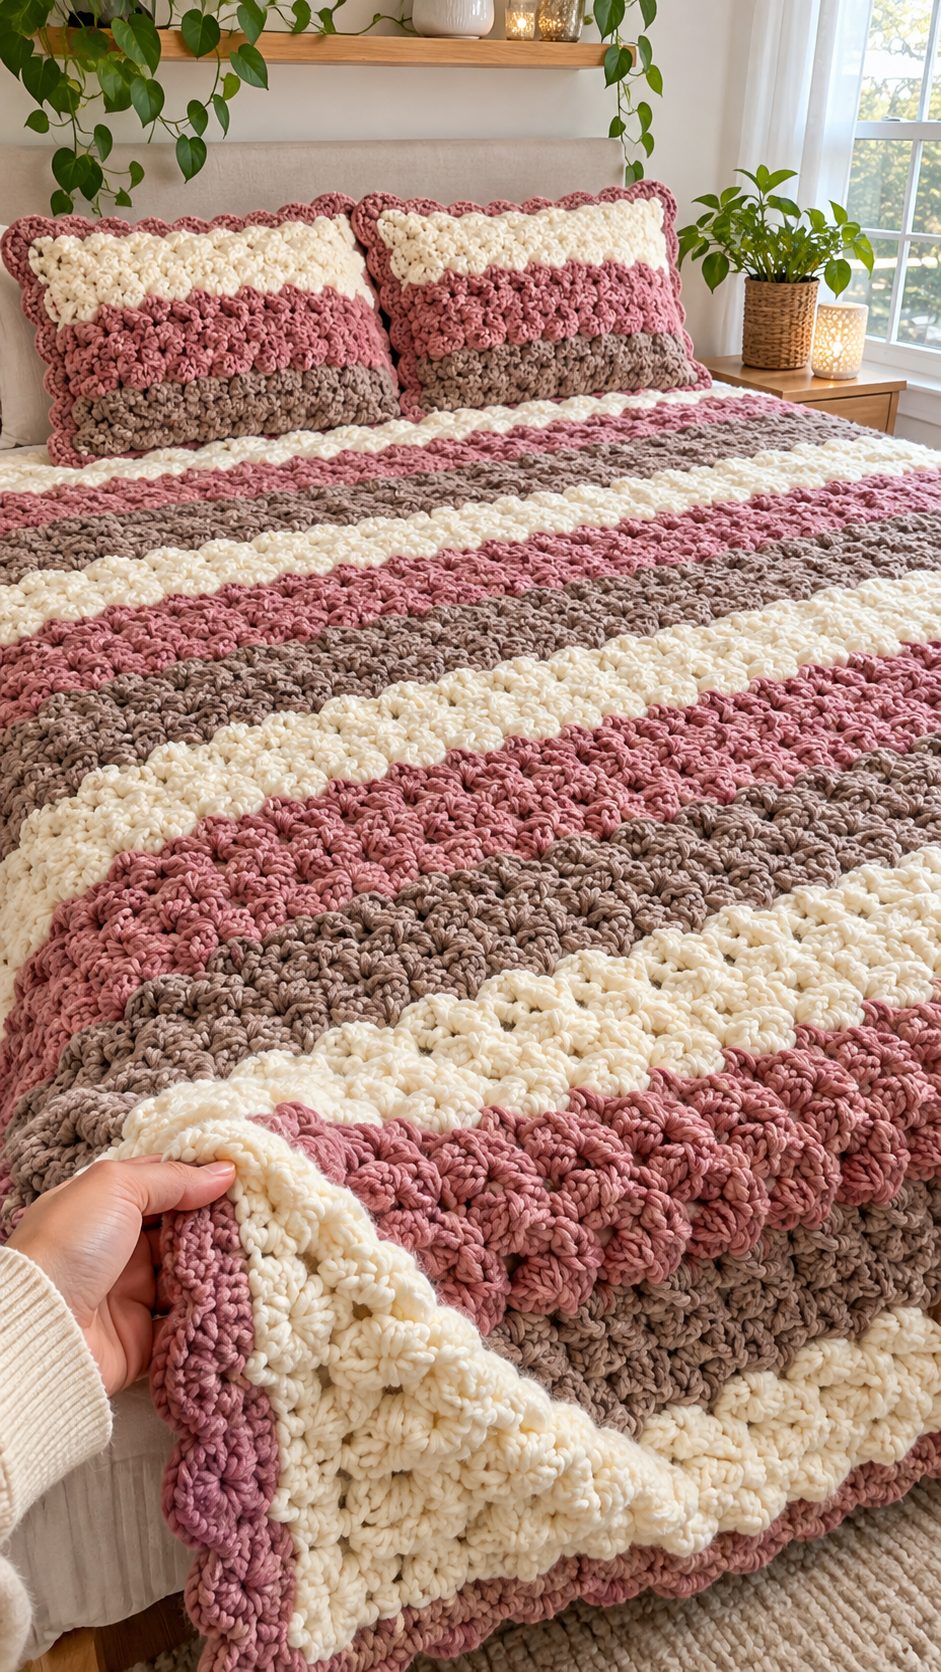
Three wide stripes of dusty rose, ivory, and taupe define this chunky crochet blanket pattern, while raised clusters give the fabric its distinctive structure. The project uses super bulky chenille yarn, an 8 mm hook, and an intermediate-level stitch repeat to create a throw measuring approximately 127 × 152 cm. Two coordinating pillow covers complete the set. The design is particularly useful for building a consistent bedroom color scheme without introducing additional stitch patterns.
The Design: What Makes This Blanket Different
The blanket combines three structural elements: raised clusters, horizontal color blocks, and a relatively flat perimeter border. Each serves a practical purpose.
Raised stitches add thickness and visual definition, allowing simple stripes to remain distinct even when the yarn has minimal color variation. The cream sections separate the rose and taupe bands, preventing neighboring colors from merging visually.
The border stabilizes the edges and helps correct minor differences in row tension. It also gives the blanket a defined outline without requiring elaborate lacework.
The matching crochet pillow covers repeat the same stitch texture on the front, but use simpler back panels to reduce bulk.
One common mistake in a textured crochet blanket is assuming that the manufacturer’s single-crochet gauge applies to clustered stitches. It does not. A separate cluster-stitch swatch is necessary before calculating the foundation chain.
Project Info at a Glance
| Detail | Specification |
|---|---|
| Skill level | Intermediate |
| Estimated time | 30–45 hours, variable |
| Target blanket size | 127 × 152 cm |
| Pillow insert size | 46 × 46 cm |
| Hook | 8 mm |
| Yarn weight | Super bulky, category 6 |
| Construction | Turned rows and sewn pillow panels |
| Best for | Sofa throws, bedroom décor, coordinated bedding |
The time estimate is a planning allowance, not a measured completion time.
Materials and Tools
Yarn
Choose a category 6 chenille yarn with a consistent thickness. Bernat Blanket is one possible option, with 300 g and 201 m per standard skein. Manufacturer specifications.
- Ivory cream — super bulky chenille: Suggested purchase allowance: 1,200–1,500 g for the full set.
- Dusty rose — super bulky chenille: Suggested purchase allowance: 1,200–1,500 g for the full set.
- Warm taupe — super bulky chenille: Suggested purchase allowance: 1,200–1,500 g for the full set.
These quantities are provisional purchasing allowances. They have not been confirmed by crocheting and weighing the complete design. The final amount depends on your gauge, cluster height, blanket dimensions, and pillow construction.
Tools
- 8 mm crochet hook, adjusted after swatching
- Locking stitch markers for tracking row ends
- Large blunt tapestry needle for chenille yarn
- Scissors for trimming yarn tails
- Flexible measuring tape for checking dimensions
- Two 46 × 46 cm pillow inserts
- Rust-resistant pins for joining pillow panels
- Digital kitchen scale for estimating yarn consumption
Use yarn from the same product line for all three colors where possible. Differences in fiber construction can affect the thickness and stretch of the finished fabric.
Abbreviations — US Crochet Terms
| Abbreviation | Meaning |
|---|---|
| ch | Chain |
| sc | Single crochet |
| dc | Double crochet |
| sl st | Slip stitch |
| st(s) | Stitch(es) |
| RS | Right side |
| WS | Wrong side |
| rep | Repeat |
| CL | Three-double-crochet cluster |
| FO | Fasten off |
CL definition: Yarn over, insert hook into the indicated stitch, yarn over and pull up a loop, yarn over and pull through two loops. Repeat that partial double crochet twice more in the same stitch. Yarn over and pull through all four loops on the hook.
Each completed CL counts as one stitch.
Gauge and Stitch Calculations
Gauge is the controlling measurement for this pattern. Do not use the single-crochet gauge printed on the yarn label to calculate a clustered fabric.
Make a test swatch at least 20 cm wide and 20 cm tall.
Work the swatch with the following sequence:
- Chain 19.
- Row 1: Sc in the second chain from the hook and each remaining chain. Turn. (18)
- Row 2: Ch 1, sc in the first stitch. *CL in the next stitch, sc in the next stitch, CL in the next stitch.* Repeat the three-stitch sequence five times. Sc in each of the final two stitches. Turn. (18)
- Row 3: Ch 1, sc in every stitch. Turn. (18)
- Repeat Rows 2–3 until the swatch measures at least 20 cm tall, or enlarge the starting chain if necessary.
Measure the center of the swatch without stretching it. Record the stitch gauge and row gauge over 10 cm.
For a blanket with a 3 cm border on each side, the center panel should measure approximately 121 cm wide.
Panel stitches = (stitches per 10 cm × 121) ÷ 10.
Round the result to the nearest multiple of three. Add one chain for the turning setup.
For example, a measured gauge of 7.5 stitches per 10 cm produces approximately 91 stitches. Rounding to 90 gives a suitable three-stitch multiple.
The example instructions below use 90 stitches, but this number must be adjusted if your swatch differs.
Pattern — Step by Step
Part 1: Blanket Foundation
Yarn: Dusty rose
With the 8 mm hook, chain 91.
Row 1: Sc in the second chain from the hook and in every remaining chain. Turn. (90)
Row 2: Ch 1, sc in the first stitch. *CL in the next stitch, sc in the next stitch, CL in the next stitch.* Repeat from * to * across the next 87 stitches. Sc in the final two stitches. Turn. (90)
Row 3: Ch 1, sc in each stitch across. Turn. (90)
Rows 2 and 3 establish the textured pattern.
The cluster row produces 58 raised clusters, with 32 single crochet stitches. The following plain row maintains the width of the panel.
Keep the turning chain separate from the stitch count.
Part 2: Dusty Rose Stripe
Continue alternating the cluster row and the plain single-crochet row.
Work until the first stripe measures approximately 20 cm tall.
For an example gauge of five rows per 10 cm, this would require approximately ten rows. That row count is illustrative only; measure your own fabric.
Finish with a plain single-crochet row before changing color.
At the end of the row, cut the rose yarn, leaving a tail approximately 15 cm long.
Join ivory cream at the first stitch of the next row.
Part 3: Ivory Cream Stripe
Yarn: Ivory cream
Continue the established two-row repeat.
Keep the cluster stitches positioned in the same stitch columns. This prevents the textured sections from shifting diagonally.
Work until the cream stripe measures approximately 20 cm tall.
The maker should check the width at the beginning and end of each color block. If the fabric narrows, inspect the final stitch of every row before proceeding.
Complete the stripe with a plain single-crochet row.
Change to taupe.
Part 4: Warm Taupe Stripe
Yarn: Warm taupe
Repeat the same textured pattern.
Work to a stripe height of approximately 20 cm.
Do not change hook sizes between colors unless a gauge difference has been measured. Some chenille shades can feel slightly different during stitching, but the important measurement is the finished width.
Maintain 90 stitches per row in the example.
Change back to dusty rose.
Part 5: Complete the Blanket Color Sequence
Repeat the following color arrangement until the center panel reaches its required length.
| Stripe | Color | Target height |
|---|---|---|
| 1 | Dusty rose | 20 cm |
| 2 | Ivory cream | 20 cm |
| 3 | Warm taupe | 20 cm |
| 4 | Dusty rose | 20 cm |
| 5 | Ivory cream | 20 cm |
| 6 | Warm taupe | 20 cm |
| 7 | Dusty rose | 20 cm |
This sequence creates a center panel approximately 140 cm long before the top and bottom borders.
Add or remove complete two-row repeats to reach your preferred dimensions. For a 152 cm target length, a border of approximately 3 cm at each end would call for a 146 cm center panel, so adjust the final stripe accordingly.
The photograph contains more frequent stripe changes than this simplified example. To achieve a closer visual match, divide the total panel length into narrower alternating color sections while keeping the stitch repeat unchanged.
Part 6: Blanket Border
Yarn: Dusty rose
A simple single-crochet border creates a clean perimeter and supports the heavy textured fabric.
Border Round 1: Join yarn at a corner. Work one sc in each stitch along the top and bottom edges. Along the sides, distribute sc evenly according to the measured edge length, working three sc in each corner. Join with sl st.
Count the stitches along opposite sides. Adjust the spacing if necessary so that the two long edges have equal counts and the two short edges have equal counts.
Border Round 2: Ch 1. Sc in each stitch around, working three sc into the middle corner stitch at each corner. Join with sl st.
Border Round 3: Repeat Round 2 if additional border width is needed.
Fasten off and weave in the ends.
For a scalloped appearance closer to the photograph, a shell edging can replace the final round. Test the shell repeat on a sample first, because the stitch count must fit the perimeter without causing ripples.
Matching Crochet Pillow Covers
The pillows repeat the blanket’s three-color layout. Their front panels use the same raised cluster pattern, while the back panels use plain single crochet.
This reduces unnecessary bulk behind the pillow inserts.
Part 7: Pillow Front Panels — Make Two
Yarn: Ivory cream, dusty rose, and warm taupe
Make a gauge swatch using the same hook and yarn.
For each 46 cm pillow insert, target a front panel approximately 44–46 cm square, depending on the firmness of the insert and the stretch of the crochet fabric.
Calculate the required foundation stitch count from your swatch and round to a multiple of three.
Example using 33 stitches:
Chain 34.
Row 1: Sc in the second chain from the hook and across. Turn. (33)
Row 2: Ch 1, sc in the first stitch. Repeat *CL, sc, CL* ten times across the next 30 stitches. Sc in the final two stitches. Turn. (33)
Row 3: Ch 1, sc across. Turn. (33)
Repeat Rows 2–3 until the panel reaches the intended height.
Divide the panel into three approximately equal color sections:
- Top: Ivory cream
- Middle: Dusty rose
- Bottom: Warm taupe
Finish both pillow fronts at the same measured height.
If 33 stitches do not produce the necessary width, recalculate the foundation chain rather than stretching the fabric to fit.
Part 8: Pillow Back Panels — Make Four
Each pillow uses two overlapping back panels.
For a 46 cm insert, a practical starting point is to make each back panel approximately 44 cm wide and 28 cm tall. The two pieces will overlap by roughly 12 cm when assembled into a 44 cm square cover.
The exact overlap depends on the finished panel dimensions.
Row 1: Chain the number required for the pillow width, plus one turning chain. Sc in the second chain from the hook and across.
Row 2: Ch 1, sc in every stitch. Turn.
Repeat Row 2 until the back panel measures approximately 28 cm tall.
Fasten off, leaving a 20 cm tail.
Make four panels in total.
Part 9: Pillow Assembly
Place one pillow front right side down.
Position the two back panels over it, right sides facing outward if using an exposed crochet seam. Overlap the back pieces at the center.
Pin all four edges.
Join the panels using single crochet through both layers around the perimeter. At the overlapping section, work through all layers where they coincide along the outer edge.
Work three single crochets at each corner.
Repeat for the second pillow.
Insert the pillow forms through the envelope openings.
Assembly and Finishing
- Lay the completed blanket flat and measure the center panel.
- Check the width at the top, middle, and bottom.
- Inspect the border for corners that curl or flare outward.
- Correct any uneven border spacing before fastening off permanently.
- Weave each yarn tail through several neighboring stitches.
- Reverse direction when weaving in ends to improve resistance to pulling.
- Lay both pillow fronts flat and compare their dimensions.
- Align the pillow backs and secure the overlapping sections with pins.
- Crochet the pillow seams, insert the forms, and inspect the corners.
- Wash and dry a test swatch according to the yarn label before laundering the complete set.
The finished project consists of one striped textured blanket and two coordinated removable pillow covers.
7 Technical Tips for Better Results
- Mark the first and last stitches. Missing the final stitch of a cluster row reduces the width and can create a visible diagonal edge after several rows.
- Measure every color stripe. A 1 cm difference repeated across seven stripes can produce a 7 cm variation in the blanket’s overall length.
- Control cluster tension. If the three partial double crochets are pulled too tightly, the raised stitches become compact and the fabric may pucker.
- Check the turning chain. The chain-one turning movement does not count as a stitch in this pattern, so adding a stitch into it can increase the row count.
- Avoid overworking chenille tails. Excessive pulling can damage the yarn’s pile or cause the core to separate; leave at least 15 cm for weaving.
- Pin pillow panels before joining. A mismatch of even 2 cm between front and back panels can cause distorted corners and an uneven envelope opening.
- Test laundering on a swatch. Measure a 20 cm sample before and after washing to identify shrinkage, stretching, or changes in cluster definition.
How to Resize the Blanket
The same stitch system can be adapted to smaller or larger projects.
A lap blanket may use a target size of approximately 102 × 127 cm. A standard throw commonly measures about 127 × 152 cm, while larger bed coverings require considerably more fabric.
To resize the width, calculate the number of stitches required from your cluster-stitch gauge and round to a multiple of three.
To resize the length, add or remove complete two-row repeats.
For a balanced appearance, distribute any extra length across the color stripes rather than adding all additional rows to one stripe.
When planning a bed-sized blanket, measure the mattress width and desired overhang before selecting the final dimensions.
How Much Yarn Does the Blanket Need?
Yarn consumption depends on the finished area, stitch density, and individual tension. Raised clusters generally use more yarn than plain single crochet, but the exact difference must be measured.
Use a swatch-based calculation rather than relying on a fixed number of skeins.
For example, suppose a 20 × 20 cm swatch weighs 35 g.
The area of the swatch is: 20 × 20 = 400 cm².
A blanket measuring 127 × 152 cm has an area of: 127 × 152 = 19,304 cm².
Estimated yarn consumption before allowance for the border: (19,304 ÷ 400) × 35 = 1,689 g.
This is a hypothetical example, not a measured requirement for the pictured design.
Add an allowance for borders, tails, and gauge variation. Calculate the pillow fronts and backs separately, since their stitch textures differ.
With 300 g skeins, divide the estimated grams for each color by 300 and round upward to whole skeins.
Washing and Caring for the Finished Set
Chenille yarn requires careful handling because its surface fibers are held around a central core.
For Bernat Blanket yarn, the manufacturer specifies machine washing on a delicate cycle and gentle tumble drying. Bleaching, ironing, and dry cleaning are not recommended. Yarn care reference.
Remove the pillow inserts before washing the covers.
Inspect all seams and yarn tails before laundering. Loose ends should be secured before the fabric is exposed to mechanical agitation.
Wash similar colors together, particularly during the first laundering.
After drying, measure the blanket again. Record any dimensional changes for future projects made with the same yarn and stitch pattern.
Common Crochet Blanket Problems
Why are the blanket edges uneven?
Uneven edges usually result from missed end stitches, accidental increases, or inconsistent turning-chain placement.
Count every row until the stitch repeat becomes familiar. The example blanket maintains 90 stitches across every row.
Why does the blanket curl?
Curling can result from tight foundation chains, differences between row tensions, or a border that contains too few stitches.
If the foundation is noticeably tighter than the rest of the fabric, remake it using a larger hook.
Why do the clusters look flat?
Cluster definition depends on the height of the partial double crochets and the yarn’s ability to hold texture.
A tightly worked cluster can lose height. Test a slightly looser tension before increasing the hook size.
Can regular acrylic yarn replace chenille?
Yes, but the appearance, gauge, and yarn consumption will change.
Use a swatch to calculate new stitch counts. A thinner yarn may require multiple strands or a substantially larger foundation chain to achieve the same dimensions.
Can the pillow covers be made without an envelope opening?
Yes. Two full panels can be joined around three sides, filled with an insert, and sewn closed.
However, the insert cannot be removed easily for laundering unless a zipper or another closure is added.
Conclusion
This chunky crochet blanket pattern combines a repeatable cluster stitch, three coordinated yarn colors, and matching pillow covers into one structured home décor project. The most important preparation step is measuring a completed swatch, because cluster-stitch gauge determines the blanket width, stripe height, and total yarn requirement.
Before starting the full blanket, crochet and weigh a 20 × 20 cm sample. Use those measurements to calculate your foundation chain and purchasing quantities.
Share your completed project on Pinterest or Instagram with #RoseTaupeCrochetSet and include your finished dimensions.
Would you keep the cream stripes evenly spaced, or make them narrower to emphasize the dusty rose and taupe sections?









