Introduction
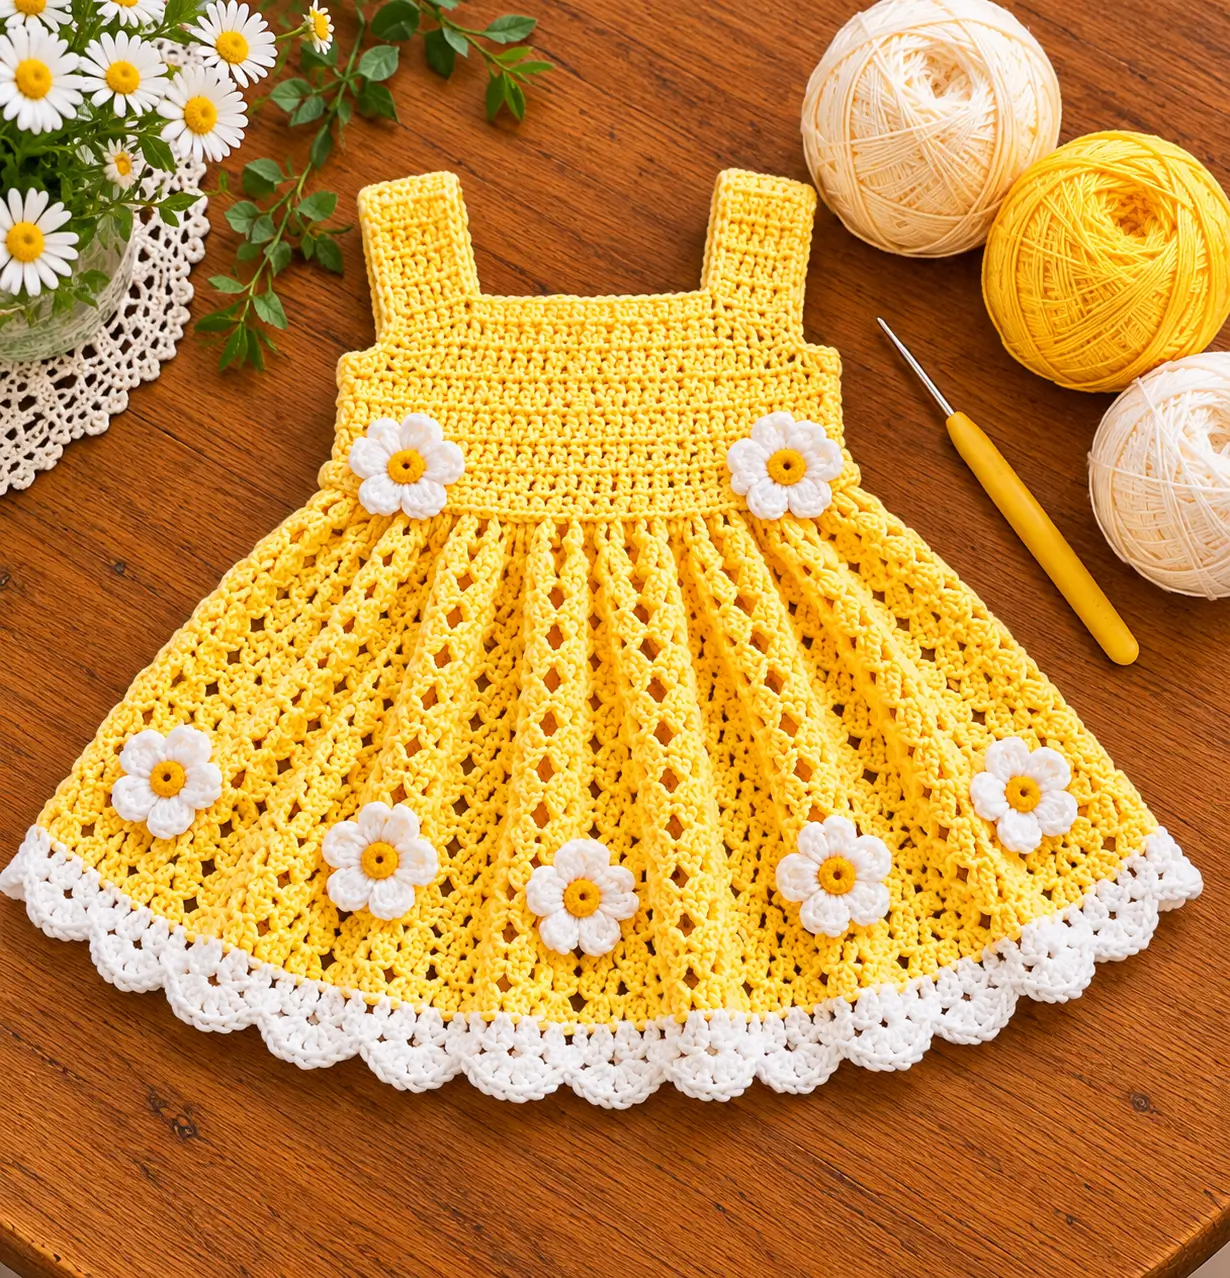
The skirt has to gain enough width for its deep folds without forcing the fitted bodice to flare at the waist. This yellow daisy crochet baby dress pattern combines a compact sleeveless bodice, an open lace skirt, white scalloped edging, and raised daisy appliqués. The photo-inspired project works well in cotton or a soft cotton blend with a 3.0–3.5 mm hook and is suited to intermediate crochet skills.
The Design: What Makes This Daisy Dress Different
The dress uses two different fabric structures. The upper section is worked densely so the shoulder straps and neckline keep their shape, while the skirt changes to an open stitch pattern that can expand without becoming excessively heavy.
A generous increase at the waist creates the gathered silhouette. Vertical lace sections then emphasize the flare from waist to hem. The white border provides a strong visual finish and repeats the white used for the dimensional flowers.
Seven small daisies are distributed across the sample: two near the waist and five across the skirt. Each flower is made separately, so its position can be adjusted after the dress has been blocked. The main construction problem is adding too many skirt stitches at once, which creates a ruffled waist instead of controlled fullness.
Project Info at a Glance
| Skill Level | Construction | Hook | Yarn | Best For |
|---|---|---|---|---|
| Intermediate | Bodice with flared lace skirt | 3.0–3.5 mm | DK #3 cotton or cotton blend | Baby and toddler summer dress |
Materials and Tools
Yarn
- Sunny yellow — DK #3 cotton or cotton blend — main dress
- White — DK #3 — daisy petals and scalloped hem
- Golden yellow — DK #3 — daisy centers
For a garment, yarn quantity should be calculated from the selected size and gauge rather than from the photograph. Make a measured swatch before purchasing the full quantity.
Tools
- 3.0–3.5 mm crochet hook
- Yarn needle
- Scissors
- Locking stitch markers
- Tape measure
- Blocking mat
- Small buttons if adding a back opening
Abbreviations
- MR — magic ring
- ch — chain
- sl st — slip stitch
- sc — single crochet
- hdc — half double crochet
- dc — double crochet
- tr — treble crochet
- sp — space
- st/sts — stitch/stitches
- RS — right side
- WS — wrong side
- FO — fasten off
Important Sizing Method
Baby and toddler garments should be based on actual measurements. Measure the child’s chest circumference and the desired shoulder-to-hem length.
Add approximately 4–6 cm of positive ease to the chest measurement for a comfortable dress fit.
For example, if the chest measures 50 cm:
50 cm + 5 cm ease = 55 cm finished chest circumference.
Use this finished measurement with your blocked gauge to calculate the bodice stitch count.
Gauge Swatch
Using yellow yarn and the selected hook, crochet a swatch at least 12 × 12 cm in hdc.
Wash and dry it using the same method planned for the finished dress.
Measure the central 10 cm without stretching.
Record both stitches and rows per 10 cm.
Calculating the Bodice Foundation
Use:
Finished chest circumference × stitches per cm = approximate bodice stitch count.
For example, if the gauge is 18 stitches per 10 cm:
18 ÷ 10 = 1.8 stitches per cm.
For a 55 cm finished chest:
55 × 1.8 = 99 stitches.
Adjust the number slightly to suit the stitch pattern and planned back opening.
Bodice Construction
The upper dress can be worked flat with a small opening at the center back. This makes dressing easier than constructing a completely closed tube.
Foundation Row
With yellow yarn, chain the calculated number required for the chest width plus turning chains.
Beginning in the appropriate chain, hdc across.
Turn.
Row 2
Ch 2.
Hdc in every stitch across.
Turn.
Rows 3–Bodice Length
Repeat Row 2 until the lower bodice reaches the desired underarm-to-waist measurement.
Keep the edges straight.
Do not add skirt increases yet.
Dividing for the Upper Bodice
Mark the stitches into five sections:
- Right back
- Right armhole
- Front
- Left armhole
- Left back
The exact division depends on the child’s measurements.
The front should contain the largest uninterrupted section.
Front Upper Bodice
Work across the marked front stitches in hdc.
Continue upward until the front reaches the required neckline height.
For a square neckline similar to the photo, keep the center edge relatively horizontal rather than forming a deep curved neckline.
Right Shoulder Strap
Join yellow yarn at the upper right front.
Work hdc across enough stitches to create a strap approximately 3–4 cm wide.
Turn.
Continue in hdc rows until the strap reaches the back bodice without stretching.
FO, leaving a sewing tail.
Left Shoulder Strap
Repeat the same construction on the opposite side.
Count the stitches carefully so both straps have identical width.
Measure the row count rather than relying only on visual comparison.
Back Bodice
Work the two back sections upward to the required height.
Leave a center opening approximately 6–10 cm long, depending on garment size.
The opening should be large enough for the child’s head to pass through comfortably.
Button Band
Join yellow yarn at the lower edge of one side of the back opening.
Sc evenly to the top.
Work one additional sc row if a firmer band is required.
Button Loop Side
Work sc along the opposite edge.
At the required button positions, replace one or two stitches with:
ch 3, skip 1 st.
Adjust the chain length to the actual button diameter.
Armhole Edging
Join yellow yarn at the underarm.
Sc evenly around the armhole.
Do not place one stitch into every row end automatically. Add only enough stitches for the edge to lie flat.
Repeat for the second armhole.
Neckline Edging
Join yellow at the back neckline.
Sc evenly around the complete neckline.
Join or FO at the opposite side of the back opening.
A second sc round can be added if the neckline needs additional stability.
Preparing the Waist
Join yellow yarn around the lower bodice edge.
Work one complete round of sc or hdc, distributing stitches evenly.
Count the resulting stitches.
Place markers at the side seams and center front and back.
Skirt Increase Round
The skirt needs considerably more circumference than the bodice.
A useful starting ratio is approximately 1.5 skirt stitches for each bodice stitch.
One practical increase sequence is:
hdc in next st, 2 hdc in next st.
Repeat around.
This produces approximately a 50% increase.
Join.
Checking the Waist Increase
Lay the bodice flat after the increase round.
The skirt edge should begin to spread gently.
If it forms dense ruffles immediately, reduce the number of increases.
If it remains almost the same width as the bodice, additional increases may be required.
First Skirt Round
Ch 3.
Dc in each stitch around.
Join.
This solid round stabilizes the increased waist before the open lace begins.
Lace Skirt — Foundation Round
Ch 3.
Repeat around:
dc in next 3 sts, ch 2, skip 2 sts.
Adjust the final repeat if required so the pattern closes symmetrically.
Lace Skirt — Round 2
Work dc into each dc.
Over each ch-2 space work:
ch 2.
This creates vertical open columns.
Lace Skirt — Round 3
Repeat the established pattern, but add increases at evenly spaced solid sections.
For an increase, work 2 dc into one selected dc.
Spread increases around the complete circumference rather than concentrating them at the sides.
Building the Skirt Flare
Continue the lace pattern while gradually increasing the number of solid stitches between open sections.
Check the skirt every 4–5 rounds.
The lower circumference should increase gradually from the waist to the hem.
Avoid adding increases on every round.
Alternative Lace Repeat
For a more open skirt, use:
3 dc, ch 3, skip 3 sts.
On the following round, work into the dc stitches and ch 3 over each opening.
This produces larger vertical windows.
Creating the Vertical Texture
To emphasize the long raised lines visible in the skirt, replace the center dc of selected solid sections with a front-post double crochet.
Keep these raised columns aligned from round to round.
Use the same number of textured columns around the entire skirt.
Skirt Length
Continue until the yellow section reaches the required length minus approximately 3–5 cm for the white hem.
Measure vertically from the waist while the dress is lying flat.
Do not stretch the lace while measuring.
Preparing the Hem
Before changing color, work one complete yellow round of sc.
This stabilizes the lace and provides a consistent foundation for the white edging.
Join and FO yellow.
White Hem — Foundation Round
Join white yarn.
Ch 1.
Sc in every stitch around.
Join.
White Hem — Openwork Round
Ch 1.
Sc in the first stitch.
Repeat:
ch 3, skip 2 sts, sc in next st.
Continue around.
Join.
Scalloped Hem
Sl st into the first ch-3 space.
Into each ch-3 space work:
sc, hdc, 3 dc, hdc, sc.
Repeat around.
Join and FO.
Checking the Scallops
Place the dress flat before weaving in the white yarn tail.
The scallops should spread without overlapping.
If the edge ripples strongly, reduce the number of shells.
If it pulls inward, increase the spacing or use slightly larger chain arches.
Daisy Appliqué — Make 7 or Desired Quantity
The flowers are made separately and attached after the dress is complete.
Yellow Center — Round 1
With golden yellow, make a MR.
Work 8 sc into the ring.
Join. (8)
Center — Round 2
Work 2 sc in each stitch around.
Join. (16)
FO yellow.
White Petal Foundation
Join white yarn.
Repeat around:
sc in next st, ch 5, skip 1 st.
Continue until eight loops are formed.
Daisy Petals
Into each ch-5 loop work:
sc, hdc, 3 dc, hdc, sc.
Repeat for all eight petals.
Join.
FO, leaving approximately 15–20 cm for sewing.
Making Fuller Petals
If a more dimensional flower is wanted, substitute:
sc, hdc, 2 dc, 2 tr, 2 dc, hdc, sc
into each loop.
Test one flower before making the complete set because fuller petals require more yarn and produce a larger appliqué.
Flower Size
For a small child-size dress, target approximately 5–7 cm across each finished daisy.
The waist flowers may be slightly larger than those near the hem if desired.
Flower Placement
Pin every daisy to the finished dress before sewing.
Place two flowers near the waist, one toward each side.
Distribute the remaining flowers across the lower skirt at alternating heights.
Avoid placing every flower on one horizontal line.
Attaching the Flowers
Using the white sewing tail, stitch around the center and through the inner base of each petal.
Leave approximately the outer half of each petal free.
This keeps the flowers dimensional while preventing them from folding completely away from the garment.
Optional Green Leaves
Small green leaves can be added if a stronger botanical detail is wanted.
With green yarn, ch 7.
Starting in the second chain work:
sl st, sc, hdc, dc, hdc, sc.
Ch 1 and work along the opposite side:
sc, hdc, dc, hdc, sc, sl st.
FO and sew beside a daisy.
Adjusting the Dress Length
Lengthen the dress by adding complete lace rounds before the white border.
Shorten it by removing complete pattern repeats.
Do not remove part of the final repeat because an incomplete lace sequence can make the hem uneven.
Adjusting the Chest Width
Do not add stitches only at one side.
Recalculate the bodice from the chest measurement and gauge.
The front and back sections should remain balanced around the center lines.
Adjusting the Strap Length
Pin the unfinished straps to the back bodice before sewing.
Check the neckline and armhole depth.
Remove or add rows until both straps fit without stretching.
Optional Wider Straps
For larger toddler sizes, increase strap width to approximately 4–5 cm.
Wider straps distribute the weight of a longer skirt across a larger area.
Optional Picot Neckline
After completing the sc neckline edge, add:
sc in next 2 sts, ch 3, sl st into first ch, sc in next 2 sts.
Repeat around the front neckline only.
Keep the back button area flat.
Alternative Colorways
The construction can be worked in other combinations while keeping the daisy theme.
| Main Dress | Petals | Centers |
|---|---|---|
| Sage Green | Cream | Golden Yellow |
| Dusty Pink | White | Mustard |
| Lavender | Ivory | Yellow |
| Sky Blue | White | Golden Yellow |
| Peach | Cream | Mustard |
Yarn Estimation
Because dress dimensions vary substantially by age and gauge, calculate yarn from a swatch rather than using a fixed quantity.
Make a measured 20 × 20 cm sample in the main stitch pattern and weigh it.
Calculate the approximate garment surface area and compare it with the swatch area.
Add approximately 10–15% extra yellow yarn for swatching, seams, finishing, and gauge variation.
White and golden yellow require much smaller quantities because they are used mainly for the hem and appliqués.
Assembly
- Crochet and block a gauge swatch, then calculate the bodice from the child’s actual chest measurement plus approximately 4–6 cm of positive ease.
- Work the yellow lower bodice to the required waist depth while keeping both side edges equal.
- Divide the upper bodice, form the neckline and armholes, then crochet two shoulder straps to identical measured lengths.
- Complete the back opening and button bands, then finish the neckline and armholes with stable sc edging.
- Join yarn at the waist and distribute the skirt increases evenly around the complete circumference.
- Work the open lace skirt, checking the flare every 4–5 rounds and adding increases gradually rather than on every round.
- Finish the skirt with the white foundation, openwork, and scalloped hem rounds, then check that the perimeter lies flat.
- Make all daisy appliqués to the same target diameter and weave in every tail except the sewing tails.
- Pin the flowers across the bodice and skirt before sewing, keeping the arrangement asymmetrical but visually balanced.
- Sew the daisies securely, weave the remaining tails through dense stitches, wash according to the yarn label, and block the dress to its final measurements.
The finished dress should have a stable fitted upper section, controlled fullness through the yellow lace skirt, an even white scalloped hem, and dimensional daisies that remain securely attached during wear.
7 Technical Tips
- Measure the chest before choosing the foundation count. A difference of only 2–3 cm can affect fit significantly on a baby or toddler garment.
- Check both shoulder straps by row count and finished length. A strap difference greater than approximately 5 mm can pull the neckline toward one side.
- Inspect the skirt immediately after the waist increase. Dense ruffling at this stage means too many stitches were added before the lace section began.
- Check the skirt flare every 4–5 rounds. Concentrating increases into one area creates a visible bulge rather than an even circular spread.
- Keep all daisy appliqués within approximately 5 mm of the master flower diameter. Size variation is particularly noticeable when flowers sit close together near the waist.
- Sew through only the inner half of each petal. Attaching the entire petal removes the raised effect, while attaching only the flower center allows the petals to snag.
- Test the white border after the first 20–30 cm. Overcrowded shells produce a wavy hem; insufficient shells pull the skirt inward and reduce the flare.
Care and Final Blocking
Follow the washing instructions for the selected yarn. For cotton, reshape the garment while damp and lay it flat to dry.
Measure the chest width first, then straighten the straps and skirt. Arrange the scalloped hem without stretching the lace vertically.
Reshape each daisy by hand after the main garment has been positioned. Allow the dress to dry completely before fastening buttons or storing it.
Conclusion
The fitted bodice and expanding lace skirt are the two measurements that control this yellow daisy crochet baby dress pattern. Start with a washed gauge swatch, calculate the chest from the child’s measurements, and test the skirt increase before committing to the full lace section. Make the daisies separately and pin every flower in position after blocking; this gives better control over spacing than attaching decorations during construction. Your next step is to measure the chest and desired shoulder-to-hem length, then crochet the gauge swatch. Save the finished dress to Pinterest or share it on Instagram with #YellowDaisyCrochetDress. Would you keep the sunny yellow body or make the same daisy dress in sage green?









