Introduction
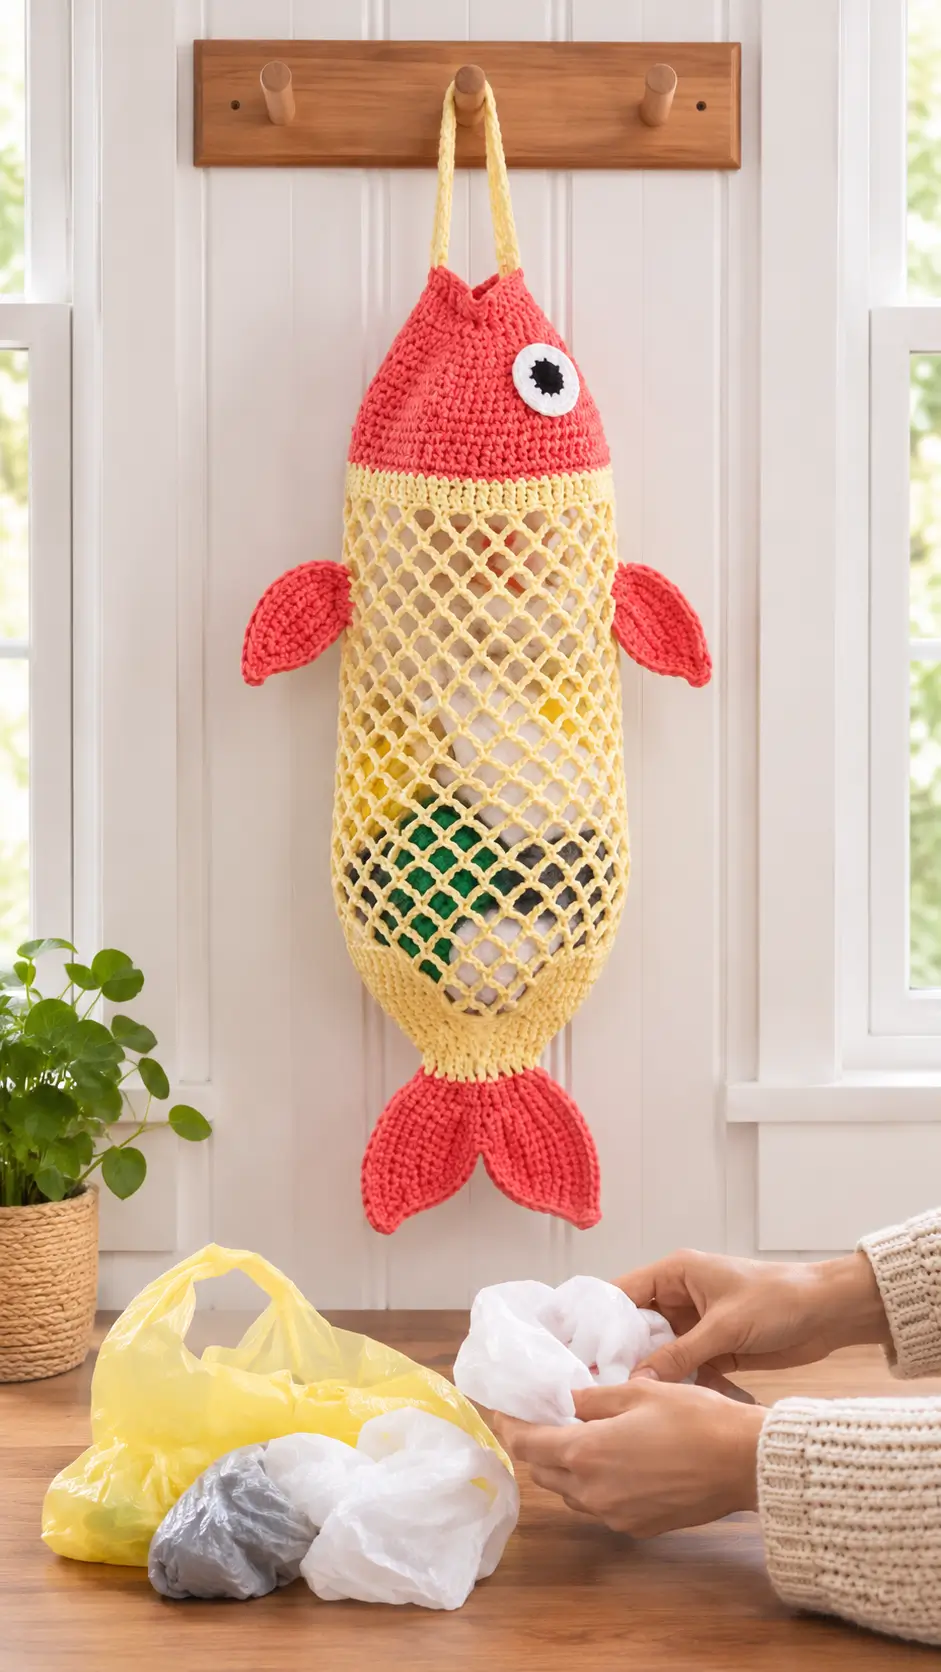
A fish with a mesh belly can store plastic grocery bags without hiding how many remain. This crochet fish bag holder pattern combines a coral head, yellow diamond-mesh body, two side fins, and a split tail. Use worsted cotton yarn, a 4 mm hook, and basic amigurumi shaping techniques to create a medium-to-large hanging organizer. The intermediate-level construction is particularly useful for keeping lightweight shopping bags accessible beside a kitchen counter.
The Design: What Makes This Crochet Fish Bag Different
The fish uses three structural zones: a solid head, an expandable mesh abdomen, and a reinforced lower opening. Each section performs a separate function. The head supports the hanging straps, the mesh holds lightweight bags, and the lower opening permits controlled removal.
Two coral side fins are sewn onto opposite sides of the mesh transition. Their broad bases distribute tension across several stitches rather than pulling on individual chain loops. The split tail is decorative and sits outside the dispensing opening.
Unlike a conventional stuffed fish amigurumi, this crochet mesh fish bag contains no permanent stuffing. The contents provide its volume.
A common mistake is tightening the mesh chains until the body loses its flexibility. This fish-shaped kitchen organizer requires consistent chain length and a firm attachment band.
Project Info at a Glance
| Detail | Specification |
|---|---|
| Skill Level | Intermediate |
| Estimated Time | 6–9 hours |
| Finished Size | Target approximately 55–65 cm, excluding straps |
| Hook | 4.0 mm |
| Yarn | Worsted cotton, category 4 |
| Construction | Spiral crochet with chain-loop mesh |
| Best For | Lightweight plastic shopping bag storage |
The finished size and working time are estimates for this original, untested design. Gauge and mesh stretching can change the result.
Materials and Tools
Yarn
Choose a firm cotton yarn with limited stretch. Worsted-weight cotton provides a practical starting point for the solid sections and hanging straps.
- Pale yellow cotton yarn – worsted weight – approximately 100–130 g for the mesh, lower band, and straps.
- Coral-red cotton yarn – worsted weight – approximately 65–85 g for the head, fins, and tail.
- White cotton yarn – worsted weight – approximately 5 g for the eye patches.
- Black cotton yarn – worsted weight – approximately 2–3 g for the pupils.
These quantities are provisional purchasing allowances rather than measured yarn consumption. Suitable yarn families include Lily Sugar’n Cream or another washable worsted cotton.
Tools
- 4.0 mm crochet hook
- Tapestry needle for sewing
- Locking stitch markers, at least four
- Scissors
- Measuring tape
- Rust-resistant pins
- Optional 3.5 mm hook for eye appliqués
Safety eyes and polyester stuffing are not required. The fish uses flat crocheted eyes and a hollow storage body.
Abbreviations
| Abbreviation | Meaning |
|---|---|
| MR | Magic ring |
| sc | Single crochet |
| inc | Increase: 2 sc in one stitch |
| dec | Invisible single crochet decrease |
| sl st | Slip stitch |
| ch | Chain |
| BLO | Back loop only |
| FLO | Front loop only |
| hdc | Half double crochet |
| dc | Double crochet |
| st/sts | Stitch/stitches |
| sp | Space |
| R | Round or row |
An invisible decrease is made by drawing up a loop through the front loops of the next two stitches and completing one single crochet.
Pattern – Step by Step
Work the solid pieces in continuous spirals unless a section specifies rows or joined rounds. Place a marker in the first stitch of each spiral round.
This original pattern uses a 36-stitch head plateau and a 12-repeat mesh circumference. The head is closed at the crown, while the lower band retains a dispensing opening. Load the holder through the flexible mesh openings.
Head (Make 1)
Yarn: Coral red. Original shaping based on standard amigurumi math.
R1: 6 sc in MR (6)
R2: inc ×6 (12)
R3: (1 sc, inc) ×6 (18)
R4: (2 sc, inc) ×6 (24)
R5: (3 sc, inc) ×6 (30)
R6: (4 sc, inc) ×6 (36)
R7: sc around (36)
R8: sc around (36)
R9: sc around (36)
R10: sc around (36)
R11: sc around (36)
R12: sc around (36)
R13: sc around (36)
R14: sc around (36)
The head begins at the crown and widens into a rounded cone. Do not stuff it. The open final edge connects directly to the mesh body.
Do not fasten off. Change to yellow yarn at the beginning of R15.
Diamond Mesh Body (Make 1)
Yarn: Pale yellow. Original 12-repeat chain-mesh construction.
The mesh continues directly from the 36-stitch head. Its 12 evenly distributed attachment points create the diamond pattern.
R15: (sc in next st, ch 5, skip next 2 sts) ×12 (12 sc, 12 ch-5 spaces)
R16: (sc in next ch-5 sp, ch 5) ×12 (12 sc, 12 ch-5 spaces)
R17: Repeat R16 (12 spaces)
R18: Repeat R16 (12 spaces)
R19: Repeat R16 (12 spaces)
R20: Repeat R16 (12 spaces)
R21: Repeat R16 (12 spaces)
R22: Repeat R16 (12 spaces)
R23: Repeat R16 (12 spaces)
R24: Repeat R16 (12 spaces)
R25: Repeat R16 (12 spaces)
R26: Repeat R16 (12 spaces)
R27: Repeat R16 (12 spaces)
R28: Repeat R16 (12 spaces)
R29: Repeat R16 (12 spaces)
R30: Repeat R16 (12 spaces)
R31: Repeat R16 (12 spaces)
R32: Repeat R16 (12 spaces)
R33: Repeat R16 (12 spaces)
R34: Repeat R16 (12 spaces)
At the end of R34, the body contains 20 mesh rounds. Measure the hanging length before proceeding. Add or omit complete mesh rounds to adjust capacity.
The first mesh round consumes all 36 head stitches. Subsequent rounds attach to the 12 chain spaces from the preceding round.
Keep the first mesh anchor marked. Do not treat each chain as a separate attachment point. Finish the last mesh round with a slip stitch into the first anchor to level the edge.
Lower Body and Dispensing Opening (Make 1)
Yarn: Pale yellow.
The lower band changes the flexible mesh back into a solid crochet structure while retaining an opening for removing bags.
R35: Work 2 sc into each of the 12 mesh spaces (24)
R36: (3 sc, inc) ×6 (30)
R37: (4 sc, inc) ×6 (36)
R38: sc around (36)
R39: sc around (36)
R40: (4 sc, dec) ×6 (30)
R41: (3 sc, dec) ×6 (24)
R42: (2 sc, dec) ×6 (18)
R43: sc around (18)
R44: sc around (18)
R45: sl st loosely in each st around (18)
Fasten off and weave the yarn tail into the solid band.
Do not close the final 18-stitch opening. It is the functional dispensing outlet.
Test the opening with a folded plastic grocery bag. The band should hold the stored bags while allowing one to be withdrawn without excessive pulling.
Side Fins (Make 2)
Yarn: Coral red.
R1: 6 sc in MR (6)
R2: inc ×6 (12)
R3: (1 sc, inc) ×6 (18)
R4: (2 sc, inc) ×6 (24)
R5: sc around (24)
R6: sc around (24)
R7: (2 sc, dec) ×6 (18)
R8: sc around (18)
R9: (1 sc, dec) ×6 (12)
R10: sc around (12)
Flatten each fin without stuffing. Work 6 sc through both layers across the open edge (6).
Fasten off, leaving a 25 cm sewing tail.
The flattened fins form rounded leaf shapes. Attach them to opposite sides of the fish, approximately two rounds below the beginning of the mesh.
Pin both fins before sewing and check their alignment while the bag hangs.
Tail Lobes (Make 2)
Yarn: Coral red.
R1: 6 sc in MR (6)
R2: inc ×6 (12)
R3: (1 sc, inc) ×6 (18)
R4: (2 sc, inc) ×6 (24)
R5: (3 sc, inc) ×6 (30)
R6: sc around (30)
R7: sc around (30)
R8: (3 sc, dec) ×6 (24)
R9: sc around (24)
R10: (2 sc, dec) ×6 (18)
R11: sc around (18)
R12: (1 sc, dec) ×6 (12)
R13: sc around (12)
Flatten without stuffing. Work 6 sc through both layers across the open edge (6).
Fasten off, leaving a 30 cm sewing tail on each lobe.
Position the two lobes at opposing angles beneath the yellow dispensing band. Sew each to the exterior of the band, leaving the central opening clear.
The tail is decorative and should not bear the weight of stored bags.
White Eye Patches (Make 2)
Yarn: White.
R1: 6 sc in MR (6)
R2: inc ×6 (12)
R3: (1 sc, inc) ×6 (18)
R4: (2 sc, inc) ×6 (24)
Sl st into the next stitch. Fasten off, leaving a 20 cm sewing tail.
Keep both patches flat. Lightly dampen and block them if the edges curl upward.
The photograph shows one eye because the fish is viewed from the side. Add a matching eye to the opposite side for a balanced design.
Black Pupils (Make 2)
Yarn: Black.
R1: 6 sc in MR (6)
R2: inc ×6 (12)
Sl st into the next stitch. Fasten off, leaving a 15 cm sewing tail.
Sew each pupil near the center of its white eye patch. A slightly off-center placement reproduces the upward-looking expression visible in the photograph.
Secure the yarn ends before attaching the completed eyes to the head.
Hanging Straps (Make 2)
Yarn: Pale yellow.
The image shows two narrow straps rising from the head to a wooden hanging peg.
Row 1: ch 41, sc in the second ch from the hook and each remaining chain (40)
Row 2: ch 1, turn, sc across (40)
Row 3: ch 1, turn, sc across (40)
Fasten off, leaving a 25 cm sewing tail at each end.
Make the second strap identically. Measure both before attaching them because the finished length depends on gauge.
Sew the ends to opposite sides of the upper head, distributing each attachment over at least five stitches. Reinforce the attachment points with additional passes of yarn or a small fabric patch inside the head.
Optional Mouth Detail (Make 1)
Yarn: Coral red.
Row 1: ch 9, sc in second ch from hook and across (8)
Fasten off, leaving a 15 cm tail.
Sew the strip into a shallow curve near the upper front of the head. The photo does not show a clearly defined mouth, so omit this feature for a closer visual match.
Construction Check Before Assembly
The head has a maximum circumference of 36 stitches. The mesh contains 12 attachment spaces per round. The lower band begins with 24 stitches, expands to 36, and decreases to an 18-stitch dispensing opening.
The side fins and tail lobes reach maximum circumferences of 24 and 30 stitches respectively. Their flattened seams contain six stitches each.
These stitch counts are internally consistent. The pattern is an original reconstruction from the photograph and has not been physically sample-tested. Final proportions may require adjustment after making a gauge sample.
Assembly
- Inspect the head. Place the coral head with the magic-ring crown at the top and the mesh transition at the bottom. Confirm that the head remains hollow.
- Check the body alignment. Hang the head and mesh temporarily from a hook. The mesh should fall vertically without crossed chain loops.
- Shape the lower band. Stretch the yellow dispensing opening gently. Confirm that all 18 final stitches remain accessible.
- Attach the eye patches. Pin one white patch to each side of the coral head, approximately between R8 and R12. Sew around the outer edges.
- Finish the facial details. Secure the black pupils. Add the optional mouth only if a more defined expression is wanted.
- Position the side fins. Pin the two coral fins opposite each other near the upper mesh section. Sew through stable attachment stitches.
- Attach the split tail. Position both lobes beneath the yellow lower band. Sew their flattened edges to the exterior without blocking the opening.
- Attach the hanging straps. Sew the straps to opposite sides of the upper head. Match their lengths and reinforce the attachment points.
- Test the organizer. Insert a few clean, dry plastic bags through the mesh. Pull one through the bottom opening and check that the remaining contents stay in place.
- Finish all yarn ends. Weave each end through several stitches in different directions. Trim the excess and hang the fish from a smooth, stable hook.
The completed holder has a coral head, expandable yellow mesh body, two side fins, split tail, crocheted eyes, and two hanging straps.
7 Technical Tips for a Better Fish Bag Holder
- Mark every mesh round. A missing stitch marker can shift the 12 attachment points and create a diagonal seam instead of evenly aligned diamonds.
- Do not stuff the head. Polyester filling can block the upper mesh and add unnecessary weight. Keep the head hollow for storage.
- Keep invisible decreases consistent. Working through both loops instead of the front loops can leave visible ridges in the lower band, particularly across R40–R42.
- Position the eyes before sewing. A difference of two rounds between the eye patches can make the fish appear uneven. Measure both positions from the crown.
- Control yarn tension. A chain-5 repeat that is substantially shorter than its neighbors can distort the mesh. Compare several loops against the same measured sample.
- Pin the fins symmetrically. Fins sewn at different heights can pull the mesh sideways. Align both attachment seams with the same horizontal round.
- Reinforce strap ends and woven tails. Short woven ends can work loose under repeated loading. Weave at least 6 cm of each structural end through multiple stitch directions.
Using the Finished Fish as a Plastic Bag Dispenser
The fish is designed for lightweight household bag storage. Its mesh body allows the contents to remain visible, while the lower opening provides a controlled dispensing point.
To fill the holder, fold clean, dry grocery bags into narrow strips and feed them through the mesh openings. Avoid forcing large bundles into a single diamond opening because excessive stretching can distort the chains.
To remove a bag, hold the lower yellow band with one hand and draw the bag through the bottom opening with the other. This prevents pulling force from transferring directly to the hanging straps.
Do not use the holder for heavy groceries, sharp objects, wet waste, or items that could catch on the mesh. The straps and decorative fins are not designed as load-bearing handles.
Cotton yarn may stretch slightly during use. If the fish becomes longer after filling, reduce the stored quantity or add a short lining panel to support the contents.
Adjusting the Size and Capacity
The pattern uses a medium 36-stitch head and 12 mesh spaces per round. This makes it possible to adjust the length without changing the head or lower band.
For a shorter fish, remove four complete mesh rounds. For a longer version, add four complete mesh rounds. Each change preserves the same 12-repeat circumference.
Do not add isolated chains to one side of the body. Doing so changes the spacing between attachment points and can make the organizer hang at an angle.
A smaller head requires a new mesh-transition calculation. A 30-stitch head cannot use the existing 12 repeats of three foundation stitches without adjustment.
Likewise, a 42-stitch head needs a different number of mesh repeats or a revised spacing sequence.
Changing the mesh length is therefore the simplest modification. It alters capacity while retaining the stitch arithmetic of the original design.
Care and Maintenance
Wash the finished fish according to the yarn manufacturer’s instructions. Cotton is commonly washable, but exact temperature and drying recommendations vary by brand.
Before washing, remove all stored bags and inspect the straps, fin seams, and lower dispensing opening. Repair loose attachment stitches before they become larger gaps.
Reshape the mesh while damp and lay the organizer flat to dry. Hanging saturated cotton can stretch the straps and lengthen the mesh unevenly.
Avoid high heat if the chosen yarn contains acrylic or another heat-sensitive fiber. Store the organizer dry and away from direct contact with hot appliances.
Conclusion
This crochet fish bag holder pattern uses a 36-stitch head, 12-repeat mesh body, and reinforced lower opening to create a functional hanging organizer. The coral fins and split tail reproduce the fish silhouette, while the yellow mesh provides flexible storage for lightweight grocery bags.
Before making several copies, crochet one sample and record its finished length, yarn consumption, and dispensing performance. Those measurements will help refine the pattern for consistent results.
Save the project to Pinterest and share the finished organizer on Instagram using #CrochetFishBagHolder.
Would you position the coral side fins directly below the head, as pictured, or lower them to the middle of the mesh body?









