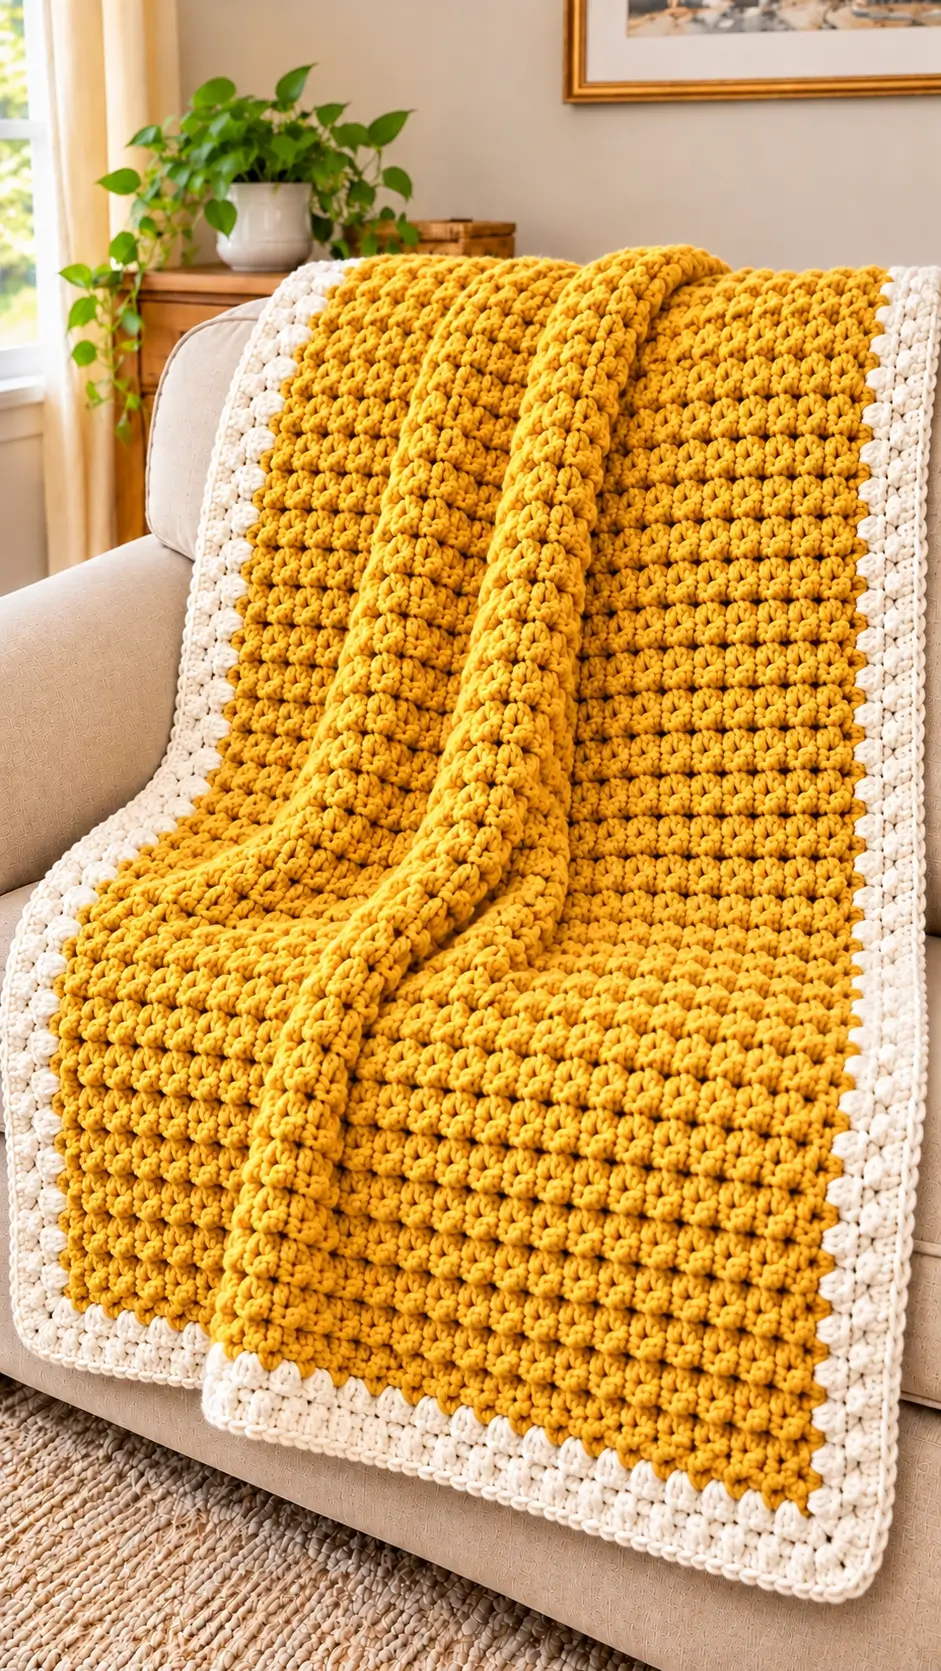
Mustard yellow bobbles form the dense central panel, while a wide cream border frames all four sides. This chunky mustard yellow crochet blanket pattern recreates that distinctive two-color construction using super bulky yarn, a 9 mm hook, and alternating textured rows. The proposed throw measures approximately 120 × 150 cm after gauge adjustments. It suits intermediate crocheters and provides a practical way to create a substantial sofa throw with a defined edge.
The Design: What Makes This Blanket Different
The defining feature of this textured crochet throw blanket is the contrast between the raised mustard center and the structured ivory border. Rather than using individual motifs, the center is crocheted as one continuous rectangular panel. That construction eliminates motif joining and keeps the bobbles aligned across the fabric.
A second design decision concerns stitch placement. Alternating bobble rows with plain single crochet rows gives each raised stitch enough space to project from the surface without forcing neighboring clusters together.
The cream edging serves a structural purpose. It covers irregular row ends, stabilizes the perimeter, and introduces a visual boundary around the heavier center.
One frequent mistake with a chunky bobble blanket is crocheting the foundation chain too tightly. The resulting bottom edge contracts while the textured rows expand. A larger foundation hook or foundation single crochet can reduce that distortion.
Project Info at a Glance
| Detail | Specification |
|---|---|
| Skill Level | Intermediate |
| Estimated Time | 18–30 hours, depending on gauge |
| Target Finished Size | Approximately 120 × 150 cm |
| Recommended Hook | 9 mm, adjustable |
| Yarn Category | Super Bulky, Category 6 |
| Construction | Flat rows with joined border rounds |
| Main Technique | Bobble stitch and single crochet |
| Best For | Sofa throw or decorative blanket |
| Pattern Terminology | US crochet terms |
The dimensions and completion time are estimates for this photo-inspired pattern. Actual measurements depend on yarn, hook size, and tension.
Materials and Tools
Yarn
- Mustard Yellow — Main Color: Category 6 super bulky yarn. Suggested purchasing allowance: approximately 1,200–1,600 g. Lion Brand Hometown or a comparable smooth super bulky yarn is a possible choice.
- Cream White — Border Color: Category 6 super bulky yarn. Suggested purchasing allowance: approximately 250–400 g. Choose the same yarn family as the center for consistent thickness.
Yarn quantities are provisional estimates, not tested requirements. Make and weigh a gauge swatch before purchasing the full quantity.
Tools
- 9 mm crochet hook — Primary hook, adjusted to match gauge.
- 10 mm crochet hook — Optional for a loose foundation chain.
- Stitch markers — At least four locking markers.
- Large-eye tapestry needle — For weaving yarn tails.
- Sharp scissors — For trimming ends.
- Measuring tape — For checking width, length, and border depth.
- Digital kitchen scale — For calculating yarn consumption.
Crochet Abbreviations
| Abbreviation | Meaning |
|---|---|
| ch | Chain |
| sc | Single crochet |
| dc | Double crochet |
| sl st | Slip stitch |
| st(s) | Stitch(es) |
| sk | Skip |
| rep | Repeat |
| RS | Right side |
| WS | Wrong side |
| BO | Bobble stitch |
| FO | Fasten off |
Special Stitch: Five-Double-Crochet Bobble
Work five incomplete double crochets into the same stitch, leaving the final loop of each double crochet on the hook. With six loops on the hook, yarn over and pull through all six loops.
Each completed bobble counts as one stitch.
An invisible decrease is not required because the rectangular blanket does not contain shaped decreases.
Chunky Mustard Yellow Crochet Blanket Pattern — Step by Step
This is an original pattern inspired by the photographed blanket. The exact stitch construction of the original item cannot be identified from the photograph alone.
Step 1: Make a Gauge Swatch
Before beginning the full panel, create a sample with mustard yellow yarn.
Using the 9 mm hook, chain 21.
Row 1: Sc in the second chain from the hook and in each remaining chain. (20 sc)
Row 2: Ch 1, turn. Sc in first st, BO in next st; repeat across. (10 sc, 10 BO; 20 sts total)
Row 3: Ch 1, turn. Sc in each stitch across. (20 sc)
Rows 4–11: Repeat Rows 2 and 3 four more times. (20 sts per row)
Measure the central 10 × 10 cm area without stretching the fabric. Record the number of stitches and rows, then wash and dry the swatch according to the yarn label before taking the final measurement.
The 9 mm hook is a starting recommendation rather than a guarantee of the required dimensions.
Step 2: Crochet the Mustard Foundation
Yarn: Mustard yellow.
Using the foundation hook, chain 101.
Row 1: Work 1 sc into the second chain from the hook. Continue with 1 sc in each remaining chain. (100 sc)
Ch 1 and turn.
Count the stitches before proceeding. The working panel must contain exactly 100 stitches, excluding the turning chain.
Place a marker in the first and last stitches. These markers identify the edge stitches during the entire center construction.
If the measured width is unsuitable, change the foundation to any even number of working stitches and add one turning chain. For example, 110 working stitches require a starting chain of 111.
Step 3: Create the Raised Bobble Texture
Yarn: Mustard yellow.
Row 2: Sc in the first stitch, BO in the next stitch. Repeat this two-stitch sequence across the entire row. (50 sc, 50 BO; 100 sts)
Row 3: Ch 1, turn. Sc in every stitch across. (100 sc)
Row 4: Ch 1, turn. Repeat Row 2. (50 sc, 50 BO; 100 sts)
Row 5: Ch 1, turn. Repeat Row 3. (100 sc)
Row 6: Ch 1, turn. Repeat Row 2. (50 sc, 50 BO; 100 sts)
Row 7: Ch 1, turn. Repeat Row 3. (100 sc)
Row 8: Ch 1, turn. Repeat Row 2. (50 sc, 50 BO; 100 sts)
Row 9: Ch 1, turn. Repeat Row 3. (100 sc)
Row 10: Ch 1, turn. Repeat Row 2. (50 sc, 50 BO; 100 sts)
Row 11: Ch 1, turn. Repeat Row 3. (100 sc)
Continue alternating Rows 2 and 3, keeping 100 stitches in every row.
The bobble rows must all face the same side of the blanket. Push each completed bobble toward the designated right side as needed.
Step 4: Extend the Blanket to Full Length
Continue the established two-row sequence until the mustard panel reaches the required length.
For a sample working plan:
- Rows 12–119: Continue alternating bobble and plain rows. (100 sts per row)
- Row 120: Work a bobble row. (50 sc, 50 BO; 100 sts)
- Row 121: Sc across to produce a level finishing edge. (100 sc)
The planned 121 rows are an example, not a verified route to 150 cm. Measure the work periodically and stop when the center reaches the required length after allowing for the border.
For a 150 cm target length with a 6 cm border at each end, the mustard center should measure approximately 138 cm. Its width should be approximately 108 cm for a final width of 120 cm.
Fasten off, leaving a 15 cm yarn tail.
Step 5: Prepare the Cream Border
Yarn: Cream white.
Lay the panel flat with the right side facing upward.
Attach cream yarn at any corner using a slip stitch.
Border Round 1: Ch 1. Work single crochet stitches evenly around the entire rectangle.
Across the top and bottom edges, place one sc in each foundation or finishing-row stitch.
Along the sides, distribute stitches according to the measured row height. A practical starting ratio is approximately two single crochets for every three rows, but the correct ratio depends on gauge.
At each corner, work 3 sc into the corner location.
Join to the first sc with a sl st.
The total stitch count depends on the number of side-edge stitches. Record the completed count rather than assigning an unsupported fixed number.
Step 6: Build the Cream Frame
Border Round 2: Ch 1. Sc in every stitch around, working 3 sc into the center stitch of each corner group. Join with a sl st.
Border Round 3: Repeat Round 2.
Border Round 4: Repeat Round 2.
The border should lie flat after each completed round. If it begins to ripple along the sides, too many stitches may have been added in the foundation border round.
If the corners curl upward, the perimeter may contain too few stitches.
Do not attempt to correct a severe stitch distribution problem by increasing hook size alone. Rework the affected border section.
Step 7: Add the Raised Cream Edging
The photograph shows a substantial, textured ivory border. To approximate this appearance, add a bobble-accent round over the existing cream frame.
Border Round 5: Ch 1. Sc in the first stitch, then alternate BO and sc along each straight side. Work 3 sc into each corner center stitch, adjusting the last repeat before the corner so the corner itself remains free of bobbles. Join with a sl st.
Because side counts vary, a single fixed bobble count cannot be supplied for all four edges.
Border Round 6: Ch 1. Work sc in every stitch around, with 3 sc in the center corner stitch of each corner group. Join with a sl st.
Border Round 7: Repeat Round 6.
Border Round 8: Work a final sc round, again placing 3 sc at each corner center stitch. Join, fasten off, and leave a 15 cm yarn tail.
The finished cream border should measure approximately 5–7 cm, depending on yarn thickness and tension.
Step 8: Check the Finished Rectangle
Place the blanket on a flat surface.
Measure the top and bottom widths separately. Then measure both long sides.
A small difference can sometimes be corrected through gentle washing and drying. Larger differences usually indicate inconsistent stitch counts or edge distribution.
Check all four corners. They should remain close to 90 degrees when the blanket is laid flat without stretching.
Inspect the bobble surface for missing clusters or accidental increases.
The main panel contains 100 stitches per row in the sample instructions. If a row contains 99 or 101 stitches, locate the discrepancy before proceeding to the next repeat.
Finishing and Assembly
- Inspect the center panel. Check that the bobble columns remain aligned and that the last mustard row is level.
- Confirm the border attachment. Look for loose stitches where the cream yarn was joined to the mustard panel.
- Inspect the corners. Each corner must have sufficient space to turn without pulling the adjoining edges inward.
- Check the textured border. Confirm that the cream bobbles face outward consistently.
- Secure the mustard yarn tails. Thread each tail through a tapestry needle and weave it through several stitches on the reverse side.
- Secure the cream yarn tails. Work the tails through the thicker border stitches, reversing direction to reduce movement.
- Trim excess yarn. Leave the woven sections intact rather than cutting directly beside the last visible stitch.
- Wash according to the yarn label. Use the care instructions for the least washable yarn if different yarns were combined.
- Dry the blanket flat when appropriate. Arrange the corners and long edges into a rectangle without stretching the bobble fabric.
- Measure and record the finished dimensions. Note the final width, length, and total yarn consumption for future versions.
The blanket is complete when the edges lie flat, all yarn tails are secured, and the fabric has dried fully.
7 Technical Tips for Better Results
- Prevent foundation-chain contraction. A chain that is 5 cm shorter than the working rows can distort the entire bottom edge. Make the foundation with a hook one size larger if the sample shows significant tightening.
- Control bobble height. Incomplete double crochets pulled to inconsistent heights create uneven raised clusters. Keep each working loop close to the height of a normal double crochet before closing the bobble.
- Use stitch markers to catch lost stitches. Place markers at both edges and optionally every 20 stitches across the row. A missed final stitch can gradually narrow a 100-stitch panel.
- Check the bobble direction. Raised stitches sometimes project toward the wrong side when worked in alternating rows. Push each bobble toward the designated right side immediately after completing it.
- Avoid border rippling. Too many single crochets along the side edges create a wavy perimeter. Test a short section using approximately two stitches per three rows, then adjust based on the actual row gauge.
- Maintain consistent yarn tension. Super bulky yarn can produce visible size differences when the working tension changes between skeins. Compare the width after every 10 rows and adjust before a substantial variation develops.
- Secure thick yarn tails properly. A 15 cm tail gives sufficient working length for weaving through multiple stitches. Reverse direction at least once to reduce the chance of the tail emerging after washing.
How to Adjust the Blanket Size
A chunky mustard yellow crochet blanket pattern becomes more useful when the maker can modify its dimensions without changing the underlying stitch repeat.
The main panel uses an even stitch count. This allows every bobble row to contain an equal number of bobbles and single crochets.
For a narrower blanket, reduce the foundation by increments of two working stitches. For a wider blanket, add stitches in the same increments.
Use the following formula after measuring a representative swatch:
Working stitches = Desired center width (cm) × Swatch stitches ÷ Swatch width (cm)
Round the result to the nearest suitable even number.
For example, if 20 stitches measure 24 cm and the desired center width is 108 cm, the calculation gives 90 working stitches. Chain 91 to begin.
The required row count can be estimated in the same way using the measured height of a complete two-row repeat.
How Much Yarn Does a Chunky Bobble Blanket Need?
Bobble stitches consume more yarn than ordinary single crochet because several incomplete double crochets are gathered into one raised stitch.
The amount depends on yarn weight, bobble height, stitch tension, and blanket dimensions.
The most reliable method is to crochet a representative sample, weigh it, and calculate its surface area.
For example, a 20 × 20 cm sample covers 400 square centimeters. A center panel measuring 108 × 138 cm covers 14,904 square centimeters.
Divide the larger area by the sample area to estimate how many samples are represented in the center. Multiply that number by the weight of the sample.
Add a separate allowance for the border and approximately 10–15% extra for joins, tails, and differences in tension.
A bobble-heavy design can require substantially more yarn than a plain blanket of identical dimensions. Buying yarn solely by the number of skeins can produce a shortage because skein weights and yardages vary.
Washing and Care Instructions
Check the fiber composition before washing the finished blanket.
Machine-washable acrylic yarn is often suitable for gentle washing, although the specific label controls the recommended water temperature and drying method.
Wool blends may require hand washing and flat drying.
Avoid hanging a saturated super bulky blanket from one corner. The weight of the water can stretch the stitches and distort the rectangular shape.
After washing, spread the blanket across a suitable drying surface and arrange the border without pulling on the textured center.
Keep direct high heat away from acrylic fibers unless the yarn manufacturer specifically permits the chosen drying method.
Conclusion
The finished design combines a mustard yellow bobble panel with a contrasting cream border, using an even stitch repeat that can be resized from measured gauge. Before beginning the full project, crochet and weigh a sample to establish the actual dimensions and yarn requirements. Record those figures alongside the finished blanket measurements for future versions.
Save this chunky mustard yellow crochet blanket pattern to Pinterest, or share a photograph of the completed border on Instagram using #MustardBobbleBlanket. Include the hook size and yarn category so other makers can compare results.
Would you keep the wide cream border shown in the photograph, or reduce its width to emphasize the mustard bobbles?









