Introduction
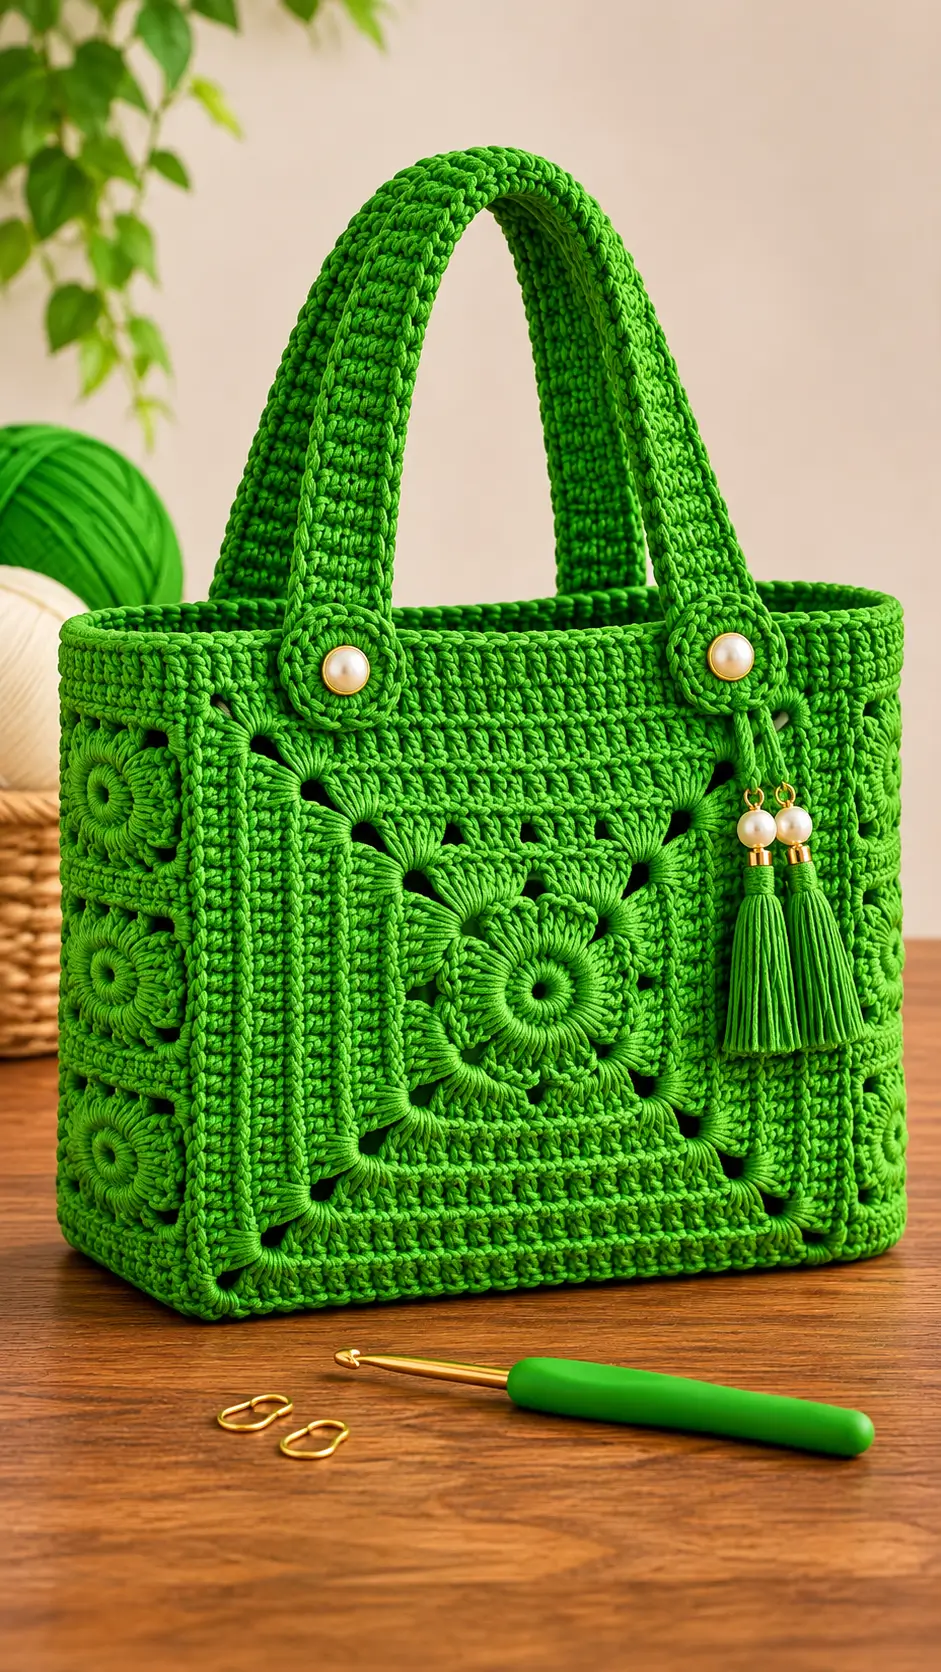
The central flower on this green handbag must remain square enough to support a flat base and two upright handles. This green floral crochet tote bag pattern combines decorative flower motifs with dense crochet panels, reinforced straps, and pearl-style hardware. Use worsted cotton yarn and a 4.5 mm hook to make an approximately 30 × 25 × 10 cm intermediate-level tote. Its structured construction makes it suitable for carrying everyday lightweight essentials.
The Design: What Makes This Green Floral Tote Different
The bag uses a large central flower motif rather than a repeating arrangement of small granny squares. This gives the front panel a clear focal point while allowing the surrounding stitches to carry most of the load. A rectangular base distributes weight across the bottom instead of pulling directly against the floral openings.
The second structural decision is the use of dense single-crochet panels along the sides and handles. These sections resist stretching better than an entirely openwork construction. The third is the reinforced handle attachment: each strap overlaps the bag wall, with the pearl-style button functioning as decoration rather than the sole load-bearing connection.
A common mistake in a flower granny square bag is joining unblocked motifs with different edge measurements. The resulting crochet handbag can develop twisted corners, uneven sides, and a top opening that loses its rectangular shape.
Project Info at a Glance
| Detail | Specification |
|---|---|
| Skill Level | Intermediate |
| Estimated Time | 12–18 hours |
| Target Finished Size | 30 × 25 × 10 cm |
| Recommended Hook | 4.5 mm |
| Yarn Category | Worsted cotton |
| Construction | Floral motifs and sewn panels |
| Best For | Lightweight everyday essentials |
| Terminology | US crochet terms |
Measurements and time are estimates for this original photo-inspired design. The pattern has not been physically sample-tested. Make a gauge swatch before assembly.
Materials and Tools
Yarn
- Bright leaf green cotton yarn — worsted weight, approximately 450–550 g purchasing allowance. Lion Brand 24/7 Cotton or a comparable firm cotton yarn.
- Matching green cotton yarn for tassels — approximately 15–25 g, taken from the main yarn allowance when possible.
- Matching sewing thread — for hardware attachment and structural reinforcement.
The photographed handbag appears to use tightly twisted cotton cord. Substituting macramé cord will change the gauge, hook size, dimensions, and yarn consumption.
Tools
- 4.5 mm crochet hook, or the size required to achieve gauge.
- Two pearl-style buttons, approximately 16–20 mm.
- Two decorative pearl beads, approximately 10–12 mm.
- Two gold-tone connector rings and optional tassel caps.
- Tapestry needle, scissors, measuring tape, and stitch markers.
- Blocking pins and a blocking surface.
- Cotton lining fabric, optional but recommended.
- Heavy-duty sewing needle and thread for the lining and reinforcement.
Gauge and Measurements
Work a single-crochet sample measuring at least 12 × 12 cm. Measure the central 10 cm after washing and drying. The design assumes approximately 18 single crochet stitches and 20 rows per 10 cm. This is a target gauge rather than a tested result.
The front and back support panels target 30 × 25 cm. The side panels target 10 × 25 cm, and the base targets 30 × 10 cm. Check the actual measurements before joining the pieces.
Abbreviations
| Abbreviation | Meaning |
|---|---|
| MR | Magic ring |
| sc | Single crochet |
| inc | Two single crochet stitches in one stitch |
| dec | Single crochet decrease |
| sl st | Slip stitch |
| ch | Chain |
| BLO | Back loop only |
| dc | Double crochet |
| hdc | Half double crochet |
| tr | Treble crochet |
| sp | Space |
| st | Stitch |
| rep | Repeat |
| RS / WS | Right side / wrong side |
An invisible decrease works through the front loops of two consecutive stitches to reduce the bulk of a standard single-crochet decrease.
Construction note: This handbag is made with flat panels and joined decorative rounds. The six-stitch increase rule used for stuffed amigurumi does not apply to every section.
Pattern – Step by Step
This original pattern is inspired by the photograph. The rectangular panels use calculated stitch counts. The floral motifs should be measured and blocked before attachment because their finished dimensions depend on yarn and tension.
Part 1: Central Flower Motif (Make 2)
Yarn: bright green. Work joined rounds unless otherwise specified.
Flower Center
R1: Make a MR, work 6 sc into the ring, and join with a sl st. (6)
R2: Ch 1, inc in each stitch around, and join. (12)
R3: Ch 1, (sc in next st, inc in next st) ×6, and join. (18)
R4: Ch 1, (sc in next 2 sts, inc in next st) ×6, and join. (24)
R5: Ch 1, (sc in next 3 sts, inc in next st) ×6, and join. (30)
R6: Ch 1, (sc in next 4 sts, inc in next st) ×6, and join. (36)
Flower Petals
R7: Ch 1, repeat (sl st in next st, skip next st, 5 dc in next st, skip next st, sl st in next st, sc in next st) six times. (6 petal groups; 48 worked stitches)
R8: Working behind the petals, ch 1 and make 36 evenly distributed sc into accessible stitches and anchoring points of R6. Join. (36)
R9: Ch 1, (sc in next 5 sts, inc in next st) ×6. Join. (42)
R10: Ch 1, (sc in next 6 sts, inc in next st) ×6. Join. (48)
Square-Setting Border
R11: Ch 3, dc in the same stitch, ch 2, 2 dc in the same stitch; repeat (dc in each of the next 11 sts, then 2 dc, ch 2, 2 dc in the next stitch) three times; dc in each of the next 11 sts and join. (60 dc; 4 corner ch-2 spaces)
R12: Ch 1, sc in each dc and work (sc, ch 2, sc) into each corner ch-2 space. Join. (68 sc; 4 corner ch-2 spaces)
R13: Ch 3, dc in every sc and work (2 dc, ch 2, 2 dc) into each corner space. Join. (84 dc; 4 corner ch-2 spaces)
R14: Ch 1, sc in every dc and work (sc, ch 2, sc) into each corner space. Join. (92 sc; 4 corner ch-2 spaces)
Fasten off, leaving a 20 cm sewing tail. Block the motif flat. The petal stitches are decorative and are not included in the later perimeter counts.
Check the motif’s shape and corner placement before repeating it. These decorative instructions have not been physically tested, and minor border adjustments may be necessary.
Part 2: Front and Back Support Panels (Make 2)
Yarn: bright green.
Foundation: Ch 55. (55 chains)
Row 1: Sc in the second chain from the hook and in each remaining chain. (54)
Rows 2–40: Ch 1, turn, sc in each stitch across. (54 per row)
Rows 41–46: Ch 1, turn, sc in each stitch across, working BLO. (54 per row)
Rows 47–50: Ch 1, turn, sc in each stitch across through both loops. (54 per row)
Fasten off, leaving a 30 cm tail.
At the target gauge, each panel measures approximately 30 × 25 cm. Place a flower motif centrally on each panel and pin it flat. Sew around the motif’s outer edge with matching yarn, without pulling the flower into a puckered shape.
This layered construction is an adaptation of the photographed openwork bag. It provides a more solid surface behind the decorative flower.
Part 3: Side Panels (Make 2)
Yarn: bright green.
Foundation: Ch 19. (19 chains)
Row 1: Sc in the second chain from the hook and across. (18)
Rows 2–50: Ch 1, turn, sc in each stitch. (18 per row)
Fasten off with a 30 cm sewing tail.
Each side panel targets approximately 10 × 25 cm. For subtle decorative ridges, work rows 16–35 through the back loops only while maintaining 18 stitches per row.
Measure both side panels against the front and back pieces. Correct any height differences before sewing.
Part 4: Rectangular Base (Make 1)
Yarn: bright green.
Foundation: Ch 55. (55 chains)
Row 1: Sc in the second chain from the hook and across. (54)
Rows 2–20: Ch 1, turn, sc in each stitch across. (54 per row)
Fasten off, leaving a 35 cm sewing tail.
The intended base measures approximately 30 × 10 cm. For greater stability, crochet a second identical base and place a flexible plastic canvas insert between the two layers. Keep the insert slightly smaller than the fabric so it does not press against the seams.
Part 5: Reinforced Crochet Handles (Make 2)
Yarn: bright green.
Foundation: Ch 9. (9 chains)
Row 1: Sc in the second chain from the hook and across. (8)
Rows 2–90: Ch 1, turn, sc across. (8 per row)
Fasten off, leaving a 40 cm tail.
Each handle targets approximately 45 cm in length and 4.4 cm in width before blocking. Fold the strap lengthwise and stitch the long edges together for additional firmness, or reinforce the wrong side with narrow cotton webbing.
Mark attachment positions approximately 6 cm inward from the upper corners of the bag. Both handles should have matching lengths and symmetrical attachment points.
Part 6: Handle Attachment Tabs (Make 4)
Yarn: bright green.
Foundation: Ch 11. (11 chains)
Row 1: Sc in the second chain from the hook and across. (10)
Rows 2–10: Ch 1, turn, sc across. (10 per row)
Fasten off, leaving a 25 cm tail.
Position each tab over a handle end, allowing at least 4 cm of overlap. Sew a reinforced rectangle through the tab, strap, and bag wall. Add diagonal reinforcing stitches where possible.
Sew one pearl-style button to each front attachment tab. The buttons are decorative and must not serve as the sole structural attachment.
Part 7: Decorative Tassels (Make 2)
Yarn: bright green.
- Cut approximately 30 yarn strands, each 20 cm long, for each tassel.
- Fold the strands in half over a suitable connector ring.
- Wrap another strand around the folded bundle approximately 1.5 cm below the top.
- Make 8–10 firm wraps and knot securely.
- Hide the wrapping ends inside the tassel.
- Trim the tassel to approximately 8 cm.
- Repeat for the second tassel.
Thread a decorative pearl bead above each tassel if the bead opening and connector permit. Attach the tassels near the right front handle, keeping the connectors separate from the structural handle seam.
Part 8: Optional Flower Corner Accents (Make 4)
Yarn: bright green.
R1: 6 sc in MR. Join. (6)
R2: Ch 1, inc ×6. Join. (12)
R3: (Sl st in next st, 3 hdc in next st) ×6. Join. (6 petals; 24 worked stitches)
Fasten off, leaving a 15 cm sewing tail. Attach these optional small flowers near the lower corners or side seams if additional floral decoration is desired.
Assembly – 10 Steps
- Block the pieces. Measure the front, back, sides, base, and handles. Allow everything to dry completely.
- Attach the flower motifs. Center each flower on a support panel and sew around the outer perimeter without distorting the petals.
- Join the front to the base. Place right sides together and sew the front lower edge to one long edge of the base.
- Attach the back panel. Join the opposite base edge to the back panel, aligning both corners.
- Add the side panels. Sew the sides between the front and back, then attach their lower edges to the base.
- Finish the top opening. Work a round of single crochet around the upper edge. Add two more rounds if the rim needs greater firmness.
- Attach the handles. Position all four handle ends symmetrically and sew securely through the bag walls.
- Add the decorations. Sew on the pearl-style buttons and attach the two tassels near the right front handle.
- Insert the lining. Cut cotton fabric to fit the interior with seam allowances, sew it into a bag shape, and hand-stitch it below the top rim.
- Inspect the finished tote. Check the structural seams, handle attachments, connectors, and yarn ends. Remove temporary markers.
The completed tote has two floral faces, rectangular sides, a flat base, reinforced handles, and decorative tassels.
7 Technical Tips for Better Results
- Stitch-marker placement: Place a marker at the first stitch of each circular flower round. Losing the start of R9 can shift the increases and distort the medallion.
- Panel measurement: Measure the front-panel width after rows 10 and 30. A difference greater than 1 cm indicates changing tension that should be corrected before assembly.
- Motif flatness: If the flower cups upward after R10, verify the stitch count and tension. Tight sewing will not correct a distorted crochet center.
- Handle stretch: Measure both handles before and after applying a light, evenly distributed load. Add cotton webbing if either strap stretches excessively.
- Cord substitution: A 3 mm cotton cord may need a larger hook than 4.5 mm. Recalculate the panels from a new gauge swatch instead of retaining the original stitch counts.
- Pinning accuracy: Mark the handle positions 6 cm inward from the upper corners. A difference greater than 5 mm between corresponding attachment points may cause uneven hanging.
- Tail weaving: Leave 25–40 cm yarn tails on structural seams and weave through several changes of direction. Short unsecured tails can loosen when the bag flexes under load.
Care, Lining, and Shape Retention
A floral crochet handbag combines dense fabric with decorative openings. These sections respond differently to weight, moisture, and repeated handling.
A tightly woven cotton lining helps prevent small objects from catching in the flower motifs or protruding through the openwork. Choose non-stretch fabric and fit it to the interior without pulling the bag walls inward.
For heavier contents, add a reinforced base insert and attach the lining below the upper rim with small, evenly spaced hand stitches. Decorative pearl buttons should never carry the weight of the bag.
Follow the yarn manufacturer’s washing instructions. Even if the yarn is machine washable, beads, metal connectors, and a stiff base insert may require more careful handling.
Air-dry the tote in its intended rectangular shape. Avoid hanging it by the handles while wet because the additional water weight may stretch the straps.
Common Crochet Bag Problems and Fixes
Why are the floral panels uneven?
Inconsistent tension, missed stitches, or uneven blocking are common causes. Compare the outer dimensions of both motifs before attaching them to the support panels.
Why does the tote lean to one side?
Check whether the side panels have equal row counts and whether the handles are attached symmetrically. Uneven seam tension can also distort the rectangular body.
Can acrylic yarn replace cotton?
Yes, although acrylic may stretch more under load. A fabric lining, reinforced handles, and stable base are particularly useful when substituting acrylic yarn.
Can this bag be made without a lining?
Yes. However, small items may catch on or slip through the openwork. A lining is recommended for regular handbag use.
How can the bag be made larger?
Increase the front and back panel dimensions, then adjust the side panels and base to match. Recalculate the required stitch counts from your actual gauge before beginning.
Conclusion
This green floral crochet tote bag pattern combines a decorative flower center with solid structural panels, a rectangular base, and reinforced handles. Before using the finished bag, measure its dimensions, test the handle attachments with a light load, and check that the lining does not pull against the crochet seams. The next practical step is to record your actual gauge, yarn consumption, and finished measurements so future versions can be reproduced consistently. Save the project to Pinterest and share your completed bag on Instagram using #GreenFloralCrochetTote. When adapting the design, would you keep the two pearl buttons at the handle bases or replace them with plain crocheted tabs?









