Introduction
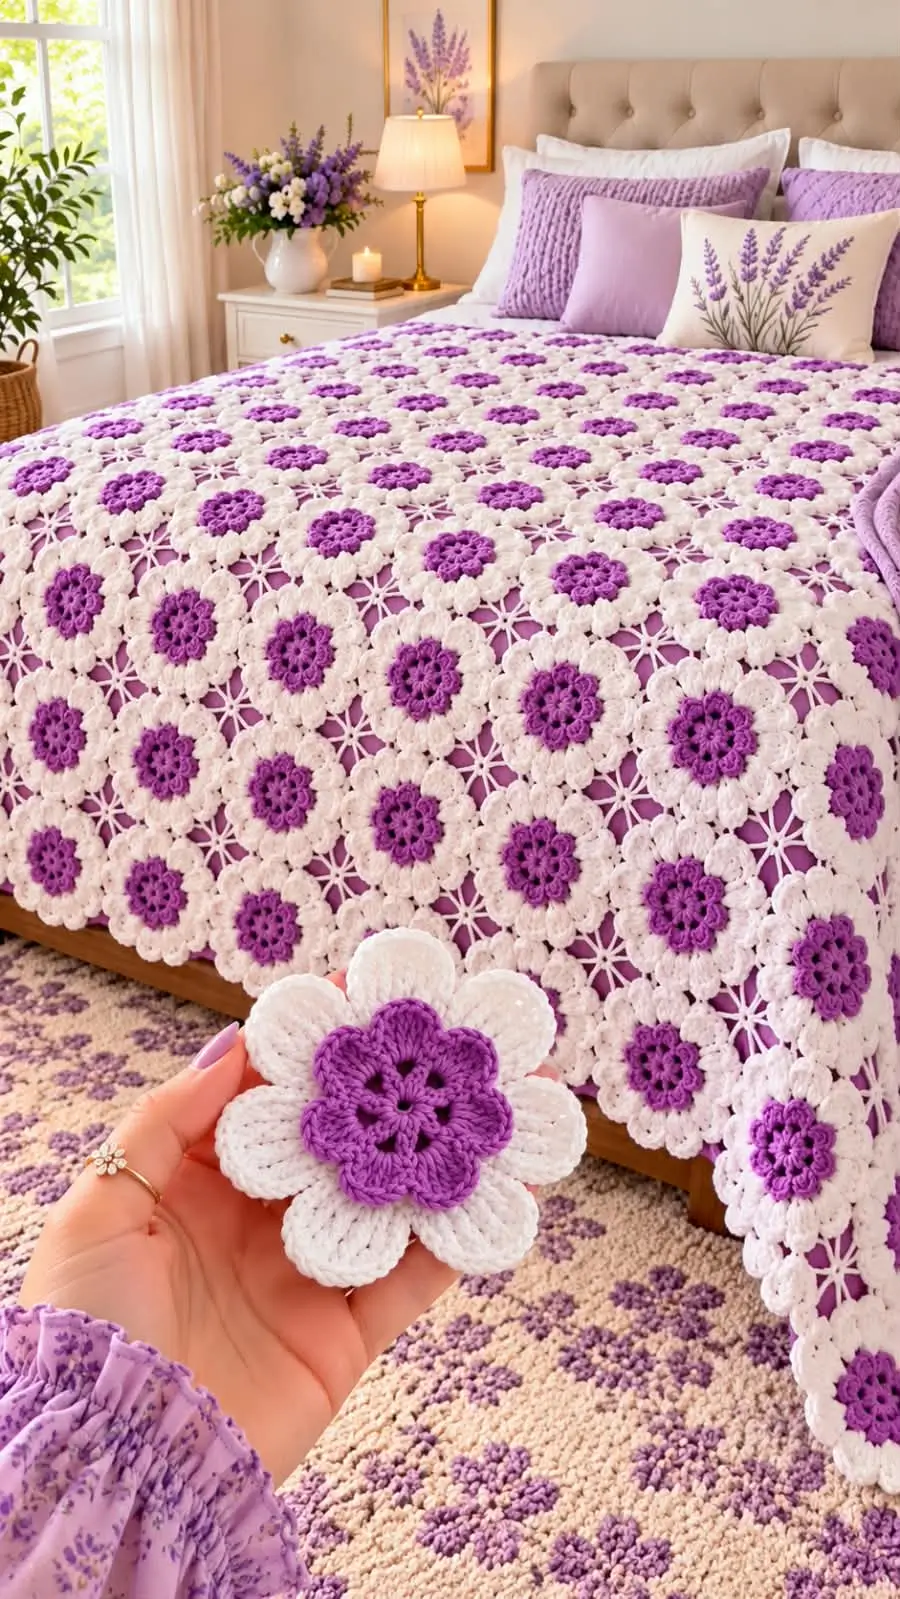
The purple florets in this bedspread sit above six ivory petals, while lavender shows through the star-shaped gaps. This purple and white crochet flower blanket uses layered motifs rather than solid granny squares. Work it with DK yarn and a 4 mm hook; the size is adjustable after a gauge sample. Intermediate crocheters can build a decorative bed cover one flower at a time, then connect the petals with open lace bridges.
The Design: What Makes This Flower Bedspread Different
The photograph has three features worth retaining. First, the purple center rises above the ivory petals. Working those lobes through front loops leaves back loops available for the second layer, so the center keeps definition without a sewn-on appliqué.
Second, each outer flower has six petals, creating six predictable joining points. Stagger adjacent rows, and open spaces remain part of the fabric instead of hiding beneath solid squares.
Third, short ivory bridges connect neighboring tips and support star-shaped fillers. Without those bridges, outer petals can turn under the weight of a bedspread.
A common mistake in a crochet daisy blanket pattern is connecting every petal too tightly. The resulting floral lace crochet blanket may cup, even when each motif measures correctly. Match tip spacing before deciding panel dimensions.
Project Info at a Glance
| Skill Level | Time | Finished Size | Hook | Best For |
|---|---|---|---|---|
| Intermediate | Depends on measured time per motif | Made to measure | 4.0 mm | Decorative throw or bedspread |
Verification note: Cherry Heart’s separately designed Daisy Puff Hexagons blanket measures 78 × 92 cm and uses a 4 mm hook with DK yarn. This original construction has no tested finished gauge or fixed motif count.
The lavender seen between the flowers may be a sheet beneath the openwork, not a crocheted backing.
Materials and Tools
Yarn
- Ivory white: DK or light-worsted yarn. Suggested brand: Stylecraft Bambino DK in White or Clotted Cream. The quantity depends on the number and weight of completed motifs.
- Orchid purple: Matching DK yarn. Choose a coordinating smooth shade such as Heather. This color forms the raised centers and six smaller upper petals.
- Optional lavender backing: Separate woven fabric or a sheet, rather than a required part of the crochet pattern.
Stylecraft Bambino is listed at approximately 268 meters per 100 grams. For comparison, Cherry Heart lists 620 meters of main-color yarn and 750 meters of contrast yarn for a different 78 × 92 cm blanket.
Those amounts convert to approximately 232 grams and 280 grams at the Bambino yardage rate. They are not tested yarn requirements for this flower design.
Weigh your sample motifs before purchasing the full blanket quantity.
Tools
- 4.0 mm crochet hook
- Tapestry needle
- Sharp scissors
- Locking stitch markers
- Measuring tape
- Digital kitchen scale, accurate to 1 gram
- Blocking mats and rust-resistant pins
Safety eyes, stuffing, wire, and sewing hardware are not required. These motifs remain flat rather than forming stuffed figures.
Crochet Abbreviations
| Abbreviation | Meaning |
|---|---|
| MR | Magic ring |
| sc | Single crochet |
| hdc | Half double crochet |
| dc | Double crochet |
| tr | Treble crochet |
| inc | Two single crochets in one stitch |
| sl st | Slip stitch |
| ch | Chain |
| FLO | Front loop only |
| BLO | Back loop only |
| st/sts | Stitch/stitches |
| sp | Space |
| rep | Repeat |
All instructions use US crochet terminology. A starting chain one does not count as a stitch. Close each center round with a slip stitch into its first single crochet.
The petals are worked in joined rounds rather than continuous spirals. Invisible decreases are not required because the flower construction contains no decrease rounds.
Free Crochet Flower Blanket Pattern: Step by Step
Pattern note: This is an original photo-inspired construction, not a confirmed reproduction of the photographed designer’s pattern. Stitch arithmetic has been checked, but the gauge, full blanket, and joining stability have not been physically tested.
Make one complete sample flower before beginning a bed-sized project.
Part 1: Purple Circular Center
Make one per flower. Yarn: orchid purple.
R1: Work 6 sc into MR. Pull closed and join. (6)
R2: Ch 1, inc ×6. Join. (12)
R3: Ch 1, [sc in next st, inc in next st] ×6. Join. (18)
Count eighteen stitches before continuing. Six groups of three stitches will support the raised purple lobes.
Mark the first stitch of each group if the yarn obscures the stitch tops.
Do not cut the purple yarn yet.
Part 2: Raised Purple Inner Petals
Make six petals per flower. Yarn: orchid purple.
R4: [Sl st in FLO of next st; work (hdc, dc, tr, dc, hdc) in FLO of next st; sl st in FLO of next st] ×6.
Count: 6 petals, with 42 worked stitches including 12 slip stitches.
The five taller stitches form each purple lobe. Two slip stitches lower the base and separate the individual petals.
Work through the front loops only. Using both loops at this stage removes the attachment line needed for the ivory layer.
Check the six petals from above. Their peaks should radiate outward at equal intervals.
Fasten off purple. Leave a 12 cm yarn tail and weave it along the wrong side without crossing the unused back loops.
Part 3: Ivory Petal Foundations
Make six foundation arches per flower. Yarn: ivory white.
Use the unworked back loops from R3.
R5: With ivory and a slip knot on the hook, begin in the first unworked R3 back loop.
[Sc in the next available BLO, ch 7, skip the next 2 BLO] ×6. Join to the first sc.
Count: 6 sc anchors and 6 ch-7 spaces.
The ivory arches sit behind the purple petals.
Each arch must contain exactly seven chains. A shorter arch will form a smaller outer petal and pull its joining tip toward the flower center.
Keep the foundations loose enough to flatten behind the inner petals without creating oversized chain loops.
Part 4: Rounded Ivory Outer Petals
Make six outer petals per flower. Yarn: ivory white.
R6: In each ch-7 space, work:
(sc, hdc, 2 dc, tr, 2 dc, hdc, sc).
Sl st into the following R5 single crochet anchor.
Repeat around all six arches.
Count: 6 petals × 9 stitches = 54 petal stitches, plus 6 separator slip stitches. (60 worked stitches total)
Each outer petal contains one central treble crochet.
Avoid catching the purple upper petals while working into the ivory foundation arches.
R7: Starting at the first R6 petal:
Sc in the first stitch, hdc in the next, dc in each of the next 2, (dc, ch 2, dc) in the central tr, dc in each of the next 2, hdc in the next, and sc in the final stitch.
Sl st in the following R6 separator.
Repeat ×6.
Count: 10 petal stitches plus 1 separator slip stitch per repeat. (66 worked stitches total, plus 6 ch-2 tip spaces)
The six chain-two spaces provide the attachment points for neighboring flowers.
Lay the motif on a level surface. All six tips should sit at approximately equal distances from the center.
If two tips curl inward, check the placement of the R7 stitches before blocking.
For a standalone flower, fasten off and leave a 15 cm ivory tail.
For subsequent flowers, work the joining variation during R7.
Part 5: Joining the Flower Motifs
Yarn: ivory white. Method: tip-to-tip join-as-you-go.
Begin with one completed flower.
Position the next flower so that one ivory petal tip faces a matching tip on the completed motif.
When R7 reaches the joining tip, replace the normal ch 2 with:
Ch 1, sl st through the matching ch-2 space on the completed flower, ch 1.
Continue the next double crochet into the central treble of the new flower.
Only connect tips that face each other without stretching.
One join connects a single tip on each flower. It does not consume the neighboring tip.
For additional flowers, repeat the same technique at each planned contact point.
Arrange the flowers in staggered rows rather than forcing them into a rigid square grid.
Test a three-flower arrangement first because six-way symmetry affects edge alignment.
Stitch-count check: Each flower still contains six ivory petals. Every R7 petal retains its ten worked stitches.
A joined tip substitutes two free chains with two chains and one connecting slip stitch.
The additional connecting slip stitch belongs to the join and does not change the counted petal stitches.
A purple and white crochet flower blanket depends on matching connection lengths rather than adding stitches between every flower.
Part 6: Optional Openwork Star Fillers
Make one per selected triangular gap. Yarn: ivory white.
The small connecting stars fill open spaces where three neighboring flowers approach one another.
R1: Work 6 sc in MR and join. (6)
R2: [Sl st in next center sc, ch 4, sl st through one surrounding flower-tip join, ch 4, sl st in next center sc] ×3.
Use the next surrounding flower-tip join for each repeat.
Count: 6 center slip stitches, 3 outer linking slip stitches, and 24 chains forming three paired arms.
Position the center ring near the middle of the open space rather than pulling it toward one flower.
If a chain-four arm draws the panel inward, add one chain to each matching arm within that gap.
If the connector sags, test chain three instead.
Fasten off, leaving a 12 cm yarn tail.
Weave the tail along the wrong side of the connector.
Not every opening requires a filler. Make one connector first, compare its appearance with the photograph, and repeat the same choice consistently.
Part 7: Optional Scalloped Border
Yarn: ivory white.
The photograph already shows a naturally scalloped outline formed by the individual flower petals.
An extra border is optional.
Border R1: Join ivory yarn at one exposed outer ch-2 tip.
Work sc into that tip, then chain a measured distance to the next exposed outer tip and sc into its space.
Repeat around the perimeter, using the same chain length for equally sized gaps.
At projecting corners, replace the single tip sc with (sc, ch 2, sc).
Count: One anchor per exposed tip. Chain quantities depend on blocked spacing.
Border R2: Sl st into the first chain arch.
In each arch, work (sc, hdc, 3 dc, hdc, sc).
Sl st into the anchor between arches.
Repeat around.
Count: Seven stitches per scallop, plus one separator slip stitch.
Test a short border section before edging the entire blanket.
If the trim ruffles, shorten the foundation arches or leave the natural flower edges exposed.
How to Calculate Yarn and Blanket Size
Before making a bedspread, complete three identical flower motifs with the same yarn and crochet hook.
Weigh the ivory and purple yarn separately before and after working the samples, or weigh the cut yarn allocated to each color.
Divide the weight of each color by three to determine an average per flower.
Include a sample lace connector and border section if the complete blanket will use those elements.
Join the three flowers and block them flat.
Record the horizontal and vertical distance between the flower centers. Estimate the total flower quantity from the intended staggered arrangement.
Do not rely only on the diameter of a standalone flower. Staggered rows have different horizontal and vertical spacing.
Yarn calculation:
Estimated grams for one color = average grams per motif × planned motif count + joining and border yarn + 10–15% reserve.
Repeat this calculation for the second yarn color.
For a larger bedspread, repeat the weighing test after the first twelve motifs. Small differences in tension can produce a meaningful change in total yarn consumption.
Assembly Instructions
- Complete the first center. Work the purple R1–R3 circle, count eighteen stitches, and mark six groups of three stitches.
- Make the raised lobes. Work R4 in front loops only, leaving the unused back loops available for the ivory foundations.
- Build the outer flowers. Work R5–R7, confirming six complete ivory petals and six joining tips per flower.
- Check color placement. Position the purple centers face up and inspect the ivory petals for uneven openings or twisted stitches.
- Arrange the first row. Position motifs on a flat surface so the intended joining tips meet without stretching.
- Join adjacent flowers. Connect matching tip spaces during R7 of each new flower while retaining the ten-stitch petal sequence.
- Build the remaining rows. Stagger neighboring flowers and measure the growing panel after each completed row.
- Fit the lace connectors. Add three-arm star fillers in selected triangular gaps, keeping each center ring level.
- Finish the outer edge. Retain the natural scalloped flower outline or add the optional two-round border.
- Block and finish. Weave in all yarn tails, damp-block the blanket to the intended dimensions, and let it dry flat before measuring again.
The completed fabric consists of layered flower motifs, tip joins, optional lace inserts, and a shaped outer edge.
7 Technical Tips for Better Crochet Flowers
- Prevent stitch-marker drift: Place a locking marker in the first stitch of R3 and another at every third stitch. A missed group shifts one of the six purple lobes away from its matching ivory petal.
- Avoid an oversized center: Do not add extra stitches to the six-stitch magic ring. An enlarged ring creates an unwanted center opening and changes the placement of the upper petals.
- Check the working loops: Work R4 through the front loops and return to the remaining back loops for R5. Working through both loops removes the intended attachment line for the white petal layer.
- Maintain even petal peaks: Count exactly nine R6 stitches in every outer petal. A missing double crochet shifts the chain-two joining space away from the center.
- Avoid tight joining chains: The standard tip connection uses ch 1, a linking slip stitch, and ch 1. If the connected petals buckle, check yarn tension before increasing every join length.
- Block equal petal intervals: Pin the six tips of the test flower at evenly spaced radial positions. If one petal remains significantly shorter, check its stitch count instead of stretching it excessively.
- Secure woven yarn tails: Leave twelve to fifteen centimeters for finishing. Weave through several stitches on the wrong side in more than one direction because tails secured only through open chains can migrate to the front.
Related Crochet Blanket Patterns
- Daisy Puff Hexagons: A DK-weight raised daisy design using modular joining techniques. View the Daisy Puff Hexagons pattern. [INTERNAL LINK NEEDED: puff flower hexagon guide]
- Grandmother’s Flower Garden Blanket: A portable hexagon project with multiple size options. Read the flower garden blanket tutorial. [INTERNAL LINK NEEDED: crochet hexagon blanket]
- Six-Petaled Flower Hexagon: A textured floral motif with six defined petals. Explore the six-petaled flower pattern. [INTERNAL LINK NEEDED: six-petal motif tutorial]
- Daisy Lace Flower Blanket: An intermediate flower blanket with openwork connections and edging. See the daisy lace blanket design. [INTERNAL LINK NEEDED: lace crochet blanket border]
Conclusion
A finished floral panel should show distinct purple centers, six rounded ivory petals per flower, and repeatable open spaces between motifs. Check the width and diagonal stretch after blocking, not only while the blanket is lying on a table. If the edges flare, shorten the outer chains before adding more motifs. The next practical step is to make three identical flowers, join them, and record their blocked width and combined yarn weight. Use those figures to calculate the bedspread quantity rather than treating the photograph as a gauge chart. Share your completed purple and white crochet flower blanket on Pinterest or Instagram with #PurpleWhiteFlowerBlanket. Which flower-to-flower gap is hardest to keep even: the side joins or the three-way star openings?









