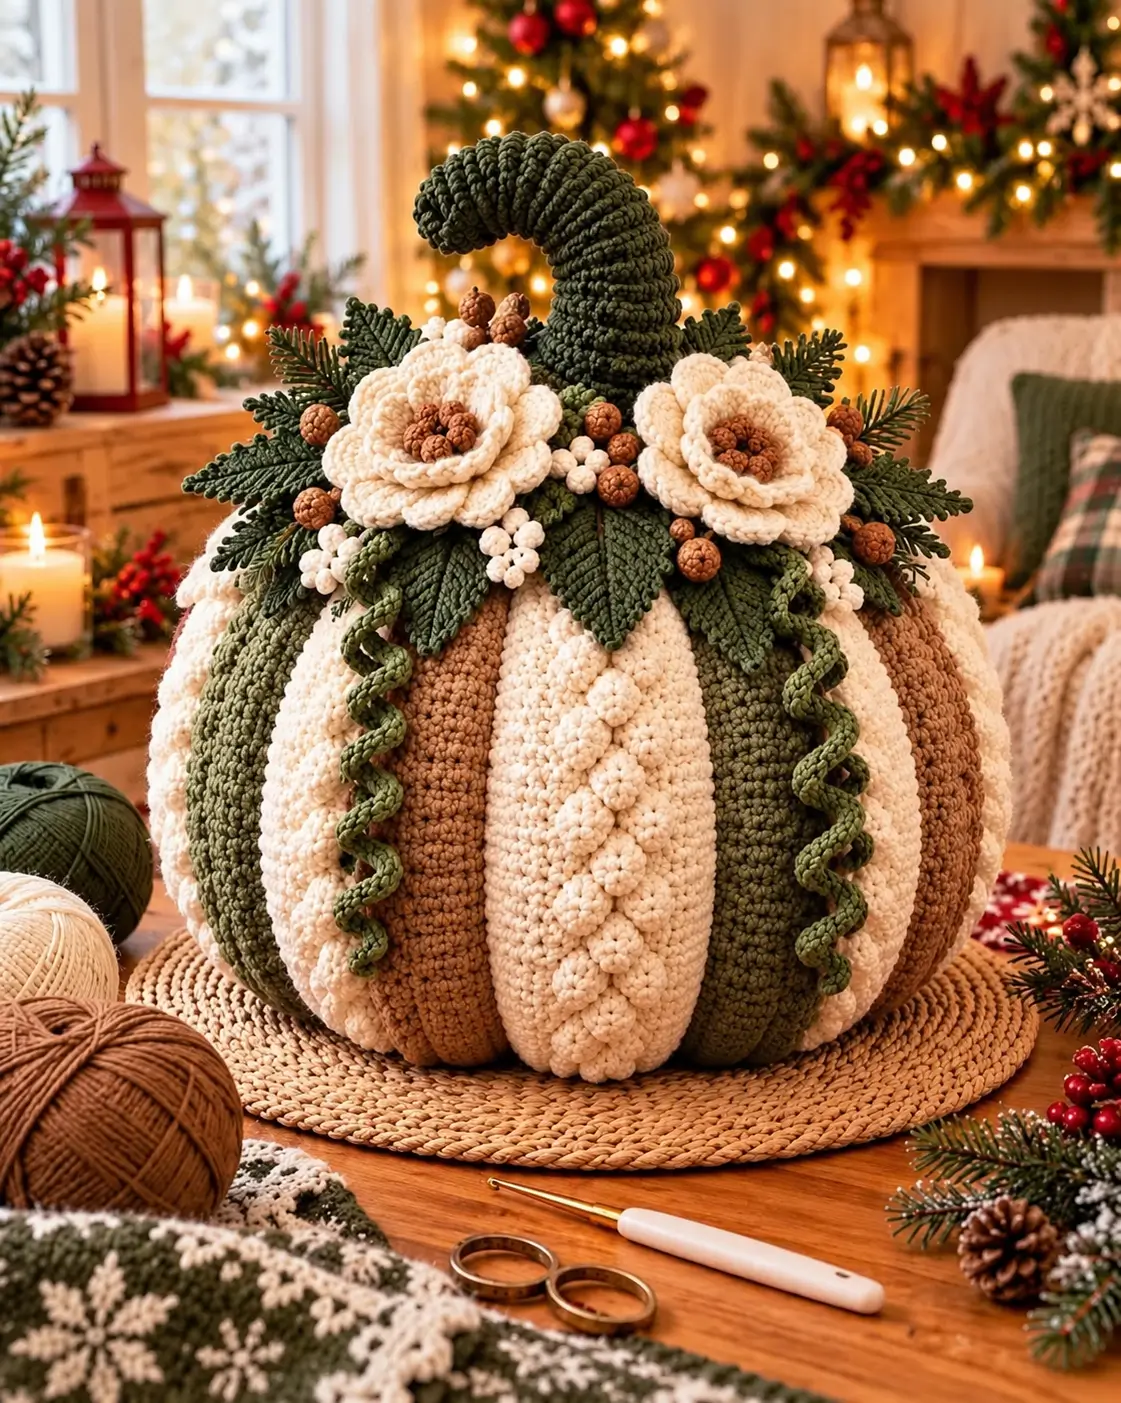
A Christmas pumpkin needs a crown large enough to balance its body, and this one carries flowers, berries, evergreen foliage, spiral vines, and an oversized hooked stem. This Christmas crochet pumpkin pattern uses ivory, olive, and caramel panels with raised texture across a large stuffed form. Work it primarily in Aran or bulky yarn with a 5 mm hook. The finished centerpiece is intended for a table, mantel, sideboard, or large seasonal display.
What Makes This Christmas Crochet Pumpkin Different
The body uses broad vertical sections rather than relying on one uniformly textured sphere. Alternating ivory, olive, and caramel areas create visible segmentation before any sculpting yarn is added, while a raised cream motif gives the front panel additional depth. Above that structure sits a dense botanical crown: two layered flowers establish the focal points, dark foliage spreads horizontally, berries fill small gaps, and spiral vines drop down the body. The exaggerated curved stem provides height and separates this crochet Christmas centerpiece from a conventional fall pumpkin. A common failure with a large crochet pumpkin is making the topper too small. On a body this wide, a short stem and two small leaves would disappear visually instead of balancing the mass below.
Project Info at a Glance
| Skill Level | Construction | Target Size | Hook | Best For |
|---|---|---|---|---|
| Advanced intermediate | Stuffed segmented body with applied decoration | Approx. 35–45 cm wide | 5 mm | Christmas centerpiece, mantel or sideboard |
The 35–45 cm measurement is an image-based target rather than a published measurement of the photographed object. Published large crochet pumpkins around 16.5 × 22.9 cm can already require 183–229 m of bulky yarn, so this centerpiece should be treated as a substantially larger yarn project.
Materials and Tools
Yarn
- Warm ivory Aran/bulky yarn — main pumpkin panels, flowers, white berries.
- Olive green Aran/bulky yarn — pumpkin panels and spiral vines.
- Caramel brown Aran/bulky yarn — pumpkin panels and flower centers.
- Dark forest green worsted/Aran yarn — leaves, evergreen foliage and large stem.
- Medium brown worsted yarn — berries and flower centers.
- Polyester fiberfill — body and curved stem.
Do not assign an exact total gram quantity from the photograph. Make one complete body panel, weigh it, and calculate the remaining body yarn from that sample. Keep separate allowances for the flower crown and oversized stem.
Tools
- 5 mm crochet hook
- 4 mm crochet hook for smaller berries and dense foliage
- Yarn needle
- Scissors
- Locking stitch markers
- Tape measure
- Polyester fiberfill
- Rustproof pins
Abbreviations
- MR — magic ring
- ch — chain
- sl st — slip stitch
- sc — single crochet
- hdc — half double crochet
- dc — double crochet
- tr — treble crochet
- inc — 2 stitches in one stitch
- dec — decrease
- FPdc — front-post double crochet
- BLO — back loop only
- st/sts — stitch/stitches
- RS — right side
- WS — wrong side
For invisible decreases in three-dimensional components, insert the hook through the front loops of the next two stitches before completing one single crochet.
Pattern — Step by Step
The photograph shows a very large decorated pumpkin, but it does not expose the hidden seams or internal structure. This reconstruction uses separate vertical body panels because that method gives direct control over color placement, front texture, circumference, and deep segment definition.
Plain Pumpkin Panel — Make 8
Make 3 ivory, 3 olive and 2 caramel panels.
Ch 41.
Row 1: Sc in second ch from hook and across. Ch 1, turn. (40)
Row 2: Sc BLO across. Ch 1, turn. (40)
Rows 3–18: Repeat Row 2. (40 each row)
Fasten off with a 40 cm sewing tail.
Each panel should be longer than it is wide. If your yarn produces a very narrow panel, add rows rather than adding stitches to the foundation because the foundation length controls the pumpkin height.
Raised Ivory Front Panel — Make 2
Yarn: warm ivory.
Ch 41.
Row 1: Sc in second ch from hook and across. Ch 1, turn. (40)
Rows 2–4: Sc across. Ch 1, turn. (40)
Row 5: Sc 17, work one 5-dc bobble in next stitch, sc 5, work one 5-dc bobble in next stitch, sc 16. Ch 1, turn. (40 positions)
Row 6: Sc across. Ch 1, turn. (40)
Row 7: Sc 19, 5-dc bobble in next stitch, sc 20. Ch 1, turn. (40 positions)
Row 8: Sc across. Ch 1, turn. (40)
Continue alternating plain rows with centered or paired bobbles until Row 16, creating a vertical raised line rather than a solid field of bobbles.
Rows 17–18: Sc across. (40)
Fasten off with a long sewing tail.
The photograph suggests a more complex cable/bobble texture than a still image can decode. This reconstructed panel recreates the raised visual rhythm without claiming the unidentified original cable sequence.
Joining the Pumpkin Panels
Arrange the ten panels before sewing.
A useful sequence is:
ivory textured → olive → ivory plain → caramel → ivory textured → olive → ivory plain → caramel → olive → ivory plain.
Place two neighboring panels RS together.
Whipstitch one long edge from top to bottom.
Open the joined pieces and check the seam.
Continue adding panels until all ten form one wide sheet.
Join the first and final long edges to create a large tube.
Do not gather either opening yet.
Closing the Pumpkin Bottom
Cut a long length of strong matching yarn.
Thread it onto a yarn needle.
Work a running stitch around the entire lower opening approximately 8–10 mm from the edge.
Place one gathering stitch through every panel seam so the ten segments converge evenly.
Pull the opening closed gradually.
Pass through the gathered center several times.
Knot securely inside the pumpkin.
Stuffing the Large Pumpkin
Turn the body RS out.
Add fiberfill around the outside perimeter first.
Push stuffing into each segment independently.
Fill the central cavity only after the outer circumference has taken shape.
Keep the body broad.
Do not pack the vertical center so firmly that the pumpkin becomes spherical.
The upper crown must compress deeply enough to hold the heavy botanical decoration.
Closing and Compressing the Top
Run a strong yarn strand around the upper opening.
Leave an opening approximately 8–10 cm wide.
Add the final stuffing.
Pull the opening closed.
Pass the needle from the top center through the pumpkin and out through the bottom center.
Return through the body.
Repeat several times until the crown sits noticeably lower than the outside shoulders.
Secure the shaping yarn.
Defining the Ten Pumpkin Segments
The panel seams already mark the segment boundaries.
If stronger grooves are required, cut a long matching strand.
Pass it through the top center.
Run the strand externally along one seam.
Take it through the bottom center and back through the body.
Repeat around selected seams.
Pull only enough to deepen the existing channels.
The panels should remain broad and rounded rather than collapsing into narrow wedges.
Oversized Curved Stem
Yarn: dark forest green.
The photographed stem is a major sculptural component rather than a conventional short pumpkin stalk.
R1: 6 sc in MR. (6)
R2: Inc ×6. (12)
R3: (sc, inc) ×6. (18)
R4: (2 sc, inc) ×6. (24)
R5: (3 sc, inc) ×6. (30)
R6: (4 sc, inc) ×6. (36)
R7–R28: Sc around. (36 each round)
Begin stuffing firmly after Round 10.
From Round 15 onward, place slightly more stuffing along the outside of the intended curve and less on the inside.
R29: (4 sc, dec) ×6. (30)
R30–R33: Sc around. (30)
R34: (3 sc, dec) ×6. (24)
R35–R38: Sc around. (24)
Fasten off with a 50 cm tail.
Bend the stuffed stem into a hook before attachment. If it will not retain the curve, sew several hidden shaping stitches between the inner surfaces of the bend.
Large Layered Flowers — Make 2
Yarn: warm ivory with caramel or brown centers.
Flower Center
R1: 6 sc in MR. (6)
R2: Inc ×6. (12)
Fasten off.
Inner Petal Layer
Join ivory to the center.
Repeat six times:
sl st in next stitch, ch 2, 3 dc in next stitch, ch 2, sl st in same stitch.
Fasten off.
Middle Petal Layer
Join ivory behind the first layer.
Work six chain-4 loops evenly around the back of the flower.
Into each loop work:
sc, hdc, 3 dc, hdc, sc.
Fasten off.
Outer Petal Layer
Join behind the middle layer.
Make six chain-6 loops.
Into each loop work:
sc, hdc, dc, 3 tr, dc, hdc, sc.
Fasten off with a 30 cm tail.
Shape the petals so the outer layer spreads to roughly 9–12 cm depending on yarn.
Brown Flower-Center Berries — Make 10
Yarn: caramel or medium brown.
R1: 6 sc in MR. (6)
R2: Inc ×6. (12)
R3: Sc around. (12)
Add a tiny amount of stuffing.
R4: Dec ×6. (6)
Fasten off with a sewing tail.
Sew five berries into the center of each large ivory flower.
Decorative Brown Berries — Make 12–16
Repeat the same four-round berry pattern.
Stuff lightly.
Leave a 15 cm tail on every berry.
These berries fill spaces between the flowers and evergreen foliage.
White Berry Clusters — Make 12–18 Berries
Yarn: warm ivory.
R1: 6 sc in MR. (6)
R2: Sc around. (6)
Fasten off.
These tiny berries do not need stuffing when worked tightly.
Group three to five berries together and stitch their bases into one cluster before attaching the cluster to the crown.
Broad Green Leaves — Make 6
Yarn: dark forest green.
Ch 17.
Beginning in second ch from hook work:
sc, hdc, dc, 8 tr, dc, hdc, sc, sl st.
Work 3 sc into the final chain.
Continue along the opposite side:
sl st, sc, hdc, dc, 8 tr, dc, hdc, sc.
Join at the base.
Fasten off with a long tail.
Add a loose line of surface slip stitches from the base toward the tip to create a central vein.
Evergreen Sprigs — Make 8–12
Yarn: forest green.
Ch 24.
Starting in the second chain, sl st in each chain to create the branch spine.
Working back along the spine, repeat:
ch 5, sl st back down 4 chains, sl st into next spine stitch.
Alternate the needle branches from one side to the other.
For fuller sprigs, occasionally use ch 6 instead of ch 5.
Fasten off with a sewing tail.
Spiral Vines — Make 2
Yarn: olive green.
Ch 45.
Beginning in the second chain from the hook, work 3 sc in every chain.
The repeated increases cause the cord to coil automatically.
Fasten off with a 20 cm tail.
Make one second vine between 35 and 50 chains so the two spirals are not exactly the same length.
Building the Botanical Crown
Attach the large curved stem first.
Position it slightly behind the center rather than directly above the front textured panel.
Sew through the 24-stitch stem base repeatedly and into several neighboring pumpkin panels.
Next, pin the two large ivory flowers to the left and right front of the stem.
Place broad leaves behind the flowers.
Spread evergreen sprigs horizontally around the crown.
Fill open areas with brown and white berry clusters.
Attach the two spiral vines last so they can fall over the front segments without becoming trapped beneath other motifs.
Supporting the Heavy Topper
The botanical crown adds considerably more weight than a standard pumpkin stem.
Before final attachment, push extra stuffing into the upper shoulders of the pumpkin.
Keep the center depression intact.
Sew large motifs through both the outer fabric and several neighboring panel seams whenever possible.
Do not rely on one stitch at the flower center.
Each flower should have at least three concealed attachment zones around its rear surface.
Adjusting the Finished Size
The foundation length controls body height.
Panel width and panel count control circumference.
For a smaller centerpiece, reduce each panel to approximately 30 stitches tall and 14 rows wide.
For an oversized floor or hearth pumpkin, increase the panel foundation while maintaining broad proportions.
Make the stem and flowers proportionally larger whenever the body size increases.
A topper that works on a 25 cm pumpkin will look undersized on a 45 cm body.
Yarn Planning
A published 6.5 × 9 inch bulky pumpkin uses approximately 183–229 m of yarn. This design has a much larger apparent body plus flowers, leaves, berries, vines, and an oversized stem.
For accurate purchasing, crochet one plain panel first.
Weigh it.
Multiply that measurement by eight.
Make one textured ivory panel and weigh it separately, then multiply by two.
Next, make one flower, one broad leaf, one evergreen sprig, and one berry.
Use those measured samples to calculate the decorative yarn requirement.
Add an additional allowance for seams, testing, and attachment tails.
Assembly
- Crochet eight plain body panels and two raised ivory panels, keeping their finished lengths consistent.
- Arrange the ivory, olive, caramel, and textured sections in the final color sequence before joining them.
- Sew all long panel edges together, close the sheet into a tube, and gather the lower opening securely.
- Stuff the pumpkin broadly, gather the upper opening, and compress the top and bottom centers to establish the squat segmented body.
- Deepen selected panel seams with shaping yarn only where the natural grooves need stronger definition.
- Crochet, stuff, curve, and attach the oversized dark-green stem at the rear half of the crown.
- Make the two layered ivory flowers, brown centers, broad leaves, evergreen sprigs, and berry clusters.
- Pin the complete botanical crown in position before permanently sewing any flower or foliage group.
- Sew the flowers first, add foliage and berries around them, then attach the two spiral vines so they fall over separate front panels.
- Check the centerpiece from every side, reinforce any moving crown component, redistribute stuffing where needed, and bury all structural tails inside the pumpkin.
The completed centerpiece should have ten clearly readable body segments, a recessed crown, a tall curved stem, two dominant flowers, spreading evergreen foliage, berry clusters, and two hanging spiral vines.
7 Technical Tips
- Keep all ten body panels within approximately 5 mm of the same finished length. A longer panel creates a bulge at the top or bottom when the seams converge.
- Leave the top 8–10 cm opening accessible until the final stuffing adjustment. Closing it too early makes it difficult to support the weight of the floral crown.
- Stop adding fiberfill when the panel stitches remain closed under pressure. Visible gaps between stitches indicate overstuffing and weaken the surface beneath heavy appliqués.
- Give each large flower at least three concealed attachment zones. Sewing only through the center allows a 9–12 cm layered flower to rotate forward under its own weight.
- Keep the spiral vines at least 3 cm away from the pumpkin base. Longer coils become trapped underneath the centerpiece when it is moved.
- Shape the large stem gradually while stuffing Rounds 15–28. Filling the tube completely before bending it produces a stiff straight stem instead of the photographed hook.
- Reinforce the stem through several neighboring panel seams rather than one central point. A tall 36-stitch stuffed stem creates enough leverage to pull a weak crown attachment out of shape.
Finishing the Christmas Centerpiece
Place the pumpkin on its intended display surface before trimming the final tails.
Rotate the body until a raised ivory panel faces forward.
Check that the two flowers sit at different angles rather than forming a rigid horizontal pair.
Spread the evergreen sprigs behind them to increase the apparent width of the crown.
Move berry clusters into any remaining visual gaps.
Let each spiral vine follow a different pumpkin groove.
The tall stem should curve forward or sideways without touching the flowers.
If the centerpiece leans, redistribute stuffing through the crown opening before making the final closure stitches.
Conclusion
The scale of the crown is what separates this Christmas crochet pumpkin pattern from a standard stuffed pumpkin. Build the body first, measure its actual width, and use that measurement to judge the flowers, foliage, berries, vines, and oversized stem before permanent attachment. The next practical step is to crochet one plain body panel and record its dimensions and yarn weight; that sample controls both final size and purchasing quantities. Share the finished centerpiece on Pinterest and Instagram with #ChristmasCrochetPumpkin. For this specific pumpkin, would you keep the caramel body panels or replace them with deep Christmas red?