Introduction
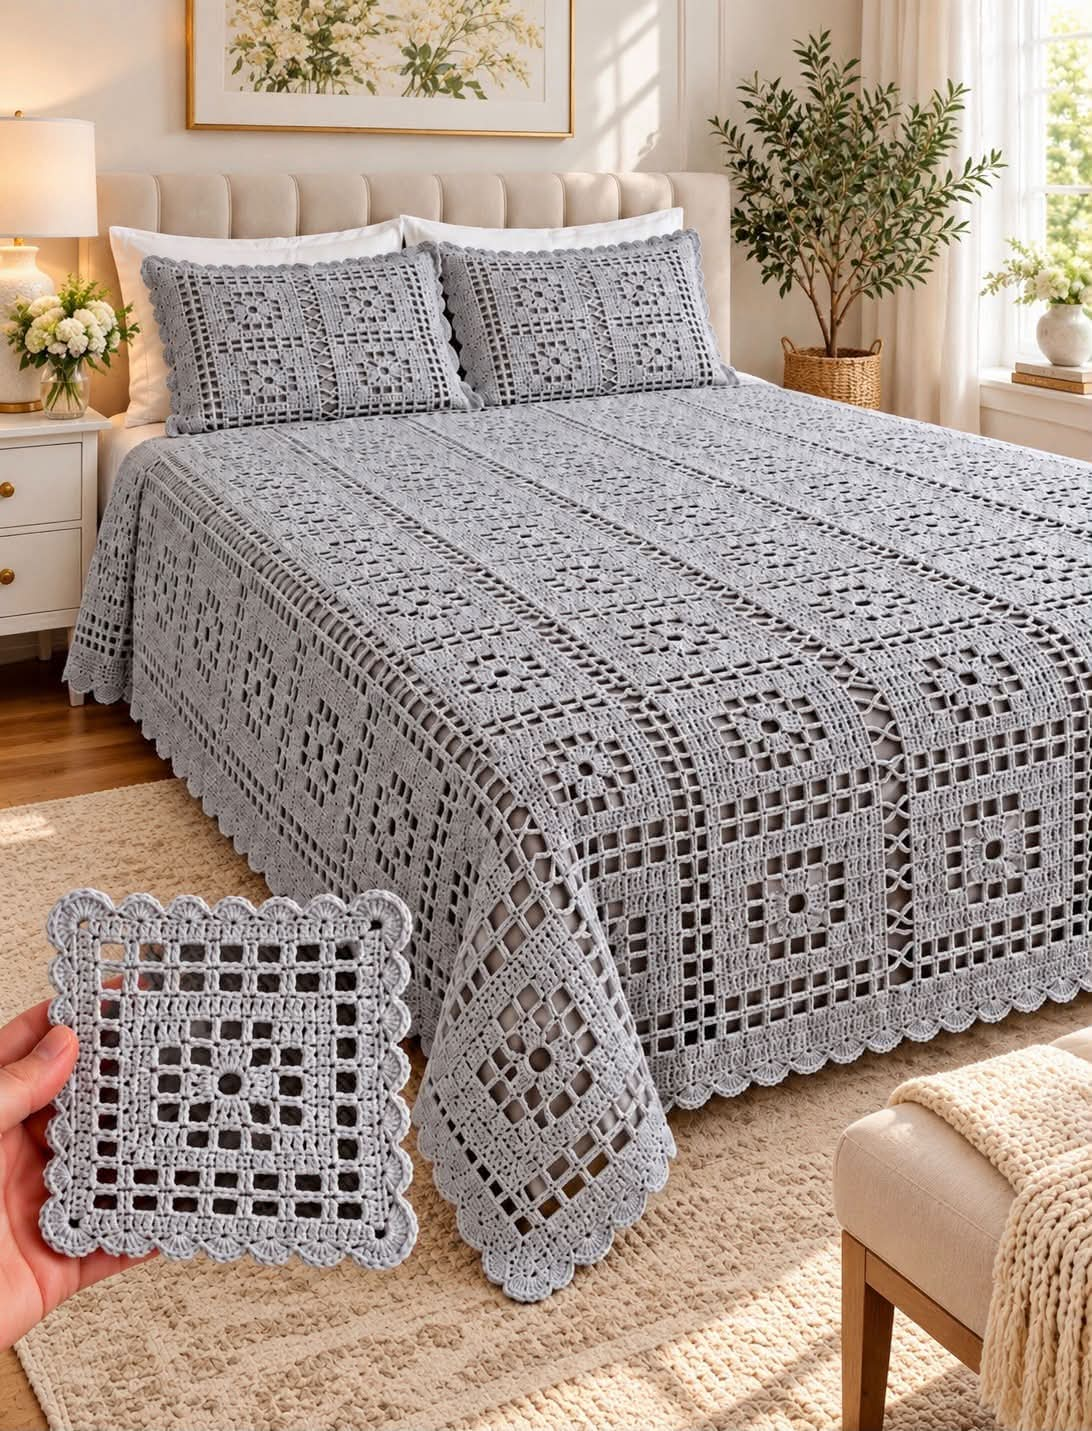
A single round eyelet anchors every square in this bedspread, while alternating solid bars and open mesh make that tiny center visible from across the room. This filet crochet bedspread pattern recreates the photographed gray coverlet with modular lace squares and a scalloped perimeter. Use smooth cotton or cotton-blend yarn and a hook matched to your gauge. Intermediate skills are appropriate because consistent mesh dimensions matter more than complicated stitches.
The Design: What Makes This Filet Crochet Bedspread Different
The photographed motif does not rely on flowers or raised appliqués. Its structure comes from negative space. A small center ring is surrounded by compact stitches, followed by increasingly large bands of square mesh. Solid double-crochet sections interrupt that mesh near the corners, keeping the motif rigid enough to join without losing its square geometry.
The bedspread repeats those blocks in a strict grid, while the matching pillow covers use the same visual language at a smaller scale. A narrow scalloped edge softens the otherwise geometric construction.
Comparable filet-crochet bedspreads vary widely in gauge: published examples range from 6-inch motifs worked in fine thread to 14¼-inch and 17-inch squares. For this photo-inspired version, a filet crochet square motif around 15–16 cm is a practical target.
Project Info at a Glance
| Skill Level | Construction | Target Motif Size | Hook | Best For |
|---|---|---|---|---|
| Intermediate | Joined openwork squares | Approx. 15–16 cm | 3.5–4.0 mm | Throws, coverlets and bedspreads |
The 15–16 cm measurement is the target for this reconstructed motif rather than a measurement taken directly from the photograph. Filet sizing is controlled by mesh count and gauge, so one blocked sample should determine the dimensions of the full project.
Materials and Tools
Yarn
- Soft gray — DK or light worsted cotton/cotton blend — main motifs, joining and border
Use a smooth yarn with visible stitch definition. Highly fuzzy fibers obscure the straight mesh bars that give filet crochet its geometric appearance.
Published filet bedspread patterns demonstrate how strongly yarn choice changes scale. A Workbasket filet motif uses No. 20 crochet cotton and measures about 6 inches, while a larger vintage motif made with heavier crochet cotton measures approximately 14¼ inches.
Tools
- 3.5–4.0 mm crochet hook
- DK or light worsted yarn
- Yarn needle
- Scissors
- Locking stitch markers
- Tape measure
- Blocking mats
- Rust-resistant pins
Abbreviations
- MR — magic ring
- ch — chain
- sl st — slip stitch
- sc — single crochet
- hdc — half double crochet
- dc — double crochet
- tr — treble crochet
- sp — space
- st/sts — stitch/stitches
Filet mesh in this pattern means a double crochet followed by a chain space, with the next double crochet forming the opposite vertical side of the open cell.
Filet Crochet Square Motif
This is an original photo-inspired construction rather than a transcription of a published pattern. The hand-held motif in the photograph provides the structural reference: a small center opening, concentric open mesh, solid corner groups and a shell-style perimeter.
Center Ring
Yarn: soft gray.
Round 1: Make a MR. Ch 3 to count as the first dc. Work 11 dc into the ring. Join with sl st to the top of ch-3. (12 dc)
Pull the ring until a small opening remains. The photograph shows a visible center eyelet rather than a completely closed center.
First Openwork Round
Round 2: Ch 4 to count as dc plus ch 1.
Work:
(dc in next st, ch 1) around.
Join with sl st to the third chain of the beginning ch-4. (12 dc, 12 ch-1 spaces)
This round establishes the small radial openings around the center.
Establishing Four Corners
Round 3: Sl st into the first ch-1 space. Ch 3, 2 dc in same space.
Ch 2, 3 dc in next ch-1 space.
For the first corner work:
(3 dc, ch 3, 3 dc) in the next ch-1 space.
Continue around, distributing four corner groups evenly.
Join with sl st.
Place a marker in each ch-3 corner space before proceeding.
First Filet Mesh Band
Round 4: Ch 3.
Across each side work alternating:
dc, ch 2, skip 2 sts, dc
to create square openings.
At every marked corner work:
(2 dc, ch 3, 2 dc)
Continue around and join.
The mesh cells should appear approximately square rather than tall rectangles. Adjust chain tension if the openings are visibly compressed.
Solid Frame Round
The photograph alternates open cells with stronger solid bands. These bands prevent a large bedspread from becoming excessively stretchy.
Round 5: Ch 3.
Dc into each dc and work 2 dc into each ch-2 side space.
At every corner work:
(2 dc, ch 3, 2 dc)
Continue around and join with sl st.
Check the motif on a flat surface. Four sides should be equal before another mesh band is added.
Second Filet Mesh Band
Round 6: Ch 3, ch 2, skip 2 sts, dc in next st.
Repeat:
ch 2, skip 2 sts, dc in next st
across the side.
At each corner work:
(dc, ch 3, dc)
Continue the mesh pattern along the next side.
Repeat around and join.
Second Solid Frame
Round 7: Ch 3.
Dc in every dc and work 2 dc into each ch-2 mesh space.
At each corner ch-3 space work:
(2 dc, ch 3, 2 dc)
Continue around.
Join with sl st.
This alternating sequence of open and filled rounds creates the concentric square effect visible in the photographed sample.
Outer Mesh Round
Round 8: Ch 4 to count as dc plus ch 1.
Skip one stitch and dc in the next stitch.
Repeat:
ch 1, skip 1 st, dc in next st
across each side.
At every corner work:
(dc, ch 3, dc)
Continue around and join.
This smaller mesh prepares the motif for the structural outer frame.
Outer Square Frame
Round 9: Ch 1.
Work sc into each dc and one sc into each ch-1 space.
At each corner work:
(2 sc, ch 2, 2 sc)
Continue around and join.
The square should now have a firm perimeter suitable for joining.
Optional Scalloped Motif Edge
The hand-held sample shows scallops around an individual square. For a bedspread that will be joined edge-to-edge, omit these shells on internal motifs and reserve the scallop construction for exposed edges or decorative pillow squares.
For a standalone motif, join yarn in any corner.
Skip approximately two stitches and work:
5 dc in next st, skip 2 sts, sl st in next st.
Repeat along each side.
At a corner, use 7 dc if required to turn the angle without pulling the fabric inward.
Fasten off and weave in the tail.
Checking the Filet Mesh
The most important measurement is not the number of stitches alone. Each mesh opening must remain consistent.
Place a ruler over the center of the blocked square.
Compare several neighboring cells.
If one row has noticeably taller openings, the chain stitches in that round were worked more loosely.
If the vertical bars lean, one side of the motif may contain a missed or additional mesh.
Correct significant errors before joining. A bedspread grid makes irregular filet cells much easier to see.
Blocking the Square
Dampen the finished motif according to the yarn manufacturer’s instructions.
Pin all four corners first.
Measure both diagonals.
Adjust the pins until the diagonal measurements match.
Pin the midpoint of each side.
For this version, target approximately 15–16 cm square.
Published filet patterns demonstrate why gauge must be checked rather than assumed. A vintage Workbasket motif measures about 6 inches using fine No. 20 cotton and a 1.4 mm hook, while a larger filet design measures approximately 14¼ inches with heavier crochet cotton.
Allow the motif to dry completely before removing it from the blocking surface.
How Filet Crochet Sizing Works
Filet crochet size is determined by the number of mesh cells and the gauge of those cells.
If a chart contains 24 cells across and the gauge is four meshes per inch:
24 ÷ 4 = 6 inches
The same 24-cell design at three meshes per inch becomes:
24 ÷ 3 = 8 inches
This is why a geometric filet design can be adapted to several yarn weights without changing its visual structure.
For a bedspread, however, changing yarn after several motifs have been completed is impractical. Make, wash and block one test square first.
How Many Squares Are Needed?
Use the actual blocked measurement rather than relying on the nominal yarn weight.
If one square measures 15 cm:
10 motifs across = approximately 150 cm
14 motifs long = approximately 210 cm
A 10 × 14 layout therefore requires:
140 motifs
If each square blocks to 16 cm, the same grid becomes approximately 160 × 224 cm before the final border.
Choose the grid from the mattress dimensions and desired side drop.
Example Bedspread Layouts
| Grid | Motifs | Approx. Size with 15 cm Squares |
|---|---|---|
| 7 × 9 | 63 | 105 × 135 cm |
| 9 × 12 | 108 | 135 × 180 cm |
| 10 × 14 | 140 | 150 × 210 cm |
| 12 × 15 | 180 | 180 × 225 cm |
The joining method and outer border add additional width and length.
Estimating Yarn
Published filet bedspreads demonstrate that yarn requirements vary enormously with yarn weight and motif scale. One vintage 90-inch-square thread bedspread specifies approximately 2,300 g of crochet cotton, while another modular filet bedcover lists approximately 2,000 g for a 59½ × 88-inch finished piece.
For a modern DK or light-worsted reconstruction, calculate yarn from a physical sample rather than transferring thread-crochet quantities directly.
Weigh one washed and blocked square.
If one motif weighs 22 g and the blanket requires 140 motifs:
22 × 140 = 3,080 g
Add yarn for joining and the perimeter, plus a reserve for gauge variation.
Joining the Filet Crochet Squares
The photograph shows narrow structural lines separating the squares. A flat slip-stitch join reproduces that effect without creating a bulky ridge.
Place two blocked squares side by side with right sides facing upward.
Join gray yarn at corresponding corners.
Insert the hook through the matching edge loops of both motifs.
Work one loose slip stitch.
Continue across the complete edge, matching every stitch position.
Fasten off at the opposite corner.
Join all squares into horizontal strips first. Connect the strips after verifying that each completed row remains the same length.
Preventing Tight Joining Seams
A slip-stitch seam can contract more than the surrounding double crochet.
After joining the first two motifs, place them flat.
If their outer edges curve toward the seam, the joining loops are too tight.
Pull each slip stitch to approximately the height of the edge loops before making the next stitch.
Do not compensate by skipping edge stitches. That creates mismatched mesh positions and makes the grid look irregular.
Bedspread Border
After the complete grid is assembled, work one structural round before adding the decorative shells.
Border Round 1
Join gray yarn at any outer corner.
Ch 1 and sc evenly around the perimeter.
At each corner work:
(2 sc, ch 2, 2 sc)
Join with sl st.
Border Round 2
Ch 3.
Dc in each stitch around.
At every corner ch-2 space work:
(2 dc, ch 2, 2 dc)
Join with sl st.
Open Border Round
Ch 1, sc in the first stitch.
Repeat:
ch 3, skip 2 sts, sc in next st
around each side.
At each corner work:
(sc, ch 5, sc)
Join with sl st.
Scalloped Final Edge
Sl st into the first ch-3 space.
Work 5 dc into the same space.
Sl st into the next anchoring stitch or space.
Repeat around the blanket.
At each corner, work a larger 7-dc shell if necessary to keep the border flat.
Fasten off.
Matching Filet Crochet Pillow Covers
The photograph pairs the bedspread with two gray crochet pillow covers. The same square motif can be adapted without designing another stitch pattern.
Measure the pillow insert first.
Arrange blocked motifs until their combined dimensions match the required front panel.
For example, four motifs can form a 2 × 2 decorative panel. Larger cushions can use a 3 × 3 grid.
Join the motifs using the same flat seam as the bedspread.
Add a solid crochet or fabric back if the open filet front would expose the pillow insert too strongly.
Finish the outer perimeter with the same scalloped edging to coordinate the pillow and coverlet.
Making the Filet Mesh More Open
For larger openings, replace selected ch-2 mesh spaces with ch-3 spaces.
Test one complete motif before making this change throughout the bedspread.
Longer chains increase both openness and finished dimensions.
They can also reduce structural stability, particularly in a heavy blanket containing more than 100 motifs.
A better option for a moderately airier square is to enlarge only the outer mesh band while retaining the compact inner framework.
Making the Bedspread Denser
Replace selected mesh cells with filled filet blocks.
A filled section can be produced by working dc stitches across the chains that would otherwise form an opening.
Keep filled areas symmetrical on all four sides.
Adding solid blocks near the outer frame increases stability without removing the openwork character from the center.
Do not change several rounds at once. Crochet and block one modified sample to check that it remains square.
Assembly
- Crochet one complete gray filet square from the center eyelet through the outer structural frame.
- Wash and block the sample, matching both diagonal measurements before recording its finished size.
- Calculate the required motif grid from the intended bedspread dimensions.
- Make the remaining squares with identical yarn, hook size and mesh tension.
- Block every motif to the same measurements before beginning any permanent joins.
- Arrange the squares into horizontal rows and check the center eyelets for consistent orientation.
- Join neighboring motifs with relaxed gray slip stitches, matching every corresponding edge position.
- Connect the completed horizontal strips and inspect all four-square intersections for gaps.
- Work the solid and open perimeter rounds followed by the scalloped final border.
- Block the assembled bedspread lightly, straightening the outer grid without overstretching the open mesh.
The completed coverlet should form a regular field of square openings, solid concentric frames and evenly aligned center eyelets.
7 Technical Tips for Better Filet Crochet Squares
- Measure at least five neighboring mesh cells. One oversized chain space can distort the grid, while repeated differences of 2–3 mm create visibly uneven horizontal lines.
- Mark every corner before beginning a new square round. Missing one corner increase converts the motif into a trapezoid that blocking cannot reliably correct.
- Compare both diagonals before the motif dries. A difference greater than about 5 mm means the square needs to be repinned.
- Keep joining slip stitches at full loop height. Tight joins shorten the shared edge and produce raised seams between otherwise flat motifs.
- Count the mesh openings on every side. One missing cell shifts all later solid blocks and becomes conspicuous when two motifs are joined.
- Pin the structural frame rather than pulling individual mesh chains. Stretching isolated chain spaces produces openings of different sizes even when the overall square reaches the correct measurement.
- Weave each joining tail through at least 5 cm of solid gray stitches. Open mesh provides fewer secure hiding points, so short tails can become visible after repeated laundering.
Why Gauge Matters More in Filet Crochet
Filet crochet is effectively a grid. A small gauge difference is repeated across every cell, every motif and every row of the finished blanket.
Published patterns illustrate the scale variation clearly. A Workbasket filet square measures approximately 6 inches with fine No. 20 cotton, while another vintage bedspread motif measures 17 inches square using No. 5 cotton. A separate 1941 filet design uses 7½-inch squares.
The stitch concept remains similar, but the physical projects are dramatically different.
For this reason, the yarn label should never replace a gauge sample. The blocked test motif is the measurement that controls the final bedspread.
Keeping a Large Filet Bedspread Square
Measure the assembled project after every two or three motif rows.
Compare the left and right outer edges.
If one side becomes longer, identify the affected joining seam rather than trying to correct the discrepancy in the final border.
Lay the work flat whenever possible during assembly. The weight of a large crochet coverlet can stretch open mesh if most of the blanket hangs from the working edge.
Support the completed sections on a table or bed while joining additional rows.
Finishing and Care
Inspect all intersections before working the border. Four motif corners meet at these positions, making them the most likely locations for loose joins.
Secure any gaps with matching gray yarn.
Follow the care instructions supplied with the selected fiber. When washing a large openwork bedspread, support its weight while wet rather than lifting it from a single edge.
Dry flat when practical.
While damp, straighten the outside edges and gently align the rows of filet cells. Avoid pulling individual openings significantly larger than their neighbors.
For storage, fold the bedspread along motif seams rather than placing a hard fold through the center of a square.
Conclusion
The repeating mesh grid is the measurement that controls this filet crochet bedspread pattern. Crochet one complete square first, block it to approximately 15–16 cm, and count the finished mesh openings before calculating the bedspread dimensions. Keep the chain spaces uniform, alternate open bands with stronger solid frames, and join every blocked motif with relaxed stitches so the grid remains flat. The next practical step is to make one gray sample and record its washed size and weight; those two measurements determine both motif quantity and yarn requirements. Save the finished coverlet to Pinterest or share it on Instagram with #GrayFiletCrochetBedspread. Would you keep the monochrome gray palette or work the same filet grid in warm ivory?