Introduction
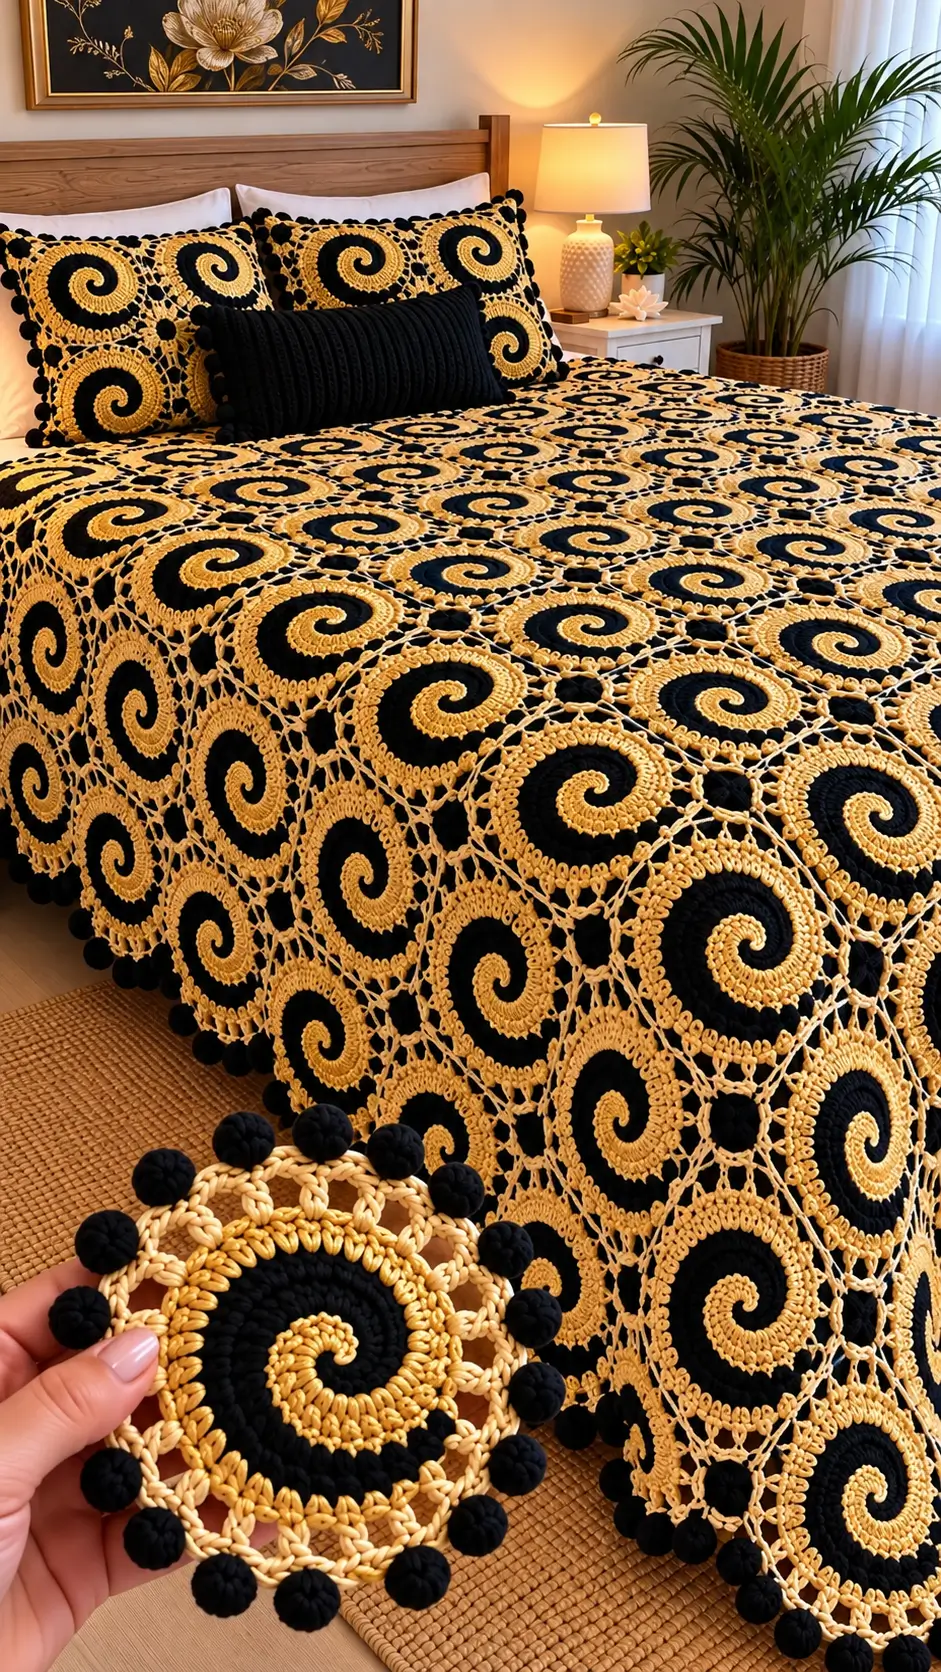
Two interlocking spirals create the distinctive black-and-gold circles in this crochet spiral bedspread pattern. The design combines contrasting crochet motifs, decorative openwork connections, and a pom-pom border to produce a coordinated bedroom set. Using medium-weight yarn and a 4.5 mm hook as a starting point, this intermediate-to-advanced project can be adapted to different bed dimensions. Its modular construction allows individual sections to be made and measured before final assembly.
The Design: What Makes This Spiral Bedspread Different
The black and gold crochet blanket uses a repeating circular motif rather than conventional granny squares. Each circle features two contrasting yarn sections that curve around a shared center. This construction produces the spiral effect without relying entirely on surface embroidery.
The second structural feature is the openwork joining. Instead of sewing solid motifs edge to edge, the design connects circles through a network of chain spaces and small joining points. This creates the lace appearance visible between the spirals.
A third feature is the black pom-pom border, which repeats the darker color at regular intervals.
One common mistake in a two-color crochet spiral is allowing one color section to advance farther than the other. The resulting circle becomes uneven, making later assembly difficult. Matching stitch counts, consistent tension, and regular measurements are essential.
Project Info at a Glance
| Detail | Specification |
|---|---|
| Skill Level | Intermediate to Advanced |
| Time | Multi-session project |
| Finished Size | Custom bed dimensions |
| Hook | 4.5 mm starting reference |
| Yarn | Worsted Weight, Medium #4 |
| Construction | Individual motifs and lace joins |
| Best For | Decorative bedspread and matching pillows |
Note: Hook size and yarn weight are starting references from related crochet patterns, not confirmed specifications for the photographed bedspread.
Materials and Tools
Yarn
- Golden yellow: Worsted-weight yarn, quantity determined by swatch. Suggested fiber: acrylic or cotton blend.
- Black: Worsted-weight yarn, matching fiber and thickness, quantity determined by swatch.
- Golden yellow for joining: Additional yarn reserved for the lace connections.
- Black for pom-poms: Additional yarn for decorative edging.
Choose yarns with comparable thickness and elasticity. Mixing a highly elastic acrylic with firm cotton may distort the circles after washing.
For a large bedspread, purchase sufficient yarn from matching dye lots once the measured yarn requirement has been calculated.
Tools
- 4.5 mm crochet hook for initial swatching
- Locking stitch markers, at least two
- Yarn needle with a large eye
- Sharp scissors
- Flexible measuring tape
- Digital kitchen scale
- Blocking mats and rust-resistant pins
- Pom-pom maker, approximately 25–35 mm
Stuffing and safety eyes are unnecessary for this project.
Crochet Abbreviations
| Abbreviation | Meaning |
|---|---|
| MR | Magic Ring |
| sc | Single Crochet |
| hdc | Half Double Crochet |
| dc | Double Crochet |
| tr | Treble Crochet |
| inc | Increase |
| dec | Decrease |
| sl st | Slip Stitch |
| ch | Chain |
| BLO | Back Loop Only |
| st | Stitch |
| sp | Space |
| R | Round |
An invisible decrease works through the front loops of two adjacent stitches to reduce bulk, although it is not required for the flat spiral motifs below.
Crochet Spiral Bedspread Pattern – Step by Step
Pattern note: This is a photo-inspired project guide using published two-color spiral techniques. The lace assembly is a proposed adaptation and has not been tested as an exact reproduction of the photographed bedspread.
Part 1: Two-Color Spiral Motif
The defining feature of this design is the two-color spiral crochet motif. Each color begins at the center and advances around the other color section.
Unlike standard six-stitch amigurumi circles, this flat crochet technique uses stitches of different heights to establish the initial spiral.
Yarn: Golden Yellow (A), Black (B)
Hook: 4.5 mm starting size
Spiral Foundation
R1, Color A: Make a magic ring. Ch 1, work 1 sc, 1 hdc, and 2 dc into the ring. Hold the working loop. (4 sts)
R1, Color B: Attach B to the same ring. Work 1 sc, 1 hdc, and 2 dc into the ring. Hold the working loop. (4 sts)
Tighten the magic ring carefully without pulling either color section out of alignment.
Spiral Growth
R2, Color B: Work 2 dc into each of the four A stitches. (8 B sts)
R2, Color A: Work 2 dc into each of the four B stitches. (8 A sts)
R3, Color A: Work 2 dc into each of the eight B stitches. (16 A sts)
R3, Color B: Work 2 dc into each of the eight A stitches. (16 B sts)
Work the colors alternately, holding the inactive loop while completing the other color section.
For the photographed bedspread, the spirals appear larger and more tightly defined than this small reference motif. Repeating the same increase rate indefinitely may cause the circle to ripple.
Make one sample and assess the edge before choosing additional rounds.
Important: These are reference foundation rounds, not a complete verified bedspread motif. The extension rounds and finished diameter require swatch testing.
Part 2: Decorative Gold Outer Ring
The gold outer ring forms the transition between the dense spiral and the surrounding openwork.
The photographed design shows a textured band around each circle, followed by chain-based connections. The band appears to contain raised or clustered stitches.
Proposed Outer Ring Method
- Complete and fasten off the spiral sample.
- Attach gold yarn at a consistent point along the outer edge.
- Work a foundation round of single crochet, adjusting stitch placement to maintain a flat circle.
- Divide the final stitch count into equal sections.
- Work evenly spaced chain arches around the circle.
- Block the motif and measure its finished diameter.
A repeat such as (sc, ch 3, skip 2 sts) requires a foundation count divisible by three. Check the total stitch count before applying this repeat.
The objective is to establish a stable outer edge with regularly spaced joining points.
Part 3: Openwork Lace Joining
The openwork joining is essential to the appearance of the crochet lace bedspread.
In the photograph, the circles do not appear to touch along their entire circumference. Narrow gold bridges connect them, leaving visible openings between the motifs.
This produces a lighter fabric than a conventional solid blanket.
Proposed Joining Method
- Prepare four completed and blocked motifs.
- Arrange the motifs in a two-by-two square.
- Align their spiral centers and confirm equal distances between neighboring edges.
- Attach golden yellow yarn to an outer chain space.
- Connect the nearest chain spaces of neighboring motifs using short chain bridges and slip stitches.
- Keep the same number of chains in corresponding bridges.
- At the central junction, connect the bridge sections to stabilize the four motifs.
- Repeat the connection method around the sample group.
- Lay the joined sample flat and check for distortion.
If the joins pull the circles inward, increase the bridge length. If the joins sag, reduce the number of chains.
These adjustments must be based on actual measurements rather than the photograph alone.
Part 4: Black Decorative Pom-Poms
The bedspread border features small black pom-poms positioned around the perimeter. Their regular spacing repeats the darker color used inside each spiral.
Pom-Pom Construction
- Wrap black yarn around a 25–35 mm pom-pom maker.
- Continue wrapping until the center is densely filled.
- Tie the middle tightly using a separate length of strong yarn.
- Cut the wrapped loops.
- Trim the pom-pom to a round shape.
- Leave the tying tails long enough for attachment.
- Secure each pom-pom to a reinforced edge point.
A densely wrapped pom-pom retains its shape better than one made with a small number of loops.
For a bedspread used daily, attach pom-poms through more than one edge stitch. A single loose attachment can stretch the border.
Part 5: Matching Crochet Pillow Covers
The photograph includes two large spiral-pattern pillow covers behind a smaller black ribbed cushion.
The matching covers repeat the same circular motifs as the bedspread, creating continuity between the upper and lower sections of the bed.
Begin by measuring the pillow insert rather than selecting a fixed number of motifs.
For example, a 45 × 45 cm insert requires a cover sized according to the actual fabric stretch and desired fit. The finished crochet panel may need to be slightly smaller than the insert.
Make the front panel using the same spiral and joining method as the bedspread.
For the back, choose a solid crochet panel or two overlapping rectangular panels. An envelope opening allows the insert to be removed without a zipper.
Avoid positioning large pom-poms along the sleeping surface. If decorative edging is wanted, place it around the outside perimeter.
How Many Crochet Spiral Motifs Do You Need?
The correct number depends on the measured size of each joined motif unit, not simply the diameter of the spiral.
Columns = Target Width ÷ Joined Unit Width
Rows = Target Length ÷ Joined Unit Height
Round each result upward to a whole number.
Total Motifs = Columns × Rows
Example Bedspread Calculation
Suppose the planned bedspread measures 220 × 240 cm and each joined motif unit occupies approximately 20 × 20 cm.
- Width: 220 ÷ 20 = 11 columns
- Length: 240 ÷ 20 = 12 rows
- Total: 11 × 12 = 132 spiral motifs
This is a planning example rather than a verified motif count for the pictured bedspread.
The openwork lattice, blocking, and final edging may change the finished dimensions.
Estimating Yarn Requirements
A reliable yarn estimate begins with a finished sample.
Weigh one complete spiral motif after all loose ends have been trimmed. Record the amount of gold and black yarn separately if possible.
Next, make and weigh a four-motif joining sample. Subtract the weight of the four individual motifs to estimate the yarn needed for the lace connections.
Multiply the average motif weight by the planned number of motifs. Add the estimated joining yarn and border yarn.
Finally, allow approximately 10–15% additional yarn for sampling, tension differences, and finishing.
For example, if a sample motif weighs 18 g and the project requires 120 motifs, the motif yarn alone would weigh approximately 2,160 g.
This is an illustrative calculation, not a measured quantity for the photographed blanket.
The pom-poms require a separate estimate because their density and diameter strongly affect yarn consumption.
Assembly Instructions
- Complete the spiral samples. Make at least four motifs using the same yarn, hook, and color arrangement.
- Measure each motif. Check the diameter at several points and record the average.
- Block the samples. Shape them consistently without stretching their outer edges beyond their natural dimensions.
- Prepare the bedspread layout. Arrange the motifs in rows and columns, keeping their spiral orientation consistent.
- Join the first four motifs. Work the proposed gold chain bridges and check the resulting spacing.
- Build the full panel. Add motifs in sections, measuring after each completed row.
- Inspect the surface. Check for ripples, stretched joins, uneven circles, and visible loose ends.
- Finish the outer border. Add a reinforced gold edging suitable for supporting the pom-poms.
- Attach the black pom-poms. Space them evenly and secure the attachment yarn through reinforced edge stitches.
- Complete the pillow covers and final blocking. Weave in remaining ends, wash according to the yarn label, dry flat, and measure the finished pieces.
The completed project consists of joined two-color spiral motifs, a decorative openwork border, and coordinated pillow covers.
7 Technical Tips for Better Results
- Stitch marker placement: Use two different markers to identify the active gold and black loops. Confusing the held loops can cause one spiral section to advance ahead of the other.
- Flatness of the spiral: Place the motif on a table after each growth stage and inspect for cupping or rippling. An incorrect increase rate can make a circular motif unsuitable for flat bedspread assembly.
- Consistent gauge: Measure the first four completed motifs across their widest points. A difference of more than 5 mm between nominally identical motifs may produce visible misalignment across multiple rows.
- Openwork tension: Measure the chain bridges before and after blocking. Overly tight joins pull adjacent circles together, while loose bridges allow the lace lattice to sag.
- Color management: Keep the black and gold working yarn separated while alternating sections. Twisted strands can introduce unwanted tension and distort the spiral center.
- Pom-pom attachment: Leave approximately 15 cm of tying yarn for securing each pom-pom. Short attachment tails may work loose after repeated handling or laundering.
- End weaving: Weave each loose end through several neighboring stitches and reverse direction before trimming. Ends secured through only one or two stitches are more likely to emerge during washing.
Conclusion
The black-and-gold crochet spiral bedspread pattern depends on three technical elements: balanced two-color spirals, consistently measured lace connections, and a reinforced decorative border. Begin with a four-motif sample rather than producing the full quantity immediately. Record its finished dimensions, weight, and joining measurements before calculating the bedspread layout. The same sample can guide the matching pillow covers and yarn budget. Save the finished project to Pinterest or share construction photos on Instagram using #BlackGoldSpiralBedspread. Include the motif dimensions and yarn specifications when sharing. For this particular design, would you keep the black pom-pom border or replace it with a plain gold crochet edging?









