Introduction
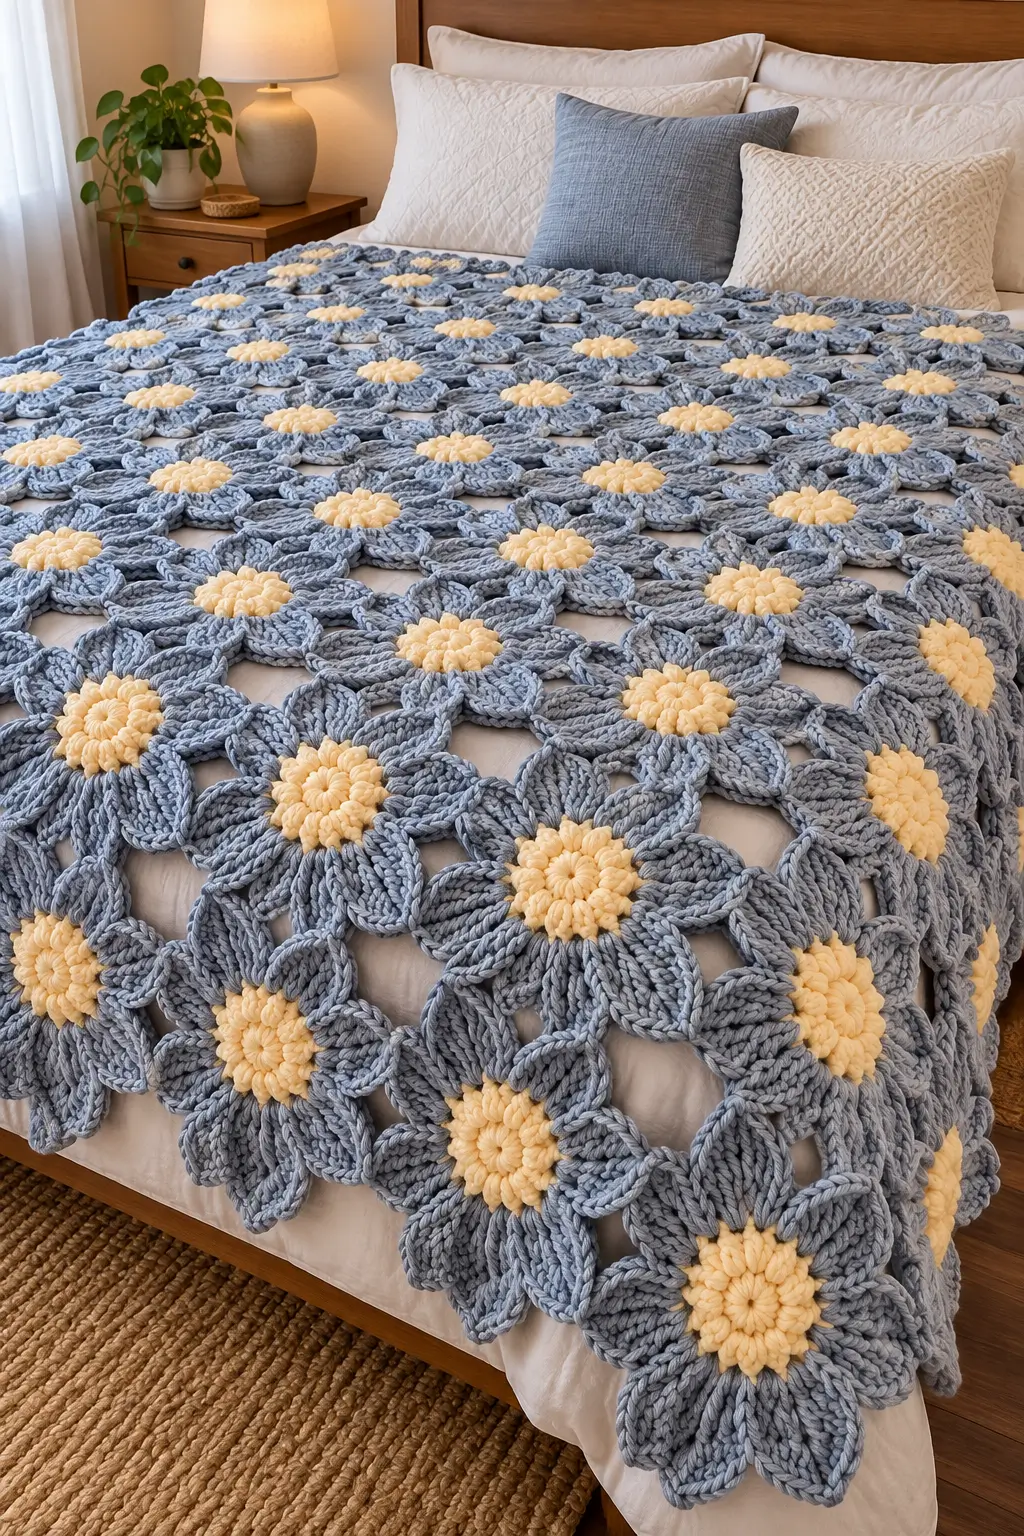
Eight oversized blue petals surround each raised yellow center in this crochet flower blanket pattern, creating a repeated floral structure with open spaces between motifs. The project uses chunky yarn, a 9 mm hook, puff stitches, and individually joined flowers to form a decorative bedspread. Designed for intermediate crocheters, the proposed 120 × 150 cm blanket provides a modular construction that can be expanded without changing the flower instructions.
The Design: What Makes This Flower Blanket Different
This 3D crochet flower blanket uses separate flower motifs rather than conventional granny squares. Each flower begins with a compact center, followed by a ring of puff stitches that creates a raised yellow disc. Eight elongated blue petals extend outward, giving the blanket a dimensional surface.
The second structural decision concerns the petal shape. Taller stitches build the widest section of each petal, while shorter stitches narrow the ends near the center. This creates a recognizable flower outline without requiring wire or additional stuffing.
Finally, the openwork layout allows the chunky crochet blanket to drape more freely than a dense fabric made entirely with single crochet.
A frequent mistake is joining every petal edge tightly. That compresses the flowers, removes the open spaces, and causes the blanket to buckle. This design uses selected joining points instead.
Project Info at a Glance
| Detail | Specification |
|---|---|
| Skill Level | Intermediate |
| Estimated Time | 35–55 hours |
| Proposed Finished Size | 120 × 150 cm |
| Hook Size | 9 mm |
| Yarn Weight | Chunky/Bulky, Category 5 |
| Construction | Individual flower motifs joined together |
| Number of Flowers | 80 (8 columns × 10 rows) |
| Best For | Decorative bedspread or openwork throw |
Note: The measurements, time, and yarn quantities are planning estimates. This original pattern is inspired by the photographed blanket and requires a test sample to confirm the final gauge and joining fit.
Materials and Tools
Yarn
Choose yarn with a consistent thickness and enough structure to hold the petal shape. A bulky acrylic or acrylic-wool blend is a practical starting point. Slippery chenille may require additional testing because stitches can loosen after washing.
- Dusty blue-gray yarn: Category 5 chunky yarn, approximately 1,600–2,000 g. Suggested option: Hayfield Bonus Chunky or a comparable bulky yarn.
- Pale buttery yellow yarn: Category 5 chunky yarn, approximately 350–500 g. Choose a matching yarn line for consistent thickness.
These quantities are preliminary estimates. Crochet and weigh a complete test motif before purchasing yarn for the entire blanket.
Tools
- 9 mm crochet hook – starting size for chunky yarn.
- Locking stitch markers – at least eight.
- Large blunt tapestry needle – suitable for bulky yarn.
- Sharp scissors – for cutting yarn tails.
- Measuring tape – for checking motif dimensions.
- Digital kitchen scale – for calculating yarn consumption.
- Blocking mats and rust-resistant pins – optional.
Crochet Abbreviations
All instructions use US crochet terminology.
| Abbreviation | Meaning |
|---|---|
| MR | Magic ring |
| sc | Single crochet |
| hdc | Half double crochet |
| dc | Double crochet |
| tr | Treble crochet |
| ch | Chain |
| sl st | Slip stitch |
| st | Stitch |
| sp | Space |
| rep | Repeat |
| BLO | Back loop only |
| inc | Two single crochets in one stitch |
| dec | Single crochet decrease |
| puff | Puff stitch described below |
| FO | Fasten off |
An invisible decrease is made through the front loops of two adjacent stitches, but decreases are not required for this blanket.
Special Stitch: Four-Pull-Up Puff
Yarn over, insert the hook into the indicated stitch, and pull up a long loop. Repeat this action four times in the same stitch. You should have nine loops on the hook.
Yarn over and pull through all nine loops. Make one chain to secure the puff.
The securing chain belongs to the puff itself. Any additional chain instructed afterward is separate.
Keep the pulled-up loops approximately 12–15 mm high when using chunky yarn. Consistent height helps produce evenly raised flower centers.
Crochet Flower Blanket Pattern – Step by Step
Construction: Each flower is worked in joined rounds rather than a continuous spiral. The yellow center is completed first, followed by the blue petal section. Finished motifs are arranged in a grid and connected at designated petal-tip points.
Make one complete flower and measure it before producing the remaining motifs.
Part 1: Raised Yellow Flower Center (Make 80)
Yarn: Pale buttery yellow.
R1: Make a magic ring. Work 8 sc into the ring. Pull tight and join with sl st to the first sc. (8 sc)
R2: Ch 2 for working height; this does not count as a stitch. Make one four-pull-up puff in each sc around. Each puff includes its securing chain. Join with sl st into the top of the first puff. (8 puffs)
The completed center should form a raised circular cluster. There should be eight accessible spaces between adjacent puff stitches.
Fasten off. Leave a 12–15 cm yarn tail for securing the center.
Stitch check: R1 contains eight single crochets. R2 contains exactly eight puff stitches, one worked into each R1 stitch.
Part 2: Blue Petal Foundation (Make 80)
Yarn: Dusty blue-gray.
R3: Attach the blue yarn in the gap between any two yellow puff stitches. Ch 1, then work (sc, ch 7, sc) into that gap. Repeat in each of the remaining seven gaps. Join with sl st to the first sc. (16 sc, 8 ch-7 loops)
Keep all eight loops approximately equal in length. These loops create the foundation for the elongated flower petals.
Avoid pulling the single crochets tightly against the puff stitches. The yellow center should remain raised while the blue foundation spreads outward.
Part 3: Sculpted Blue Petals (Make 80 Sets of Eight)
Yarn: Dusty blue-gray.
R4: In the first ch-7 loop, work (sc, hdc, 3 dc, ch 2, 3 dc, hdc, sc).
Repeat the same sequence in each of the remaining seven loops. Join with sl st to the first sc. (80 worked stitches, 8 ch-2 tip spaces)
Each petal contains ten worked stitches and one chain-two space at its outer tip.
The three double crochets on either side of the chain-two space create the broadest portion of the petal. Single crochet and half double crochet stitches taper the shape toward the flower center.
Fasten off. Leave a 20 cm tail if the motif will be used for joining.
Stitch check: Each petal contains 1 sc + 1 hdc + 3 dc + 3 dc + 1 hdc + 1 sc = 10 worked stitches. Eight petals produce 80 worked stitches and eight chain-two tip spaces.
Part 4: Shape the Individual Flowers
Lay the completed flower on a flat surface.
Identify the eight petals in clockwise order. Number them mentally from 1 to 8. Petals 1, 3, 5, and 7 will serve as the primary corner points for joining.
The four remaining petals provide the intermediate floral outline and help maintain the openwork spaces.
Gently spread the petals until they form a balanced eight-point flower. The finished motif should resemble a rounded floral square rather than a tightly packed circle.
Measure from the outer tip of petal 1 to the outer tip of petal 5. Then measure across petals 3 and 7.
These measurements should be close. A difference greater than 1 cm suggests uneven tension or inconsistent petal height.
Do not stretch the motif permanently to reach a target dimension. Adjust the hook size or yarn tension on a second sample instead.
Part 5: Optional Raised Center Detail
The flower centers in the reference design have pronounced texture. The puff round provides that effect, but an additional small ring can create extra definition.
Yarn: Pale buttery yellow.
Insert the hook through the middle of the original magic ring and pull up a loop of yellow yarn.
Detail R1: Ch 1, then work 6 sc into the center opening. Join with sl st. (6 sc)
Fasten off and weave the ends securely through the back.
This additional ring should remain small. A large central circle may cover the surrounding puff stitches and change the flower’s proportions.
For a flatter blanket surface, omit this step.
Part 6: Make a Four-Flower Test Panel
Before making all 80 flowers, crochet four complete motifs.
Arrange them in a two-by-two grid. Rotate each motif so that petals 1, 3, 5, and 7 point diagonally toward neighboring motif positions.
At the meeting point between two flowers, bring their corresponding ch-2 tip spaces together.
Using the blue yarn and a tapestry needle, pass through both chain spaces twice. Make a third pass only if the join remains loose. Secure the yarn on the reverse side.
Repeat for all adjacent flower pairs.
For a four-flower grid, there are four neighboring-pair connections: two horizontal and two vertical.
The four inner-facing petal tips should remain separate rather than being pulled into a single tight knot. This preserves the central opening.
Measure the joined panel and evaluate its drape. If the joins cause bunching, loosen them before continuing.
Part 7: Calculate the Final Blanket Size
The proposed arrangement contains eight motifs across and ten motifs down.
The finished size depends on the distance between corresponding flower centers after joining. This measurement is called the motif pitch.
Blanket width: Approximately 8 × horizontal motif pitch.
Blanket length: Approximately 10 × vertical motif pitch.
For a pitch of 15 cm, the approximate dimensions are 120 × 150 cm. This excludes any additional protrusion from edge petals.
If the joined pitch is 12 cm instead, the same arrangement measures approximately 96 × 120 cm.
The second measurement is equally valid. Do not force the flowers apart to match the larger size.
Part 8: Join the Full Blanket
Make the remaining flowers after confirming the four-motif test panel.
Lay out the first row of eight motifs on a large flat surface. Align the same numbered petals in the same directions.
Connect neighboring ch-2 tip spaces with blue yarn, following the joining method tested in Part 6.
Build the second row directly below the first. Join its eight flowers horizontally, then connect each flower to the corresponding flower above it.
Continue until ten rows are assembled.
The complete 8 × 10 grid contains:
- 80 flower motifs.
- 70 horizontal connections.
- 72 vertical connections.
- 142 neighboring-pair connections in total.
These figures assume one joining connection per neighboring pair. Additional decorative joining is optional but changes the openness of the blanket.
Part 9: Optional Reinforced Outer Edge
The reference blanket has an irregular floral edge rather than a continuous solid border. For a similar visual result, leave the outer petal shapes exposed.
If the blanket needs additional edge stability, work a narrow reinforcement using slip stitches through selected outer tip spaces.
Start at a corner petal and attach the blue yarn. Chain between neighboring outer tip spaces, using enough chains to span each gap without pulling the fabric inward.
Secure each span with a slip stitch in the next tip space. Continue around the outer perimeter.
The chain count must be determined from the completed blanket because the distance between petal tips changes with gauge and layout.
Fasten off and weave in the final tail.
How to Assemble the Crochet Flower Blanket
- Complete the first yellow center. Confirm that it contains eight puff stitches around the original magic ring.
- Add the blue foundation. Work eight chain-seven loops evenly between the yellow puff stitches.
- Finish the petals. Complete all eight blue petals and check the stitch count before cutting the yarn.
- Make the test panel. Crochet four flowers and arrange them in a two-by-two layout.
- Test the joins. Connect neighboring petal-tip spaces without drawing the flower centers together.
- Measure the panel. Record the horizontal and vertical motif pitch, then calculate the final blanket dimensions.
- Produce the remaining flowers. Work the rest of the 80 motifs using the confirmed hook size and tension.
- Join the rows. Assemble eight flowers across and ten rows down, maintaining consistent motif orientation.
- Finish the edges. Add the optional reinforcement only if the outer petals require additional stability.
- Secure and inspect. Weave in every tail, check each connection, and lay the blanket flat to identify distorted sections.
The completed blanket consists of 80 joined flower motifs with raised yellow centers, eight-petal blue outlines, and an openwork grid.
7 Technical Tips for Better Results
- Control stitch-marker placement. Place a marker in the first puff stitch of R2 and move it to the beginning of each subsequent round. Losing the start position can create nine petals instead of eight.
- Maintain consistent puff height. Aim for pulled-up loops approximately 12–15 mm high when using chunky yarn. Uneven loop height causes the yellow center to tilt or form irregular bumps.
- Check petal symmetry. Every petal must contain ten worked stitches and one ch-2 space. A missing double crochet produces a narrower petal and can pull the neighboring motif out of alignment.
- Test yarn tension before production. Crochet two flowers with the selected 9 mm hook and compare their measurements. A difference greater than 1 cm indicates that tension needs adjustment before making the full set.
- Avoid excessively tight joins. Leave enough slack for two connected petal tips to lie flat without overlapping. Tight stitching at the connection points produces puckering and reduces the openwork spaces.
- Weigh a finished motif. Measure one completed flower on a digital scale, then multiply its weight by 80 and add a 10–15% allowance for joins and finishing. This gives a more dependable yarn estimate than using a fixed gram quantity for every brand.
- Secure yarn tails against movement. Weave each tail through at least three changes of direction on the reverse side, where the stitch structure permits. Loose tails can emerge from bulky yarn after repeated handling or laundering.
Adjusting the Blanket for Different Bed Sizes
A modular flower motif blanket can be resized by changing the number of flowers rather than rewriting the stitch pattern.
The following table assumes a measured 15 cm joined motif pitch.
| Blanket Type | Motif Layout | Approximate Size |
|---|---|---|
| Small Decorative Throw | 6 × 8 = 48 flowers | 90 × 120 cm |
| Standard Throw | 8 × 10 = 80 flowers | 120 × 150 cm |
| Large Throw | 10 × 12 = 120 flowers | 150 × 180 cm |
| Oversized Bedspread | 12 × 14 = 168 flowers | 180 × 210 cm |
These dimensions are planning values. The flower petals may extend beyond the calculated grid, and actual measurements depend on the joining method.
For a bedspread, measure the mattress and decide how far the blanket should hang over each side. Add enough rows and columns to reach that target.
The openwork construction makes the blanket suitable as a decorative top layer. The large spaces between motifs make it less suitable where a dense, insulating fabric is required.
Choosing the Right Yarn for a Chunky Crochet Flower Blanket
Chunky yarn gives the flowers a pronounced three-dimensional structure, but not all bulky yarns behave alike.
A smooth, tightly spun acrylic yarn provides clear stitch definition. The petal edges remain visible, and mistakes are easier to identify during construction.
Chenille and velvet-style yarn create a softer-looking surface, closer to the plush appearance of the photographed blanket. However, these fibers can obscure stitch placement and make the puff centers less distinct.
Wool-blend yarn may provide more elasticity. That elasticity helps with joining but can also affect the final dimensions after blocking.
Make a sample with the intended yarn and wash it according to the yarn label. Measure it before and after drying. A significant size change should be included in the final blanket calculations.
For a consistent appearance, use yarns from the same product line for both colors whenever possible.
Troubleshooting Common Crochet Flower Blanket Problems
Why Are My Flower Petals Curling?
Curling may occur when the foundation chains are too tight for the stitches worked into them.
Try a larger hook for the chain-loop foundation, or work the chains with slightly looser tension.
Also verify that each petal contains the complete stitch sequence.
Why Does My Blanket Look Uneven After Joining?
The most common causes are inconsistent motif dimensions and joins pulled too tightly.
Measure several flowers before assembly. If individual motifs vary significantly, separate them by size or remake the most distorted pieces.
Do not attempt to correct major size differences by pulling the joining yarn tighter.
Can I Use Worsted-Weight Yarn Instead?
Yes, but the flowers will generally be smaller when made with an appropriately sized hook.
Published worsted-weight flower blanket patterns commonly use hooks in the 4–5.5 mm range, although the appropriate size depends on the yarn and stitch tension.
Make a new test motif and calculate the number of flowers required for your intended blanket dimensions.
Can This Crochet Flower Blanket Be Machine Washed?
That depends on the fiber content and care instructions printed on the yarn label.
Use a sample swatch to test laundering before washing the completed blanket. Bulky motifs can become heavy when wet, so support the fabric when lifting it and dry it according to the yarn manufacturer’s instructions.
Is This Crochet Flower Blanket Suitable for Beginners?
The individual stitches are accessible to crocheters familiar with single crochet, half double crochet, double crochet, and working in rounds.
However, maintaining uniform puff stitches, shaping repeated petals, and joining a large number of motifs requires accurate stitch counting and consistent tension.
For that reason, the complete blanket is classified as intermediate.
Conclusion
This crochet flower blanket pattern uses eighty individual motifs to create a dimensional bedspread with raised yellow centers and sculpted blue petals. Its modular construction allows the width and length to change without altering the flower instructions. Before producing the full blanket, complete a four-motif sample, measure the joined spacing, and calculate yarn requirements from the actual sample weight.
Once the blanket is finished, photograph it laid flat and draped over a bed to document both the floral arrangement and the openwork structure. Share the finished project on Pinterest or Instagram using #ChunkyFlowerBlanket.
Which petal arrangement works better for your bedspread: the open eight-petal design or a more tightly joined floral layout?









