SEO META
SEO Title: Mustard Yellow Crochet Leaf Blanket Pattern
Meta Description: Make a mustard yellow crochet leaf blanket pattern with cream botanical granny squares, matching pillows, detailed instructions, and sizing tips.
Keywords: crochet leaf blanket, leaf granny square, mustard crochet blanket, botanical bedspread, crochet pillow cover
Introduction
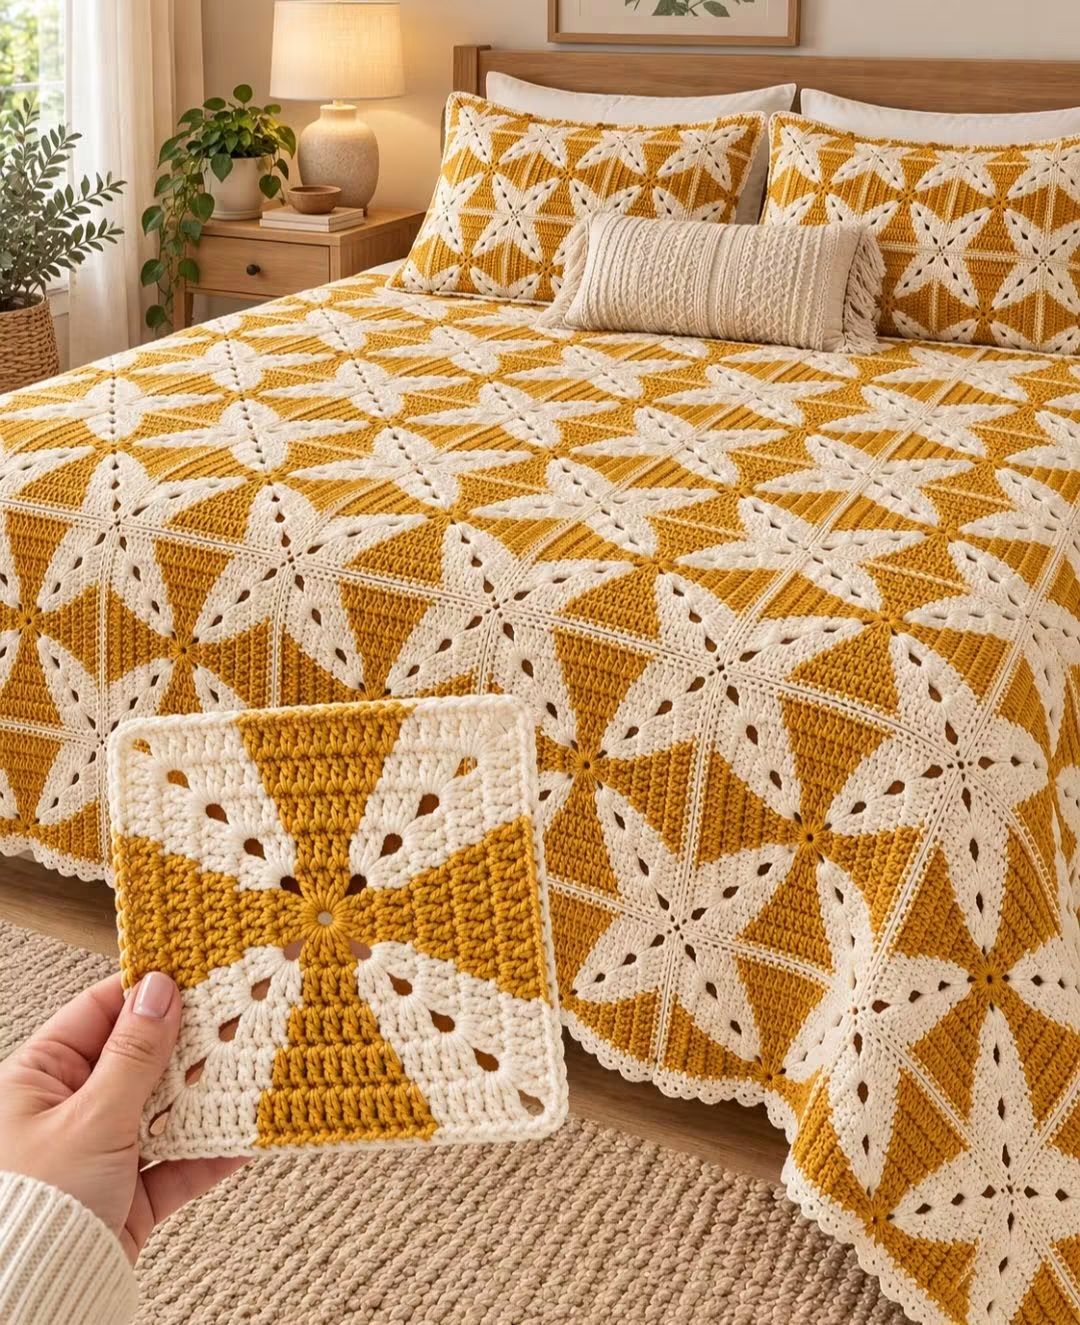
Eight cream leaves radiate from each mustard square, forming a botanical pinwheel that repeats across the bedspread. This mustard yellow crochet leaf blanket pattern uses golden-yellow backgrounds, ivory leaf appliqués, geometric framing, and decorative joins. Work with DK yarn and a 3.5–4 mm hook for an intermediate-level project. Individual squares make the blanket adjustable to different mattress dimensions and allow matching cushion covers to be constructed from the same motif.
The Design: What Makes This Leaf Blanket Different
The photographed bedspread uses an eight-point botanical motif instead of a conventional flower-centered granny square. Each cream leaf narrows toward the central junction and broadens toward the outside of the square. This creates the pinwheel arrangement that defines the design.
The mustard background is the second important feature. It separates the cream leaves and gives the geometric pattern enough contrast to remain visible across a large surface. In this reconstruction, a solid square provides the foundation for the leaf granny square crochet pattern.
The third feature is the narrow joining system. Cream seams connect the motifs without obscuring their corners, creating a continuous mustard and cream crochet blanket.
A common mistake is placing the leaf tips too far from the center. The resulting motif looks like eight separate decorations rather than one connected botanical design.
Project Info at a Glance
| Skill Level | Time | Finished Size | Hook | Best For |
|---|---|---|---|---|
| Intermediate | Depends on square count | Custom; published leaf-square references include 15–20.3 cm | 3.5–4 mm with DK yarn | Bedspreads, throws, cushion covers |
The published measurements belong to comparable leaf-square patterns, not the exact motif in the photograph. Measure a blocked sample before calculating the complete blanket.
Materials and Tools
Yarn
- Golden mustard DK yarn — square backgrounds and optional border accents.
- Warm ivory DK yarn — leaf appliqués, framing rounds, joining seams, and scalloped edging.
- Optional cream cotton-blend DK yarn — rectangular textured cushion.
Use yarns with similar thickness and fiber content. Smooth acrylic, cotton, or cotton-blend DK yarn will make the stitch structure easier to see.
For a color suggestion, choose a golden mustard shade rather than bright lemon yellow. Pair it with warm cream rather than stark white.
A published 20.3 cm leaf square uses approximately 30 g of worsted-weight yarn. That amount is a reference for a different design, not a verified requirement for this pattern.
Weigh a completed sample before purchasing yarn for a large bedspread.
Tools
- 3.5–4 mm crochet hook
- Yarn needle
- Scissors
- Locking stitch markers
- Tape measure
- Blocking mats
- Rustproof pins
- Two square cushion inserts
- One rectangular cushion insert
Abbreviations
- MR — magic ring
- ch — chain
- sl st — slip stitch
- sc — single crochet
- hdc — half double crochet
- dc — double crochet
- tr — treble crochet
- inc — two stitches worked into one stitch
- dec — decrease
- BLO — back loop only
- sp — space
- st/sts — stitch/stitches
- RS — right side
- WS — wrong side
An invisible decrease is not required for the main square because its dimensions are controlled by corner increases.
Pattern — Step by Step
The original photographed motif appears to integrate the cream leaf shapes into the square itself. The following reconstruction uses separate appliqués attached to a mustard foundation.
This method makes the placement adjustable and keeps the square’s outer stitch count consistent.
Work the foundation in joined rounds. Beginning chains do not count as stitches unless stated otherwise.
Part 1 — Mustard Square Foundation
Yarn: golden mustard.
Round 1 — Establish Four Corners
Make an MR.
Ch 2.
Work the following sequence four times into the ring:
3 dc, ch 2.
Join with sl st to the first dc.
Count: 12 dc and four ch-2 corner spaces.
Pull the ring closed.
The center now has four groups of three double crochet stitches.
Round 2 — First Square Expansion
Move to the next corner space.
Work:
(2 dc, ch 2, 2 dc) into the corner.
Work one dc into each stitch along the next side.
Repeat around all four sides.
Join with sl st.
Count: 28 dc and four ch-2 corner spaces.
Round 3 — Second Square Expansion
Continue with mustard.
Work one dc in every stitch along each side.
At every corner work:
(2 dc, ch 2, 2 dc).
Join with sl st.
Count: 44 dc and four ch-2 corner spaces.
Round 4 — Third Square Expansion
Continue working one dc in each side stitch.
At every corner work:
(2 dc, ch 2, 2 dc).
Join with sl st.
Count: 60 dc and four ch-2 corner spaces.
Round 5 — Fourth Square Expansion
Work one dc in each stitch along every side.
At the corners repeat:
(2 dc, ch 2, 2 dc).
Join with sl st.
Count: 76 dc and four ch-2 corner spaces.
Round 6 — Final Mustard Foundation
Continue with mustard.
Work one dc in each stitch along the sides.
At each corner work:
(2 dc, ch 2, 2 dc).
Join with sl st.
Count: 92 dc and four ch-2 corner spaces.
Fasten off.
Leave a 15 cm tail for weaving.
The completed foundation has four equal sides and four matching corner spaces.
Part 2 — Cream Leaf Appliqués
The photographed square contains eight elongated leaf blades arranged around its center.
Make eight leaves for each square.
Four leaves will point toward the corners. The other four will point toward the middle of the sides.
Leaf Pattern — Make Eight
Yarn: warm ivory.
Ch 10.
Beginning in the second chain from the hook, work:
1 sc, 1 hdc, 2 dc, 1 tr, 2 dc, 1 hdc, 1 sc.
Work 2 sc into the final foundation chain to turn around its end.
Continue along the opposite side of the foundation chain.
Work:
1 sc, 1 hdc, 2 dc, 1 tr, 2 dc, 1 hdc, 1 sc.
Join with sl st.
Fasten off, leaving a 20 cm sewing tail.
The stitch heights create a leaf that is narrow at both ends and broadest near the middle.
Make seven more leaves using the same sequence.
Check that all eight leaves have similar lengths before attaching them.
Part 3 — Decorative Leaf Eyelets
The cream leaves in the photograph contain small openings along their central axes.
The basic appliqué above is solid. For an eyelet effect, a decorative chain opening can be incorporated into an additional leaf edging.
Join cream at one narrow end of a finished leaf.
Work sc along the first section of its edge.
At the widest part, ch 2 and skip one suitable edge stitch.
Continue with sc around the remaining edge.
Repeat the same opening on the opposite side.
Join with sl st.
This creates small openings near the leaf’s middle, although it does not reproduce the full internal lace structure shown in the photograph.
Make one sample before adding the edging to all eight leaves.
Part 4 — Positioning the Eight Leaves
Lay the mustard square right side up.
Mark the center with a removable stitch marker.
Position the first cream leaf so one narrow end points toward the center and the other points toward the upper edge.
Place a second leaf directly opposite it.
Add two more leaves along the horizontal axis.
Position the remaining four leaves diagonally toward the corners.
All eight inner tips should approach the same central point.
Pin the leaves before sewing.
Compare the gaps between neighboring leaves.
Adjust their placement until the pinwheel appears balanced.
Part 5 — Sewing the Leaves
Thread the yarn needle with a cream sewing tail.
Begin at the inner tip of the first leaf.
Sew through the leaf and the mustard background using small stitches.
Continue along the center of the leaf.
Leave the outer edge slightly raised if a textured effect is desired.
Secure the outer tip.
Repeat for the remaining seven leaves.
Keep the stitching concealed within the cream yarn wherever possible.
After attaching all eight leaves, remove the center marker.
The leaf tips should form one connected-looking central junction.
Part 6 — Central Junction Detail
The photograph shows a small mustard-colored center where the leaf blades meet.
A tiny crochet circle can cover the appliqué attachment points.
Yarn: golden mustard.
Make an MR.
Work 6 sc into the ring.
Join with sl st.
Count: 6 sc.
Fasten off, leaving a 15 cm tail.
Sew the small circle over the center of the eight leaves.
Keep it flat against the background.
This detail conceals the inner leaf ends and emphasizes the central pinwheel shape.
Part 7 — Cream Square Border
Yarn: warm ivory.
Join cream in any corner space of the mustard foundation.
Work:
(2 dc, ch 2, 2 dc) into the corner.
Work one dc into every stitch along the next side.
Repeat at all four corners.
Join with sl st.
Count: 108 dc and four ch-2 corner spaces.
Fasten off.
Leave a tail approximately 15 cm long if the square will be sewn to another motif.
The cream border separates the mustard backgrounds and creates a consistent edge for joining.
Checking the Finished Square
Place the completed motif on a flat surface.
Check that the eight cream leaves remain visible.
Confirm that the central mustard circle is centered.
Measure the distance between opposite corners.
Measure the width of the square.
Compare the four side lengths.
If the appliqués pull the background inward, loosen the attachment stitches.
Block the square before making the remaining motifs.
Planning the Botanical Bedspread
The photographed bedspread uses repeated squares arranged in a regular grid.
Each square has the same leaf orientation.
The cream joining seams create continuous horizontal and vertical lines.
Before calculating the required number of motifs, measure the mattress width and length.
Decide how far the blanket should hang over the sides and foot.
Add the side drops to the mattress width.
Add the foot drop to the mattress length.
Compare those measurements with the blocked square size.
How Many Squares Are Needed?
Suppose a completed square measures 18 cm after blocking.
Eight squares across and ten squares down would require 80 motifs.
Before joining and border allowances, that arrangement measures approximately 144 × 180 cm.
Ten squares across and twelve down would require 120 motifs.
That arrangement measures approximately 180 × 216 cm.
Twelve squares across and fourteen down would require 168 motifs.
That panel measures approximately 216 × 252 cm.
These are calculation examples, not verified measurements of the photographed bedspread.
Use the dimensions of your blocked sample for the final layout.
Joining the Granny Squares
Arrange the completed squares in the intended order.
Check that every eight-leaf pinwheel faces the same direction.
Place two neighboring squares with right sides together.
Use cream yarn to join corresponding edge stitches.
Work loose slip stitches along the seam.
Join the squares into horizontal rows first.
Then connect the rows to form the full rectangular panel.
Keep the joining tension consistent.
A tight seam shortens the square edges and causes the blanket to pucker.
Alternative Decorative Joining Method
The photograph contains narrow cream lines between neighboring motifs.
For a slightly raised seam, place two squares with wrong sides together.
Work sc through corresponding edge stitches.
Continue along the entire seam.
Repeat for the remaining squares.
At four-square intersections, keep the stitches compact.
Avoid adding unnecessary stitches at the center of the junction.
Test this method on four squares before joining the entire blanket.
Adding the Blanket Border
Once all squares are joined, work a continuous border around the outside edge.
Join cream yarn at any corner.
Work one sc into each suitable edge stitch.
At every outside corner, work three sc.
Join with sl st.
For the second round, work one dc into each stitch.
At the corners, work three dc into the corner stitch.
Join with sl st.
Add another cream round if the blanket requires a wider outer frame.
Scalloped Outer Edging
The photographed bedspread has a narrow scalloped finish.
Join cream yarn along the outer edge.
Work one sc into the first suitable stitch.
Skip two stitches.
Work five dc into the next stitch.
Skip two stitches.
Work one sc into the following stitch.
Repeat around the blanket.
Adjust the spacing near corners so the scallops remain flat.
Fasten off and weave in the remaining tail.
Matching Botanical Pillow Covers
The photograph includes two square pillow covers made with the same mustard-and-cream leaf design.
Each pillow uses repeated botanical motifs rather than one oversized flower.
Make enough completed leaf squares to cover the desired pillow-front dimensions.
Arrange the squares into a rectangular panel.
Join them using the same cream seam as the bedspread.
Add a narrow cream border.
Block the completed front before making the back.
Measure the front panel and select a matching cushion insert.
Making the Pillow Backs
A solid crochet back provides support for the decorative leaf front.
Ch enough stitches to match the blocked pillow-front width.
Work rows of hdc until the panel reaches the required height.
Alternatively, make two shorter rectangles that overlap to form an envelope closure.
Place the front and back with wrong sides together.
Join around the edges using sc.
Leave the envelope opening accessible if the insert will be removable.
Fasten off and weave in the tails.
Rectangular Textured Cream Cushion
The smaller cushion in the photograph uses vertical crochet texture and tassels.
A ribbed hdc pattern provides a practical approximation.
Ch to the desired cushion width.
Work one row of hdc.
Turn.
For the following rows, work hdc in the back loop only.
Continue until the panel reaches the required length.
Make a matching back panel.
Join the two pieces around their edges.
Add tassels at the corners if desired.
Making the Cushion Tassels
Cut several equal lengths of cream yarn.
Fold the strands in half.
Wrap another length of yarn around the bundle near the folded end.
Secure the wrap firmly.
Trim the loose ends to an even length.
Attach one tassel to each selected corner.
Repeat the same process for the remaining tassels.
Assembly — 10 Steps
- Make one mustard square foundation and verify the stitch counts through Round 6.
- Crochet eight cream leaf appliqués and test the optional eyelet edging.
- Pin the leaves into an eight-point arrangement and sew them to the square.
- Add the mustard central circle and complete the cream framing round.
- Block the sample and record its finished dimensions and yarn consumption.
- Calculate the number of squares required for the chosen bedspread size.
- Make the remaining motifs using identical yarn, hook, and leaf placement.
- Join the squares into rows, connect the rows, and add the outer scalloped border.
- Make two matching botanical pillow covers and one textured rectangular cushion.
- Weave in all tails, inspect the seams, and complete the final blocking.
The finished set consists of a mustard-and-cream botanical bedspread, two coordinated square pillow covers, and one textured rectangular cushion.
7 Technical Tips
- Verify the 12-stitch foundation before beginning Round 2. An extra stitch changes the corner spacing and produces an uneven square.
- Mark all four corner spaces before each framing round. A misplaced corner causes the square to lean diagonally and complicates joining.
- Make all eight leaves to the same length. A difference greater than approximately 5 mm becomes noticeable when the blades meet at the center.
- Pin the leaves before sewing them down. Unequal spacing makes the central pinwheel look asymmetrical.
- Compare blocked square dimensions within approximately 5 mm. Larger differences accumulate across multiple rows and create uneven blanket edges.
- Test the joining method on four squares. Tight seams shorten the edges and pull the botanical motifs out of alignment.
- Weave yarn tails through at least 4–5 cm of matching-color stitches. Mustard tails carried behind cream appliqués may show through the lighter yarn.
Choosing the Right Mustard Yarn
The photograph uses a golden mustard shade rather than a bright yellow.
That color works with the warm cream leaf sections because the contrast remains clear across the bedspread.
Choose a mustard yarn with a slightly ochre undertone.
Pair it with ivory or natural cream.
Make one complete square before purchasing the full yarn quantity.
View the sample in natural light and under indoor lighting.
The cream leaves should remain distinct against the mustard background.
Calculating Yarn Requirements
A large botanical bedspread requires more yarn than a simple flat granny square blanket because each motif includes eight additional leaf appliqués.
Weigh one completed mustard foundation.
Weigh the eight cream leaves separately.
Record the yarn used for the cream border.
Add those measurements to determine the total weight of one finished square.
Multiply each color quantity by the number of motifs required.
Add yarn for the joining seams, blanket border, and pillow covers.
For example, if one finished square weighs 35 g and the project requires 120 squares, the motifs alone require approximately 4,200 g.
The 35 g figure is a calculation example, not a verified measurement of the photographed design.
Preventing Uneven Blanket Rows
Measure the width of each completed row before joining it to the next.
If one row is longer, inspect the square dimensions first.
Do not compensate for a large difference by pulling the joining yarn tighter.
That transfers the problem into the seam and creates puckering.
Correct or reblock the mismatched squares.
Keep the same hook size and yarn tension throughout the project.
Consistent gauge is particularly important when every square contains separate appliqués.
Blocking the Finished Squares
Block every completed square to the same target dimensions.
Dampen the crochet according to the yarn manufacturer’s instructions.
Place the square on a blocking mat.
Pin the four corners first.
Check that the diagonals are equal.
Arrange the cream leaves without stretching their tips.
Leave the motif pinned until completely dry.
Repeat with the remaining squares.
Use the first blocked sample as a template for the complete set.
Adjusting the Bedspread for Different Beds
Measure the mattress width and length.
Decide how much of the bedspread should hang over the sides and foot.
Add the desired side drops to the mattress width.
Add the foot drop to the mattress length.
Divide those dimensions by the blocked square size.
Round up to a whole number of squares.
Check the completed panel size before adding the outer border.
For a symmetrical layout, use the same number of squares in corresponding rows.
Care and Washing
Follow the yarn manufacturer’s care instructions.
Large crochet bedspreads become heavy when wet, particularly when made from cotton.
Support the fabric across its full width when moving it.
Avoid hanging a wet bedspread from one narrow edge.
The weight can stretch the joining seams.
Dry flat whenever practical.
Reshape the corners and border while the fabric is damp.
Check the cream leaf appliqués after drying and adjust any tips that have folded beneath neighboring sections.
Related Patterns
- Autumn Leaf Granny Square — A textured botanical motif for coordinating throws. [INTERNAL LINK NEEDED: autumn leaf granny square]
- Mustard Crochet Pillow Cover — A geometric cushion design using warm golden yarn. [INTERNAL LINK NEEDED: mustard crochet pillow]
- Floral Granny Square Blanket — A modular blanket with repeated botanical centers. [INTERNAL LINK NEEDED: floral granny square blanket]
- Crochet Scalloped Border — Decorative edging for blankets and cushions. [INTERNAL LINK NEEDED: crochet scalloped border]
Conclusion
The eight-leaf arrangement and contrasting mustard background define this mustard yellow crochet leaf blanket pattern. Begin with one complete square, check its framing counts, and block it before calculating the bedspread dimensions. Next, make a four-square joining sample to confirm that the cream seams remain flat and the botanical motifs align correctly. Record the yarn consumption of the mustard foundation and cream leaves separately before purchasing materials for the full project. The same motif can be repeated for matching pillow covers. Share the finished bedspread on Pinterest or Instagram using #MustardLeafCrochetBlanket. For this design, would you keep all eight leaves cream or alternate cream and mustard leaf blades?