Introduction
A butterfly’s four wings must remain distinguishable even when dozens of motifs are connected across a bedspread. This crochet butterfly blanket pattern uses golden-yellow centers, white wing sections, and decorative joins to create a repeating butterfly design. Made with medium-weight yarn and a 5 mm hook, the proposed construction is suitable for intermediate crocheters. Its modular format allows individual motifs to be replaced or repaired without remaking the entire blanket.
The Design: What Makes This Butterfly Bedspread Different
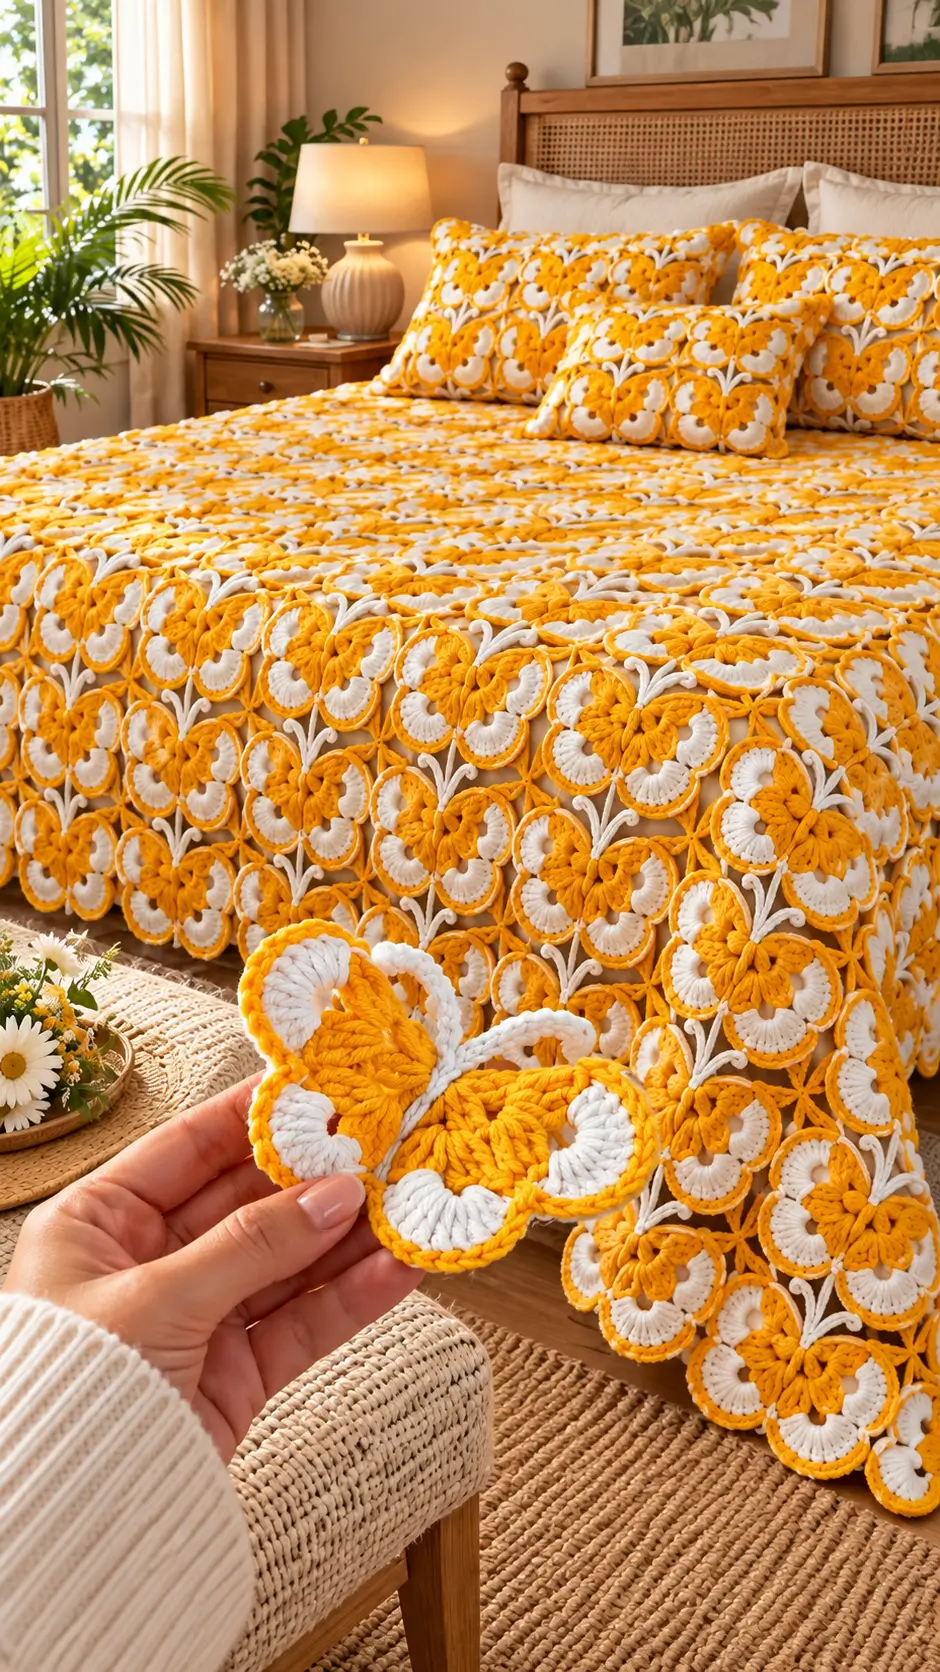
The photographed blanket relies on three visual features: raised butterfly centers, contrasting white wing sections, and narrow connectors between individual motifs. Unlike a conventional solid granny-square blanket, the design leaves small spaces between its repeated shapes.
The first structural decision is to crochet four separate circular wing sections for each butterfly. This gives the maker control over the width and orientation of the upper and lower wings.
Second, the yellow butterfly body is positioned above the wing intersections. This creates the raised appearance associated with a 3D crochet butterfly motif.
Third, the motifs are joined through reinforced outer-edge stitches. These connections help distribute the weight of a large butterfly motif crochet blanket.
A common mistake is joining the wings too tightly. The resulting fabric contracts between motifs, causing the bedspread to ripple rather than lie flat.
Project Info at a Glance
| Project Detail | Specification |
|---|---|
| Skill Level | Intermediate |
| Estimated Time | 40–80 hours for a large bedspread (estimate) |
| Finished Size | Customizable; sample target approximately 180 × 220 cm |
| Crochet Hook | 5 mm reference; adjust after swatching |
| Yarn Weight | Medium / Aran |
| Construction | Separate butterfly motifs joined into rows |
| Best For | Bedspreads, decorative throws, and matching pillows |
Note: This is an original, photo-inspired pattern interpretation, not the exact pattern used in the reference photograph. Measurements, yarn quantities, and construction details are proposed specifications and have not been physically tested.
Materials and Tools
Yarn
The blanket uses two dominant colors. Keep the color palette consistent across every motif to maintain the repeated butterfly design.
- Golden yellow yarn: Medium / aran weight, approximately 1,500–2,000 g for a large bedspread. Suggested option: Lion Brand Vanna’s Choice in a suitable yellow shade.
- White or ivory yarn: Medium / aran weight, approximately 1,000–1,500 g. Suggested option: Lion Brand Vanna’s Choice in white or cream.
- Additional golden yellow yarn: Approximately 100–200 g allowance for edging and raised details.
These are preliminary purchasing estimates rather than tested quantities. First crochet one complete motif, weigh it, and multiply that weight by the number of butterflies required. Add approximately 10–15% for joining, borders, and waste.
Tools
- 5 mm crochet hook, or the size required to achieve consistent gauge
- Tapestry needle for sewing and weaving ends
- Locking stitch markers
- Sharp scissors
- Measuring tape
- Blocking mat and rust-resistant pins
- Digital kitchen scale
- Notebook or row counter
No safety eyes or polyester stuffing are required for this blanket. Pillow inserts are needed only for the matching cushions.
Crochet Abbreviations
| Abbreviation | Meaning |
|---|---|
| MR | Magic ring |
| sc | Single crochet |
| inc | Increase: 2 sc in one stitch |
| dec | Single crochet decrease |
| sl st | Slip stitch |
| ch | Chain |
| BLO | Back loop only |
| dc | Double crochet |
| hdc | Half double crochet |
| tr | Treble crochet |
| st / sts | Stitch / stitches |
| RS | Right side |
| WS | Wrong side |
For an invisible decrease, insert the hook through the front loops of the next two stitches, pull up a loop, and complete one single crochet.
All instructions use US crochet terminology.
Crochet Butterfly Blanket Pattern – Step by Step
This simplified construction uses four circular wing panels arranged into a butterfly silhouette. It is inspired by the photograph but does not reproduce its intricate wing shaping exactly. The round stitch counts have been checked mathematically; the complete bedspread has not been physically tested.
Wing circles are worked in joined rounds. The raised body is worked in continuous spiral rounds. Decorative connectors are added during assembly.
Upper Butterfly Wings (Make 2 per Butterfly)
Yarn: Golden yellow and white.
Each upper wing is a flat circular piece with a maximum circumference of 36 stitches.
Round 1: With golden yellow, work 6 sc into MR. (6)
Round 2: Inc ×6. (12)
Round 3: (1 sc, inc) ×6. (18)
Round 4: (2 sc, inc) ×6. (24)
Round 5: Change to white. (3 sc, inc) ×6. (30)
Round 6: (4 sc, inc) ×6. (36)
Round 7: Change to golden yellow. Work 1 sc in each stitch. (36)
Join with a sl st. Fasten off, leaving a 20 cm yarn tail.
The yellow edging defines the outer boundary, while the white band creates a contrasting wing section.
Block each circle to a consistent diameter. Avoid stretching the fabric excessively, as this can distort the center.
Lower Butterfly Wings (Make 2 per Butterfly)
Yarn: Golden yellow and white.
The lower wings are smaller than the upper wings to create the four-wing butterfly silhouette.
Round 1: With golden yellow, 6 sc in MR. (6)
Round 2: Inc ×6. (12)
Round 3: (1 sc, inc) ×6. (18)
Round 4: Change to white. (2 sc, inc) ×6. (24)
Round 5: Change to golden yellow. Work 1 sc in each stitch. (24)
Join with a sl st and fasten off, leaving a 20 cm tail.
The finished lower wing should have a smaller diameter than the upper wing when worked with the same yarn, hook, and tension.
Make two identical pieces. Their left and right orientation will be determined during assembly.
Raised Butterfly Body (Make 1 per Butterfly)
Yarn: Golden yellow.
The raised body covers the central meeting point of the four wings.
Round 1: 6 sc in MR. (6)
Round 2: Inc ×6. (12)
Round 3: (1 sc, inc) ×6. (18)
Round 4: 1 sc in each stitch. (18)
Round 5: 1 sc in each stitch. (18)
Round 6: (1 sc, dec) ×6. (12)
Round 7: Dec ×6. (6)
Fasten off, leaving a 25 cm sewing tail.
Flatten the piece gently. Do not stuff it. The crochet fabric provides enough relief for the decorative center.
For a more elongated appearance, embroider a short vertical line in golden-yellow yarn over the body after attachment.
Decorative Butterfly Antennae (Make 2 per Butterfly)
Yarn: White or ivory.
Row 1: Ch 9. (9 ch)
Row 2: Starting in the second chain from the hook, work 8 sl st. (8)
Fasten off, leaving a 15 cm sewing tail.
Attach the antennae to the upper part of the butterfly body, positioning them in a shallow V shape.
For a frequently washed bedspread, secure both ends rather than leaving loose cords that may snag.
Butterfly Wing Assembly
Place the two upper wings side by side with a slight inward overlap. Position the smaller lower wings beneath them so their upper edges meet the lower edges of the upper circles.
Use the yarn tails to sew the overlapping points together. Position the raised body over the central junction.
The finished butterfly should have four distinct wing sections and a raised golden-yellow center.
Compare every completed motif with the first finished sample. Consistent wing placement is necessary for an even blanket layout.
Joining the Butterfly Motifs
Lay the completed butterflies on a flat surface in the planned arrangement. Adjust their positions until the wing edges form a regular repeated pattern.
Use ivory yarn to make the connecting bridges.
Connector A – Short Bridge
Row 1: Ch 5. (5 ch)
Row 2: Starting in the second chain, work 4 sl st. (4)
Fasten off and attach the bridge securely between the outer edges of two neighboring wings. If working the bridge directly between motifs, continue without cutting the yarn.
Connector B – Longer Bridge
Row 1: Ch 9. (9 ch)
Row 2: Starting in the second chain, work 8 sl st. (8)
Fasten off and attach between wider gaps.
The number of connectors depends on the arrangement, motif dimensions, and desired spacing. A precise connector count cannot be determined from the photograph.
For a frequently handled bedspread, use multiple connection points between adjacent butterflies where the layout permits. A single narrow connector may become a stress point.
Optional Decorative Center Patch
Yarn: White or ivory.
Make: 1 per butterfly, if desired.
Round 1: 6 sc in MR. (6)
Round 2: Inc ×6. (12)
Round 3: (1 sc, inc) ×6. (18)
Fasten off, leaving a 20 cm sewing tail.
Position the patch beneath the raised yellow body. Allow part of the white circle to remain visible without covering the four wing sections.
This is an optional design adaptation, not a confirmed separate component in the photographed blanket.
Bedspread Layout and Sizing
Measure the width and height of a completed butterfly after blocking. Include the planned space between neighboring motifs.
For example, a layout containing 12 butterflies across and 14 butterflies down requires 168 complete butterfly motifs.
| Component | Quantity |
|---|---|
| Complete Butterflies | 168 |
| Upper Wings | 336 |
| Lower Wings | 336 |
| Raised Bodies | 168 |
| Antennae | 336 |
| Optional Center Patches | 168 |
These quantities are an example for planning, not a verified count from the image.
If the joined motif repeat measures 15 cm wide and approximately 15.7 cm high, a 12 × 14 layout would approach 180 × 220 cm before any perimeter adjustment.
The actual finished dimensions depend on gauge, blocking, overlap, and joining tension.
How to Crochet the Outer Border
Once all butterfly motifs are connected, inspect the four sides of the blanket. A bedspread assembled from butterfly silhouettes will naturally have an irregular outline.
To maintain a scalloped appearance, crochet a single-crochet edging around the exposed wing boundaries.
Border Round 1: Join golden-yellow yarn at an outer wing edge. Work 1 sc into each accessible perimeter stitch, adding stitches where necessary to prevent pulling. Use slip-stitch transitions at deep indentations.
Border Round 2: Work 1 sc in each stitch around, adding extra stitches only where required to keep the fabric flat.
The total border stitch count depends on the final motif arrangement. Record the count after the first round if you want to repeat the border on a matching project.
Fasten off and weave the yarn tail through at least 5 cm of neighboring stitches.
Matching Crochet Butterfly Pillows
The reference photograph includes coordinating butterfly-patterned pillows. You can create a similar appearance by using the same four-wing motifs on separate cushion panels.
Choose a pillow insert, such as 40 × 40 cm, and create a decorative panel large enough to cover the front.
Arrange the butterflies in a regular grid, connecting them with the ivory bridges used for the blanket.
For a functional cushion, place the decorative panel over a closely crocheted backing fabric. This prevents the pillow insert from showing through the openwork spaces.
A simple backing can be worked in rows of single crochet. Begin with a foundation chain matching the required width, then repeat rows until the panel reaches the desired height.
Join the front and back panels with single crochet along three sides. Insert the cushion, then close the remaining side with a sewn seam or removable closure.
Check the butterfly motif scale before deciding how many repeats to use. The cushion design should coordinate with the bedspread without creating excessive bulk along its edges.
Assembly Instructions
- Complete the upper wings. Crochet two matching upper circles for every butterfly and check their diameters.
- Complete the lower wings. Make two smaller circles per butterfly, keeping the color changes consistent.
- Block the wing pieces. Pin each circle to its intended diameter and allow it to dry completely.
- Form the butterfly silhouette. Arrange the larger wings above and the smaller wings below.
- Sew the central junction. Secure the overlapping wing edges using yellow yarn and a tapestry needle.
- Attach the raised body. Position the golden-yellow center over the junction and sew around its underside.
- Add the antennae. Stitch the two white cords above the body and secure their ends.
- Arrange the blanket layout. Position the completed butterflies in rows and measure the overall dimensions.
- Connect the motifs. Add ivory bridges between adjacent wing edges, working systematically across the bedspread.
- Finish the outer border. Work the perimeter edging, weave in the remaining tails, inspect the joins, and block the finished blanket.
The completed project is a modular butterfly-motif bedspread with raised centers and decorative openwork connections.
7 Technical Tips for Better Results
- Use stitch markers consistently. A misplaced round marker can shift the color-change boundary by one or more stitches, causing otherwise identical wings to appear different.
- Measure every tenth wing. A diameter variation greater than 5 mm can accumulate across a large bedspread and create uneven spacing between motifs.
- Avoid overfilling raised centers. The butterfly body is designed to remain unstuffed; adding fiberfill can create an unwanted lump beneath the blanket.
- Check joining tension. If a five-chain bridge pulls neighboring wings inward, lengthen the connector instead of stretching the motifs.
- Maintain consistent yarn thickness. Substituting velvet yarn for medium-weight acrylic changes stitch definition and may require a different hook size and gauge sample.
- Pin motifs before sewing. At least four temporary attachment points around each butterfly help prevent rotation and distorted wing alignment.
- Secure yarn tails thoroughly. Weave each tail through approximately 5–7 cm of neighboring stitches and reverse direction once to reduce the chance of loose ends during washing.
Conclusion
The finished blanket depends on consistent wing dimensions, secure connections, and accurate layout measurements. Before committing to a bedspread-sized project, make four complete butterfly motifs and join them into a small test panel. Measure the panel, record its yarn weight, and calculate the quantities needed for the intended bed size.
This crochet butterfly blanket pattern provides a photo-inspired construction method that can be adjusted for throws, bedspreads, and matching pillows. Save the finished project to Pinterest, or share a photograph on Instagram using #YellowButterflyBlanket.
For your version, would you keep the photographed golden-yellow and white combination, or reverse the colors so the butterfly wings have white centers and yellow outer sections?