Introduction
The Japanese Asanoha motif builds its distinctive geometry from lines radiating through a six-part hemp-leaf structure. This Japanese Asanoha crochet blanket pattern translates that visual arrangement into a burgundy bedspread with ivory surface-crochet detailing. Designed for intermediate crocheters, the proposed project uses DK yarn, a 5 mm hook, and a target finished size of 180 × 220 cm. Its flat construction makes the geometric decoration easier to plan, repair, and align with matching pillow covers.
The Design: What Makes This Asanoha Bedspread Different
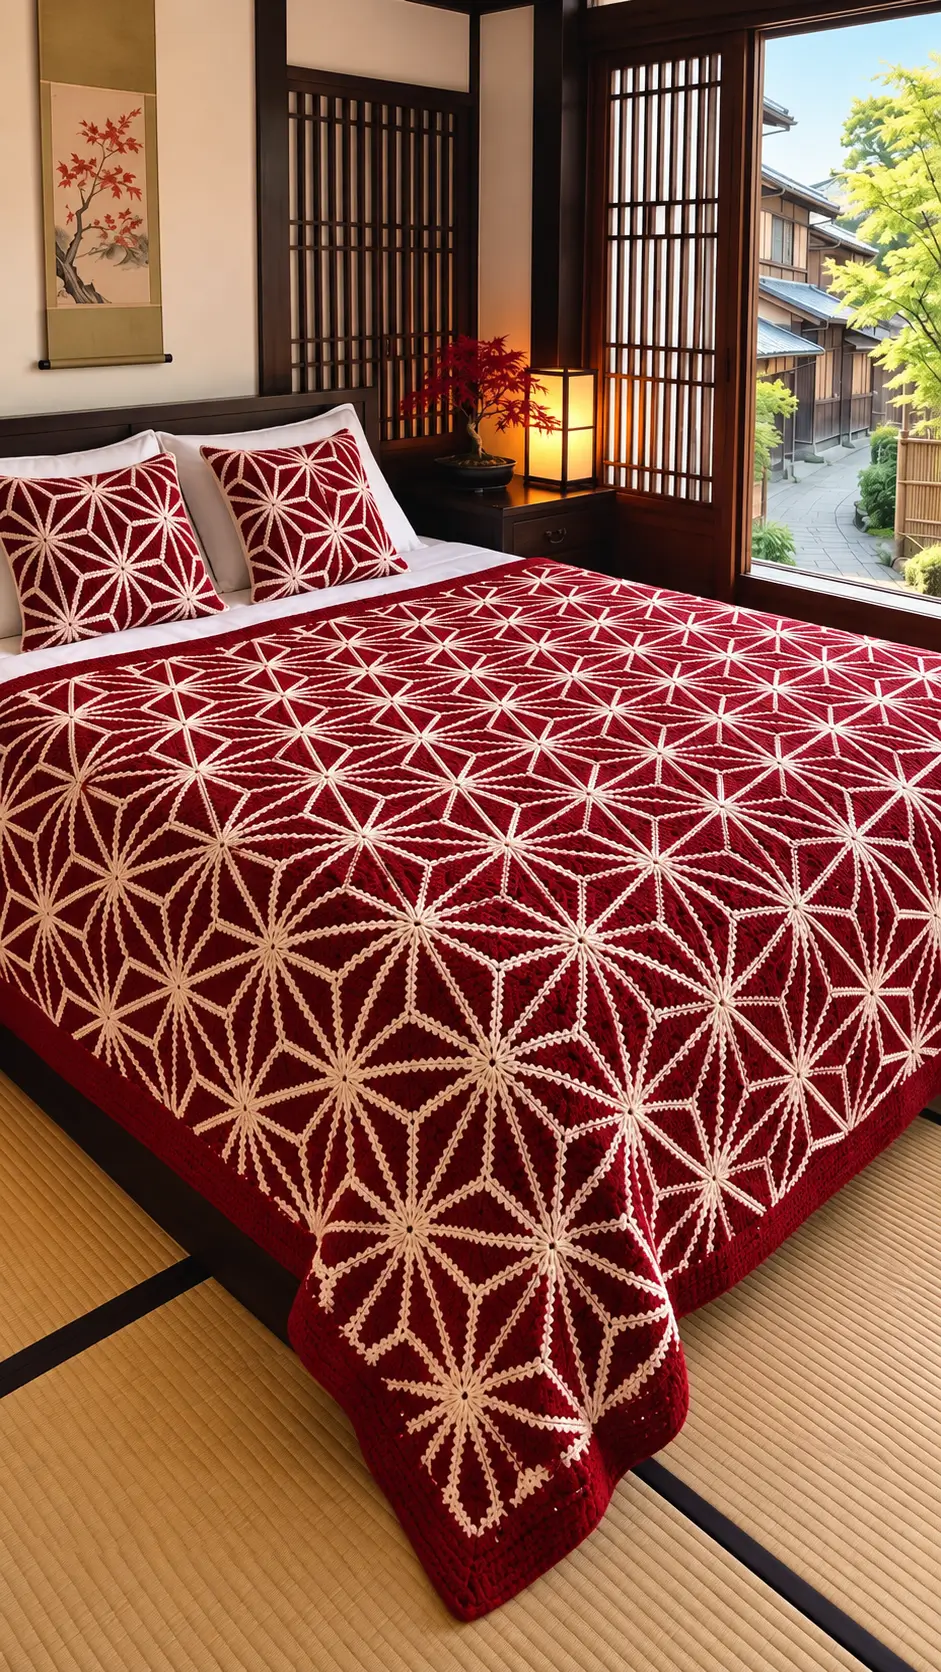
The defining feature of this geometric crochet bedspread is its network of intersecting ivory lines. Unlike a conventional granny-square blanket, the photo suggests an uninterrupted burgundy background beneath the decorative geometry.
Three structural decisions guide this adaptation.
First, the blanket uses a flat single-crochet foundation to support the surface stitches. A consistent base helps prevent the narrow ivory lines from distorting the fabric.
Second, the geometric decoration is planned on a measured grid before stitching. This approach allows the Asanoha-inspired shapes to repeat across the blanket without depending on the placement of joined motifs.
Third, the border remains solid burgundy. The darker outer frame separates the decorative field from the edges and reduces visual congestion.
A common mistake in Japanese-inspired crochet blankets is pulling surface stitches too tightly. This shortens the fabric along the decorative lines, producing puckers that become more noticeable after washing.
Project Information at a Glance
| Project Detail | Specification |
|---|---|
| Skill Level | Intermediate to Advanced |
| Finished Size | 180 × 220 cm (proposed) |
| Yarn Weight | DK / Category 3 |
| Main Hook | 5 mm |
| Detailing Hook | 4 mm |
| Main Colors | Burgundy and Ivory |
| Technique | Single Crochet and Surface Slip Stitch |
| Construction | Flat Foundation with Geometric Decoration |
| Best For | Bedspreads, Decorative Blankets, Matching Pillow Covers |
Pattern note: This is an original photo-inspired adaptation rather than an exact reconstruction of the photographed textile. Dimensions, yarn consumption, and the decorative layout require testing before being treated as final specifications.
Materials and Tools
Yarn
- Burgundy red DK yarn: Approximately 2,000–3,000 g as an initial purchasing estimate. Choose smooth cotton or cotton-blend yarn.
- Ivory DK yarn: Approximately 300–500 g as a preliminary allowance for the decorative geometric lines.
- Optional matching yarn: Additional quantities for two coordinating pillow covers, calculated after choosing the pillow dimensions.
Use two colors from the same yarn range whenever possible. Matching yarn composition and thickness helps the decorative stitches lie evenly over the foundation.
The quantities above are preliminary estimates, not tested consumption figures. A weighed gauge swatch is required for a dependable calculation.
Tools
- 5 mm crochet hook for the blanket foundation
- 4 mm crochet hook for surface detailing
- Tapestry needle with a blunt tip
- Locking stitch markers
- Measuring tape marked in centimeters
- Removable fabric marker or contrasting guide thread
- Blocking mats or a large flat drying surface
- Scissors
- Digital kitchen scale for yarn calculations
The Craft Yarn Council yarn weight guide provides standard yarn categories and recommended hook ranges. Individual yarn labels and measured gauge take priority.
Crochet Abbreviations
| Abbreviation | Meaning |
|---|---|
| ch | Chain |
| sc | Single Crochet |
| sl st | Slip Stitch |
| st / sts | Stitch / Stitches |
| RS | Right Side |
| WS | Wrong Side |
| BLO | Back Loop Only |
| rep | Repeat |
| FO | Fasten Off |
| surface sl st | Surface Slip Stitch |
The invisible decrease is not required because the rectangular foundation does not use shaped decreases.
Japanese Asanoha Crochet Bedspread Pattern – Step by Step
Step 1: Make a Gauge Swatch
Yarn: Burgundy DK
Hook: 5 mm
Before starting the full blanket, crochet a sample measuring at least 15 × 15 cm.
Foundation: Ch 25.
Row 1: Work 1 sc in the second chain from the hook and each remaining chain (24).
Rows 2–30: Ch 1, turn, work 1 sc in each stitch (24).
Fasten off. Wash the sample according to the yarn manufacturer’s care instructions and dry it flat.
Measure the central 10 cm section rather than the outer edges, where turning stitches may affect the fabric density.
The calculations in this tutorial use a proposed gauge of 16 stitches and 18 rows per 10 cm. Your actual gauge may differ.
Step 2: Crochet the Burgundy Blanket Foundation
Yarn: Burgundy DK
Hook: 5 mm
Target size: 180 × 220 cm
At a gauge of 16 stitches per 10 cm, a width of 180 cm requires 288 stitches.
Foundation: Ch 289.
Row 1: Sc in the second chain from the hook and every remaining chain (288).
Row 2: Ch 1, turn, sc in every stitch (288).
Rows 3–396: Repeat Row 2, maintaining 288 stitches per row.
Fasten off and leave a 20 cm yarn tail for weaving.
At the proposed gauge of 18 rows per 10 cm, 396 rows correspond to approximately 220 cm.
Alternative panel construction: A large single-piece blanket can become difficult to handle. Instead, crochet four equal panels with 72 stitches per row and the same number of rows. Join the panels with flat seams, then measure the completed foundation before decorating.
Panel seams may affect the final width. Adjust the foundation calculations according to the measured result.
Step 3: Plan the Asanoha Geometric Pattern
The distinctive Asanoha-inspired design is built from six-spoke stars connected by diagonal lines.
To reproduce the general geometry, use a measured triangular grid rather than copying individual lines directly from the photograph.
- Spread the finished burgundy foundation on a flat surface.
- Mark the vertical and horizontal centerlines.
- Choose a repeating motif width of approximately 20 cm.
- Use a repeating motif height of approximately 17.3 cm to establish an equilateral triangular grid.
- Mark the principal motif centers at regular intervals.
- Offset the centers in alternating rows by approximately 10 cm.
- Connect the marked points temporarily with contrasting guide threads.
- Check the entire layout before adding permanent ivory stitches.
The six-spoke stars should have consistent proportions. Neighboring stars connect through straight and diagonal lines that form the surrounding diamond shapes.
Along the outer edges, partial motifs may be used rather than forcing complete stars into the remaining space.
This is a geometric planning method, not a row-by-row stitch-position chart. Test one complete motif before decorating the full blanket.
Step 4: Crochet the Ivory Surface Lines
Yarn: Ivory DK
Hook: 4 mm
Surface crochet places decorative stitches directly over an existing crocheted fabric.
The technique creates a raised, chain-like line that can follow straight or diagonal paths.
- Position the burgundy blanket with the right side facing upward.
- Hold the ivory yarn behind the fabric.
- Insert the crochet hook from front to back at the marked starting point.
- Draw an ivory loop through to the front.
- Insert the hook into the next marked position along the guide line.
- Draw up another loop and pull it through the loop already on the hook.
- Continue working surface slip stitches along the marked path.
- Fasten off at the endpoint and weave the yarn tail into the wrong side.
Work slowly around intersections. The decorative stitches must rest on the foundation without pulling it inward.
If the fabric puckers, remove the affected section and rework it with looser tension.
For additional technique guidance, see the Yarnspirations surface crochet embroidery guide.
Step 5: Create the Six-Point Star Motifs
Each decorative star consists of six spokes radiating from a central intersection.
Place the spokes at approximately 60-degree intervals, following the triangular grid.
Begin at a marked center and work toward the first outer point.
Fasten off or continue along a compatible straight path, depending on the planned geometry.
Repeat until the six directions are complete.
Check the shape before moving to the next star. The spokes should remain evenly spaced and visually balanced.
Avoid fastening all yarn tails into one foundation stitch. Several overlapping ends can create a thick, raised center.
Instead, distribute the tails across nearby stitches on the wrong side.
Repeat the process for the remaining stars across the blanket.
Step 6: Connect the Diamond Shapes
The connected diamonds are an important part of the Asanoha-inspired design.
Use ivory surface slip stitches to connect the outer points of neighboring stars.
Follow the marked diagonal guide lines and keep the decorative stitches at a consistent tension.
At intersections, inspect the front and back of the blanket to check for bulky overlaps.
If continuing through an intersection creates excessive thickness, fasten off the first line and start a separate line.
Work systematically across the blanket, completing one planned section at a time.
Stop periodically to lay the fabric flat and inspect the alignment.
The final decorative field should contain interconnected six-point stars, diamonds, and triangular shapes against the burgundy background.
Step 7: Crochet the Burgundy Border
Yarn: Burgundy DK
Hook: 5 mm
The outer border frames the geometric pattern and gives the bedspread a finished rectangular outline.
Round 1: Join burgundy yarn at a corner. Work sc evenly around the blanket, placing 3 sc in each corner.
Across the top and bottom edges, work into the foundation stitches. Along the side edges, distribute stitches according to the measured row gauge so the fabric lies flat.
Join with a slip stitch.
Round 2: Ch 1, sc around, working 3 sc into the center stitch of each corner group. Join.
Rounds 3–6: Repeat Round 2, maintaining flat corners and even tension.
Fasten off and weave in the tail.
Record the stitch count of the first border round. If each corner increases by two stitches, each subsequent round adds eight stitches to the total.
Because the side-edge pickup count depends on the final foundation gauge, the border does not have one universal stitch count.
Step 8: Make the Matching Crochet Pillow Covers
The photograph includes two coordinating burgundy pillows with ivory geometric star motifs.
For a proposed 40 × 40 cm cushion cover, crochet two panels per pillow.
Yarn: Burgundy DK
Hook: 5 mm
Foundation: Ch 65.
Row 1: Sc in the second chain from the hook and across (64).
Rows 2–72: Ch 1, turn, sc across (64).
Fasten off.
Make four panels in total for two pillows.
Decorate the two front panels using ivory surface crochet.
Place one six-point star near the center of each panel and add surrounding diagonal connections to create a smaller geometric repeat.
Leave the back panels plain or add a simpler decorative arrangement.
Place one front and one back panel together with the wrong sides facing.
Join three sides using single crochet, insert the cushion, and close the final edge.
For removable pillow covers, use an envelope-style back or a suitable zipper closure instead.
The pillow measurements are based on the proposed gauge and should be adjusted to the actual cushion inserts.
Assembly and Finishing
- Measure the foundation: Lay the burgundy blanket flat and check its width and length at several points.
- Join panels if needed: Sew the foundation panels together with flat, low-profile seams.
- Mark the center: Identify the central vertical and horizontal axes.
- Position the stars: Mark the six-spoke motif centers using the measured triangular grid.
- Work the main spokes: Add the ivory surface-crochet lines, checking tension after each motif.
- Connect the diamonds: Work the diagonal lines between adjacent star points.
- Finish partial motifs: Complete the geometric design near the outer edges.
- Add the border: Crochet the burgundy edging while keeping the corners flat.
- Assemble the pillows: Complete the matching decorative panels and join the pillow covers.
- Wash and block: Follow the yarn care instructions, reshape the fabric, dry completely, and secure all remaining yarn tails.
The finished project consists of one geometric crochet bedspread and two matching pillow covers.
7 Technical Tips for Accurate Geometric Crochet
- Prevent stitch-count drift: Place a locking stitch marker every 24 foundation stitches and count each section before turning. A missing stitch near the edge can change the blanket width and affect the decorative grid.
- Control surface-stitch tension: Lay the fabric flat after every 20 cm of ivory detailing. If the burgundy foundation gathers beneath a line, remove that section and rework it with looser loops.
- Measure gauge after washing: Compare a central 10 cm section before and after laundering the sample. A 5% change in length can alter a 220 cm bedspread by approximately 11 cm.
- Check star-center alignment: Measure the distance between neighboring motif centers before adding the diamond connections. Repeated positioning errors of 1 cm can become noticeable across a large decorative field.
- Reduce bulky intersections: Avoid fastening six yarn tails through one foundation stitch. Distribute the tails across several nearby stitches on the wrong side.
- Keep the border flat: Work three single crochets into each corner and distribute side-edge stitches according to the measured gauge. Too many pickup stitches produce rippling, while too few cause the border to pull inward.
- Secure decorative yarn ends: Weave each tail through several centimeters of neighboring stitches, reverse direction, and weave again. Surface-crochet endpoints require careful finishing because they experience tension during washing and folding.
How to Adjust the Crochet Bedspread Size
The same geometric design can be adapted to different bed sizes.
Measure the mattress and decide how much overhang is required before calculating the foundation.
| Project Type | Example Target Size |
|---|---|
| Decorative Throw | 120 × 150 cm |
| Single Bed Cover | 150 × 200 cm |
| Double Bed Cover | 180 × 220 cm |
| Large Bedspread | 220 × 240 cm |
These dimensions are optional project targets rather than standardized mattress measurements.
Calculate the Foundation Stitch Count
Use the following formula:
Required stitches = (Desired width in cm × Stitches per 10 cm) ÷ 10
For a blanket measuring 180 cm wide with a gauge of 16 stitches per 10 cm:
180 × 16 ÷ 10 = 288 stitches
Calculate the Number of Rows
Required rows = (Desired length in cm × Rows per 10 cm) ÷ 10
For a length of 220 cm and a gauge of 18 rows per 10 cm:
220 × 18 ÷ 10 = 396 rows
Round calculated counts to whole stitches and rows. For multiple panels, adjust the stitch count so it divides evenly among the panels.
How Much Yarn Do You Need?
Large crochet blankets require more yarn than smaller decorative projects. Actual consumption depends on yarn thickness, fiber content, gauge, and stitch tension.
The most dependable estimate comes from weighing a representative crochet sample.
For example, suppose a washed 20 × 20 cm foundation swatch weighs 20 g.
The swatch area is 400 cm².
A 180 × 220 cm foundation has an area of 39,600 cm².
39,600 ÷ 400 × 20 = 1,980 g
In this hypothetical example, the foundation would require approximately 1,980 g of yarn.
The ivory geometric lines, border, seams, and pillow covers require additional yarn.
Calculate those quantities separately using representative samples. Purchase a reasonable extra allowance for swatching, finishing, and corrections.
For a large project, buy yarn from matching dye lots whenever possible.
Care Instructions for Your Crochet Bedspread
Always follow the washing and drying instructions printed on the yarn label.
Before laundering the complete bedspread, wash a small sample containing both burgundy and ivory yarn.
This test is particularly important because dark red dye transfer would be visible on the ivory geometric details.
If the yarn allows machine washing, choose a gentle cycle and avoid overloading the washing machine.
A wet, full-size crochet bedspread can become heavy and place strain on seams and decorative stitches.
Support the fabric when lifting it. Do not pull the entire wet blanket by one corner.
Dry flat whenever required by the yarn care instructions.
After drying, inspect the surface-crochet lines and check that the decorative intersections remain secure.
Store the blanket folded in a clean, dry location away from prolonged direct sunlight.
Common Crochet Problems and Solutions
Why Does the Ivory Geometric Pattern Pucker?
The surface slip stitches may be shorter than the underlying fabric. Remove the affected section and rework it with more relaxed tension.
The decorative line should rest flat when the foundation is not stretched.
Why Are the Six-Point Stars Uneven?
The motif centers may not be positioned on a consistent grid.
Establish a central reference line and measure each star from fixed guide points instead of using the previous motif as the only reference.
Can I Use Worsted-Weight Yarn Instead of DK?
Yes, but the gauge, blanket weight, dimensions, and yarn requirements will change.
Make a new gauge swatch and recalculate the foundation before beginning.
Can I Embroider the Ivory Pattern Instead?
Yes. Surface embroidery can create a similar geometric effect on a dense crochet foundation.
Test the technique on a sample to compare line thickness, flexibility, and tension.
Is the Original Bedspread Made from Separate Crochet Motifs?
The exact construction cannot be confirmed from the photograph.
It may use joined motifs, surface embellishment, or another textile technique.
This tutorial uses a flat foundation with surface crochet as an alternative inspired by the photographed design.
How Can I Prevent the Blanket from Becoming Too Heavy?
Choose a yarn with an appropriate weight and drape, and make a representative sample before committing to the full project.
Working in separate panels can also make the construction easier to handle, although it does not reduce the total finished fabric weight.
Conclusion
The Japanese Asanoha crochet blanket pattern combines a rectangular burgundy foundation with measured ivory geometric detailing. Its construction separates the structural fabric from the decorative lines, allowing each stage to be checked before the next begins. Start with a washed gauge swatch, calculate the foundation dimensions, and test one complete star before purchasing yarn for the full bedspread. After finishing, photograph the blanket flat and on the bed to document both motif alignment and drape. Share the finished project on Pinterest and Instagram using #AsanohaCrochetBedspread. Would you choose tightly connected six-point stars like the photograph, or increase the spacing between the ivory motifs?